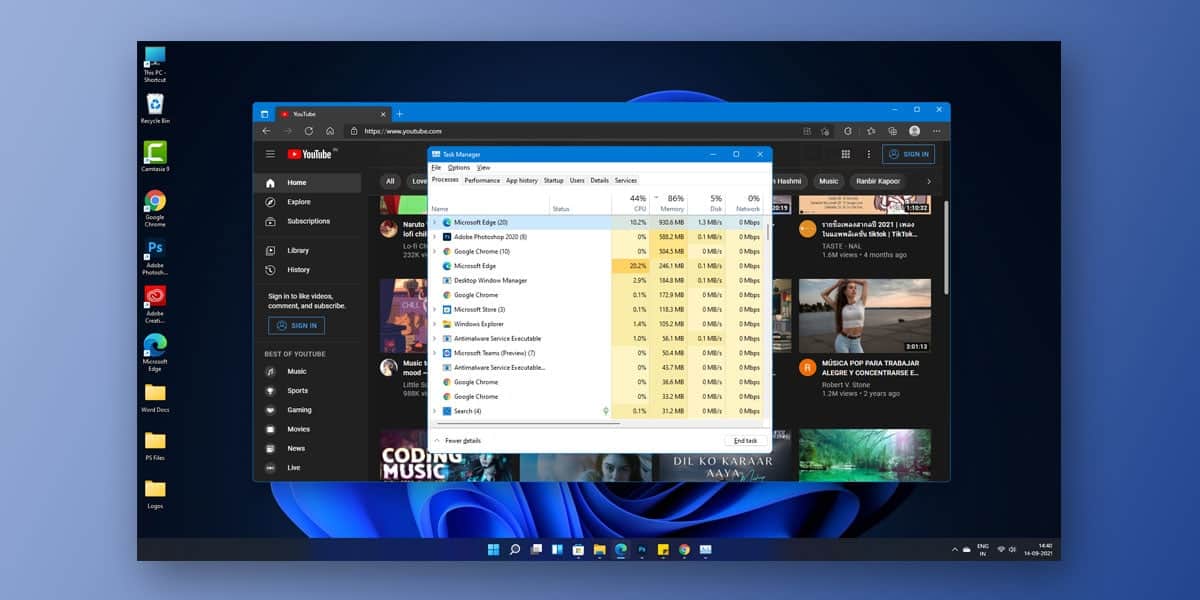
Microsoft first launched Microsoft Edge, its very own browser, when it launched Windows 10. When Microsoft first announced the browser, they claimed that Edge had the potential to be faster than Chrome, Firefox, Opera, and all the other browsers combined.
However, the browser never managed to live up to its exceptions and failed to take off. While it did a good job replacing the traditional Internet Explorer, it couldn’t match up to the likes of Chrome, Firefox, Opera, and other such browsers.
Similarly, the latest updates have brought a lot of performance issues to light. At the same time, the Edge browser sports numerous features, many of which have caused hindrances to the overall smooth performance of Microsoft Edge.
For example, several users have reported high CPU usage in Windows 11 after using the Edge browser at a stretch. Similarly, many others have said that the Edge browser takes longer than usual to load up and even longer than that to yield results.
The majority of these bad reputation and performance issues are directly linked with poor configuration and coding of the browser engine. Therefore, in this article, we will discuss about how to stop Microsoft Edge High CPU usage in Windows 11. If you are facing high CPU usage in Windows 11 not because of Microsoft Edge but in general then check this article to fix it.
What Causes Microsoft Edge High CPU Usage in Windows 11
There is no single cause that is causing this problem to arise in Windows 11. However, some of the common reasons for Windows 11 Microsoft Edge high CPU usage are as follows
- Poor Coding Of The Browser Engine
- Too Many Applications Running In The Background
- Malware Or Adware
- Antivirus Overloading The CPU
How To Check CPU Usage In Windows 11?
Before moving on towards fixing the problem, it is vital that you check the CPU usage on your Windows 11 to actually determine whether the usage is higher than usual. There could be a lot of reasons that can cause your PC to slow down. Checking the CPU usage can help you figure out whether a high CPU usage is a reason behind it. To check your CPU usage in Windows 11, follow the given steps.
- Close All Running applications
- Right-click on your Start Menu, and click on Taskbar Manager
- Alternatively, you can press Ctrl + Alt + Del on your keyboard
- The Task Manager will now be visible on the screen
- Here, you can see the CPU Usage next to each running application under the CPU Column
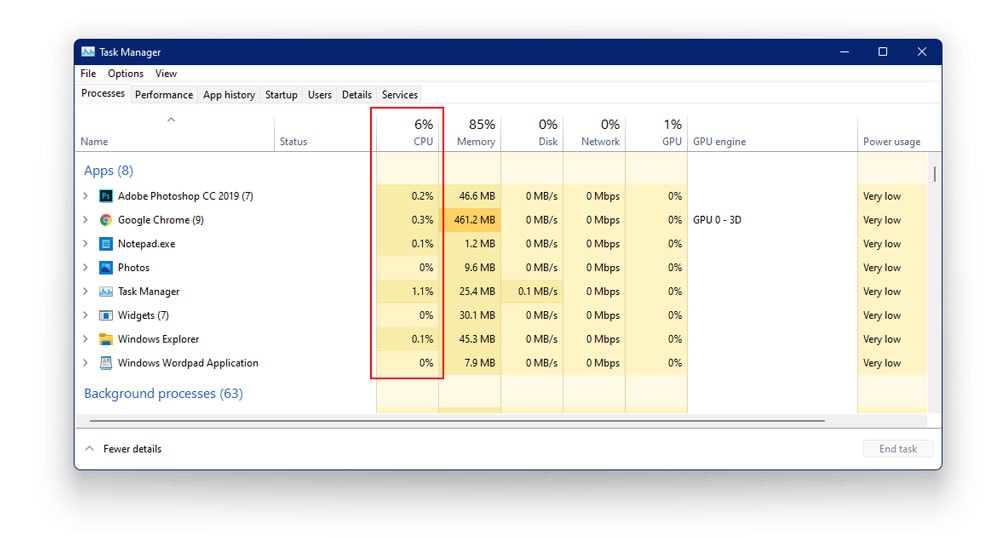
- Now, you can check and identify which program or application is utilizing maximum CPU
- The normal CPU for every program lies between 5-30%. This usage can go up to 80% if you are running high-end games on your system.
How To Fix Microsoft Edge High CPU Usage In Windows 11?
As we mentioned earlier, the Edge browser sports numerous features that make it attractive to use. However, the edge also has severe performance issues that have been causing the browser to slow down or crash altogether.
This is primarily because of poor coding and configuration of the Microsoft Edge Browser Engine. In addition, a key problem user reported is that the Edge browser is consuming a lot of CPU memory. High usage of CPU memory often leads to system heating and drastically affects the system performance.
Since the latest update, the Microsoft Edge browser is consuming a lot of CPU memory, causing the system to lag, be unresponsive, and crash alltogether. Meanwhile, it can take hours for you to search and hours more for a webpage to load. Despite the CPU fan working at full-throttle, your system tends to overheat. However, Windows technicians are yet to determine a single fundamental cause behind this problem.
Although there are countless fixes, you can apply to fix high CPU usage in Windows 11.
If you too have encountered problems with the Edge browser, then this article will walk you through and tell you how to fix Microsoft Edge High CPU usage in Windows 11.
1. Restart Your System
There is nothing a quick restart cannot fix. Though it is a temporary solution, restarting your system can cause the PC’s services to reboot and go back to normal. Once your system starts, you can check your CPU usage once again using the above-mentioned steps.
Also, you will be able to identify the root cause of the problem or even the program or application that can be causing the problem. Post a successful restart; you will see that your CPU levels have returned to normal. If they haven’t, apply the fixes given below
2. Update Windows
At times, running an outdated version can also be the reason you are facing issues with Windows 11. Therefore, it is vital that you update your drivers as well as Windows the minute there is a new update available. To update Windows 11, follow the given steps.
- Right Click on Start Menu
- Go To Settings
- Select the Windows Update tab on the left navigation tab
- Next, click on the option which reads Check For Updates
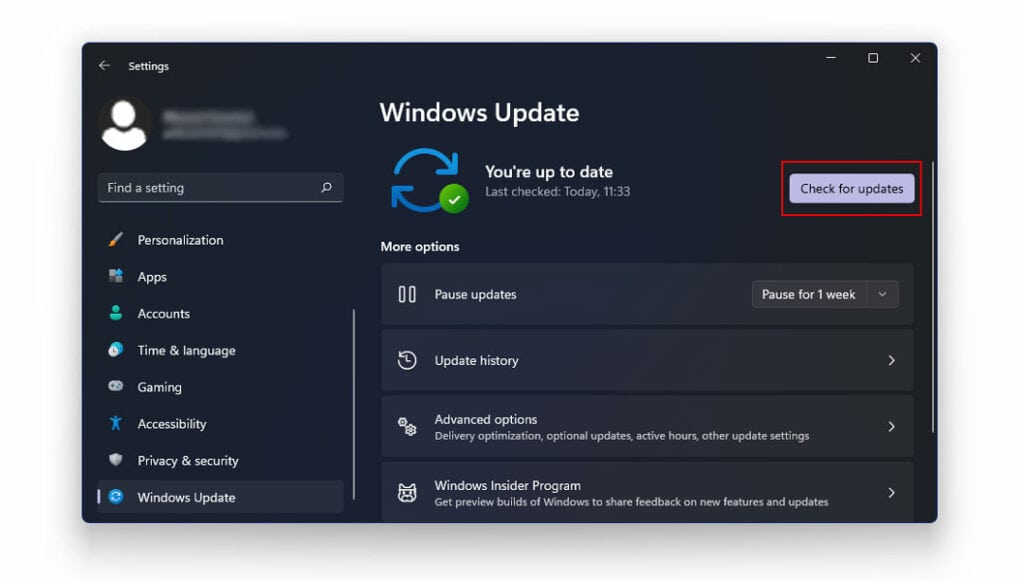
- Your system will now automatically search for updates and install them right away
Once the updates are done, restart your system and check whether the CPU levels have returned to normal.
3. Disable Background Apps
As we mentioned earlier in this article, the reason your system overheats is that there are too many applications running in the background. Even though you don’t notice it, these apps tend. To consumes their fair share of CPU memory, which can cause your system to slow down. In Windows 11, you will have to manually disable each app from running in the background.
To disable background apps in Windows 11, follow the given steps.
- Right Click on Start Menu
- Go To Settings, click on Apps
- Select Apps And Features
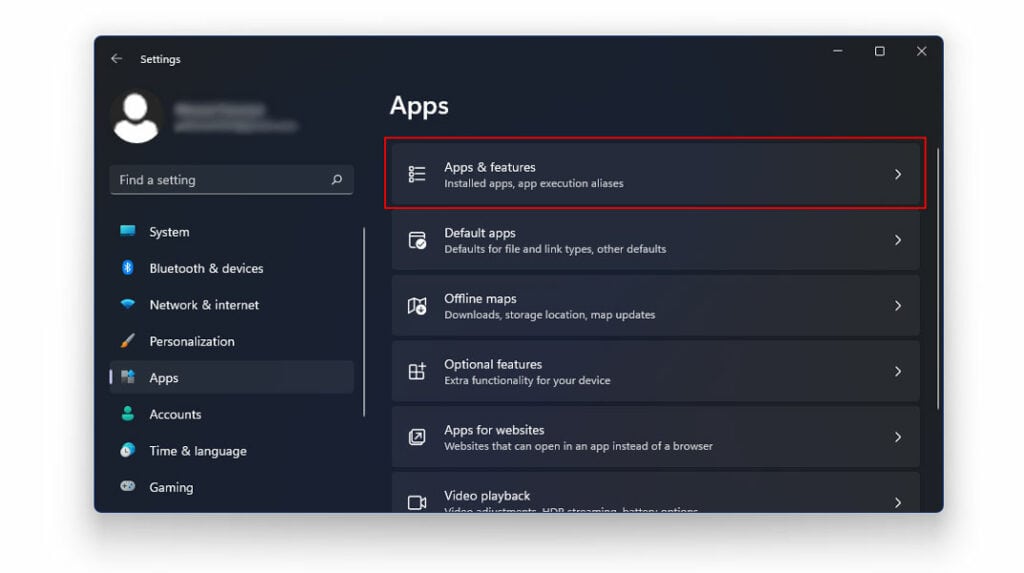
- Locate the apps you don’t want running in the background
- Click on the three vertical dots next to an app
- Now, select Advanced Options
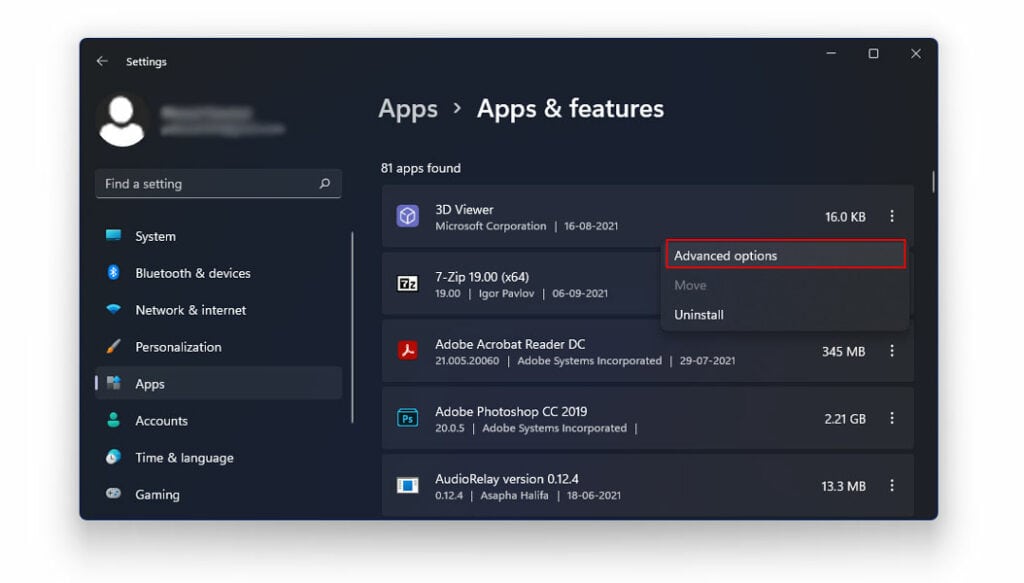
- Click on the drop-down menu for ‘Let this app run in background’ under ‘Background apps permissions.’
- Next, select Never from the list of options.
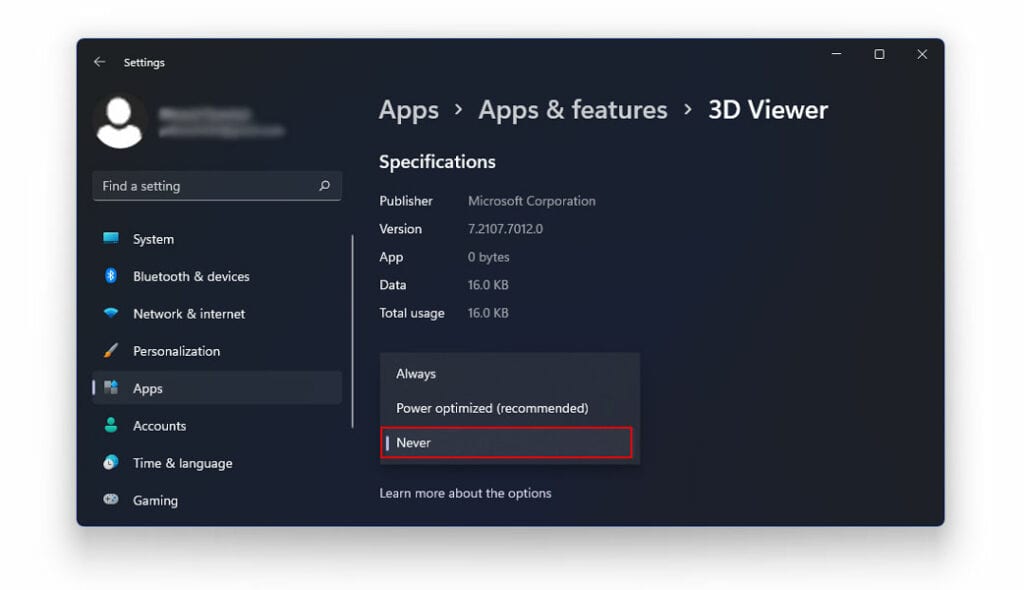
This will no longer run the application in the background. Follow the same procedure to disable any app from running in the background.
4. Run A Scan
Malware could be the reason why your system is slowed. Running a quick scan can help take care of the issue. To check for malware, run a quick scan using the following steps.
- Search Windows Security in the Start Menu
- Select Virus And Threat Protection
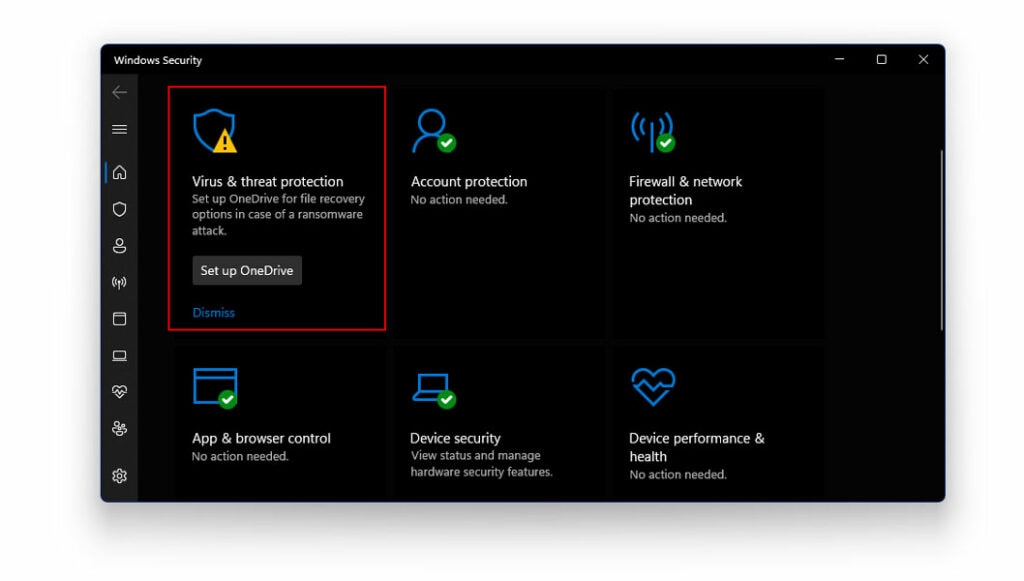
- Tap on Scan Options
- Next, select Windows Defender Offline Scan
- Then tap on Scan Now
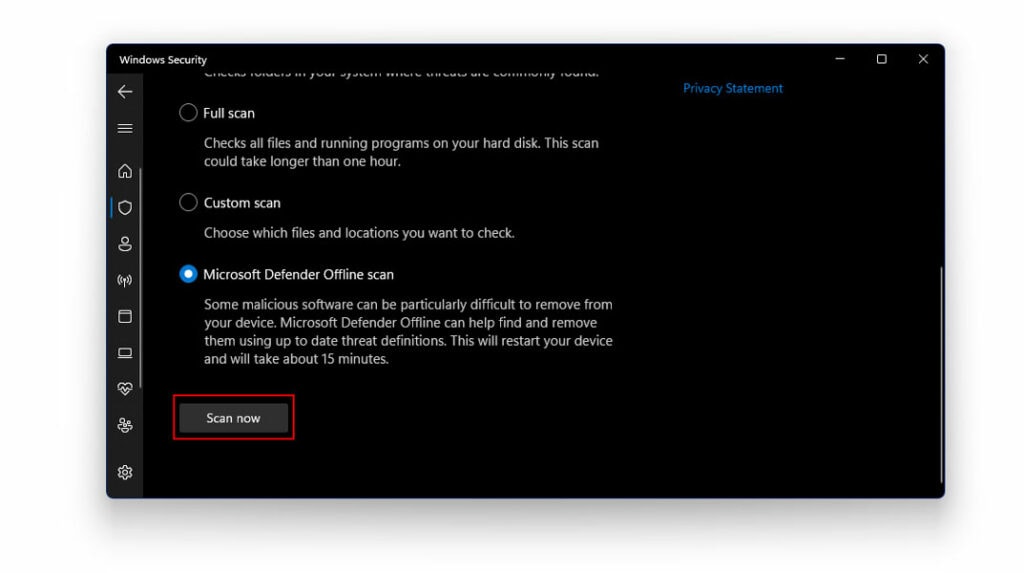
- Your system will now restart, and the PC will commence the scan.
Post-restart, check whether the CPU usage levels have returned to normal.
5. Clear Browser Cache
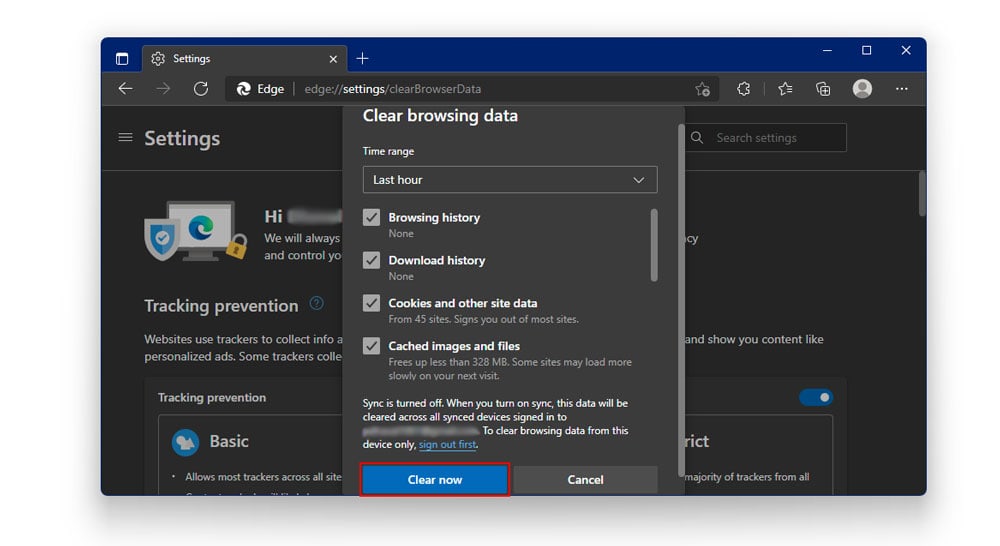
Too many items tend to accumulate in the cache memory over time. This can take a toll on the application altogether and cause it to consume more memory than usual. To clear the browser cache, follow the given steps.
- Close all running applications
- Launch Edge
- Press Ctrl + Shift + Del
- Check All The boxes
- Next, tap Clear
6. Run Microsoft Edge Browser without Extensions
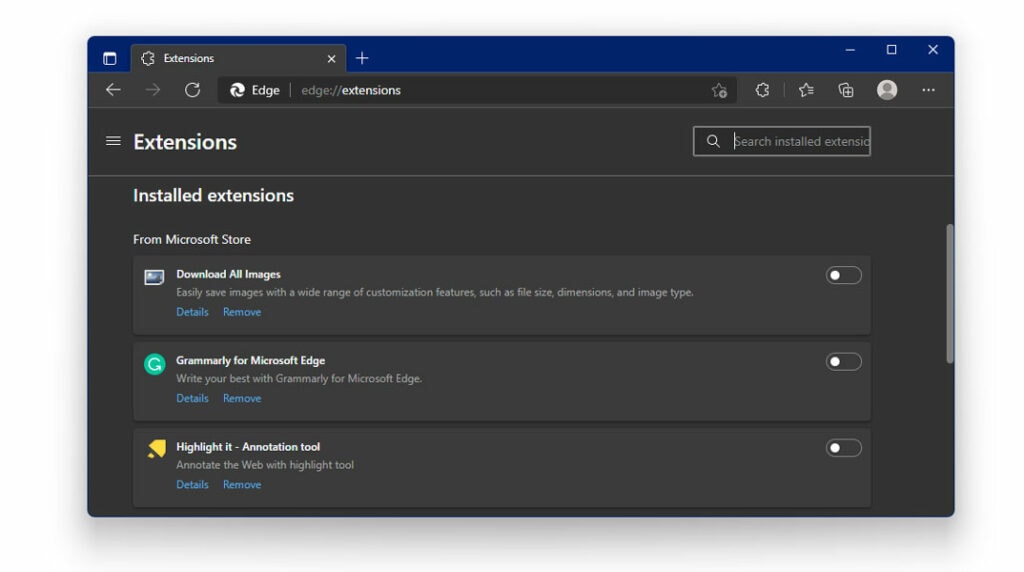
Browser extensions or add-ons are important for many users, from blocking ads from being displayed to optimizing memory usage and so on. Another troubleshooting step to fix Microsoft Edge High CPU usage in Windows 11 is to disable the extension in the Microsoft Edge browser.
- Open Microsoft Edge Browser
- Click the three dots on top right corner of the browser
- Look for “Extensions” and click on it
- After opening the “Extensions” menu, disable all the installed extensions on your Microsoft Edge Browser
The Bottom Line
We hope our article was successfully able to walk you through fixing high CPU usage in Windows 11. Note that there is no guarantee that these fixes will automatically make your CPU usage percentage back to normal.
All these fixes are temporary and can give you quick relief from the problem. If the problem persists despite applying every fix mentioned above, it is time to consult an expert or technician at the earliest.
![Microsoft Store “Something happened on our end” in Windows 11 [Fix]](https://devsjournal.com/wp-content/uploads/2022/03/Microsoft-Store-Something-happened-on-our-end-in-Windows-11-768x384.jpg)
