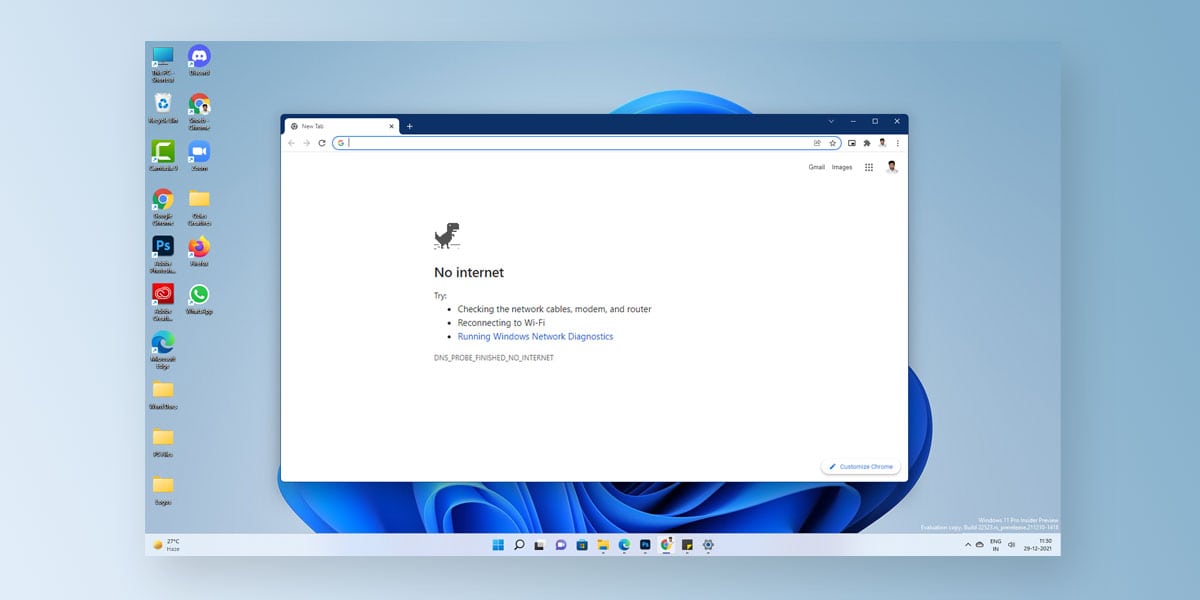
It’s a routine Monday morning for you. You start your work and it’s all smooth sailing for a while. However, just a few hours into your work you realise that you have lost your Internet connectivity. Although the WiFi shows connected, you aren’t able to access the network or anything off the Internet. As a normal person, you implement the basic fixes but to no avail.
You can still the Wifi network in your taskbar. Although you have now re-entered the password to your Wifi, you get nothing on your browser despite the fact that your Wifi shows connected. This can be frustrating especially when your work needs you to rely heavily on the Internet. This is a fairly recurring problem and the majority of the Windows 11 users have reported the WiFi Connected But No Internet issue.
If you too are suffering from the same, we are here for you. In this article, we will walk you through every possible fix to solve the WiFi Connected But No Internet issue in Windows 11.
Causes of Wifi Connected But No Internet Issue
There could be a lot of reasons as to why your device is connected but you might not be able to access anything on the network. This error is generally highlighted using a yellow triangle followed by a black exclamation mark on your devices. When you are facing the Wifi connected but no internet issue in Windows 11, here are some of the error messages that are displayed on your screen.
- WiFi connected but no internet in Windows 11
- Connected, no internet access in Windows 11
- WiFi has no Internet Access in Windows 11
- No internet connection in Windows 11
Right from extreme weather conditions to misplaced settings, anything can cause this problem. Here are some of the causes of Wifi connected but no internet.
- Faulty Wifi-Adapter
- ISP Is Down
- Incorrect IP
- Secruity Software Preventing Access
- Wrongly Configured DNS Cache (Can lead to DNS_PROBE_FINISHED_BAD_CONFIG error)
- Incorrect DNS Server Settings
- Faulty Wifi Router/Modem
- Outdated Wireless Mode
10 Ways to Fix WiFi Connected but No Internet in Windows 11
Although there are number of issues that can be tampering with your Internet signal, there are fixes devices to act against the same. Here, we will walk you through some of the best possible fixes you can implement in order to fix Wifi connected but no Internet issue in Windows 11.
1. Check Your Internet Connection
Call us dumb for suggesting you this but you cannot ignore this fix. The first thing to do if your device is connected but you might not be able to access anything on the network is to check your Internet Connection. Check for your WiFi signal on your taskbar. If you think the WiFi connection is intact but you aren’t able to access the Internet, the possible case here is that your Internet connection is down. Proceed to implementing the next fixes to get the issue solved
2. Restart Your PC and Wifi Router/Modem
As we mentioned earlier, a faulty router modem could be the reason why your Internet is acting up. However, at times there could be a problem with your system altogether. In such cases, we suggest you first restart your PC. If the problem still continues to persist post the restart, restarting your Wifi router/modem can help.
To restart your wifi router/modem, locate a small button labelled “Reset” to the back of your PC. Using a pen, long press the button. Wait for the lights on your router/modem to flash. When the flashing occurs, you have now restarted your router
3. Change the Network IP Settings
As we mentioned earlier, having an incorrect IP address is likely to be the root cause of this issue. In such cases, all you need to do is place the right IP settings using the given steps
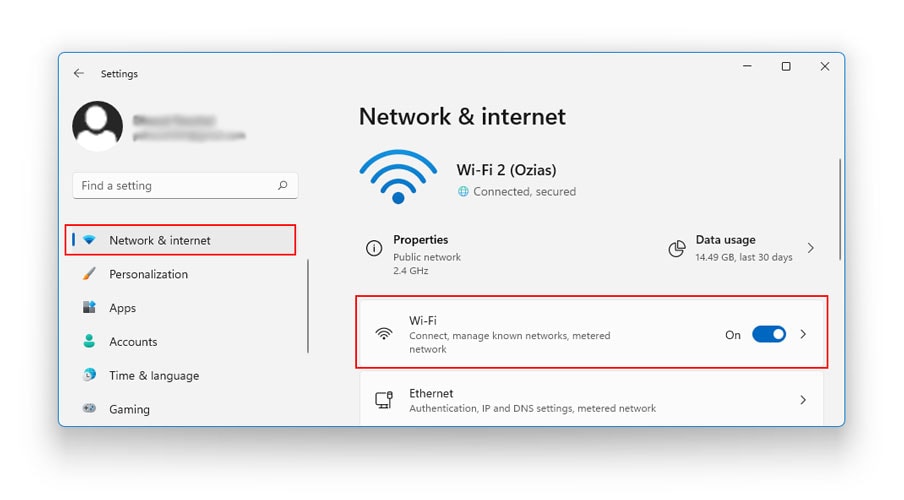
- Right click on Start Menu
- Go to Settings
- Select Network and Internet
- Tap on Wifi
- Click on the name of the Wifi that you are using
- Here, set the Network Settings to Private
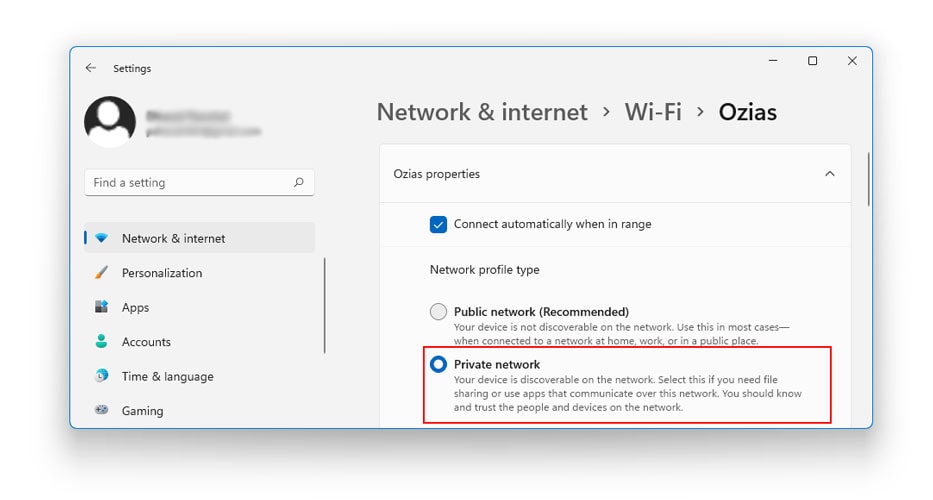
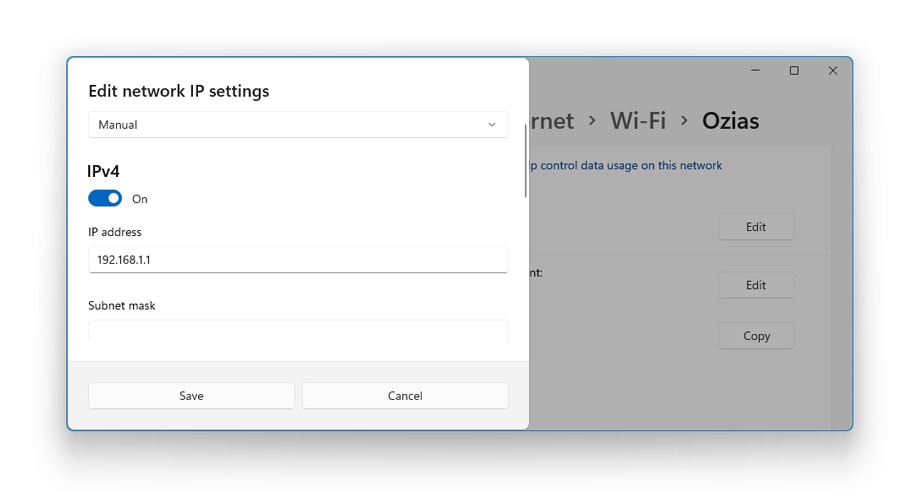
- Scroll down and locate IP Settings
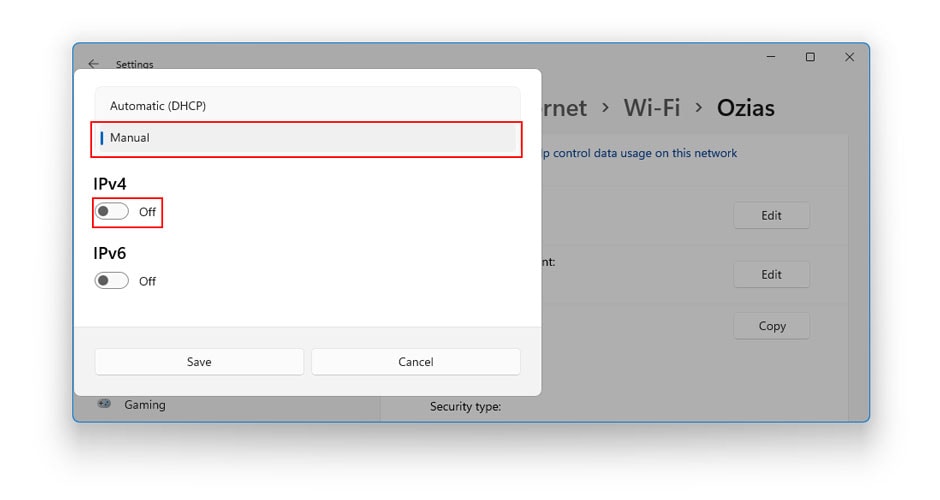
- Here, click on Edit
- Set the Automatic (DHCP) to Manual
- Toggle IPv4
- Open command prompt and inset the following command
ipconfig /all
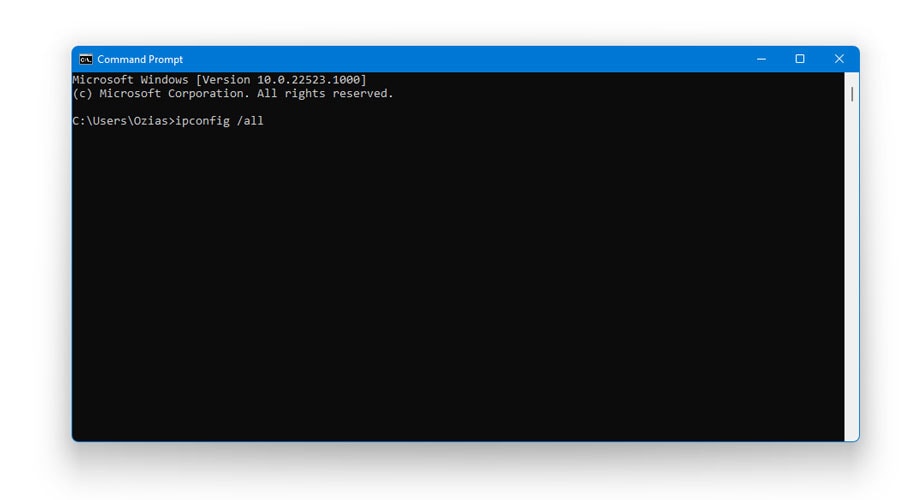
- Scroll down and locate the DHCP Server
- Copy the number (IP Address) fromthe Command Prompt
- Now, return to Wifi Settings using the initial steps
- Scroll down and locate IP Settings
- Tap on Edit
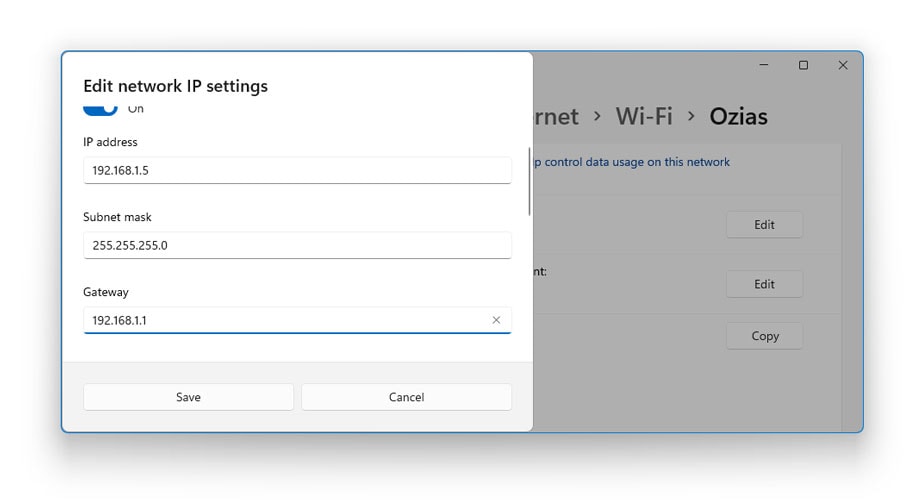
- Now, paste the number copied in the IP Address Field
- Delete the last digit of the number inserted
- Type any number of your choosing between 5-30
- Next, go to the Subnex Prefix Length
- Paste this number in the space provided: 255.255.255.0
- Go to the Gateway Field
- Now, paste the number copied from Command Prompt here
- In then Preferred DNS field, paste the following number 8.8.8.8
- In the Alternate DNS field, paste the following number 8.8.8.4
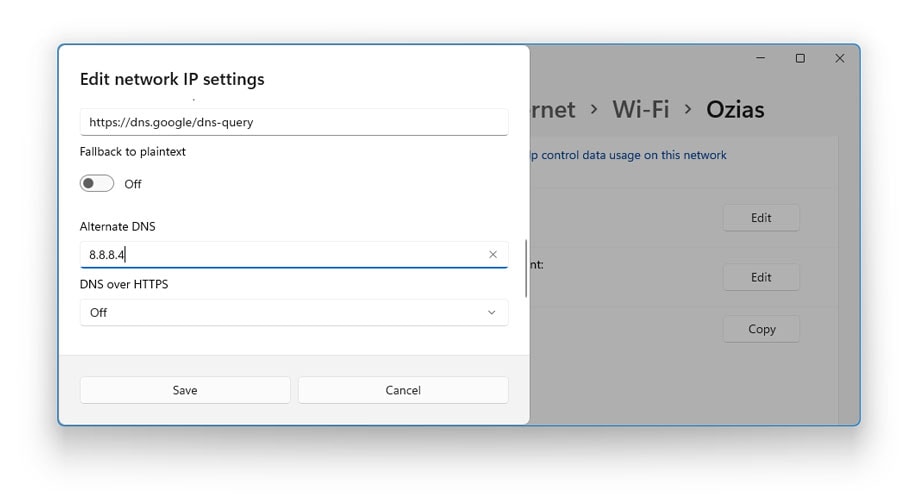
- Select Save
4. Run Network Troubleshooter
Windows 11 has tonnes of built-in tools that allows the system to automatically detect, diagnose, and fix an issues present. Hence, the first thing you need to do is run the network troubleshooter in your first line of action against the issue
- Right Click on Start Menu
- Click on Settings and search for System in Left Navigation Pane
- Click on System and search for Troubleshoot
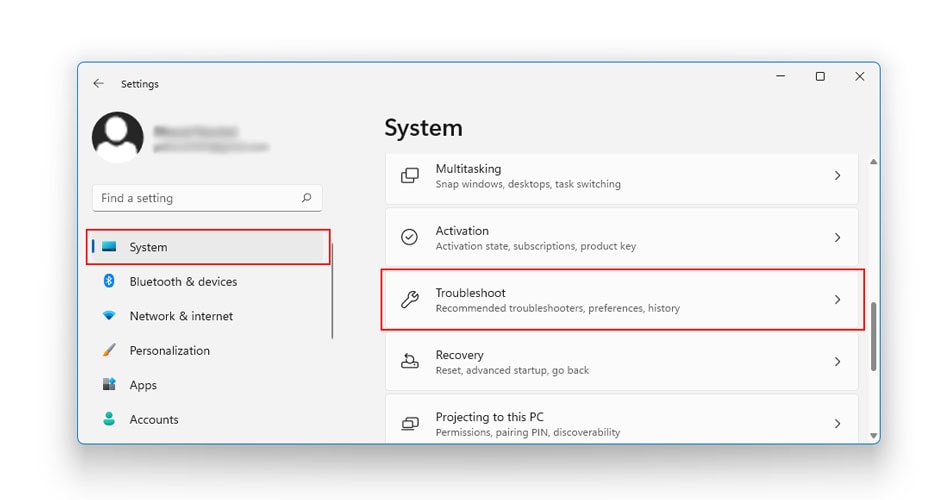
- Click on Other Troubleshooter
- Search for Network Adapter and click on Run
- Follow the instructions on-screen
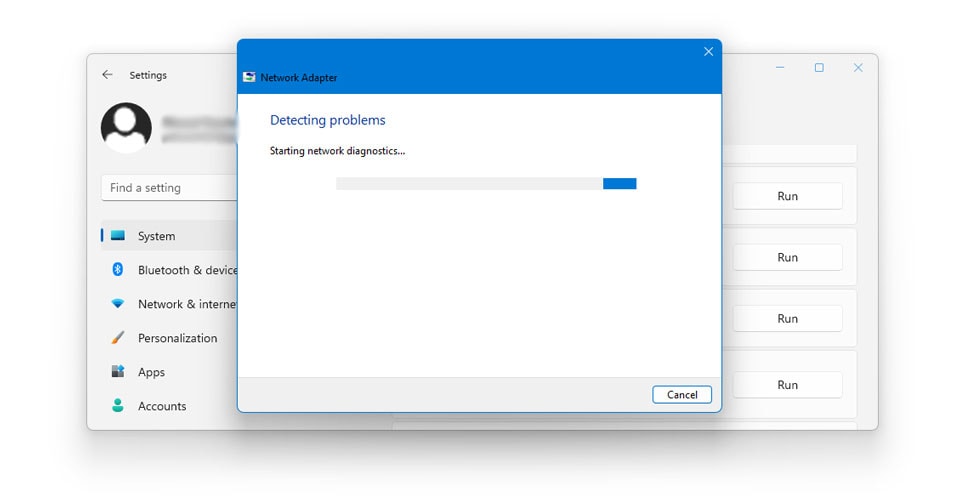
- When the process is complete, tap Close
- Restart your system
5. Reinstall your Network Adapter
One of the easiest solutions if your device is connected but you might not be able to access anything on the network is uninstalling and resintalling the network adapter
NOTE: You needn’t worry about reinstalling the network adapter as Windows 11 will automatically reinstall the driver upon the next restart
- Right-click on Start Menu
- Go to Device Manager
- Locate and Expand Network Adapters
- Locate your Wifi Adapter network and right-click on it
- Select Uninstall
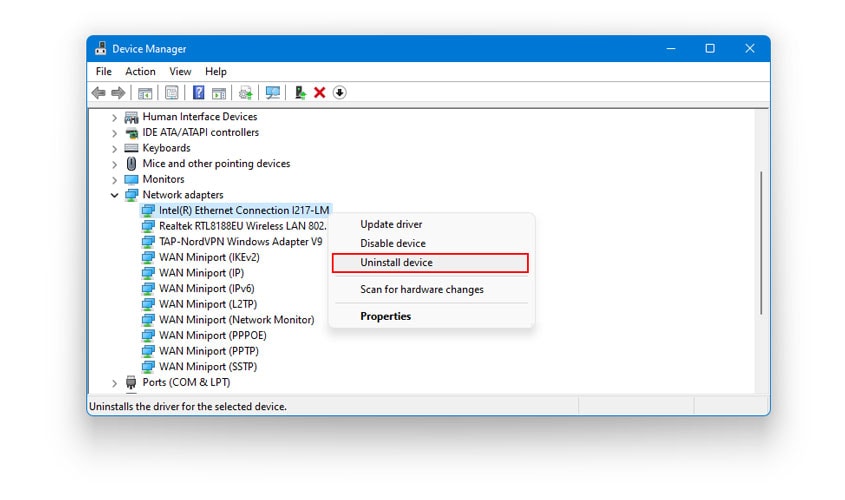
- Click Yes to confirm
- Windows will now uninstall the driver
- Post uninstallation, restart your system
- Windows will now reinstall the driver
Also Read: Network Adapter Missing in Windows 11
6. Reset Network Adapter and DNS Using Command Prompt
Trace the following steps to reset the network adapter and DNS Using command prompt
- Go to the Start Menu
- Type in cmd in the Search menu
- Right-click on CMD
- Run as administrator
- Insert the following commands one after the other and press Enter
NOTE: Ensure that your press Enter after each command and insert a new command only after the previous command has been implemented
netsh winsock reset
ipconfig /release
netsh int ip reset
ipconfig /flushdns
ipconfig /renew
- Windows will automatically reset the Winsock catalogue now
- Restart your system
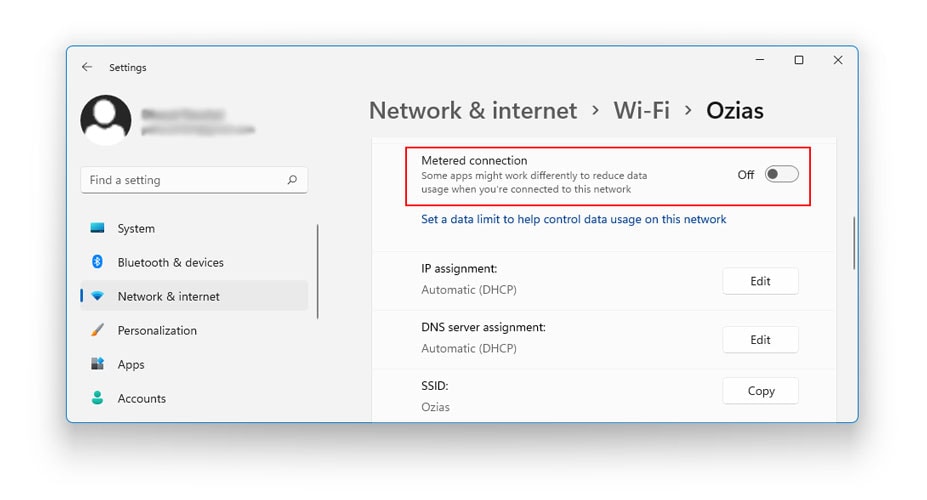
7. Turn-Off other Network Related Tools
Temporarily you can turn off other network-related tools which could be interfering with Windows ability to use the network.
Here are some examples:
- Disconnect from the VPN server
- Disable Airplane Mode
- Shut off the firewall and pause the antivirus software
- Toggle off the ‘metered connection’ setting
8. Check MAC Address Filtering in Router Settings
Incoming traffic is one of the possible causes why your Internet is acting up. Every router uses the MAC address present on your device to permit/block access to certain things on the Internet. Trace the following steps to check MAC address filtering in Router Settings
- Go To Your Router Settings
- Go to Firewall
- Choose Advanced Settings
- Locate the Settings tab that is called MAC Filtering
- If the checkbox is ticked in, it means your MAC Address filtering in router settings
- You can uncheck this box to disable MAC Address Filtering
9. Update your Windows 11
Follow the given steps to update Windows 11
- Right click on the Start Menu
- Go to Settings
- Select Windows Update on the left navigation tab
- Here, locate and click on Check For Updates
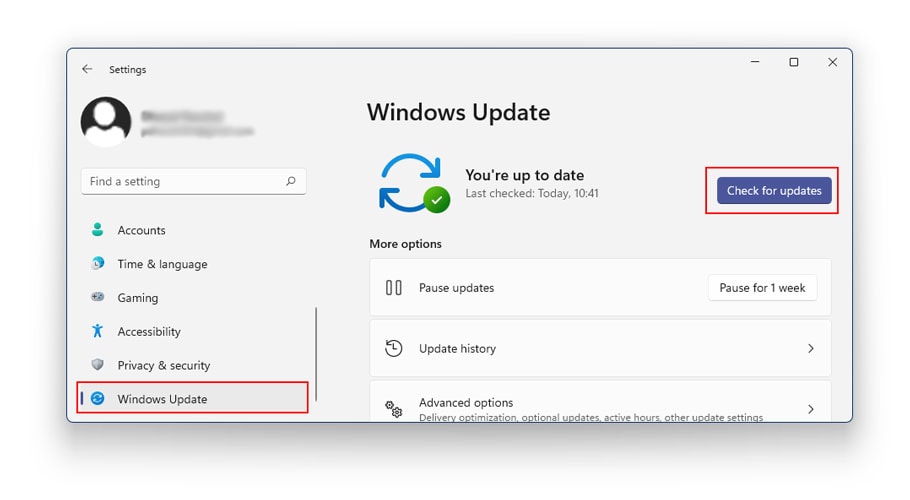
- Now, Windows will look for potential updates and install them automatically
- Once the updates are done, restart your PC to see if the issue has been resolved
TIP: Updating Windows regularly is vital to ensure the smooth functioning of your system. Therefore, we suggest you keep checking for updates regularly so as to miss out on any new features or bug fixes.
Also Read: How to Fix Windows 11 Update Error 0XC1900130
10. Contact your Internet Service Provider
If you are opting for this fix, then it means none of the fixes have worked out for you. In case you’ve have no luck with your Internet Connection, then it probably means your Internet Connection is down. Here, we advice you to reach out to your Internet Service Provider at once to get this issue solved.
The Bottom Line
There are always going to be times when your device is connected but you might not be able to access anything on the network. Despite a strong Wifi signal, you won’t get any Internet whatsoever. In such cases, it is likely that you have lost your Internet connection. This can be frustrating if your work at hand needs you to rely heavily on the Internet. This is precisely why we have compiled a list of the best possible fixes against windows 11 no internet access.