We are too hyped with the official release of Windows 11. A substantial upgrade over its predecessor, Microsoft has already started rolling out the Windows 11 update to Windows 10 users. Those who have got a look at the leaked versions already know what to expect from this brand new OS (If your system does not meet the minimum requirement for Windows 11 then you can try to bypass TPM 2.0 and Install Windows 11 via Windows Update). But it seems that the new users have reported several issues arising when using Windows 11.
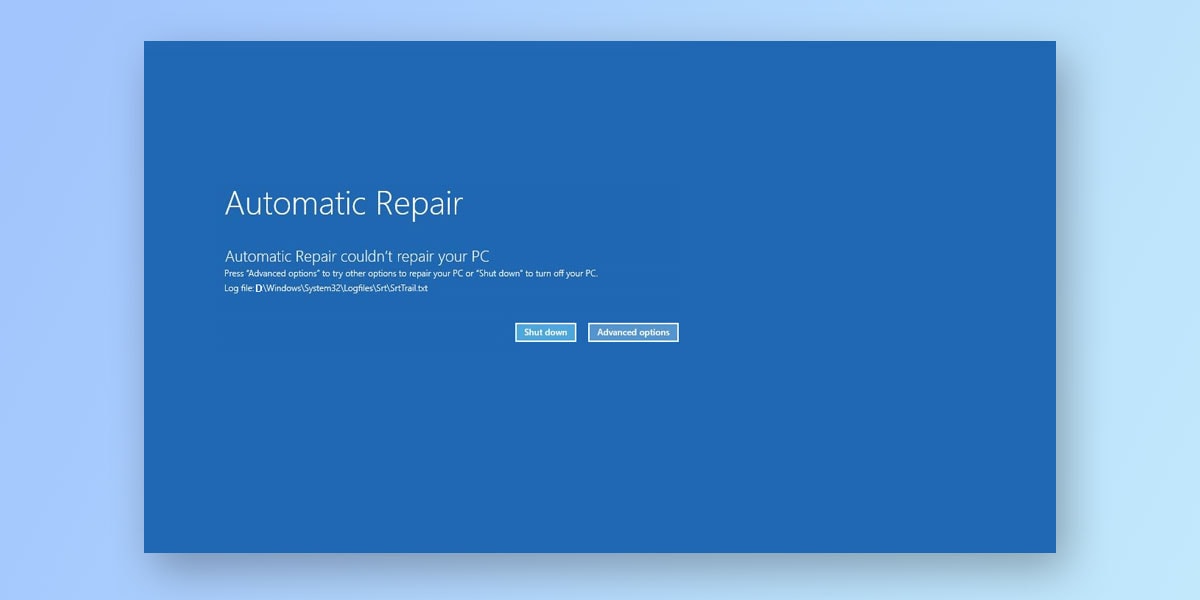
The majority of these issues arose after people updated to Windows 11. One of the core issues raised by the Reddit community is the Automatic Repair Loop in Windows 11. For those who know, Windows has a built-in automatic repair recovery tool that is designed explicitly to diagnose and troubleshoot common boot errors.
While this system recovery tool is activated solely upon boot errors, users have reported the automatic repair tool to have entered in an endless loop. If you too are facing the same problem, then this article will walk you through all the solutions that will help automatic repair loop in Windows 11.
What is Automatic Repair in Windows 11

As we mentioned earlier, Microsoft introduced the Automatic repair system recovery tool for every OS from Windows 8 and above. As the name suggests, the Automatic repair tool is a feature that automatically diagnoses and troubleshoots common boot errors. In simple words, the automatic repair tool is your system’s first line of defense every time the computer fails to boot properly.
Every time your computer runs into a particular boot issue, the automatic repair in Windows 11 gets activated. Upon activation, this system recovery tool runs a series of diagnostic tests to detect, repair, and prevent the boot errors from occurring in the future.
What Does it Mean When your Computer says Preparing Automatic Repair in Windows 11?
The automatic repair is a system recovery tool that is activated upon boot errors. Hence, if your computer says it is preparing for automatic repair in Windows 11, then it probably means your system has encountered a possible boot error which is causing the system to not boot successfully.
For example, if your computer doesn’t start even after two consecutive restarts, the Automatic Repair is triggered. Here, the system launches the Automatic Repair tool in its defense to try and detect what is causing the boot error.
What Causes Repair Loop in Windows 11?
The automatic loop is triggered every time your system runs into a particular boot error. It could either be a boot error or Windows might be missing a file for the automatic repair to start. Unfortunately, this repair tool tends to enter a vicious loop which leaves you nothing but a dreaded blue screen to look at.
There is no single probable cause for this as there could be several reasons why the automatic loop is triggered. Some of the probable causes include corrupt files, a malware infection, potential virus threat, missing drivers, outdated software, and many more. Every time the automatic repair tool runs into a loop, you tend to see “Preparing automatic repair” message on your screen with zero progress.

At times, users are left with a dreaded blue screen with the message “Your PC did not start correctly” message. Although there are several reasons that causes repair loop windows 11, there are solutions to fix the same as well.
How to Fix Windows 11 Automatic Repair loop
From a missing file to an outdated driver, anything can cause the automatic repair loop in Windows 11. Seeing that there are multiple reasons why the automatic repair tool gets stuck in a loop, there are equal solutions to fix it. Here are some of the best possible solutions to fix Automatic Repair loop in Windows 11.
1. Hard Reboot your PC
Performing a hard reboot is the first of the windows 11 repair loop fix. The Automatic Repair tool comes into effect every time your system runs into common boot errors. A hard reboot is same as shutting down the command on your PC and then turning it back on. To perform a hard reboot on your Windows 11, follow the given steps
- Press and hold down your system’s Power Button
- Wait for 5-10 seconds before your system shuts down completely
- Check to see if there are any lights visible on your system. If there are, unplug your system’s power cable from the socket or CPU.
- Wait for 60 seconds
- Plug-in the power cable & Turn on your system
- Check to see if the issue has been dealt with.
2. Disable Early Launch Anti-Malware Protection
Your system will have antivirus software protection. This software automatically comes into play every time you start your PC and keeps viruses and malware at bay. However, this anti-malware protection can also keep you away accessing or removing certain files. According to research, this anti-malware protection can often trigger the automatic repair loop. Hence, disabling the same is a quick way to fix automatic repair loop in Windows 11.
- Restart your PC & Click on Advanced options from the Automatic Repair blue screen
- Then, click on Troubleshoot > Select Advanced Options > Select Startup Settings
- Click on Disable early launch anti-malware protection
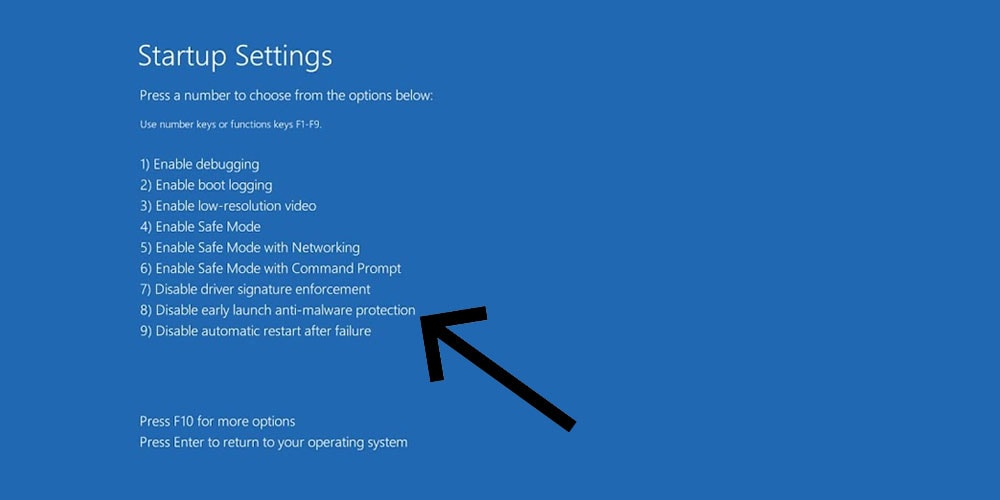
- Restart your system
3. Rebuild BCD and Run Chkdsk
To rebuild BCD, follow the given steps
- Restart your PC & Click on Advanced options from the Automatic Repair blue screen
- Then, click on Troubleshoot > Select Advanced Options > Go to Command Prompt
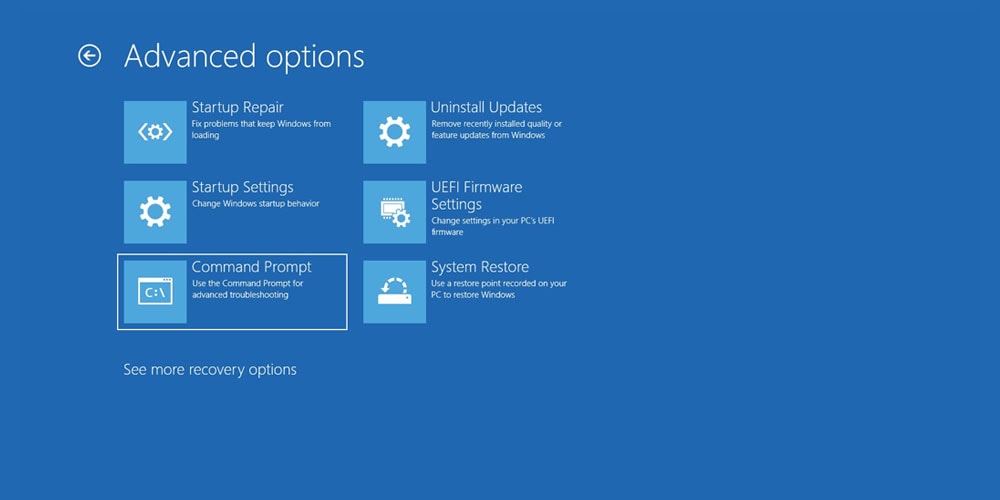
- In the cmd window, type the following commands and hit Enter
Press Enter after each command
bootrec.exe /rebuildbcd
bootrec.exe /fixmbr
bootrec.exe /fixboot
To run chkdsk, follow the given steps
- Insert the following command in CMD and press Enter
sfc /scannow
- Now, enter the following command and press Enter
chkdsk /f /r /x C:
The CHKDSK will now troubleshoot for any problems that might be tampering with your system’s overall functioning.
4. Boot in Safe Mode to Repair Windows 11 Image
Booting your Windows 11 in safe mode is one of the easiest way to fix automatic repair loop. To apply this windows 11 repair loop fix, follow the given steps
- Restart your PC & Click on Advanced options from the Automatic Repair blue screen
- Then, click on Troubleshoot > Select Advanced Options > Select Startup Settings
- Choose option 5 which reads Enable Safe Mode with Networking
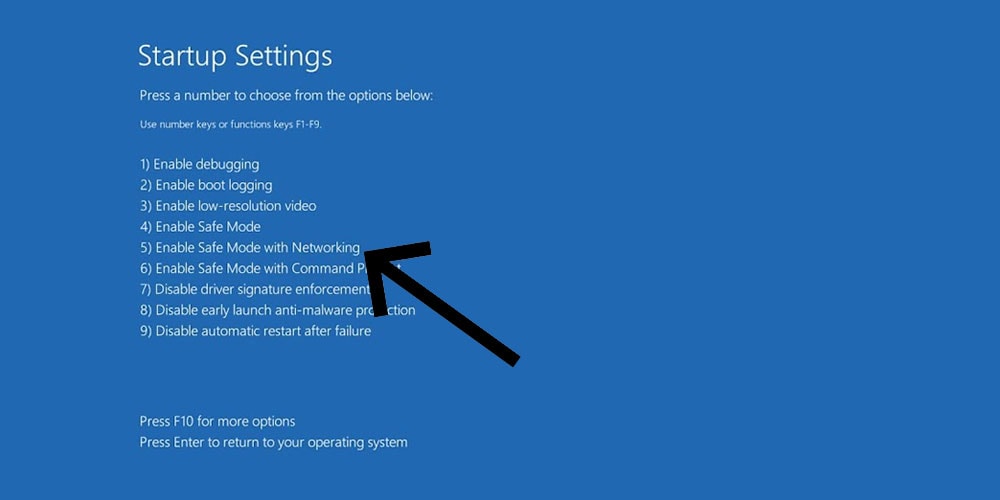
- Your Windows 11 will now restart into safe mode.
- When in Safe mode, if you suspect a particular driver, then download the updated driver from the Manufacturer’s website.
- Open command prompt by typing cmd in the start menu
- Enter the following command
DISM /Online /Cleanup-Image /RestoreHealth
- After the process, restart your PC and install the updated driver
5. Restore Windows Registry
One of the probable causes of the repair loop could be a severe malware infection or disk issues that can corrupt your Windows Registry. In such cases, your best bet is to restore Windows Registry by using the following steps
- Restart your PC & Click on Advanced options from the Automatic Repair blue screen
- Then, click on Troubleshoot > Select Advanced Options > Go to Command Prompt
- Enter the following command
copy c:\windows\system32\config\RegBack* c:\windows\system32\config\
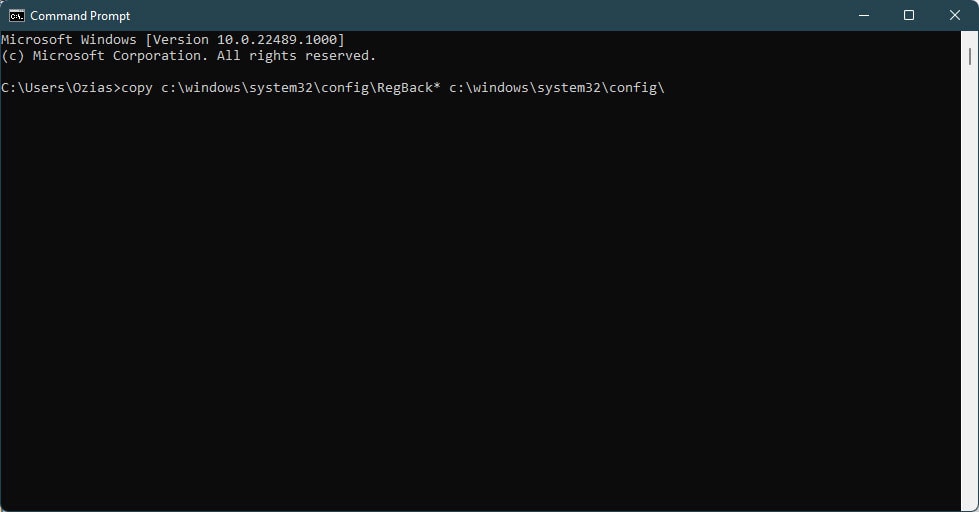
- If you are asked to overwrite files, type All and then hit Enter
- This will restore the Windows Registry and cleanse it if any malware is present
- Once the restore is finished, restart your system to check whether the issue has been dealt with
6. Perform System Restore
A System Restore is generally performed to undo any problems or errors that are occurring within the system. When you perform a system restore, you take a screenshot of your system’s current working condition and save it as a restore point every time the system detects important changes.
To perform a system restore, follow the given steps
- Restart your PC & Click on Advanced options from the Automatic Repair blue screen
- Then, click on Troubleshoot > Select Advanced Options > Click on System Restore
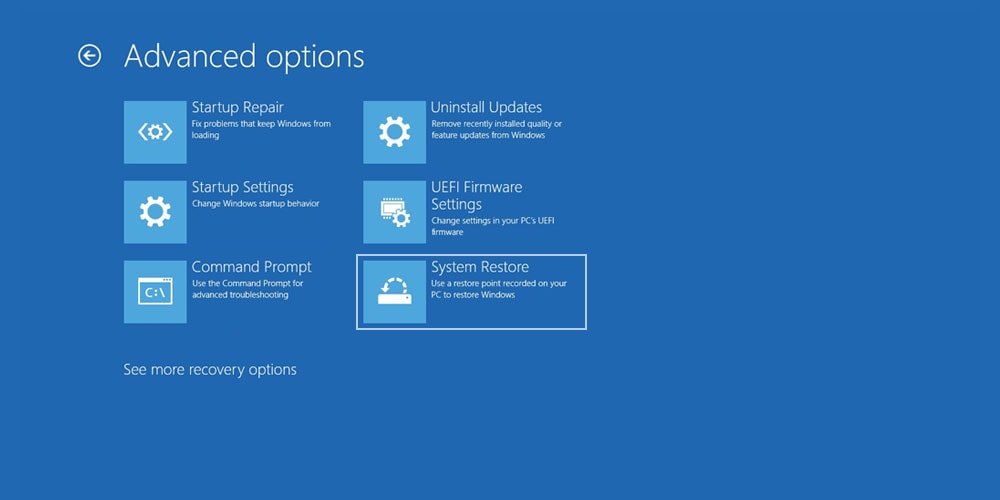
- Here, select your restore point
- Hit Next
- Wait for the restore to take place
- Restart your System
7. Run Windows Startup Repair
To run the Windows startup repair, follow the given steps
- Restart your PC
- Now, tap on Advanced Repair Options from the Automatic Repair blue screen.
- Then, click on Troubleshoot > tap on Advanced Options
- Click on Startup Repair
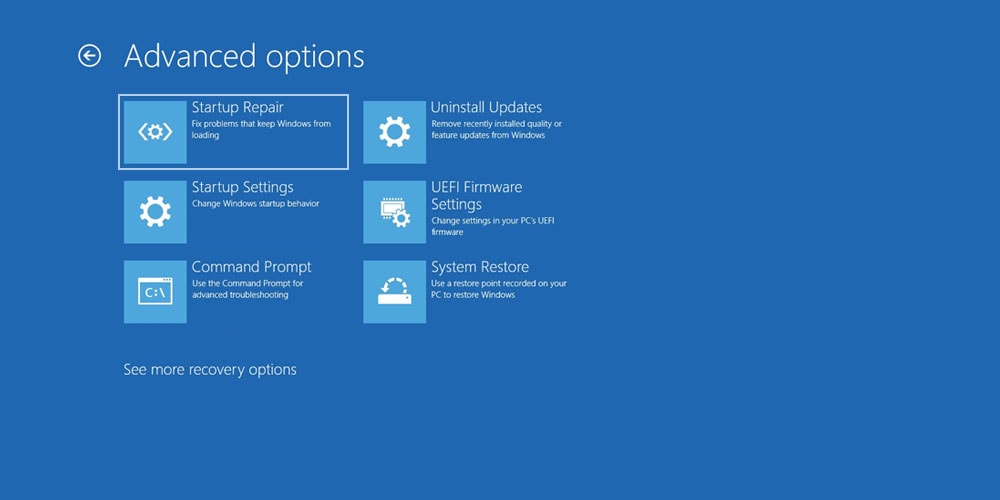
- Select an account with admin privileges
- Enter your password & Tap Continue
- Wait for the Windows Startup Repair Tool to commence
- Restart your PC
8. Disable Automatic Startup Repair
One of the easiest ways of dealing with problems in life is disabling the problems for good. Similar is the case with the Automatic Startup Repair Tool. If the tool meant to diagnose and fix problems becomes a problem in itself, it is time to disable the automatic startup repair tool for good.
To disable the automatic startup repair tool in Windows 11, follow the given steps
- Restart your PC
- Now, tap on Advanced Options from the Automatic Repair blue screen.
- Then, click on Troubleshoot > Select Advanced Options > Go to Command Prompt
- In the cmd window, type the following command and hit Enter
bcdedit
- Check if the recoveryenabled value reads yes
- Now, type the following command and press Enter
bcdedit /set {default} recoveryenabled no
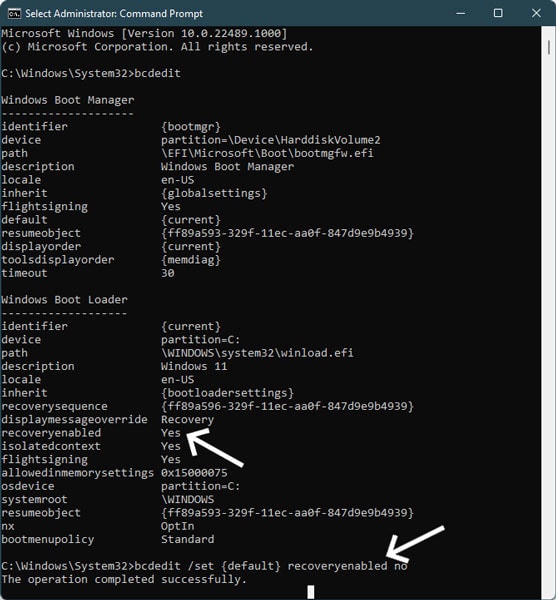
- The Windows Automatic Repair Tool is now disabled
- However, if the above-mentioned command doesn’t work, try this command instead
bcdedit /set {current} recoveryenabled no
- Restart and see if the issue has been dealt with
Also read: How to Disable Startup Programs in Windows 11
9. Reset Windows 11
This fix comes into play once you’ve exhausted all the remaining fixes. Please note that this step will wipe out your entire system data. Therefore, ensure that you backup your important data on a storage device before you reset Windows 11 to fix automatic repair loop.
You can reset your Windows 11 by using the given steps
- Restart your PC
- Now, tap on Advanced Options from the Automatic Repair blue screen.
- Then, click on Troubleshoot > Click on Reset this PC

- From the options present, select Remove Everything
- Your system will now reset. Please be patient till the reset is done as it will take time
Once you have successfully reset Windows 11, restart your PC and see if the issue still persists.
10. Reinstall Windows 11
It is unfortunate if you have to implement this windows 11 repair loop fix to get rid of the problem. But if everything else has failed, then re-installing your OS is the only feasible solution to the problem. Performing a clean installation of Windows 11 will completely erase the computer’s hard drive data and apply a fresh copy of your OS.
Reinstalling your Windows is a known solution against problems concerning memory stability, startup errors, boot errors, and so on. It is known to prolong your battery life and is one of the best ways to get rid of any malware that is present on your system.
Note: Re-installing OS will wipe out your entire data on your hard drive. Therefore, ensure that you have the backup of all your important data before you perform this windows 11 repair loop fix.
- Insert a Windows 11 bootable drive into your system
- Start your system. While booting keep pressing any of these keys – F2, F12, Delete, or Esc to get into boot menu and select to boot from USB.
- Follow the on-screen guide to install a fresh copy of the Windows 11 on your system
Recommended: How to Activate Windows 11 for Free Permanently
Conclusion
It can be frustrating when you have to solve the very thing that is designed for all your problems. While it can be difficult to understand the complexity of the same, it all becomes easier once you know which fix to apply for the same. Mentioned above are some of the best solutions to fix Automatic Repair loop in Windows 11. However, if neither of the 10 fixes works out for you, it is time you have an expert take a look at it.


Need help backing up data and then reinstalling windows 11. 3 yr old hp envy computer stuck in repair loop. Tried all the fixes….Barbaraanncoan@hotmail com