The computer is loaded with tones of features that makes our daily lives easier. For example, while Excel makes accounting easy, you can make the perfect presentations using PowerPoint. But one of the key features is copy-paste.
It is practically impossible to imagine your work life without copy-paste. Whether it is a simple net surfing session or you need some files copied over instantly, all you need to click on copy and paste the file into the destined file folder.
Similarly, if you are a programmer, the copy paste feature saves you from the hassle from rewriting the same line of code down the line. A simple copy-paste can get the job done. However, majority of the times, we tend to forget the last thing we copied. Or occasionally end up pasting the wrong thing in either the wrong file folder. This could really put you in a jiffy.
But you don’t have to worry about that in Windows 11. Microsoft’s new OS comes with an added feature that lets you check windows 11 clipboard history. Everything you copy automatically gets copied to the clipboard. You can then access the clipboard to copy a file and paste it anywhere you want as much as you want.
While this is a handy feature to have by, not many are aware of it. If you’re also one of them, then this article is for you. In this article, we will walk you through how to check clipboard history in Windows 11.
What Is Clipboard History?
Microsoft first launched the Clipboard History back during the 2018 update of Windows 10. Since, the company has made significant improvements to this feature. Similarly, Windows 11 has a plethora of options in terms of clipboard history.
Similar to the ones we use in the physical world, a clipboard is a place wherein all your data is copied before you paste it somewhere else. The clipboard history refers to the set of all data that you have copied onto the clipboard. These includes files, audio, plain text, video files, and so on.
NOTE: The Windows clipboard is configured to store only one copied element (text, audio, video, hyperlink) at a time. Therefore, the content is replaced every time you copy something, and you CANNOT retrieve the data copied before.
Here is everything you can do with your clipboard history
- Copy Data back into the Windows 11 clipboard
- Paste any clip from the clipboard history directly into the selected application or file folder
- Search for the file by its contents
- Find out the original path from where the data was copied from
- Delete clips
Windows allocates a total of 4 MBs to the clipboard and allows you to perform up to 25 marked entries onto the Windows 11 clipboard which comprises text, HTML, bitmap, and so on. In addition, you also save images less than 4 MB on your clipboard.
Everytime you copy to the clipboard is automatically stored in the system RAM. You will find no separate file, folder, or drive marked Clipboard on your system whatsoever. Therefore, the clipboard history is completely wiped out every time you turn off your system.
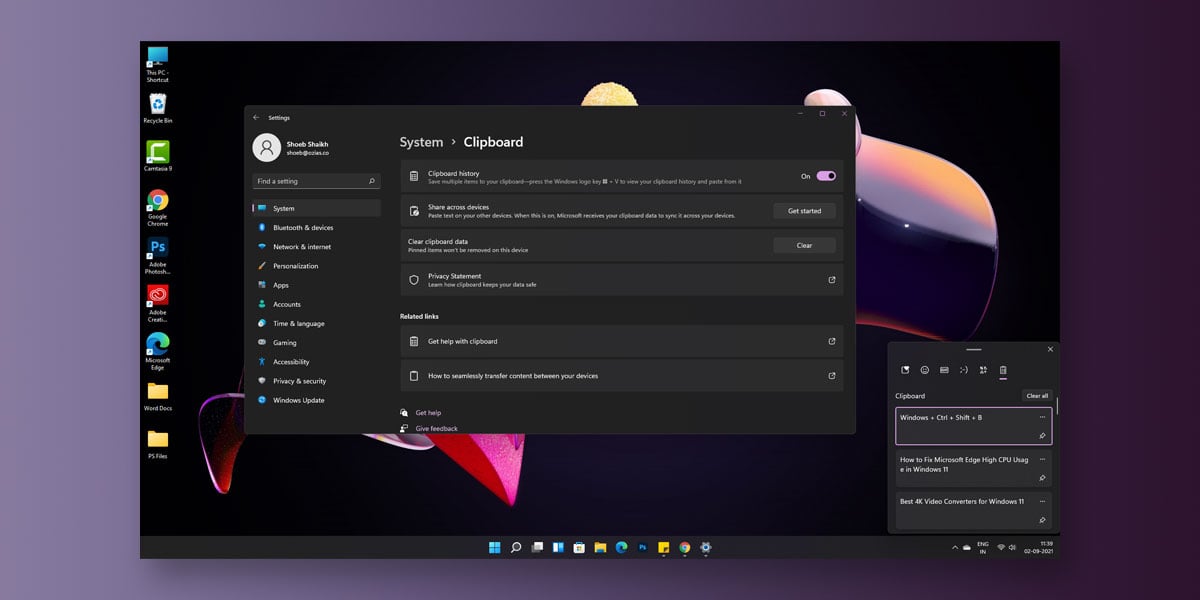
How To Enable Clipboard History In Windows 11?
As we mentioned earlier, Microsoft introduced the Clipboard feature back during the 2018 update of Windows 10. Since then, the Clipboard has become a default feature of every Windows OS. Unfortunately, the Windows 11 clipboard feature is disabled by default which means you will have to enable the clipboard history in Windows 11.
To enable clipboard history in Windows 11, follow the given steps.
- Close all running applications
- Right-click on the Start Menu
- Select Settings
- Go to System
- Scroll down until you locate Clipboard
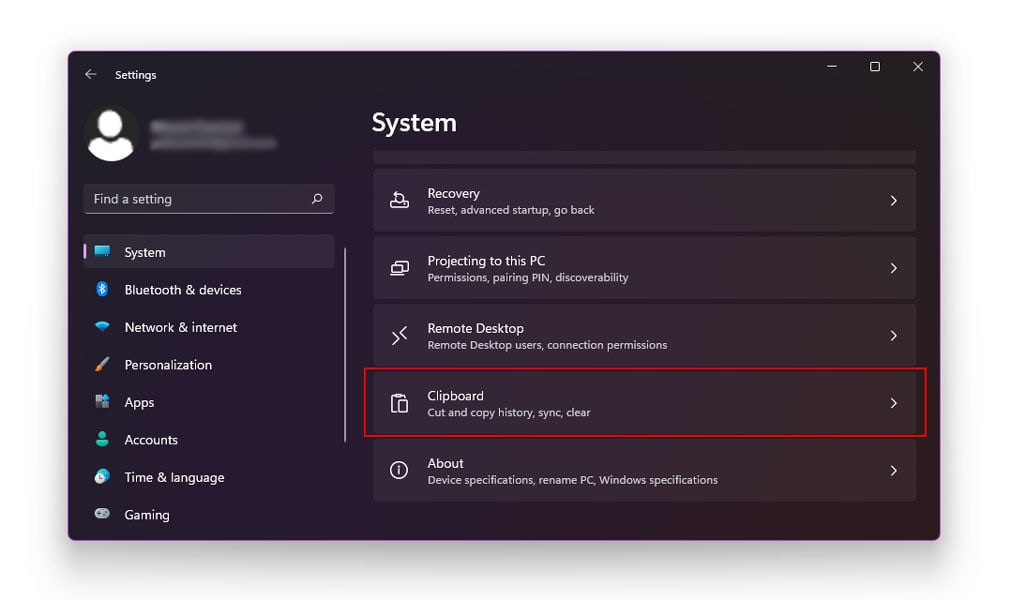
- Select Clipboard
- To enable Clipboard History, toggle the switch to ON.
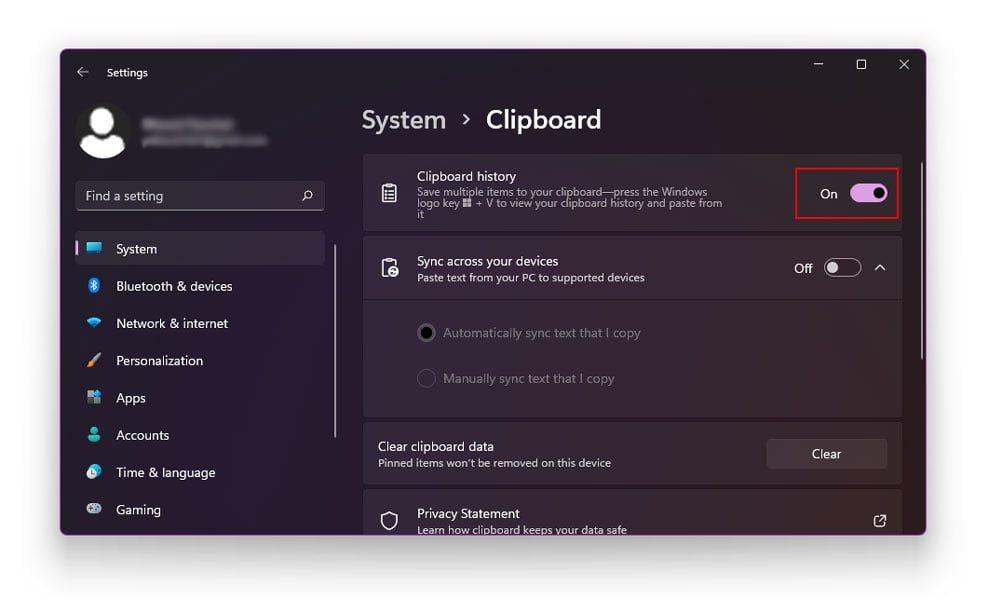
This will enable clipboard history on your Windows 11. Once the clipboard history is turned on, you can save multiple items to your clipboard, view your clipboard history, and paste anything you want from it.
How To View Clipboard History In Windows 11?
At times, we tend to copy multiple things at a time and can eventually lose track of the last thing we have copied. This can lead you to paste the wrong things in the wrong destination, in turn landing you in a problem.
As we mentioned earlier, the Windows clipboard is configured to store only one copied element (text, audio, video, hyperlink) at a time. Therefore, the content is replaced every time you copy something, and you CANNOT retrieve the data copied before.
But with the clipboard history enabled, you can copy multiple items onto your keyboard and directly select, copy, and paste the files you want anywhere on your system. Similarly, you can also view clipboard history in Windows 11. Viewing your clipboard history will give you a clear idea of where you are supposed to paste the right files.
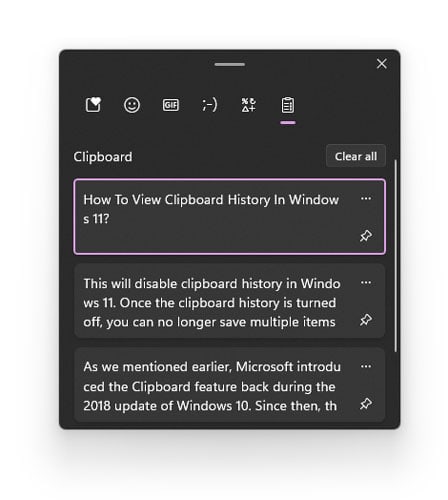
To view Clipboard history in Windows 11, follow the given steps.
- Close all running applications
- Press Windows + V on your keyboard
- A small dialogue box named “Clipboard” will now appear on the bottom right corner of your desktop.
- This box is the clipboard history.
- Here, you can check everything you’ve copied so far
- Also, you can select and copy files from the Clipboard History dialogue box and paste them where you want.
How To Delete An Item From Your Clipboard History?
Having too many things in your clipboard history can make it troublesome for you to find the file you were looking for. Therefore, you can delete items from your clipboard history using the following steps.
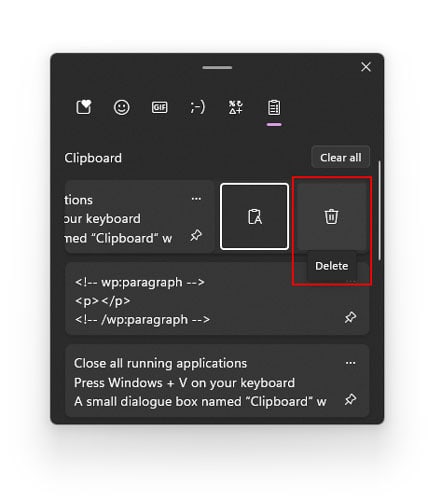
- Close all running applications
- Press Windows + V on your keyboard
- A small dialogue box named “Clipboard” will now appear on the bottom right corner of your desktop.
- This box is the clipboard history.
- Here, you can check everything you’ve copied so far
- Under every item, you will see three dots (…)
- If you wish to delete a particular item, click on the three dots
- Next, click Delete
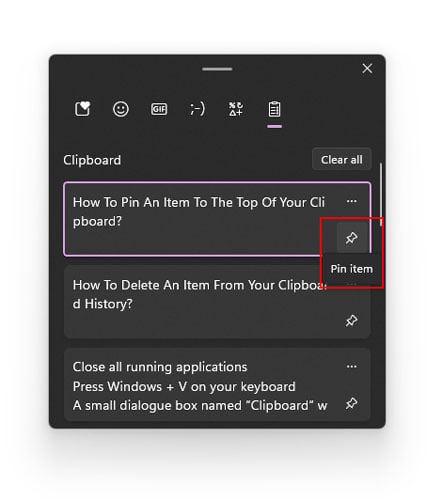
How To Pin An Item To The Top Of Your Clipboard?
At times, you might have an important file on your clipboard which you don’t want to waste time searching for. In such cases, you can pin that item to the top of your clipboard using the following steps.
- Close all running applications
- Press Windows + V on your keyboard
- A small dialogue box named “Clipboard” will now appear on the bottom right corner of your desktop.
- Here, you can check everything you’ve copied so far
- Under every item, you will see three dots (…)
- Under these three dots, you will see a Pin icon.
- Click this Pin icon under the file you wish to pin to the top of your clipboard.
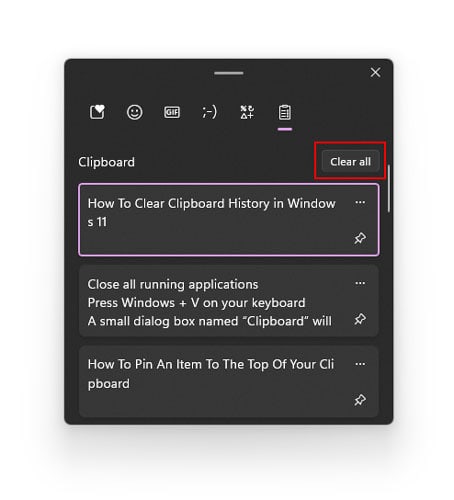
How To Clear Clipboard History in Windows 11?
It is always advisable to clear your clipboard history in Windows 11 so that you can have new space to copy over new items to your keyboard. You can remove your clipboard history in Windows 11 using the following steps.
- Close all running applications
- Press Windows + V on your keyboard
- A small dialog box named “Clipboard” will now appear on the bottom right corner of your desktop.
- This box is the clipboard history.
- Here, you can check everything you’ve copied so far
- At the top of the Clipboard, you will see an option named Clear All
- Select Clear All
- This will clear your entire clipboard history in Windows 11.
How To Clear Your Windows 11 Clipboard History Using Settings?
If you are unable to access the clipboard window due to some of the other reason, you can always go through the settings application to clear your Windows 11 clipboard history. To remove your Windows 11 clipboard history using settings, follow the given settings.
- Close all running applications
- Right-click on the Start Menu
- Select Settings
- Go to System
- Scroll down until you locate Clipboard

- Select Clipboard
- Locate the options which read Clear Clipboard Data
- Select Clear
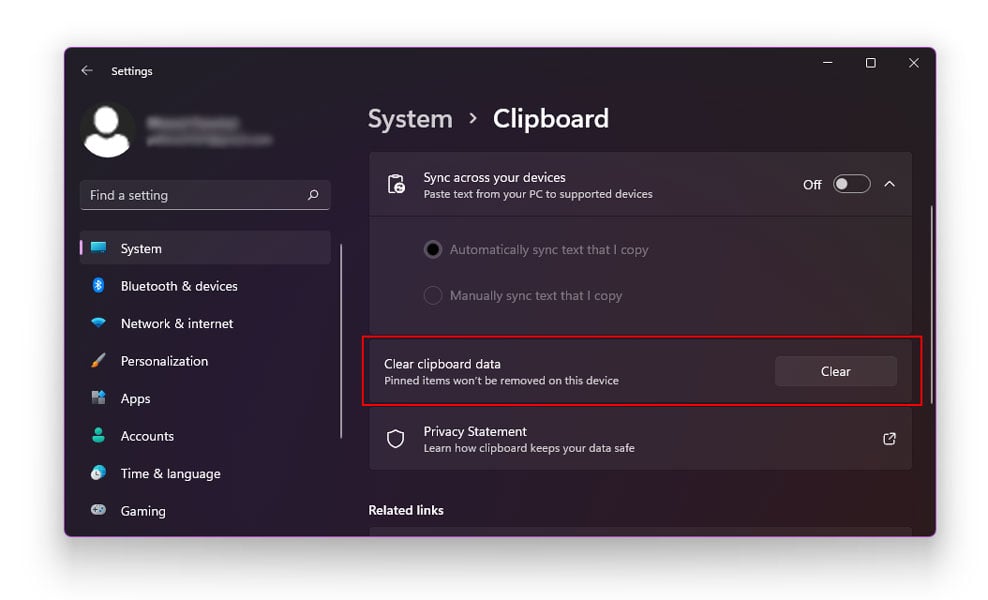
This will completely wipe out all the items currently present on your clipboard and hence clear your Windows 11 clipboard history.
Note: However, this step won’t erase the PINNED ITEMS on your clipboard.
How To Disable Clipboard History In Windows 11?
To disable Clipboard history in Windows 11, follow the given steps.
- Close all running applications
- Right-click on the Start Menu
- Select Settings
- Go to System
- Scroll down until you locate Clipboard

- Select Clipboard
- To disable Clipboard History, toggle the switch to OFF.
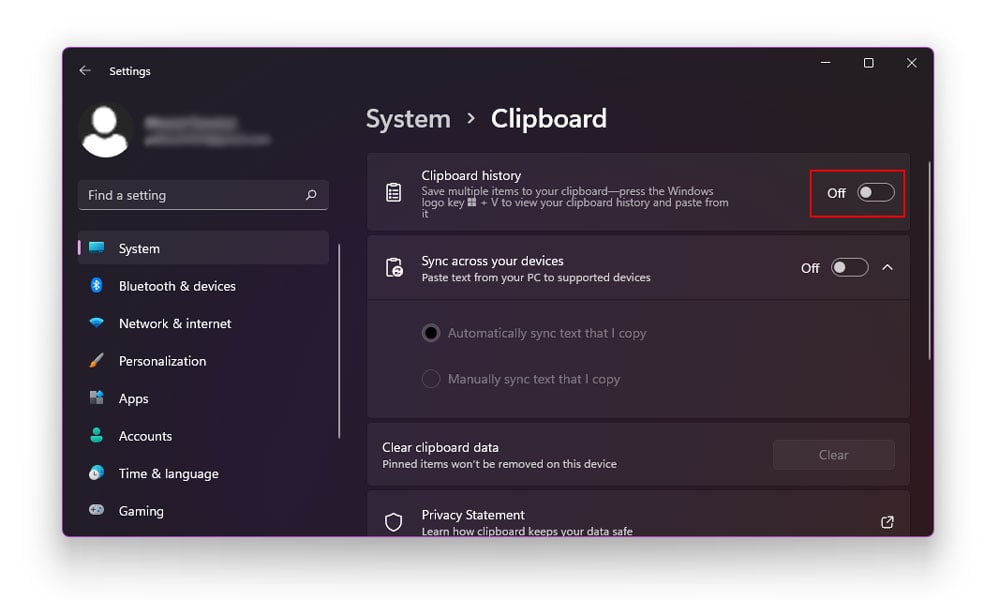
This will disable clipboard history in Windows 11. Once the clipboard history is turned off, you can no longer save multiple items to your clipboard, view your clipboard history, and paste anything you want from the clipboard.
Can We Retrieve Clipboard History?
No, as we mentioned earlier, the clipboard history is wiped clean every time you turn off or restart your system. However, you can use an external application that records everything that is copied to the clipboard (text, images, HTML, lists).
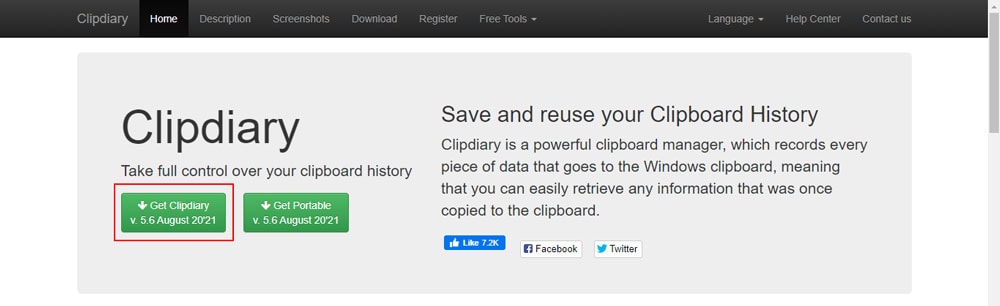
Using this third-party application, you can easily retrieve your Windows 11 clipboard history. To download the application, click on the link: Download Clipdiary
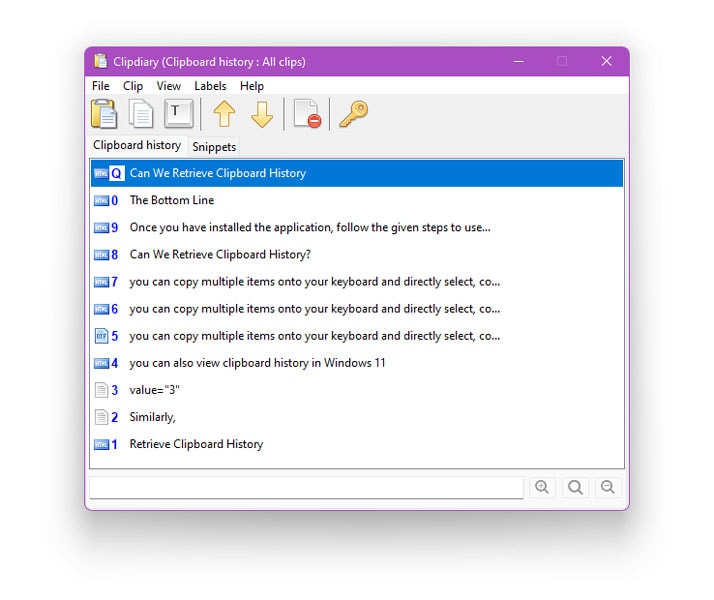
Once you have installed the application, follow the given steps to use the application.
- Press Ctrl + D on your keyboard
- This will pop up the clip diary window
- Now you can view copied history in Clipdiary application.
- Similarly, you can copy multiple items onto your keyboard and directly select, copy, and paste the files you want anywhere on your system.
- Even if you restart your PC, the history will remain safe in Clipdiary application.
The Bottom Line
We hope our article was successfully able to walk you through how you can enable, disable, and view your clipboard history in Windows 11. Note that the clipboard content gets replaced every time you copy a different content.
Also, the clipboard is an excellent way of quickly accessing your copied files, text, and other such things. In addition, you can also pin the critical files to the top of your clipboard to save you from the hassle of constantly searching for them. However, note that the clipboard history resets every time you turn off or restart your computer.
We hope you find our article helpful. If you have thought we may have accidentally missed something, kindly let us know in the comments section below. Also, if you have any queries whatsoever, feel free to drop them down in the comments section, and we will get back to you as soon as possible.