Technology has been the driving force behind the rapid advancement of the human species in the 21st century. As of 2022, technology is the key source of development in every possible sector that exists. One of the most significant byproducts of Technology is the computer. While it tends to have its perks, there are also some significant and hazardous drawbacks that come with it.
Windows comes loaded with dozens of features that make it super exciting for everyone to use. However, the more features there are, the higher are the chances of malware and viruses tampering with your system. But Windows 11 provides you with several productivity features that can protect your system against malware and other infections.
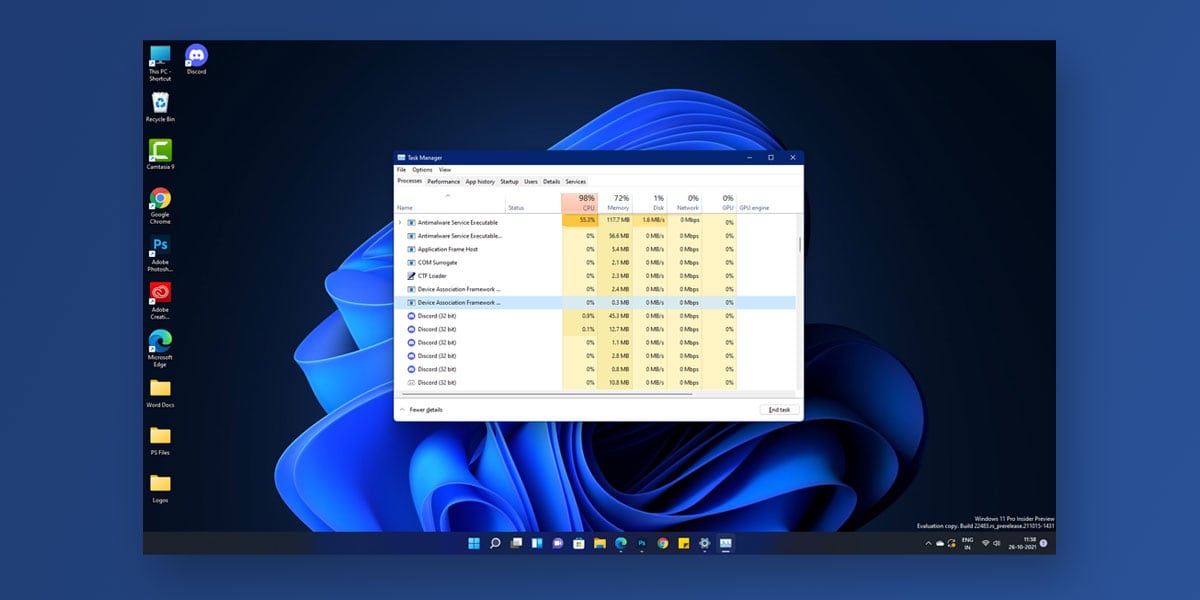
Although, users who have already got their hands on Windows 11 have reported heavy CPU usage when using the antimalware service executable. This article will walk you through all the root causes behind this problem, followed by detailed solutions that can help solve this issue. If you are facing high CPU usage in Windows 11 not because of antimalware service executable but in general then check this article to fix it.
What is Antimalware Service Executable in Windows 11?
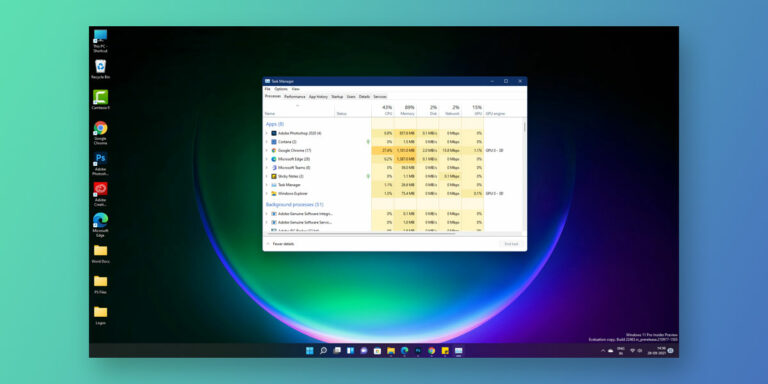
Every Windows OS comes equipped with a built-in antivirus software known as Windows Defender. So, if you don’t have antivirus software on your system, Windows automatically sets Windows Defender as the default antimalware service executable in Windows. Upon opening the Task Manager on your Windows 11, you will be able to locate these antimalware service executable by their background process MsMpEng.exe.
This antimalware service executable process quietly keeps running in the background and protects your system from malware, virus, or any other possible infections. Given its real-time operation, Windows Defender is the best choice as your system’s antivirus software.
Is Antimalware Service Executable Important in Windows 11?
Yes, it is incredibly vital that you have the antimalware service executable running in the background of your Windows 11 at all times. The primary task of this service is to provide real-time protection to your system by protecting it against malware, infections, and every other potential hazard. The Windows Defender is the default choice and your system’s first line of defense if you don’t have any third-party antivirus software installed on your Windows 11 system.
So to answer your question, the windows 11 antimalware service executable is highly important if you DON’T have any third-party antivirus installed on your system. You can always purchase and install good quality antivirus software that comes loaded with dozens of features for your system’s all-around protection.
Causes of Antimalware Service Executable High CPU Usage in Windows 11
There could be multiple reasons why the antimalware service executable displays high CPU usage on your Windows 11. As we mentioned earlier, the service offers real-time protection that keeps scanning for malicious files on your computer in real-time. Therefore, if you have installed large files on your system, the antimalware service executable will take time to scan every last detail. This process will indeed consume a chunk of your memory.
Users have generally reported this problem post updating their Windows. Once the update is complete, the service relies heavily on the system’s resources, in turn draining the CPU memory and system’s overall bandwidth leading to high CPU usage on your Windows 11.
Another likely scenario is that it is likely to contain malicious content if you have downloaded files from unverified sources. The larger the content, the more time the service will take to scan everything in real-time.
How to Fix Antimalware Service Executable High CPU Usage in Windows 11?
As we mentioned earlier, there can be a lot of reasons for the Antimalware Service Executable High CPU Usage in Windows 11. Right from large files to Windows updates, anything can cause the service to drain your system’s bandwidth and resources.
However, there are also solutions in place that can fix the Antimalware Service Executable High CPU Usage in Windows 11. These fixes tend to every possible root cause to resolve the issue
Here are some of the ways to Fix Antimalware Service Executable High CPU Usage in Windows 11
1. Reschedule Windows Defender Scheduled Scan
The majority of the Windows updates are unscheduled. These schedules can pop up anytime during the day. Generally, most of people choose to ignore it. Instead, scheduling a proper Windows Defender scan will help keep your system clean at all times. To properly set a Windows Defender Scheduled Scan, follow the given steps
- Go to the Start Menu
- In the search bar, type Task Scheduler
- Next, double-click on Task Scheduler
- This will now open the Task Scheduler on your screen
- Now, navigate to the below-mentioned path
Library/Microsoft/Windows/Windows Defender
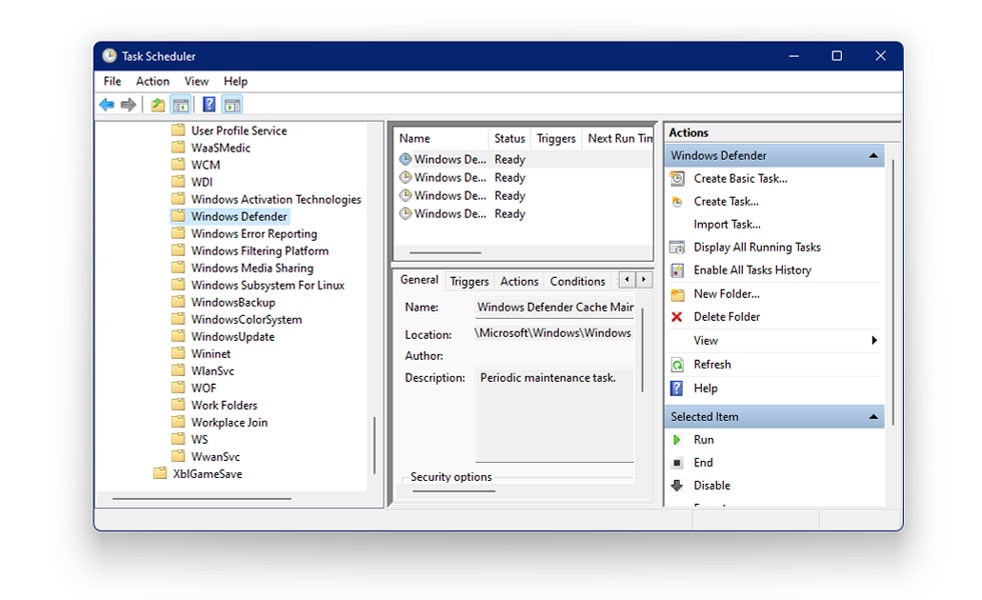
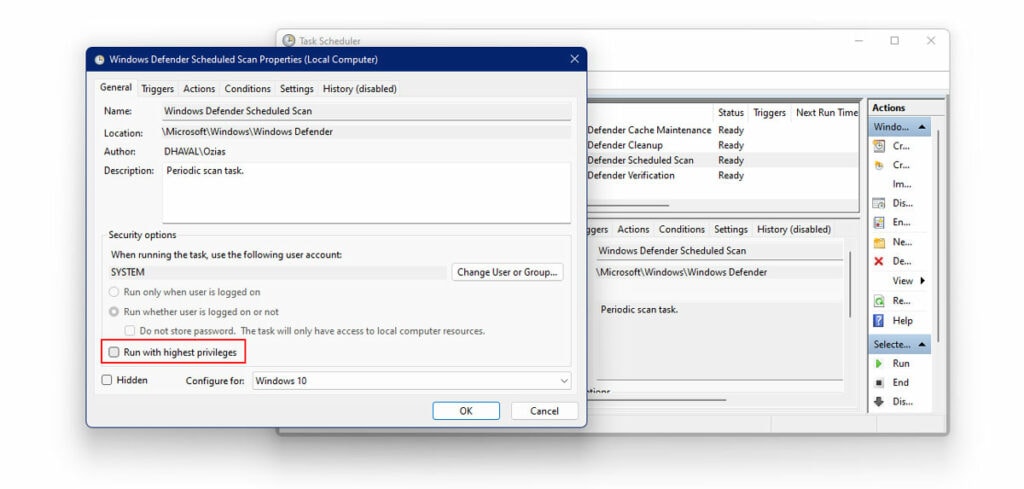
- Inside Windows Defender, locate the option which reads Windows Defender Scheduled Scan.
- Right-click on it
- Next, select Properties
- Uncheck the box next to “Run with Highest Privileges” options under General Tab
- Now, click on the Conditions Tab.
- Here, uncheck the boxes next to the following options.
Start the task only if the computer is idle for
Start the task only if the computer is on AC power
Start only if the following network connection is available.
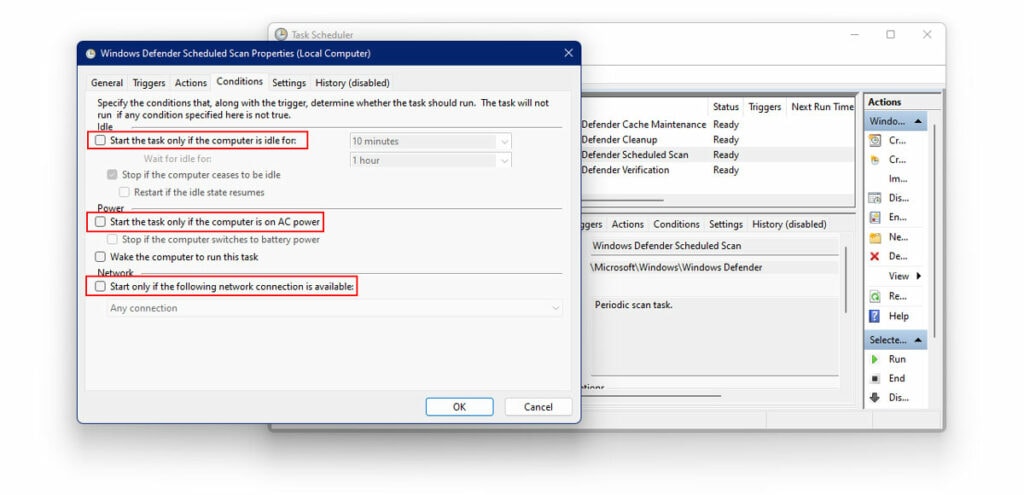
- Tap OK
- This will reschedule the Windows Defender Scheduled Scan
- Now, click on Properties on the right navigation pane
- Tap on the Triggers Tab
- Here, you can choose between monthly or weekly for your Windows Defender Scans.
- Choosing either of the two will reschedule the scan.
2. Add MsMpEng.exe to Exclusion List
Adding the antimalware service executable to the exclusion list will help considerably dial down the CPU usage. For example, to Add MsMpEng.exe to Exclusion List, follow the given steps.
- Close all running applications
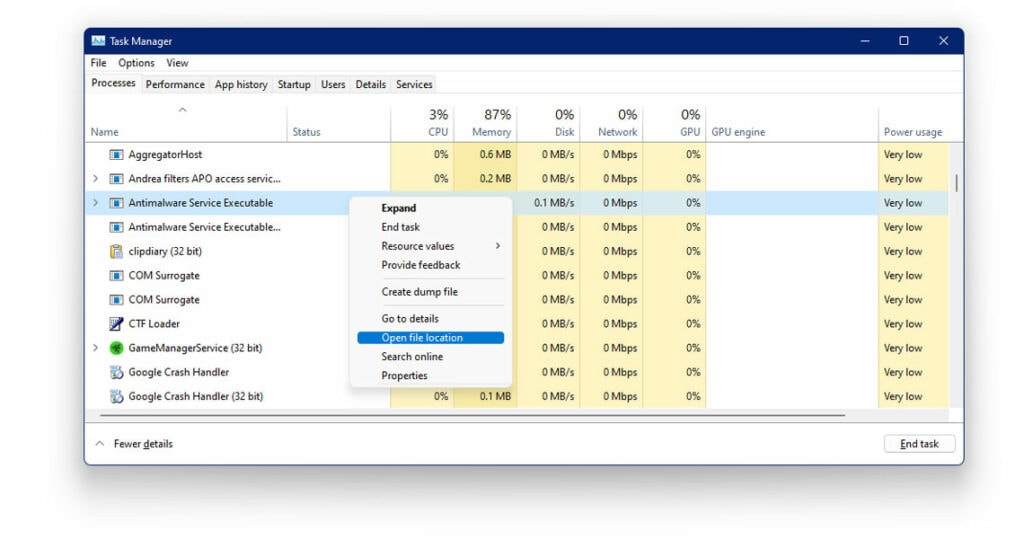
- Open the Task Manager (Ctrl + Shift + Esc)
- Locate the antimalware service executable process
- Right-click on the service
- In the submenu, tap on Open File Location
- Next, copy the complete path address of the antimalware service executable from the address bar at the top of your screen.
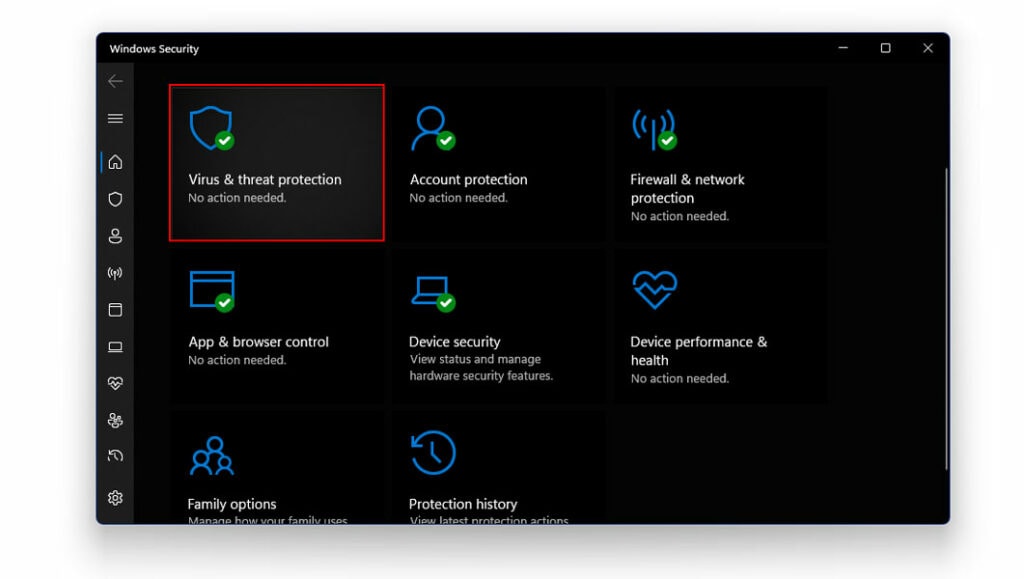
- Now, type Windows Security in the search bar
- Double click to launch it
- Here, tap on Virus And Threat Protection
- Click on Virus And Protection Settings
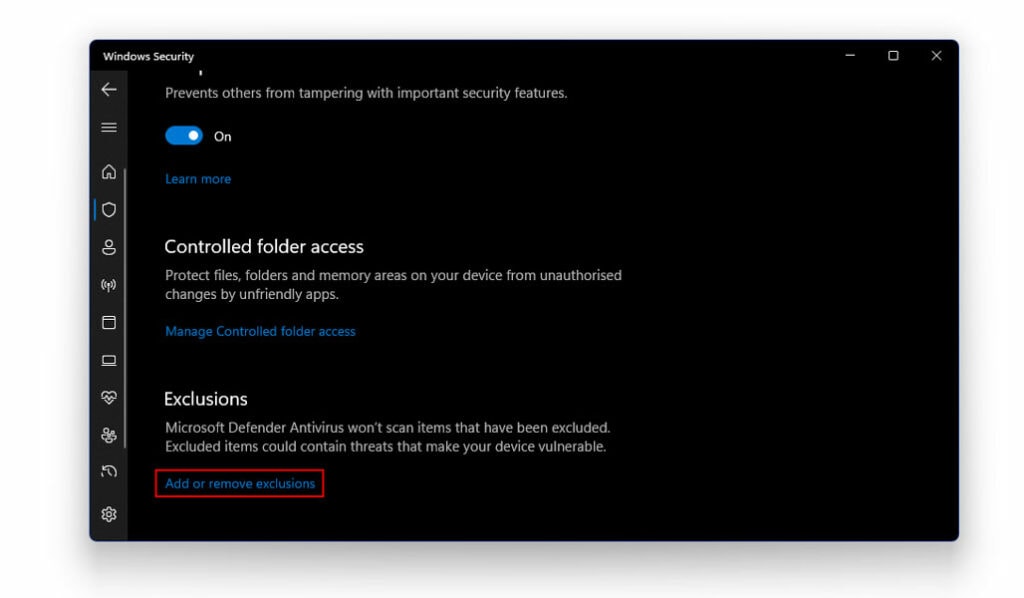
- Scroll down until you locate the Exclusions List
- Here, click on Add Or Remove Exclusions
- In the next window, click on Add An Exclusion
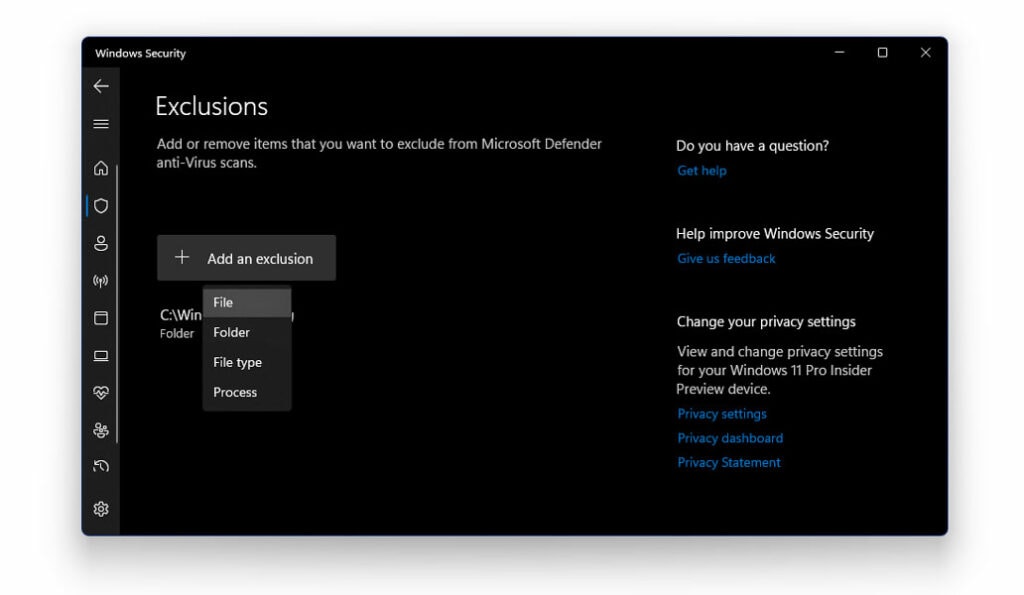
- Now in the window that appears, paste the complete path address of the antimalware service executable.
- Now, locate the file “MsMpEng” and click on Open
This will add the service to the exclusion list, meaning that Windows Defender will no longer scan this service.
3. Turn Off Windows Defender Using Windows Registry
To turn off Windows Defender using the Group Policy Editor, follow the given steps.
- Press Windows + R on your keyboard to open the Run dialogue box
- In the dialogue box, type the following command and hit Enter
regedit
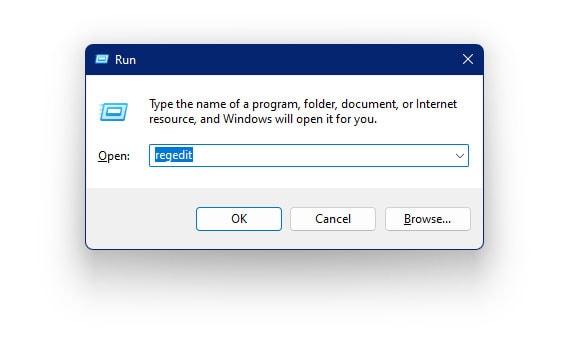
- The Windows Registry Editor is now visible on your screen
- Here, navigate to the below-mentioned path
HKEY_LOCAL_MACHINE\SOFTWARE\Policies\Microsoft\Windows Defender
- Right-click on Windows Defender
- Under New, tap on DWORD (32-bit value)
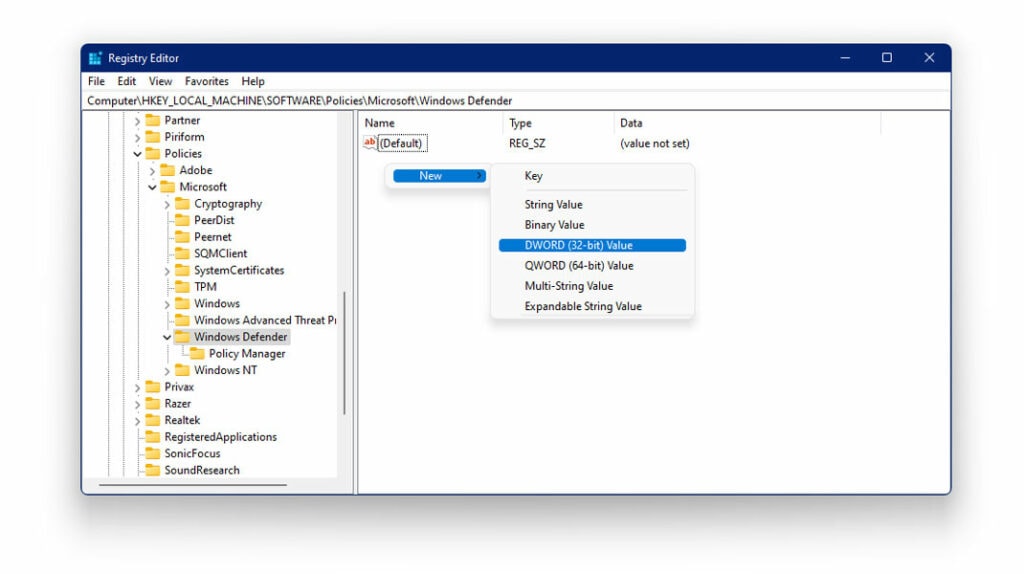
- Name the new key as DisableAntiSpyware
- Set the value to 1

This will disable Windows Defender on your system.
4. Turn off Real-Time Protection Using Group Policy Editor
To turn off real-time protection using the group policy editor, follow the given steps.
- Press Windows + R on your keyboard to open the Run dialogue box
- In the dialogue box, type the following command and hit Enter
gpedit.msc
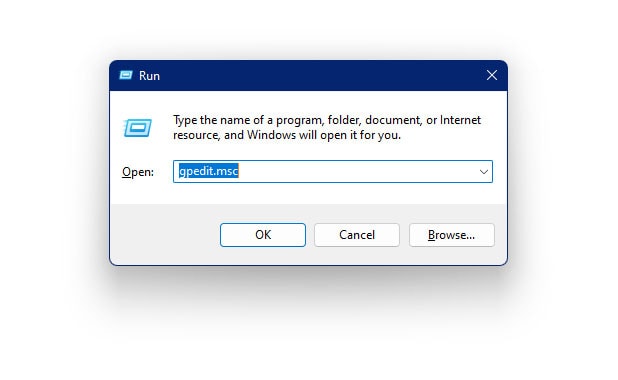
- The Local Group Policy Editor is now visible on your screen
- Here, navigate to the below-mentioned path
Computer Configuration>Administrative Templates>Windows Components>Microsoft Defender Antivirus>Real-Time Protection
- Extend the right navigation pane
- Here, locate and double click on the option which reads Turn Off Real-Time Protection
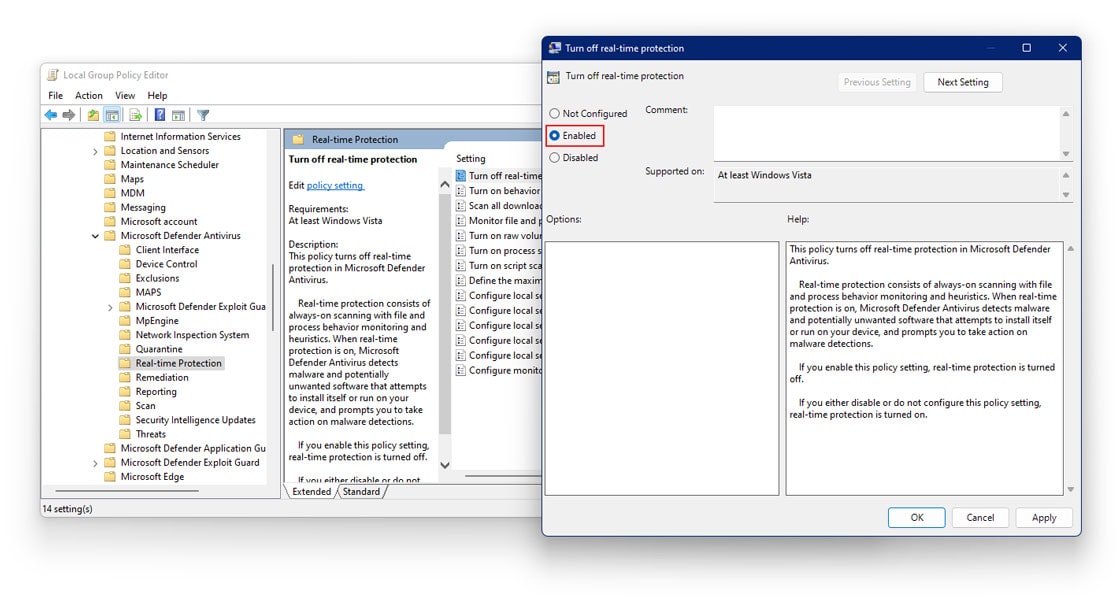
- Choose Enabled
5. Turn Off Windows Defender Using Group Policy Editor
- Press Windows + R on your keyboard to open the Run dialogue box
- In the dialogue box, type the following command and hit Enter
gpedit.msc
- The Local Group Policy Editor is now visible on your screen
- Here, navigate to the below-mentioned path
Computer Configuration>Administrative Templates>Windows Components>Microsoft Defender Antivirus
- Extend the right navigation pane
- Here, locate and click on the option which reads Turn Off Windows Defender
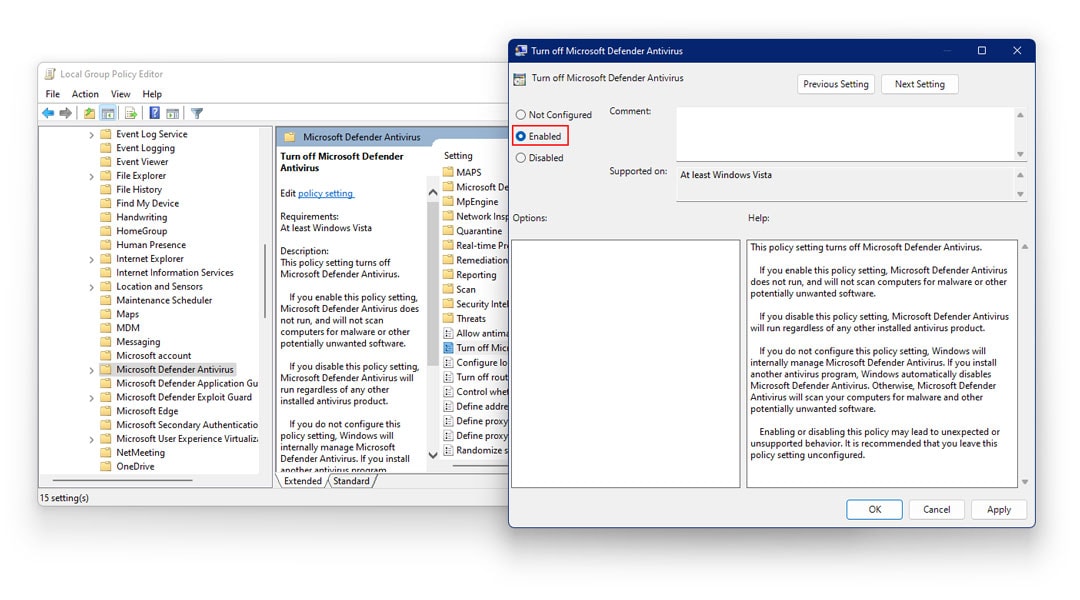
- Double click on it
- Choose Enabled
6. Remove Bad Updates Using Command Prompt
At times, some of the updates you run may be incompatible with your system. Also, some of the updates downloaded from unverified sources can contain hazardous or malicious files.
Moreover, these updates tend to leave behind a lot of junk and residual files that take up a chunk of your memory. Therefore, remove bad updates using the command prompt, follow the given steps.
- Go to the Start Menu
- In the Search bar, type cmd
- Right-click on Command Prompt
- Next, tap on Run As Administrator
- The command prompt will now be visible on your screen
- Here, type the following command and press Enter
“%PROGRAMFILES%\Windows Defender\MPCMDRUN.exe” - RemoveDefinitions - All

- Now, run the following command and press Enter
“%PROGRAMFILES%\Windows Defender\MPCMDRUN.exe” -SignatureUpdate
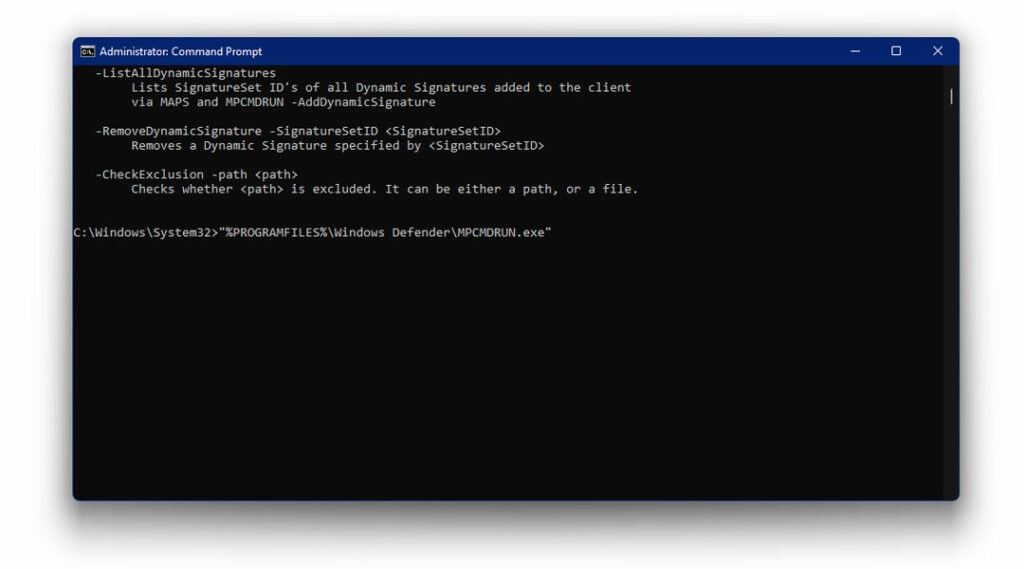
- Wait for the process to complete
- Check to see if the issue has been resolved
The Bottom Line
The anti malware service executable, a.k.a the Windows Defender, is your system’s first line of defense in the absence of antivirus software. It comes with real-time protection, which is constantly on the lookout for malicious files on your system.
However, large files, corrupt folders, or bad updates can tend to make the scan go on a lot longer. In this process, the Windows Defender takes up a huge chunk of your CPU memory which can hamper the overall functioning of your system. So if you too are suffering from the same problem, try applying the fixes mentioned above.