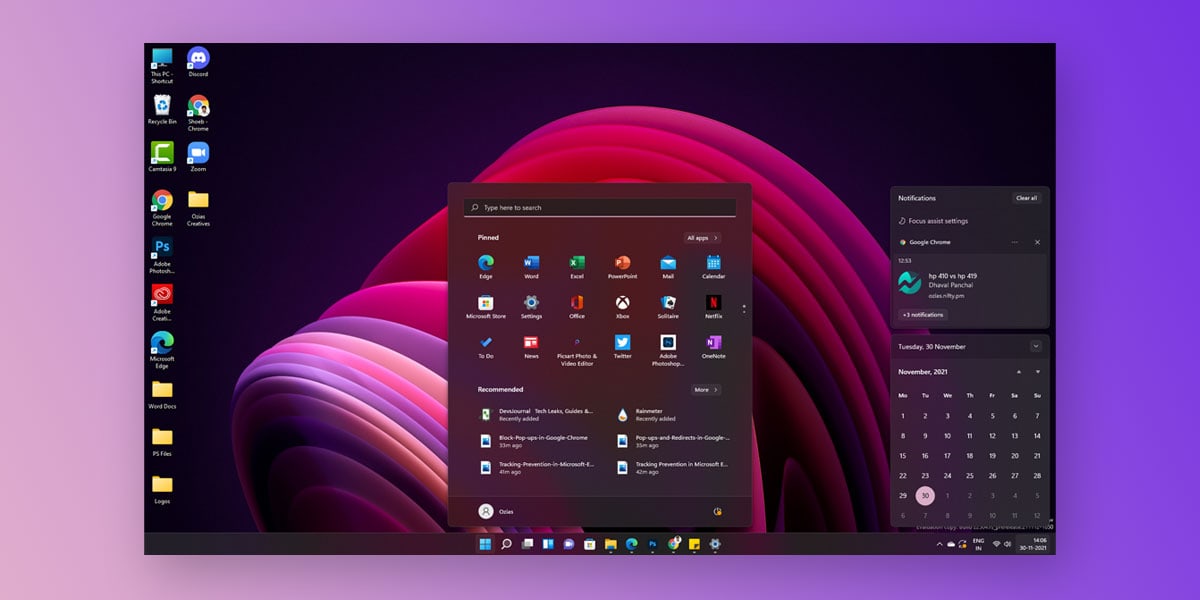
After a long day of sweating out at work, you finally come home to make the best of your me-time. As planned, you finally get started on the video game you’ve been waiting to get your hands on. But as things start getting intense, you automatically get redirected to the Windows homepage. Ignoring the notification, you return to gaming. However, throughout the game, you get countless pop-ups and notifications on your screen that can leave you frustrated.
These pop-ups, notifications, and ads are very off-putting and can largely hamper your workflow by throwing you off it at times. In order to curb these annoyances, you go to great lengths. From downloading different third-party applications to deleting an application altogether, we leave no stone untouched. But despite all our efforts, these pop-ups continue to be of nuisance to us. These pop-ups are frustrating enough for us to even consider throwing our whole system out the door.
However, Windows 11 has several great features that can stop the ads popping up in bottom right corner of desktop. In this article, we will walk you through different ways on how to stop pop-ups on Windows 11.
How to Stop Pop-up Notifications on Windows 11
If nothing else gets your attention, these stupid annoying pop-ups surely will. But thanks to Windows 11, you now get numerous utility features that can stop the ads popping up in the bottom right corner of the desktop. Here are all the ways using which you can stop these ridiculous pop-ups and notifications in Windows 11.
1. Hide Notifications using Focus Assist
To stop pop-ups using focus assist, follow the given steps
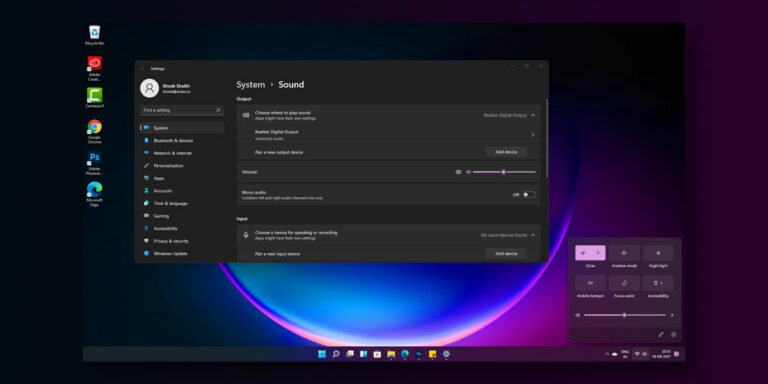
- Click on the Wi-fi & Speaker section on the right corner of your taskbar
- This will bring up the Notifications Widget on your screen
- Here, right-click on Focus Assist Settings & Select Go to Settings
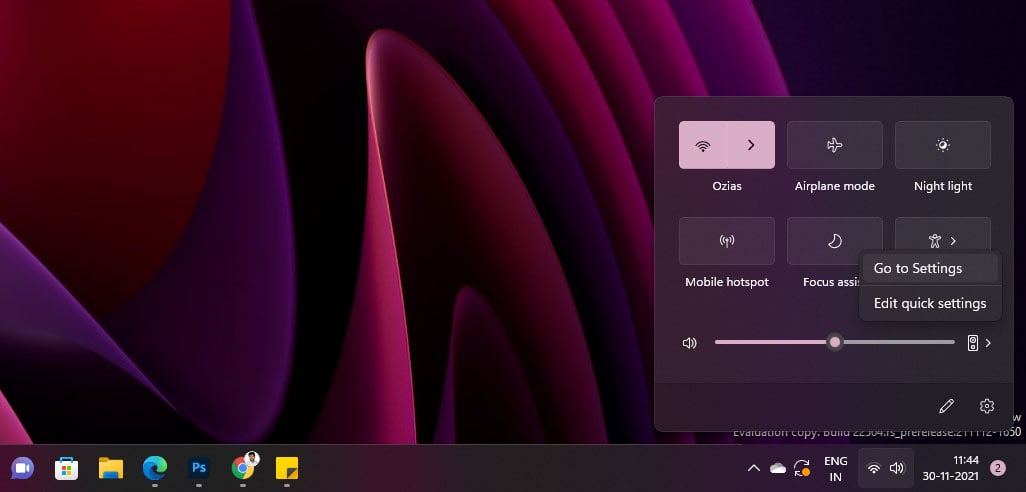
- You will now see Three options. From the options given, select Alarms Only
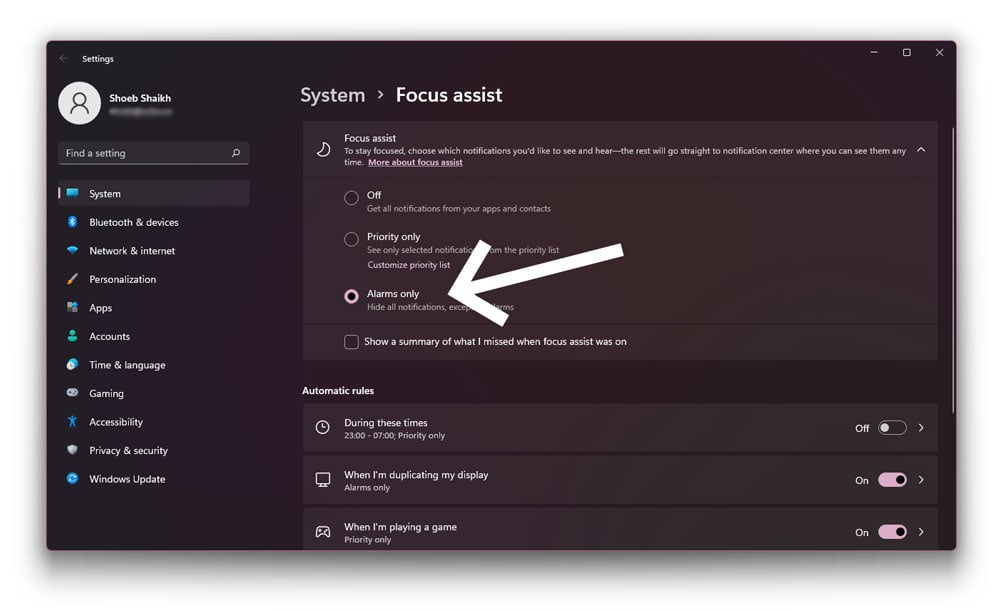
Selecting this option will completely stop notifications and ads from popping up on your Windows 11 system. As the option state, this option will only show the alarms you’ve set and send them straight to the notifications center. If you have no alarms set, then there won’t be any pop-ups and notifications whatsoever.
There is also a Priority Only mode that will help you select the notifications you want to get such as calls, texts, reminders, and so on. By selecting the Customize Priority List, you will be able to select the notifications as per your preferences.
Note: Using the Focus Assist will only stop the pop-ups, ads, and notifications from appearing on your screen. Meanwhile, they will be stored in the Notifications Centre if you wish to check them.
2. Turn off Tips and Suggestions Notifications
While tips and suggestions tend to come in handy at times, they tend to become obsolete quickly. Here is how you can turn off tips and suggestions
- Right-click on Start Menu & select Settings
- Go to System > Select Notifications on the right navigation pane
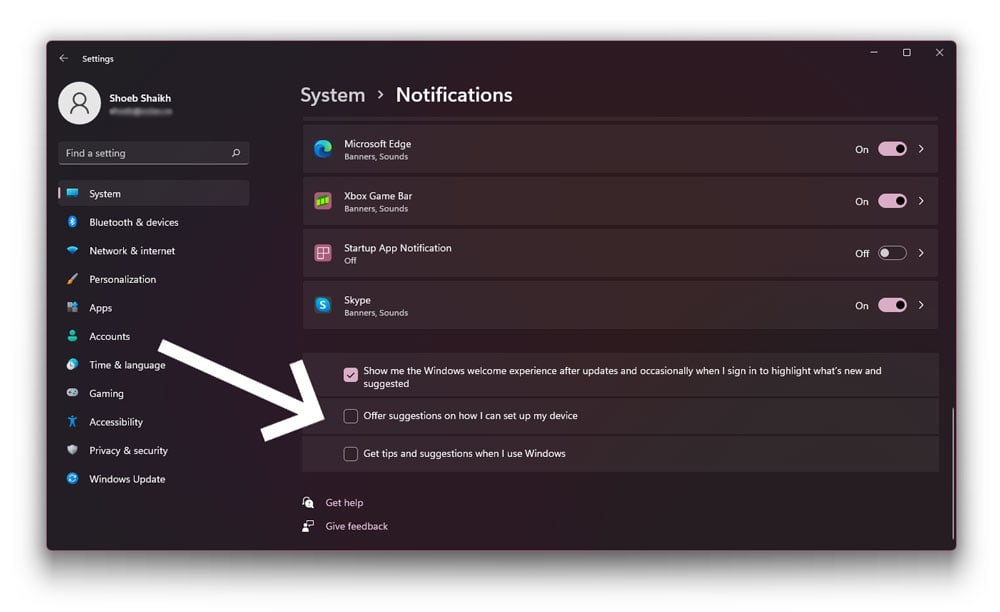
- Scroll down and uncheck the boxes to the following options
- Offer suggestions on how I can set up my device
- Get tips and suggestions when I use Windows
3. Turn off Manufacturer’s App Notifications
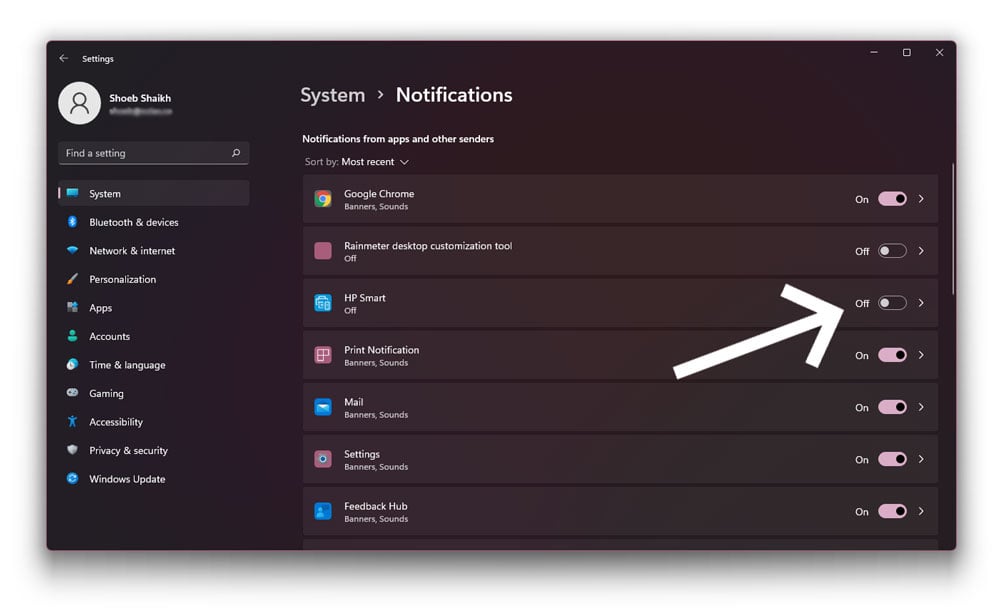
Your manufacturer tends to keep you in the loop via notifications regarding regular updates. However, HP and Dell have access to notifications using which they show you constant pop-ups and ads. Use the following steps to turn of the manufacturer’s app notifications
- Right-click on Start Menu & select Settings
- Go to System > Select Notifications on the right navigation pane
- Now, uncheck all the applications that came pre-installed on your computer
4. Completely Turn off App Notifications
To completely turn off all the app notifications, follow the given steps
- Right-click on Start Menu & Select Settings
- Go to System > Select Notifications on the right navigation pane
- Now, disable the toggle next to Notifications
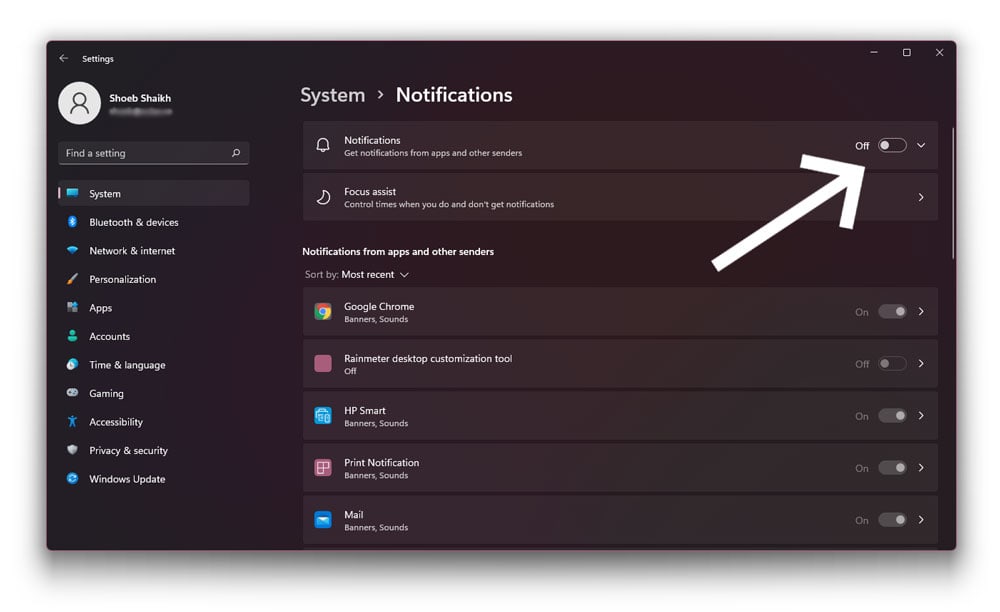
This will completely disable each app notifications in your system and all apps. Turning off all the app notifications will disable the notification center. To enable app notifications, repeat all the given steps and enable the toggle next to Notifications.
Alternatively, you can turn off notifications for certain apps. To turn off notifications for certain apps on Windows 11, just toggle off the notifications for any listed app under Notifications from apps and other senders.
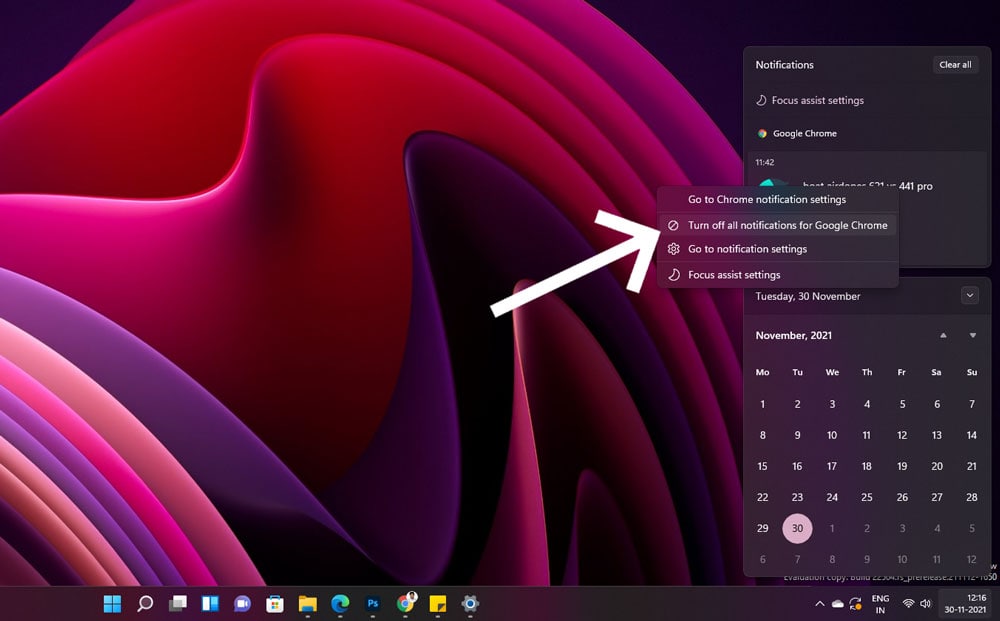
You can also turn off notifications from navigation pane. Right-click on the app’s recent notification in the notification area. Next, click on Turn off all notifications for “Application name”.
How to Stop Pop-up Ads on Windows 11
Pop-up ads are perhaps one of the worst you have encountered when working on your computer. But there are quick fixes that will stop ads popping up in bottom right corner of desktop in Windows 11.
1. Turn off Sync Provider Notifications
Sync Ads generally arrive when you’ve signed to Microsoft’s services such as OneDrive and Office. While these notifications are irksome, they tend to occupy all the space in the notification area. Here is how you can turn off sync provider notifications
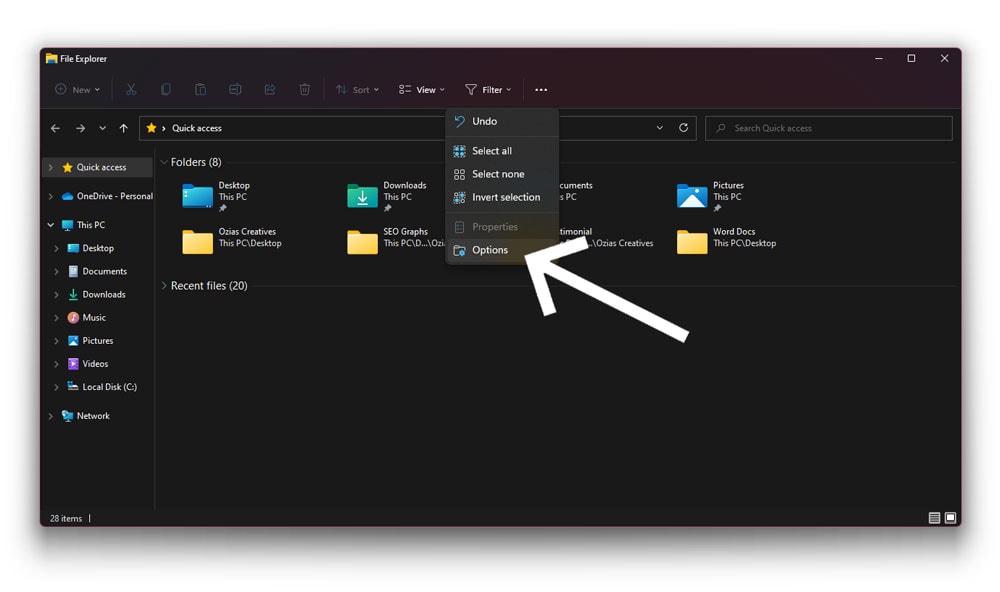
- Launch File Explorer
- Click on the Ellipsis button on the top & Go to Options
- Tap View
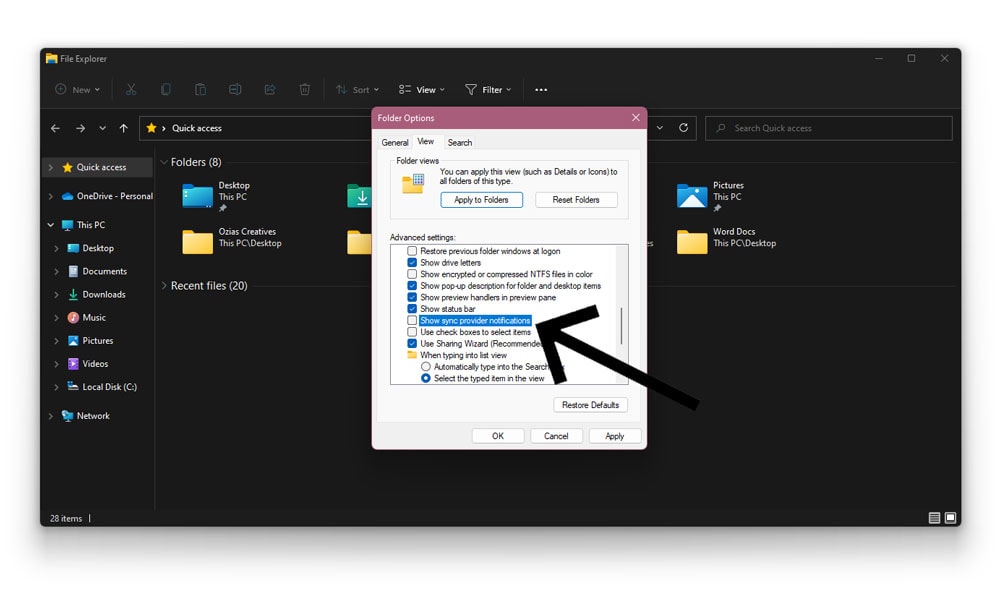
- Scroll down and locate Advanced Settings
- Under Advanced Settings, uncheck Show Sync Provider Notifications & Select OK
2. Disable App Access to your Advertising ID
The Advertising ID is generally a database Microsoft uses to keep track of all your usages and interests. Using this database, Microsoft displays ads within applications that are relevant to your choices. But if you are someone who cares for these targeted advertisements, here is how you can turn them off
- Right-click on Start Menu & Select Settings
- Click on Privacy & Security
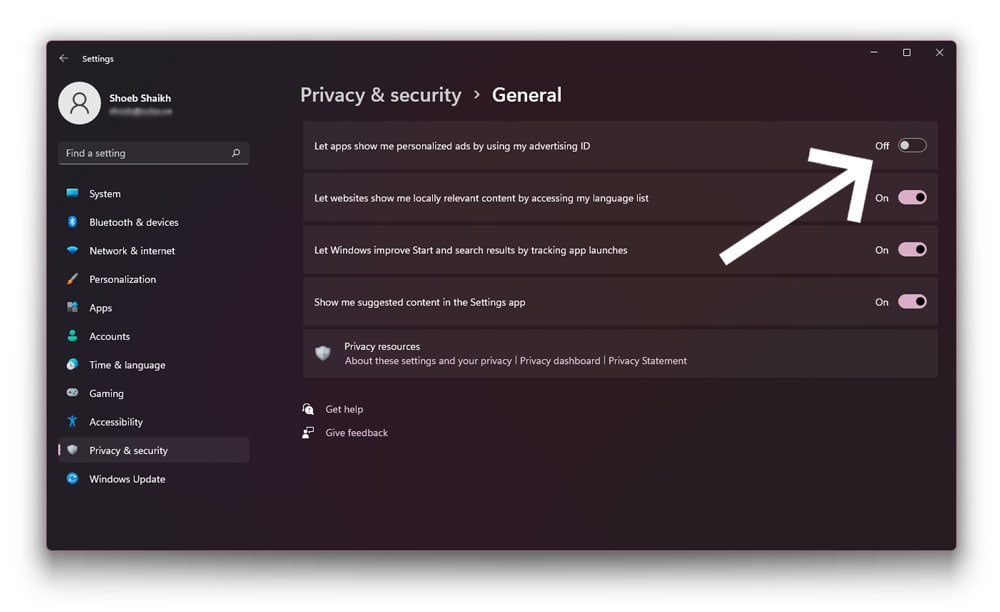
- Under Windows Permissions, Select General
- Turn the toggle off next to Let apps show me personalized ads by using my advertising ID.
3. Block Pop-ups in Browsers
Your system isn’t the only thing that keeps hammering out pop-ups on your computer. When you take care of the system notifications, Windows gets browser pop-ups to annoy you. Here is how you can block pop-ups in different browsers.
> Microsoft Edge
Since Edge is the default Windows browser, the majority of the users tend to use it. To block pop-ups in the Microsoft Edge, follow the given steps
- Open Microsoft Edge
- Click on the three-horizontal dots on the top corner & Tap Settings
- Select Cookies and site permissions
- Scroll down, locate, and click on Pop-ups and redirects
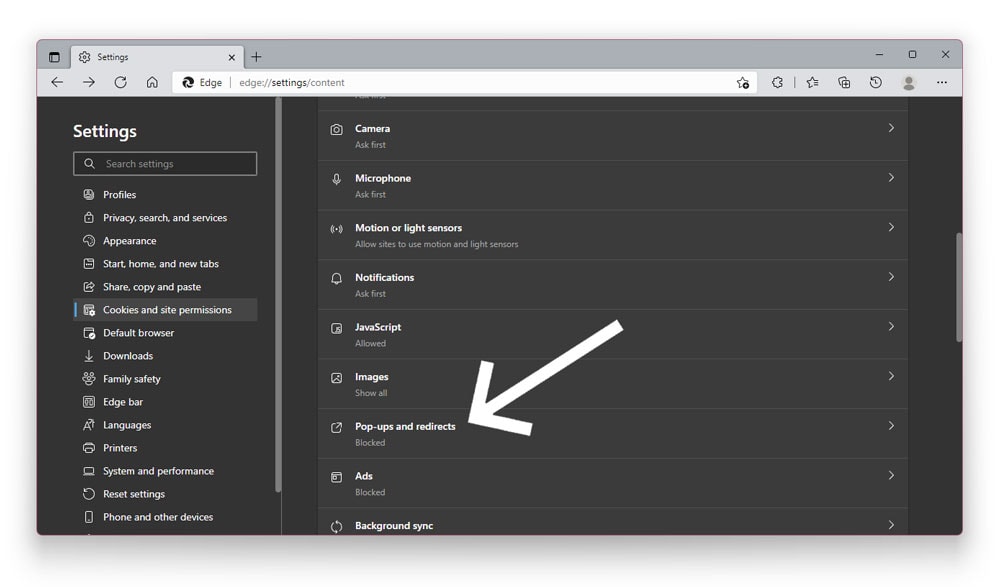
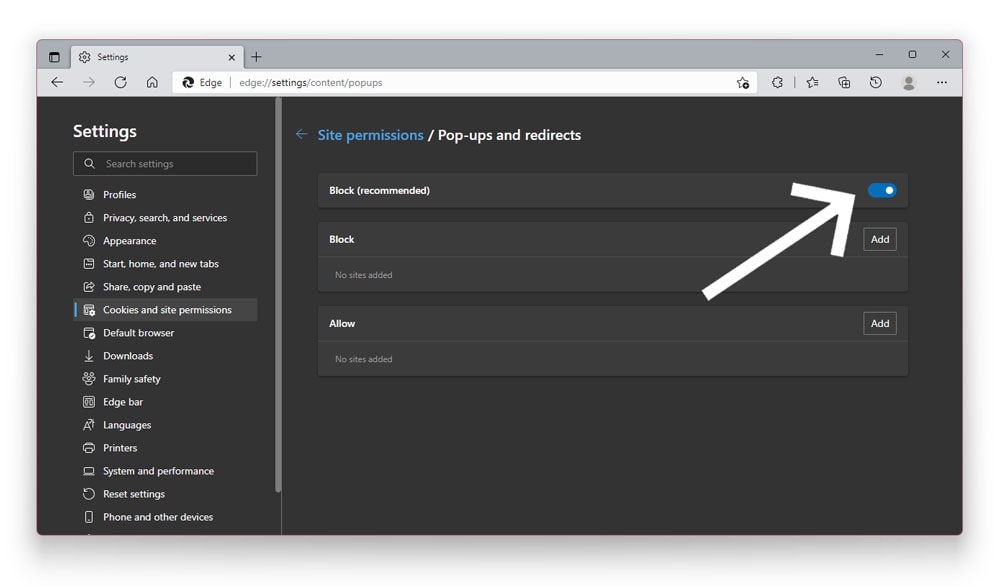
- Turn on the toggle next to Block. This will turn off the browser pop-ups
Once you have taken care of all this, you will need to turn on the “Tracking Prevention” feature. This will minimise data trafficking and block all the pop-ups concerning that.
- Open Microsoft Edge
- Click on the three-horizontal dots on the top corner & Tap Settings
- Select Privacy, Search, and Services
- Ensure that “Tracking Prevention” is toggled on
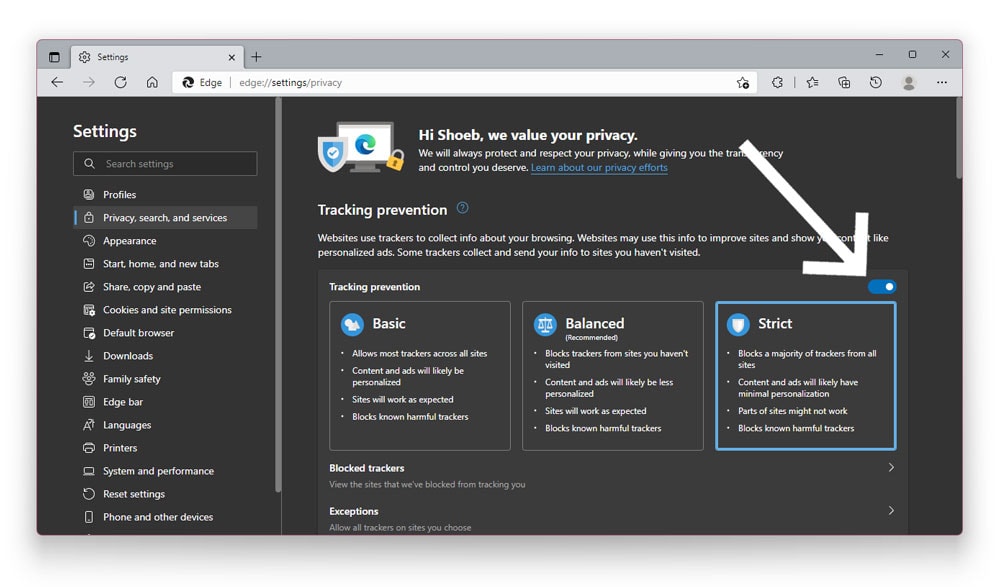
- Select Strict to block all trackers from different websites
> Google Chrome
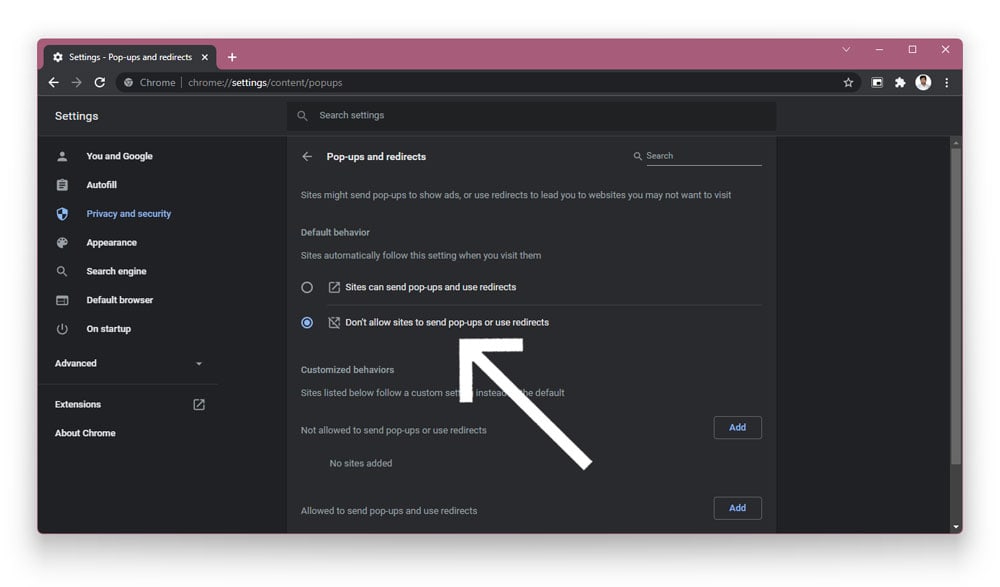
To block pop-ups and ads in Google Chrome, follow the given steps
- Launch Google Chrome
- Click on the three-horizontal dots on the top corner & Tap Settings
- Go to Privacy and security
- Select Site Settings & Scroll and find Pop-ups & redirects
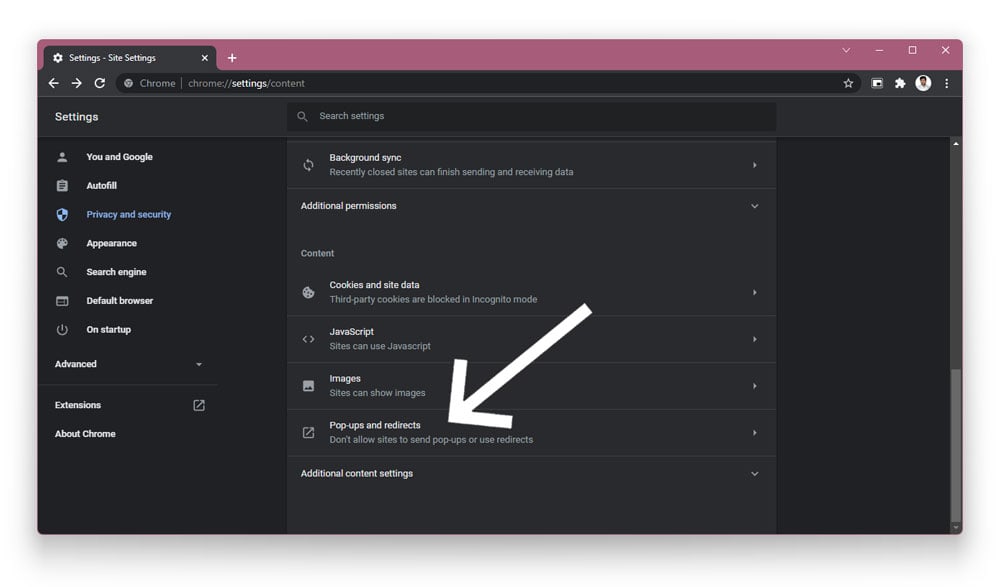
- Here, click on Don’t allow sites to send pop-ups or use redirects
> Use Ad Blocking Extensions
Ad blockers are a thing in demand. The majority of the users nowadays prefer Ad Blocking Extension for their browsers. These extensions are quite strict in their implementation. Turning on these ad-blocking extensions will block both relevant and irrelevant ads. Adblocker extensions are generally third party applications that make a website completely inaccessible. The majority of these extensions give you an option to categorize your websites into a white or blacklist.
Conclusion
We hope our article was able to successfully walk you through removing annoying ads, pop-ups, and notifications on your Windows 11 system. It doesn’t matter whether these pop-ups are generated by your Windows 11 system or the browser, this guide will walk you through everything you need to stop ads popping up in the bottom right corner of the desktop.
