Windows 11 is finally here and we cannot keep calm about it. As promised earlier, Windows finally unveiled its brand new OS this year. While tech enthusiasts already got a peek of what they can expect from Windows 11 during the alleged OS leak earlier this year, the original version tells a whole different story. However, the only thing that stands true at the moment is that Windows 11 sports a sizeable upgrade over its predecessor.
The all-new Windows 11 comes with a simplified design with an onus on enhancing productivity and the overall user experience. People with Windows 10 and compatible hardware have already received their respective Windows 11 updates. Although, users have received a few concerns upon updating particularly regarding the drag-and-drop feature that was present in Windows 10 but isn’t in Windows 11.
While some initially hoped for this to be a bug, they were disappointed when the company announced that it was an intended aspect of Windows 11. But the good news is that the Microsoft is going to bring back the drag and drop in Windows 11 and it will be available to all the users at some point in 2022. However, thanks to Modders and different third-party developers, you can revive drag and drop in Windows 11 in the current version.
So, if you are among those who cannot wait until 2022, this article will walk you through the different methods using which you can enable drag and drop in Windows 11.
Is the Drag and Drop feature officially discontinued by Microsoft?
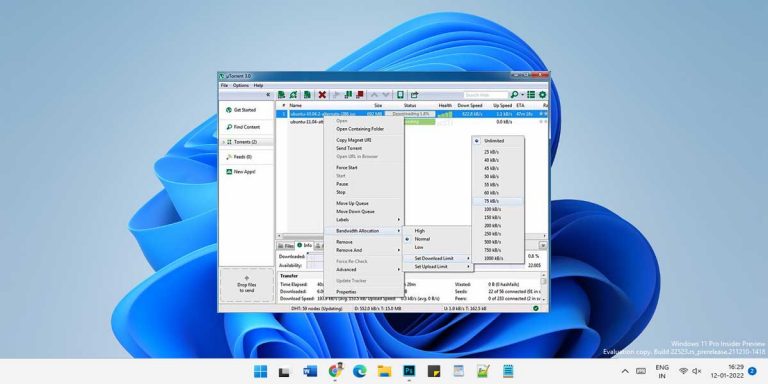
Ever since Windows first introduced the drag and drop functionality feature, it is being used by countless users every day. It allows you to organize your files, folders, and other important stuff easily using simple mouse movements. This feature is much more handy than cutting pasting every item individually from one location to another on your system.
As we mentioned earlier, drag-and-drop was one of the major features Microsoft discontinued during the launch of Windows 11. This decision proved to be controversial. But following dozens of requests on Microsoft’s official feedback hub, Microsoft plans to bring back drag and drop in Windows 11. While the exact time frame is yet to be announced, currently Microsoft is keen to restore drag and drop to taskbar in Windows 11 at some point in 2022.
How to Enable Drag and Drop in Windows 11?
As we mentioned earlier, the discontinued drag and drop feature is an intended aspect of the new Windows OS. Unfortunately, this decision has called users worldwide to erupt, with many calling the move as a bitter disappointment.
But the good news is that the it is possible to enable the drag and drop feature in Windows 11. Furthermore, you can use these methods to enable drag-and-drop and also to adjust the drag-and-drop sensitivity settings in Windows 11.
Note: These fixes are arranged as per the severity of the problem. Therefore, it is vital that you apply these fixes serially and do not jump directly to the last one. Also, the first fix will help enable the drag and drop Windows 11 functionality feature. Meanwhile, the rest of the solutions will help you fix and restore the drag and drop feature in case it stops working.
1. Drag and Drop in Windows 11 Using Alt+Tab
This is one of the easiest method if you want to drag and drop files in windows 11.
- Press, and hold down, the button on the mouse, to “grab” the file you want to drop.
- “Drag” the file and press Alt+Tab button. Keep pressing Tab while simultaneously holding Alt and mouse button to navigate between files. Release the Alt+Tab button once you are on the desired location.
- Now “Drop” the file by releasing the mouse button.
To be more clear “How to Drag and Drop Files in Windows 11” you can refer the video below:
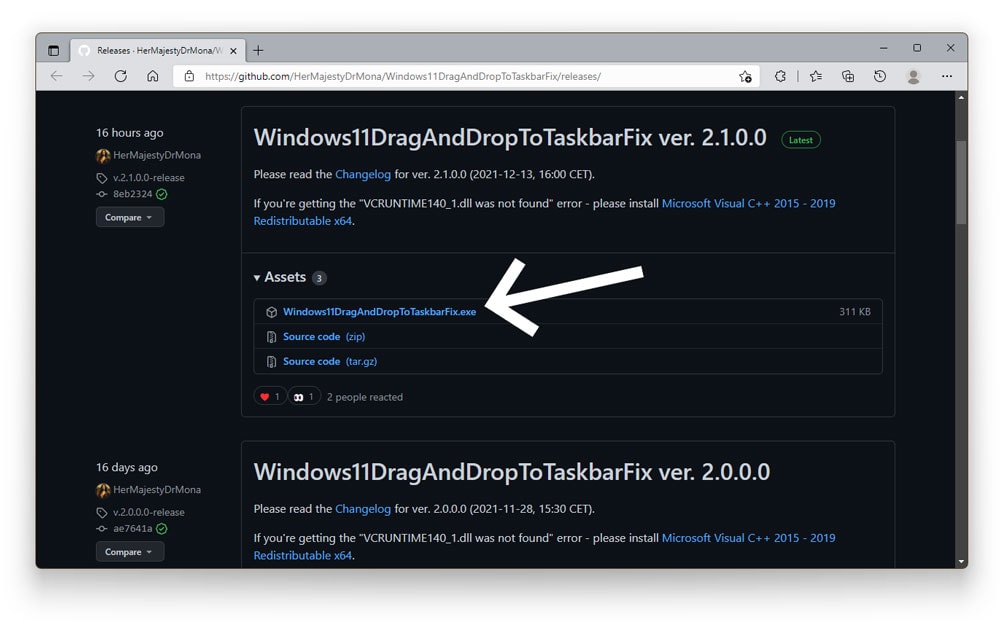
2. Using Windows11DragAndDropToTaskbarFix
Thanks to third-party developers, you can now enjoy the drag-and-drop feature in Windows 11 once again. However, this will need you to download a few files from third-party sources off the Internet.
To use the Windows11DragandDropToTaskbarFix, follow the given fix
- Visit this GitHub page.
- When on the page, locate and click on the Windows11DragAndDropToTaskbarFix.exe file to download it.
- Once the download is done, open and run the downloaded file
- Now, go to the ∧ icon on your taskbar to open the system tray
- Click on the Mona Lisa icon. This is the Windows11draganddroptotaskbarfix icon
- Now, try dragging any file from a folder and dropping it to Photoshop or any other app present on the taskbar.
- You will note that the drag-and-drop feature has been enabled on your Windows 11 system.
Note: Windows11DragAndDropToTaskbarFix does not support pinning apps/software to taskbar using drag and drop gesture.
Further, if you want to configure the startup action of this application, you can click on the Mona Lisa icon and then select Configure…, a notepad will open. If you want the application to run automatically on startup then keep AutomaticallyRunThisProgramOnStartup=1 as it is, change it to 0 if you want to start it manually.
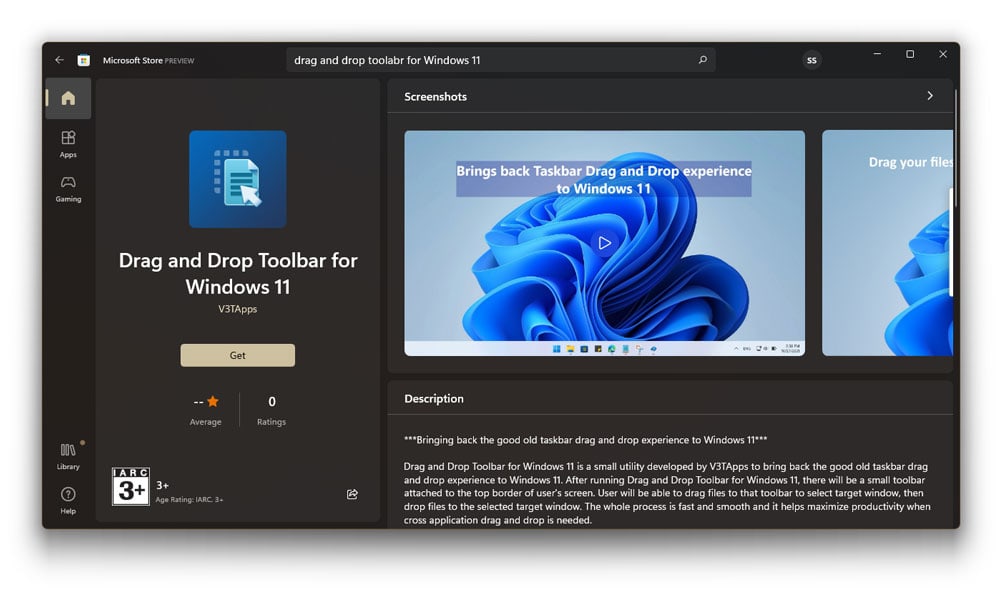
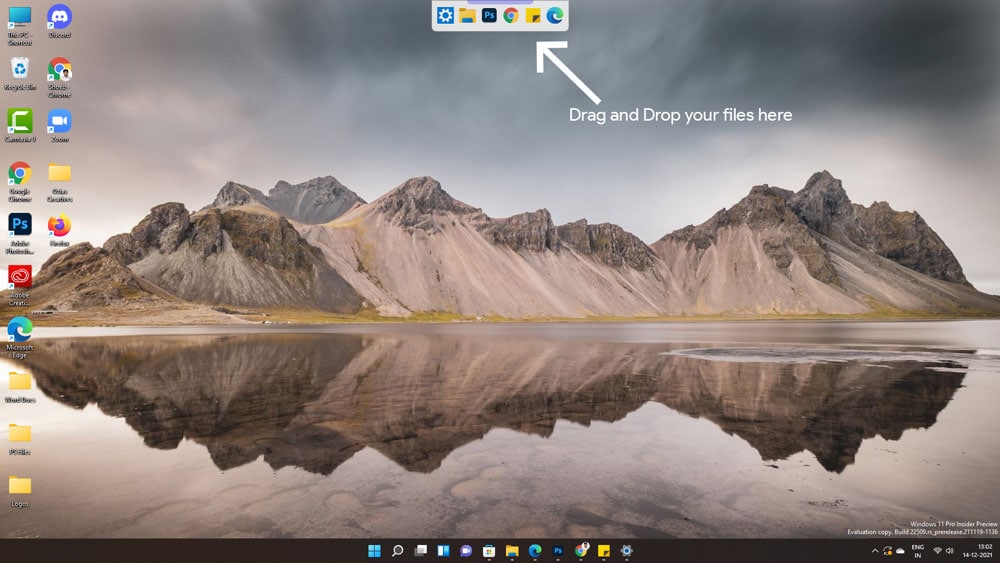
3. Using Drag and Drop Toolbar for Windows 11
At times, you are compelled to download applications to make a basic feature of your computer run. But since the drag and drop toolbar doesn’t return anytime soon, you can opt to download the drag and drop toolbar for Windows 11. Downloading this application automatically adds a replicated taskbar to the top of your screen.
To configure and use the drag and drop toolbar for windows 11, follow the given steps
- Download and Install the Drag and Drop Toolbar for Windows from below

- Once the application has been installed, you will see a new taskbar allotted on the top of your screen
- You can drag any file onto the top-taskbar and drop it into the destination folder
4. Enable Drag and Drop using Windows Registry Editor
You can enable and adjust the drag and drop sensitivity settings in Windows by creating a system restore point in the Windows Registry Editor. For example, to enable drag and drop in Windows 11 using the Windows Registry Editor, follow the given steps.
- Press Windows + R on your keyboard
- This will open the Run command box.
- In the command box, type in the following command and press OK.
regedit

- The Windows Registry Editor is now visible on your screen
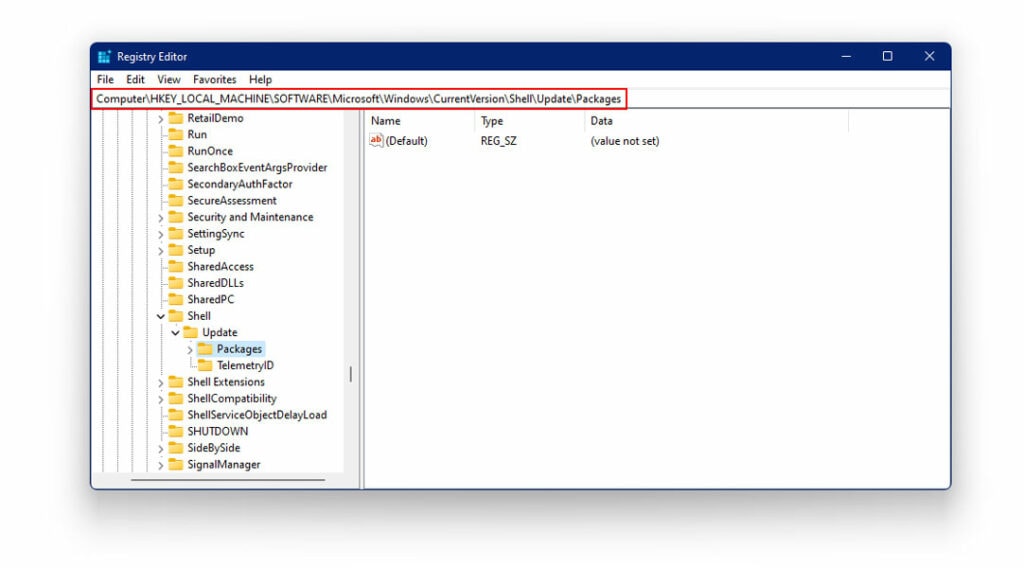
- Now, navigate to the below-mentioned path
HKEY_LOCAL_MACHINE\SOFTWARE\Microsoft\Windows\CurrentVersion\Shell \Update\Packages
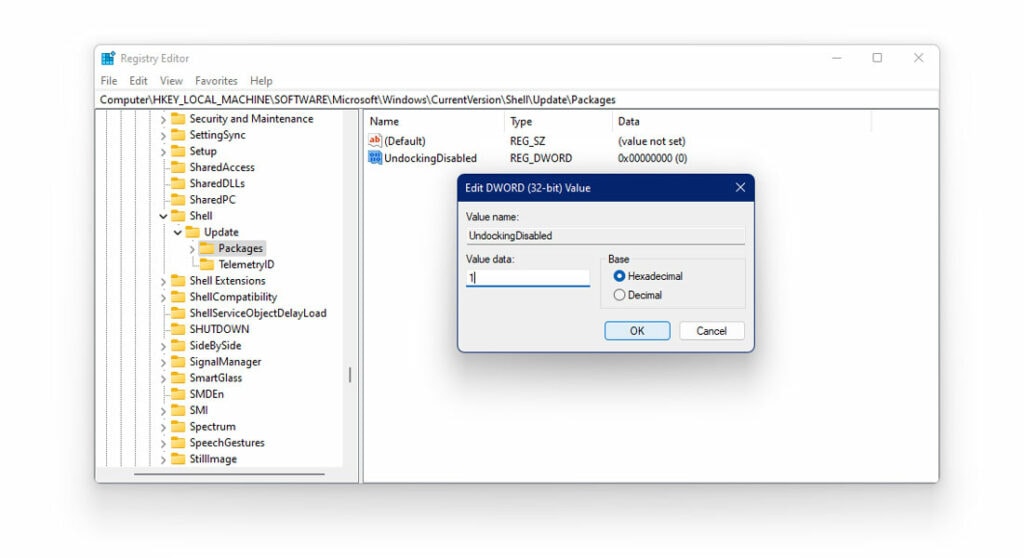
- Now, right-click on the blank white space on the right navigation pane
- Here, choose New > DWORD (32-bit) Value.

- This will create a new value in the registry editor
- Right-click on this newly created value file
- Choose Rename
- Rename this value file as follows
UndockingDisabled
- Right-click on UndockingDisabled
- Select Modify
- Now, change the value to 0 to 1
- Click OK to save the settings
Now restart your computer. After restart, you will notice the taskbar will appear same as like in Windows 10 and the drag and drop functionality feature will now be restored on your computer.
The drawback of this method is that the Start, Search and the Cortana will not open from the taskbar. You will see the icons however, they won’t launch.
To disable the drag and drop feature and restore back to normal Windows 11, navigate to registry editor to the same folder mentioned above and right click on “UndockingDisabled” and delete it. Restart your system and you’ll be back to your normal Windows 11 system.
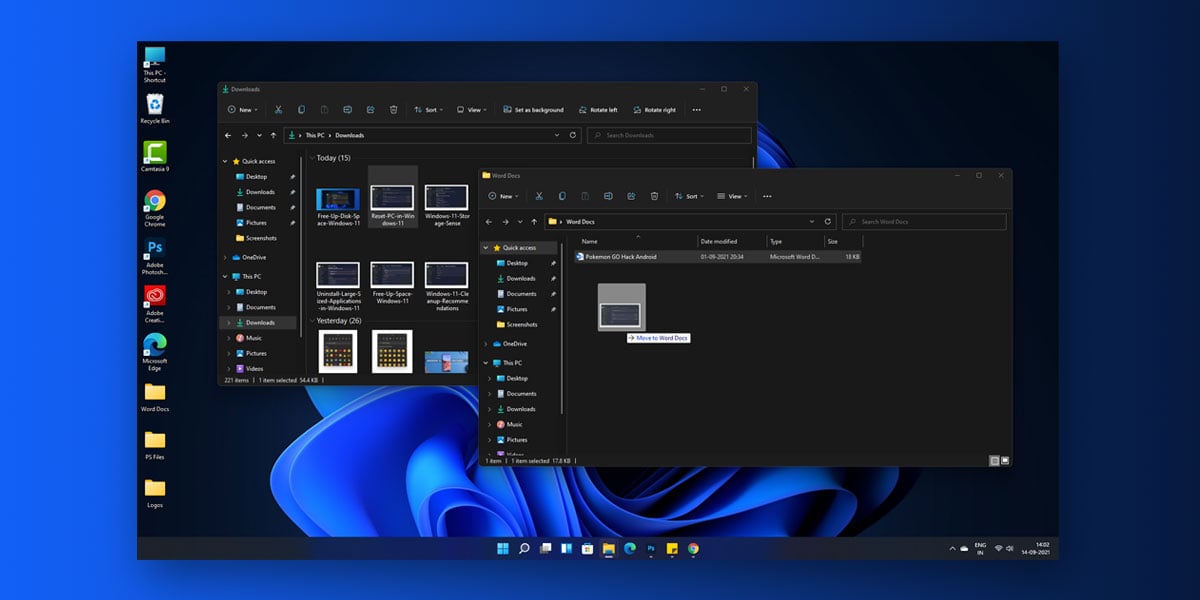
5. Drag and Drop Files in Windows 11 Between the Folders
This is an easy fix to drag and drop files in Windows 11 between the folders
- Open the two folders (drag and drop file folders) side by side.
- Open the folder from which you want to drag the file. Press, and hold down, the button on the mouse, to “grab” the file you want to drop.
- “Drag” the file to the desired location by moving the pointer.
- “Drop” the object by releasing the button into your desired location
The Bottom Line
Currently, the drag and drop taskbar is one of the many features that Microsoft has disabled for Windows 11. Given the importance of the drag-and-drop taskbar in every Windows, Microsoft received immense criticism from all ends following this decision. Thanks to Microsoft’s feedback hub, Microsoft has confirmed that it is indeed working on bringing back the drag-and-drop feature in Windows 11.
In addition, Microsoft is all set to unveil a few other features in the coming year. While the exact date is yet to be revealed, it is quite certain that these updates will be available to every Windows 11 user post the Christmas holidays.
We hope our article was able to successfully walk you through enabling drag and drop in Windows 11. The fixes mentioned above will work just fine in enabling or adjusting the drag and drop feature in Windows 11.


don’t necessarily need to restart the pc, signing off works fine and is the fast way
the drag and drop taskbar is the best alternative choice for me.
Thanks a lot Shoeb, loved the article, you saved me a ton of time with this. Hope you make more such articles with alternate method of fixes.
Thanks for sharing the information. Nice that you show several options and mention the drawbacks of these.
I especially like option 2. Using Windows11DragAndDropToTaskbarFix as it comes close to restoring the Windows 10 functionality. However, if I understand correctly, it does not work the same as in Windows 10. In Windows 10 I could drag a file to the application on the Taskbar and after dropping the file, the application would open, showing the file that was dragged. In Windows 11 this only works when I have opened the application prior to dragging the file (and even then I have to wait for the application screen to open first before finally dropping the file). Is this correct, or am I perhaps missing something in the settings of the fix?
Thanks for any reply.
Hi Henk,
I am glad that you liked the article and thanks for addressing the issue.
You can try this configuration –
1. Click on the Mona Lisa icon from the bottom right of your screen
2. Select “Configure…”
3. Now, paste this – AutoOpenPinnedAppsEvenWhenNoWindowActive=1
This will Open programs under the pinned icons, even when there is no active window. You can add more such configurations using this link.
Hi, I used the regedit method. However, Windows 10 taskbar has been appearing but somehow windows key and start button not working. Kindly share the patch for this otherwise need to revert back to the regedit and using ALT+TAB is a temporary option. Please suggest. Regards
Hi Tejveer,
I have already mentioned in the note that the drawback of this method is that the Start, Search and the Cortana will not open from the taskbar. You will see the icons however, they won’t launch. Unfortunately, I haven’t found a patch yet. I will certainly update the article whenever I found one. Until then it’s better to revert back to normal Windows 11 taskbar & use ALT+TAB method.
Thanks,
Hi Shoeb, I have the same problem as Tejveer, the Windows key and start button don’t work anymore. I also can’t search. I have no idea how to revert back to normal Windows, can you help?
Hi Tejveer, did you find a way to revert back to the way it was before? I deleted UndockingDisabled but it didn’t work. I have had no success in finding a solution so far. Thanks in advance for your help.