Windows 11 has carried forward the widely used Mail app from its previous 10th generation, and given it a somewhat aesthetic overhaul. While we appreciate the apparent improvements, there’s no denying the additional issues accompanying the updated Mail app.
Many regular users of Windows 11’s default email client have been raising complaints about the Microsoft Mail app not working, and in this article, we shall get to the bottom of that. We have provided 10 different fixes to restore the proper functionality of the Windows 11 Mail app.
10 Ways to Fix Windows 11 Mail Not Working Issue
The underlying issue behind Windows 11 Mail app not working can be multiple, but a few simple yet effective steps can fix it promptly. All that matters is whether you are willing to go through trial and error to find the fix that works in your case.
Read on for the 10 fixes for Windows 11 mail not working issue:
1. Check your Internet Connection
Oftentimes, you could be experiencing issues with the normal functioning of the Mail app due to an unstable internet connection. If you are on an unstable or slow network, we recommend you switch to a better network and then retry launching the Mail app on your device. This often leads to better results.
VPN brings down your internet speed considerably. If you have VPN software of any kind running, disable them for the time being. If your Windows 11 email problems persist, we have more fixes at our disposal.
2. Send Email through Web Client or App
Another viable way to bypass the issue of Microsoft Mail app not working is to send your mails through the web client or app. This is a rather simple way to avoid the issues altogether.
To cross-check if your e-mail server is working properly, try to send a dummy mail via your browser or any other alternative Windows email app. They all work exceptionally well, and a little digging can help you find one that works well for your needs.
3. Run Troubleshooter
Windows 11 boasts a diverse range of troubleshooters, and they are capable of detecting the most mischievous of issues at the tap of a button, and resolve it promptly. If Windows 11 email problems keep you from using your productivity hours well, here are some steps, following which might help your device troubleshoot the issue:
- Press on Windows + I.
- Under ‘System’, Click on ‘Troubleshoot’.
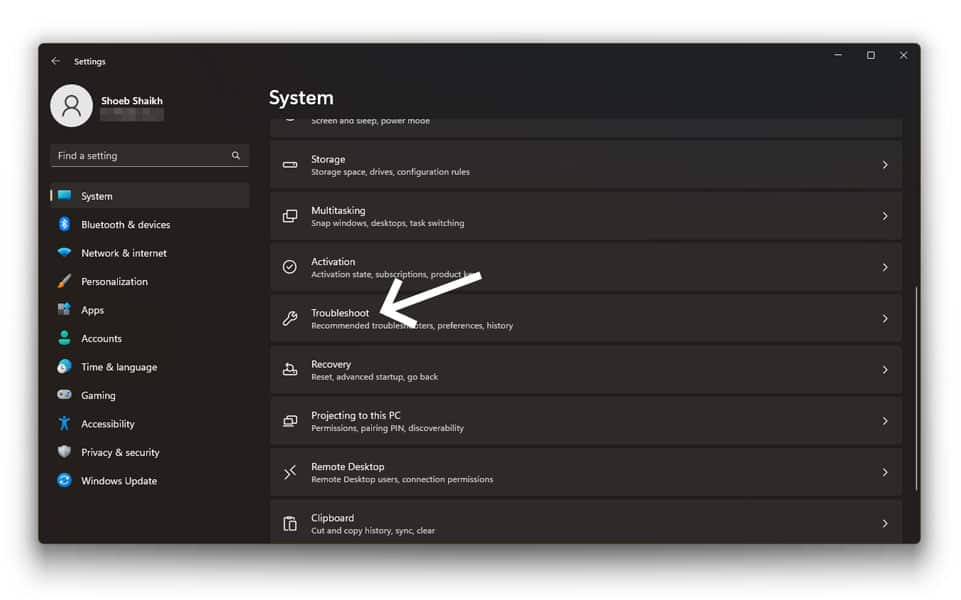
- Tap on ‘Other troubleshooters’.
- Scroll down and click the ‘Run’ button in front of ‘Windows Store Apps’.
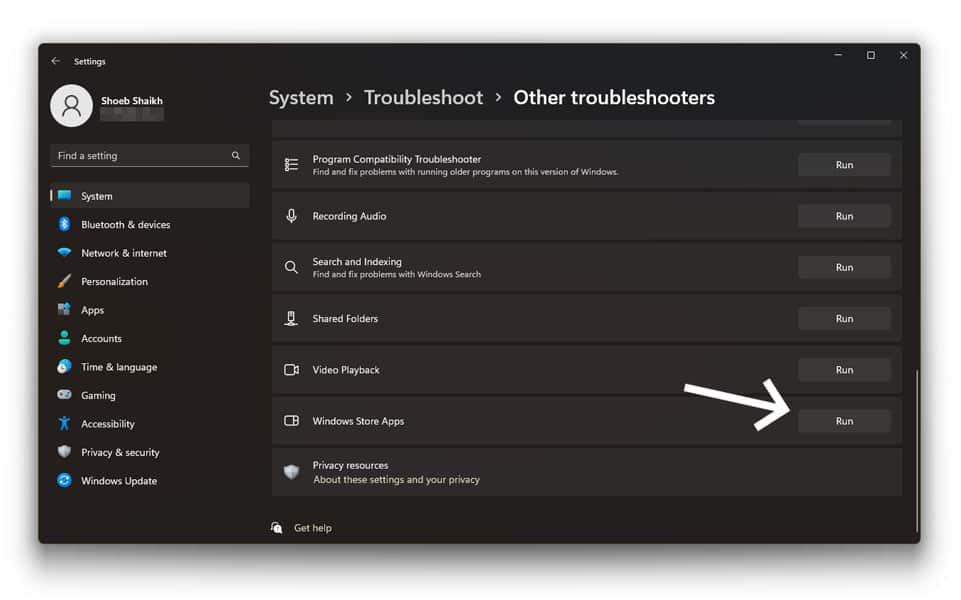
If this does not lead to the desirable results, it’s time to move on to the next fix in the list.
4. Turn Off Windows Security
Your Windows 11 email problems could be stemming from features enabled in Windows Security. Your firewall could be preventing the smooth functionality of the Mail app. You may consider temporarily disabling the Windows Security feature to restore functionality of Windows 11 mail.
Here’s how to go about it:
- Type in ‘Windows Security’ in the Search bar, and tap it.
- Click on the three-bar menu present on the top-left corner.
- Select ‘Firewall & network protection’ to access it.
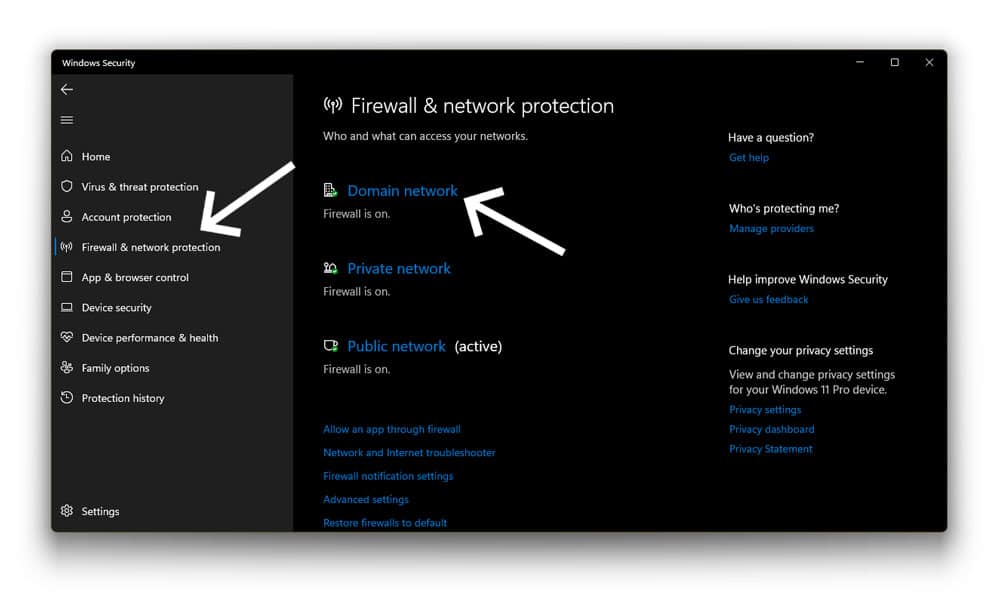
- Out of the 3 network types you see, choose ‘Domain network.’
- Toggle ‘Microsoft Defender Firewall’ off.
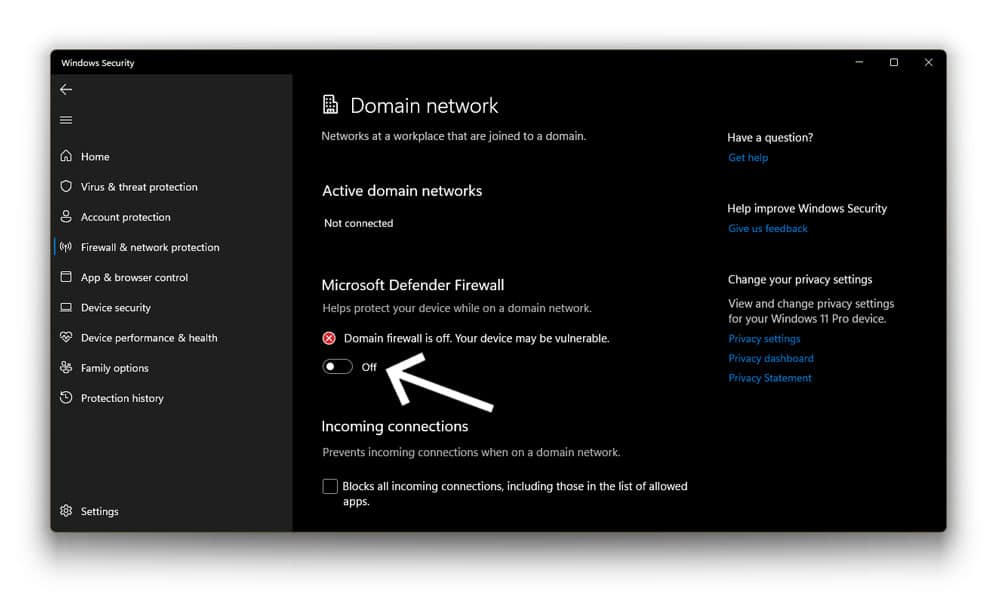
Voila, your firewall settings are disabled. You can enable them any time, so this is only a temporary move to fix the email issues.
5. Remove your Account & Add Again
One of the most common reasons behind Windows 11 Mail app not working is your account freezing up. Luckily, it’s fairly easy to resolve this problem, and get things back on track. You simply have to remove and re-add your active email account. Here’s how to do it:
- Press Windows and type out ‘Mail’.
- When the Mail app launches, click the gear icon.
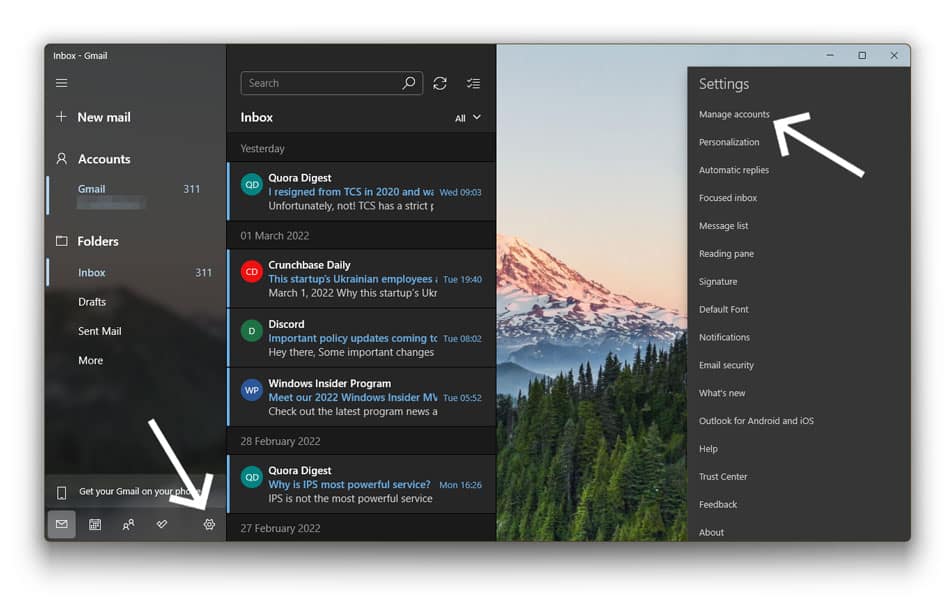
- Click on ‘Manage accounts,’ and choose the account you wish to remove.
- Tap on ‘Delete account from this device’.
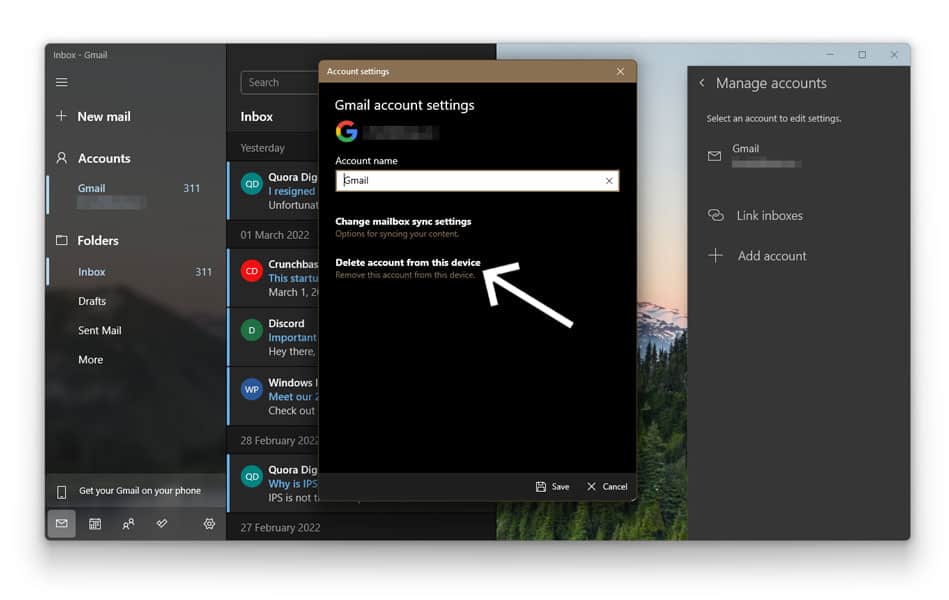
- Now, go back to the ‘Manage accounts’ settings.
- Click on ‘Add account’.
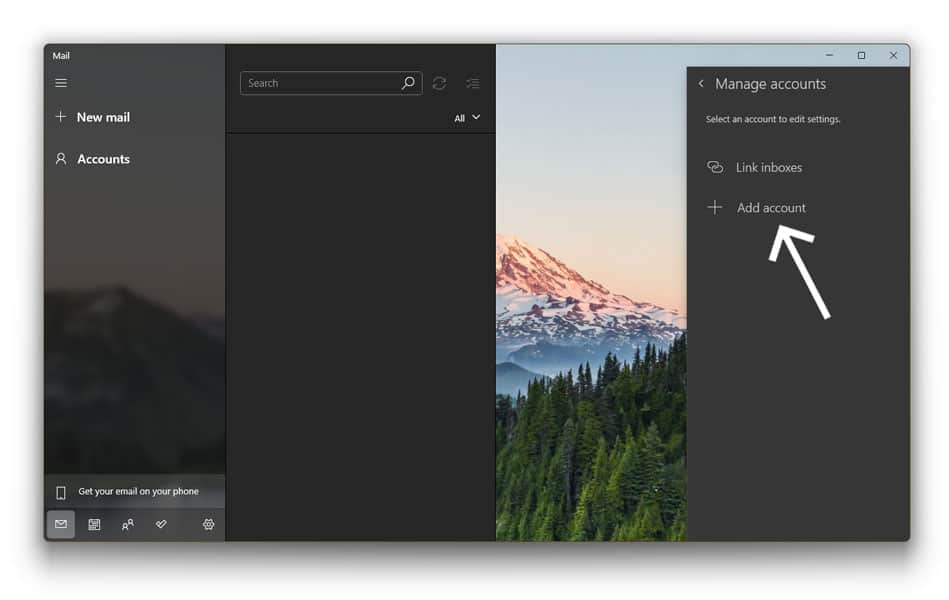
- Choose the type of account you wish to add.
- Sign-in with your credentials.
This has a high chance of fixing the issue for you, but if you end up facing the same issue, read on for more fixes.
Also read: How to Install & Set up Gmail in Windows 11
6. Check Sync Settings
Many have been complaining about Windows 11 mail not syncing, and if your issues sound similar, this method might just be the one. Adjusting your sync settings can help your device synchronize all your incoming mails. As for how to do it, here are a few simple steps you may follow:
- Press on Windows + S, and type ‘Mail’.
- When the app launches, click the ‘Settings’ icon.
- Tap on ‘Manage accounts’.
- Choose the account in question.
- Select ‘Change mailbox sync’ settings.
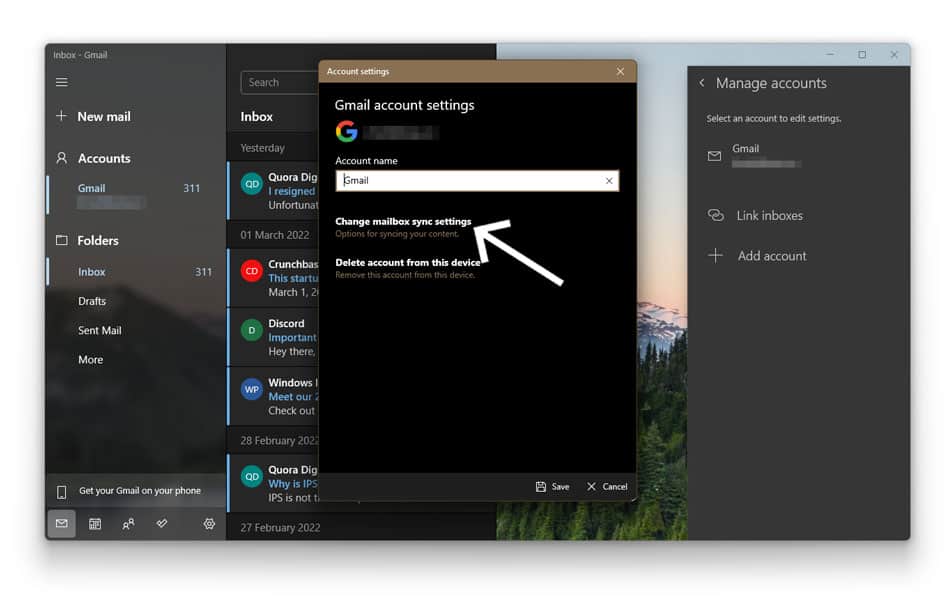
- Toggle the button for ‘Email’ to ON.
- Select ‘Done’.
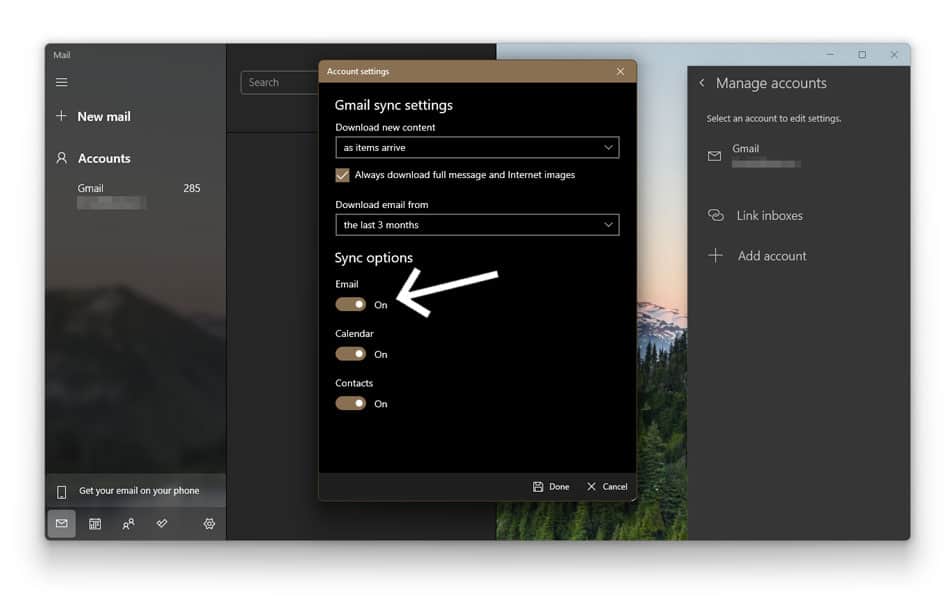
This ought to take care of the issue for you. If not, we have more fixes lined up.
Recommended: How to Set Gmail as Default Email in Windows 11
7. Check Email Privacy Settings
Your permissions in the Mail Privacy setting could be the culprit behind Windows 11 mail not working. Once again, it’s quite easy to fix this issue, since you will simply need to tweak a few Privacy settings, and bam- you are good to go!
Here’s how to go about it:
- Right-click on ‘Start’ and select ‘Settings’.
- Click on ‘Privacy & security’.
- Navigate to the right and go to ‘App permissions’ section.
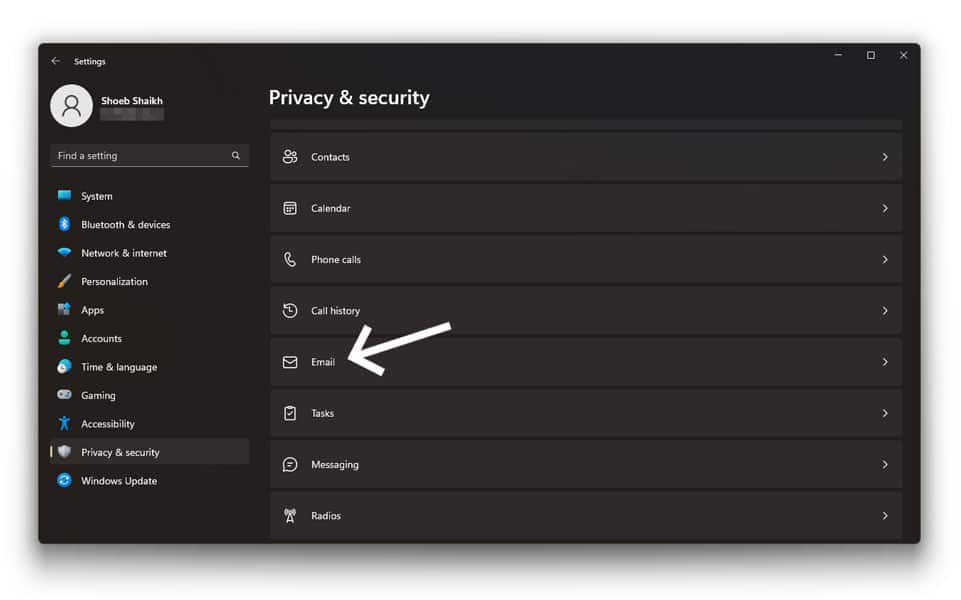
- Click on ‘Email’ and check if the toggles are on.
- Enable the toggle switch on ‘Mail and ‘Calendar’ as well.
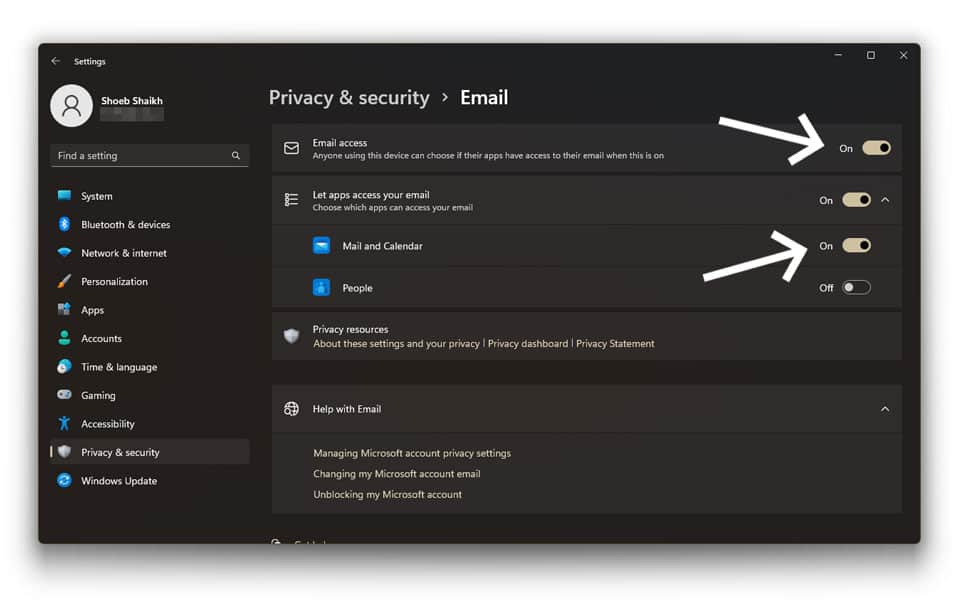
- Carry out the same permissions alterations for ‘Calendar’ under ‘Privacy & security’.
This helps avert the Windows 11 email problems. If not, we haven’t ran out of resolutions just yet.
8. Repair & Reset Mail App
If the issue of Microsoft Mail app not working persists, it’s time to move on to yet another highly effective fix. You might try to repair and reset the Windows 11 Mail app to resolve the repeated issues. Here’s how to do that:
- Press Windows + I.
- Select ‘Apps’ on the left.
- Tap on ‘Installed Apps’ on the right.
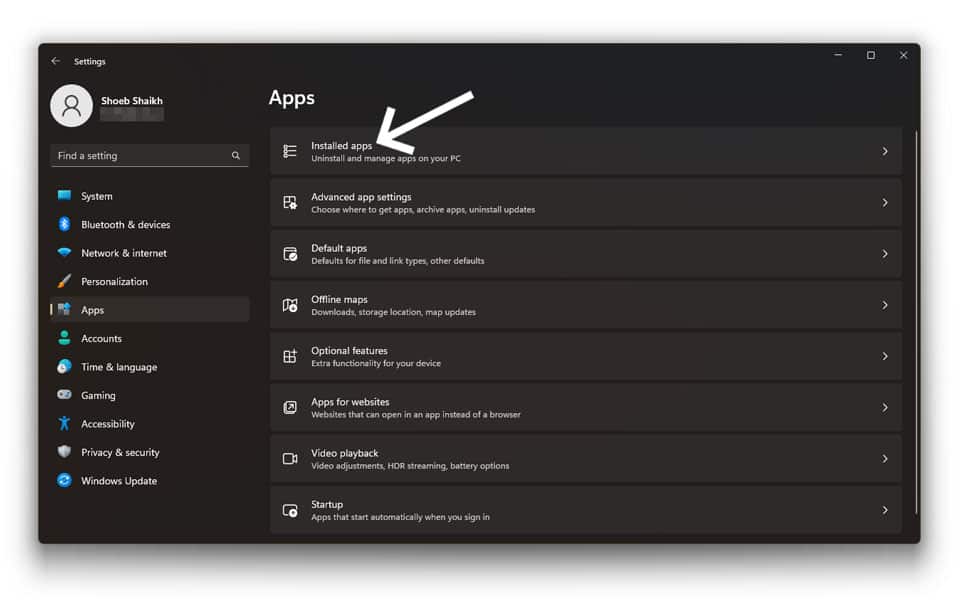
- Keep scrolling down, and locate ‘Mail and Calendar’.
- Click on the 3 dots and select ‘Advanced options’.
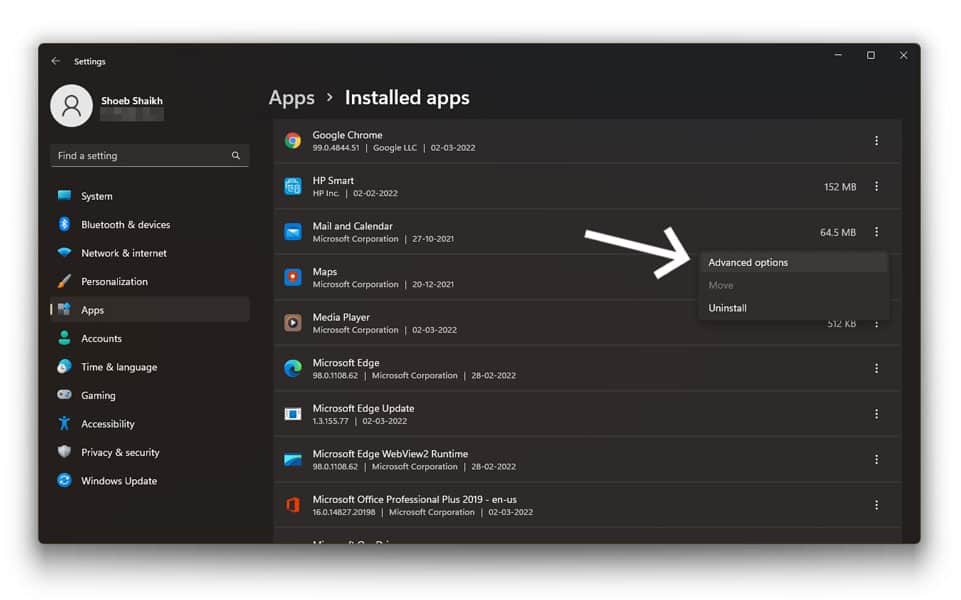
- Scroll down till you land on ‘Repair,’ then tap on it.
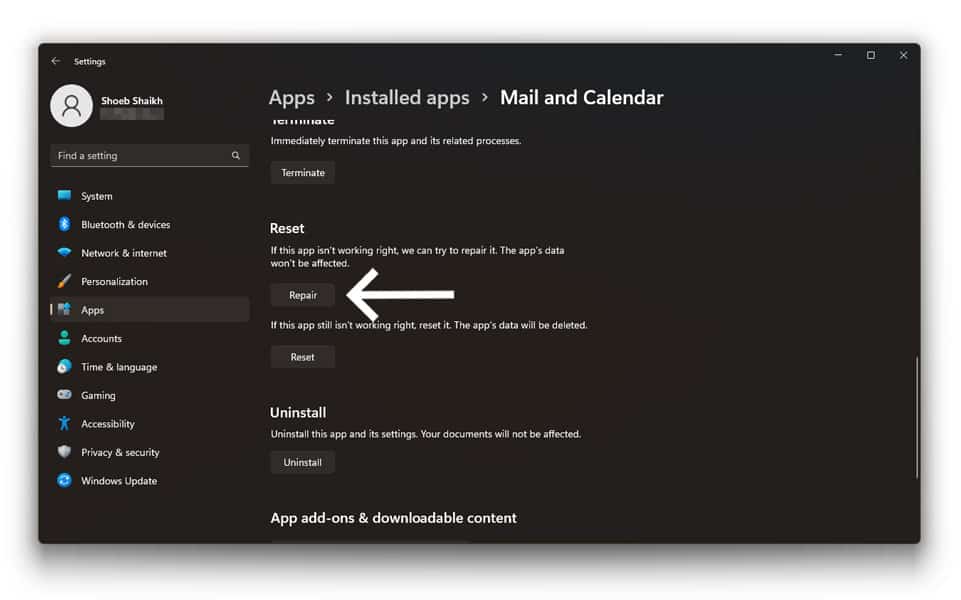
This should ideally do the deed, if if you re-launch the Mail app but to no avail, read on for the steps to reset it:
- Go back to ‘Advanced options’ of ‘Mail and Calendar’ using the steps above
- Scroll down and Click on ‘Reset’.
Once the reset process is done and dusted, launch the Mail app, and log in with your credentials. You may send a dummy mail as a way to check the functionality. If this does not work out, there are 2 more ways to resolve the issue.
9. Reinstall Mail App
Reinstalling the Mail app is a way that often works out if you face Windows 11 email problems of similar nature. If Troubleshooting fails to resolve the issue, this method stands a good chance.
Here’s how to uninstall the app:
- Type ‘Mail’ in the Windows Search box.
- Select ‘Uninstall’ from the list of options.
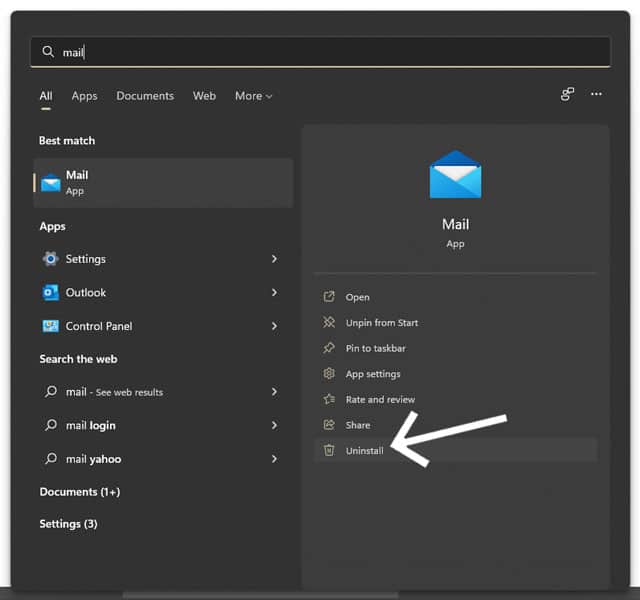
Yes, it is that easy. If you want to install it once again, you have to simply make your way to the Microsoft Store, and you can get it there.
10. Update Windows 11
We always advise that you manually check for pending Windows updates, so as to maintain the smooth functionality of all apps on your device. One of the most common and highly ignored underlying issues behind such Windows 11 email problems is outdated Windows.
Usually, you should be automatically notified about updates, but if not, here’s how you can manually check for them:
- Press on ‘Windows’ + I.
- Select ‘Windows Update’ from the navigation pane on the left.
- Select ‘Check for updates’.
- Pending updates (if any) will be automatically downloaded and installed.
- Restart the system.
This has a good chance of resolving the issue of Windows 11 Mail app not working. Make sure you execute the steps in the correct order for the desired results.
Also read: How to Fix Windows 11 Update Error 0XC1900130
Conclusion
Any one of these aforementioned fixes should be able to resolve your Windows 11 email problems. They are all extremely hassle-free and DIY-friendly. Whether you are a beginner or as tech savvy as they come, these fixes ought to come to your aid, if your Windows Mail app keeps acting up.
Just remember to be patient and go through each fix till you land on the one that works. Good luck!
