In the 21st century, Cloud Storages are the need of the hour. This is because these cloud storages hold data without occupying any unnecessary space on your system. Over the years, Internet has introduced numerous cloud storage such as Dropbox, Google Drive, Box, and many more. This is because clouds storages let you access any of your files even from the remotest locations with the sole requirement of an internet connection.
Though many deem it unnecessary, cloud storages come in handy in case you suffer a hard drive failure and risk losing all your data. Similarly, in cases of a hardware malfunction, you need not worry about losing your data provided you have it saved to Cloud. But at times, continuous pop-ups from these cloud devices can be a menace.
If you are looking to turn off, disable, or uninstall OneDrive in Windows 11, we are here for you. In this article, we will walk you through how to disable OneDrive from Windows 11.
What is OneDrive and Why do you Need it
As we mentioned earlier, Google has brought several cloud storage applications at our disposal over the years. Taking a page out of Google’s playbook, Microsoft introduced its own cloud storage facility known as OneDrive. Designed and configured by Microsoft, OneDrive is a built-in hosting and sync service that helps keep all your important files and documents backed up, synced, and accessible to all your connected devices.
For example, assume that you have just purchased a new laptop. While you have conquered all the basics associated with setting up the OS on your new device, you still need all your data moved from one place to another. This can be a tedious process especially if there is a huge chunk of data present on your older device. However, if you have all your important files and documents backed up to OneDrive, your job is made easier.
All you need to do is login into your respective OneDrive account on your new device and OneDrive will automatically take care of the rest. The next time you restart your new PC, you will find all your backed up files and folders present on your new system.
How to Pause OneDrive Sync in Windows 11
Despite OneDrive being a really good and handy cloud storage facility, it might prompt you to disable it at times or even uninstall it. Fortunately, Windows gives you all the options to uninstall or disable OneDrive in Windows 11. However, if you don’t want to go to extreme lengths, you can simply opt to pause OneDrive on Windows 11. OneDrive allows you to pause its service temporarily for 2, 8, or 24 hours.
To pause OneDrive on Windows 11, follow the given steps:
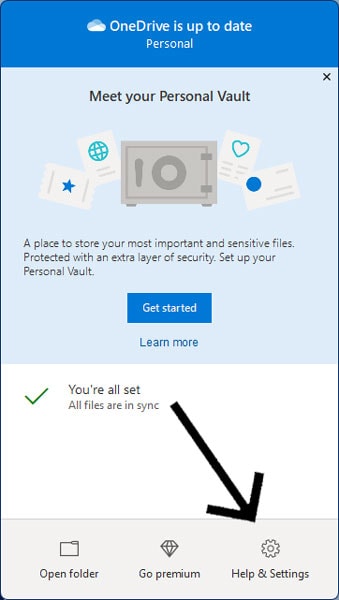
- Go to the System Tray to the bottom right of your screen
- Tap on the OneDrive icon
- The OneDrive folder will now open on your screen
- Click on Help & Settings to the bottom right of your OneDrive folder
- Next, tap on the Pause Syncing menu & Choose a time frame for the duration of which you want to pause OneDrive in Windows 11
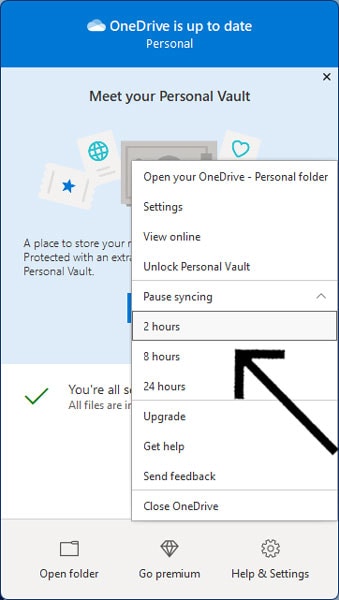
- This will now pause OneDrive for the chosen time frame
- Note that the service will start automatically once the time frame is up
How to Choose which OneDrive Folders to Sync in Windows 11
Just like Windows lets you pause OneDrive in Windows 11, you also have to option to choose which OneDrive folders to sync in Windows 11. This way, you can stop syncing OneDrive for only the specified folders on your Windows 11.
To choose with onedrive folders to sync in Windows 11, follow the given steps
- Go to the System Tray to the bottom right of your screen & Tap on the OneDrive icon
- Click on Help & Settings to the bottom right of your OneDrive folder
- Select Settings and Go to the Account Tab
- Click on Choose Folders
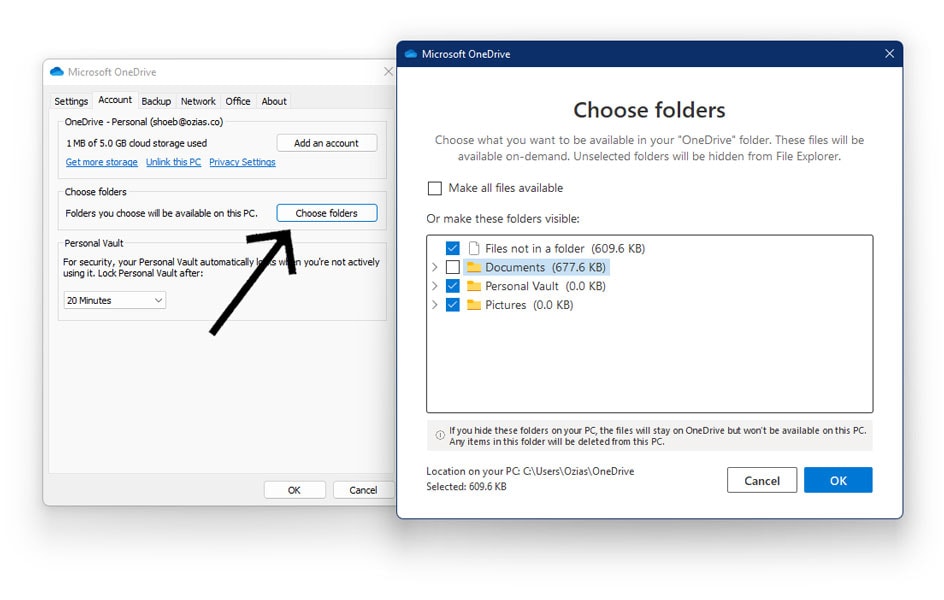
- You will now see a list of all the folders that are currently being synced
- Here, uncheck all the folders you don’t want to sync over to cloud & Click OK
- Now, OneDrive will only sync for the specified folders
How to Disable OneDrive in Windows 11
If pausing won’t work, you can opt to disable OneDrive in Windows 11 instead of completely uninstalling it. You can simply disable OneDrive in Windows 11 and leave the application be on your system so that you can enable and use it later. Now, there are different ways to disable OneDrive in Windows 11. Here, we will discuss how to disable OneDrive in Windows 11 in all possible ways.
1. Disable OneDrive from Startup in Windows 11
If you look carefully, you’ll realise that OneDrive is just another startup application on your Windows 11. Hence, just like every other startup application, you can directly disable OneDrive in Windows 11 using the startup settings. To disable OneDrive from startup in Windows 11, follow the given steps
- Right-click on the Start Menu
- Go to Settings
- Select Apps on the left navigation pane
- Tap on Startup on the right navigation pane

- Here, turn off the toggle next to Microsoft OneDrive
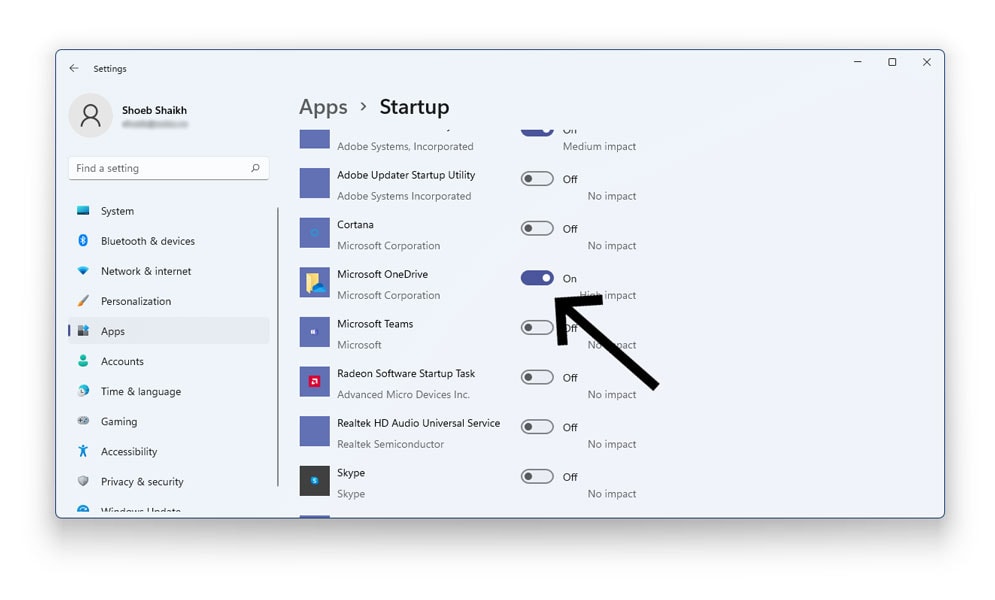
You have now successfully disabled OneDrive in Windows 11. To re-enable OneDrive, follow the same steps and turn on the toggle next to Microsoft OneDrive
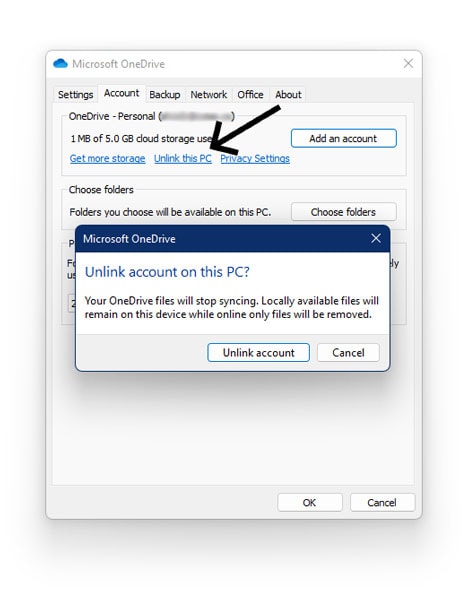
2. Unlink OneDrive from Windows 11
Another easy way to disable OneDrive in Windows 11 is by simply unlinking your OneDrive account from your device. By Unlinking OneDrive from Windows 11, you will automatically log out of your OneDrive account ultimately disabling the app and leaving it behind. Note that by unlinking your OneDrive account from Windows 11, you will NOT lose any data that is already synced.
To unlink OneDrive from Windows 11, follow the given steps
- Go to the System Tray to the bottom right of your screen & Tap on the OneDrive icon
- Click on Help & Settings to the bottom right of your OneDrive folder
- Select Settings & then Go to the Account Tab
- Click on the option which reads Unlink this PC
- In the dialogue box that appears, click on Unlink Account to confirm your selection
- This will log you out of your OneDrive account and disable OneDrive in Windows 11
To confirm whether you have successfully unlinked your OneDrive account, hover over the OneDrive icon in the system tray to see if it says “Not Signed in.”
3. Disable OneDrive in Windows 11 via Group Policy Editor
For those who don’t know, the Group Policy Editor (GPE) lets you make important adjustments and changes to your computer. Therefore, to disable OneDrive in Windows 11 using the Group Policy Editor, follow the given steps
- Go to the Start Menu
- Type gpedit in the search menu
- From the search results, click on Edit Group Policy
- The Group Policy Editor will now be visible on your screen
- In the GPE, navigation to the below mentioned path
Computer configuration > Administrative Templates > Windows Components > OneDrive
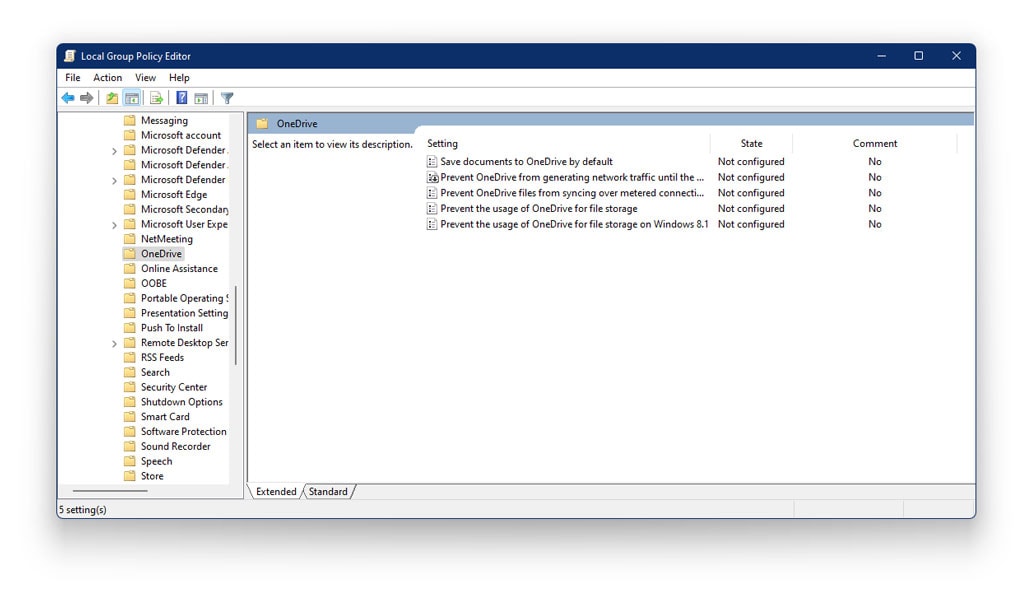
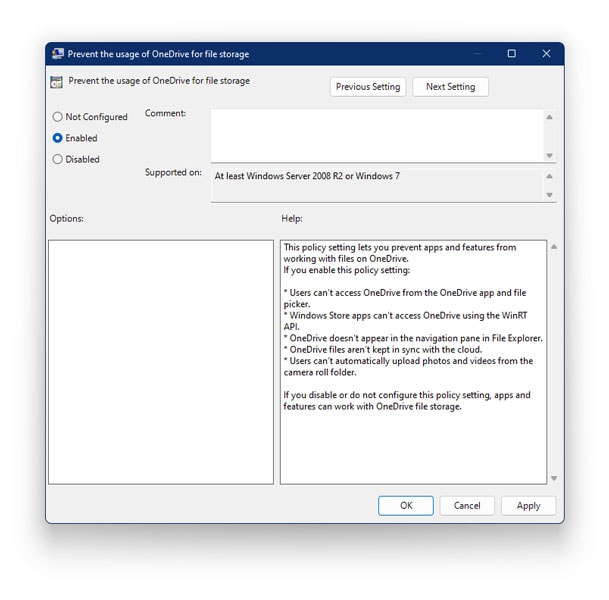
- Now, double click on Prevent the usage of OneDrive for file storage
- Click on Enabled & Click Apply and then tap on OK
4. Disable OneDrive in Windows 11 via Registry Editor
To disable OneDrive using the Windows Registry Editor, follow the given steps
- Press Windows + R on your keyboard to open RUN
- In the dialogue box, type regedit
- Now, navigate to the below-mentioned path in the Windows Registry Editor
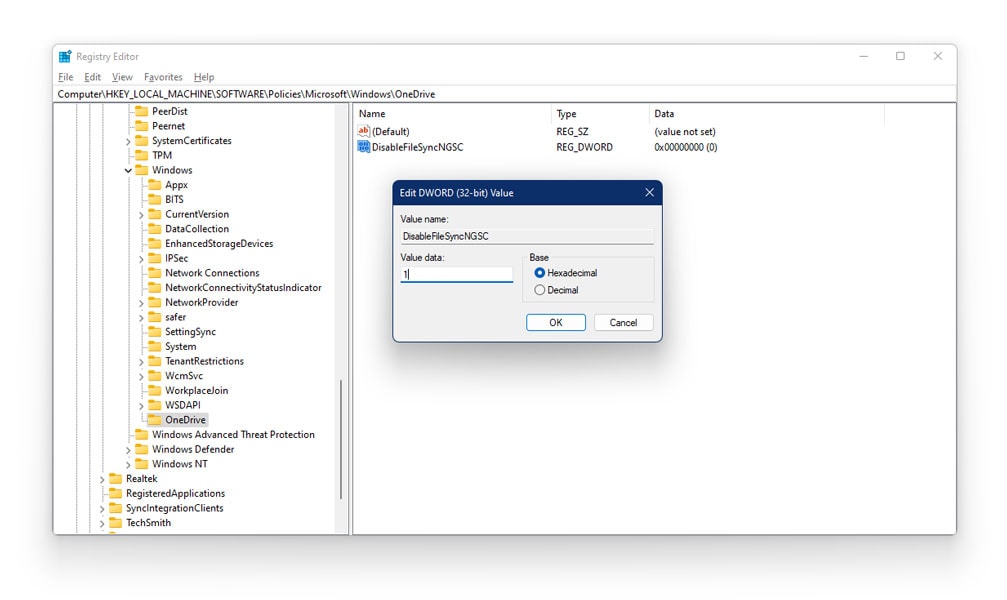
Computer\HKEY_LOCAL_MACHINE\Software\Policies\Microsoft\Windows\OneDrive
- In the right navigation panel, locate a DWORD named “DisableFileSyncNGSC.”
- Double click on the DWORD & Change the value to 1
- If you aren’t able to locate the above-mentioned DWORD file, you’ll need to create one and make changes to it.
- Right-click on the Windows folder on the right navigation pane > Tap New > Select Key
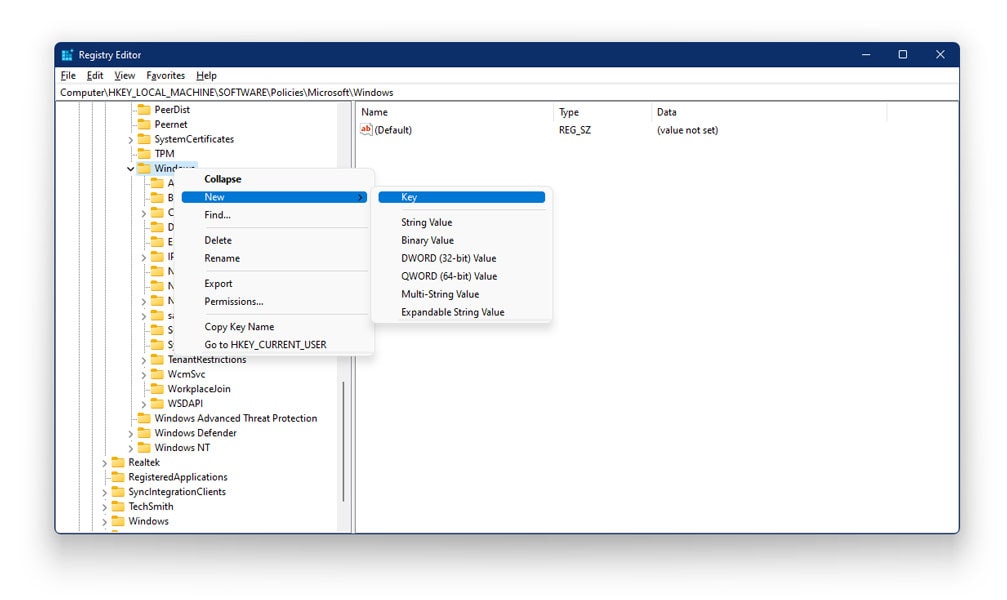
- Rename the folder as ‘OneDrive’
- Right-click on the newly created OneDrive folder (key) > Tap New > Select DWORD (32-bit) Value.
- This will now create a new DWORD name value as ‘New Value #1’. Rename this value as DisableFileSyncNGSC
- Double click on DisableFileSyncNGSC & Change the value data from 0 to 1
Now, restart your system to save changes to your computer. If you wish to re-enable OneDrive in the future, simply follow the given steps and change the DWORD value to 0
How to Uninstall OneDrive from Windows 11
If you don’t feel the need of having OneDrive on your computer, you can simply uninstall OneDrive from Windows 11. There are 2 ways using which you can uninstall OneDrive from Windows 11.
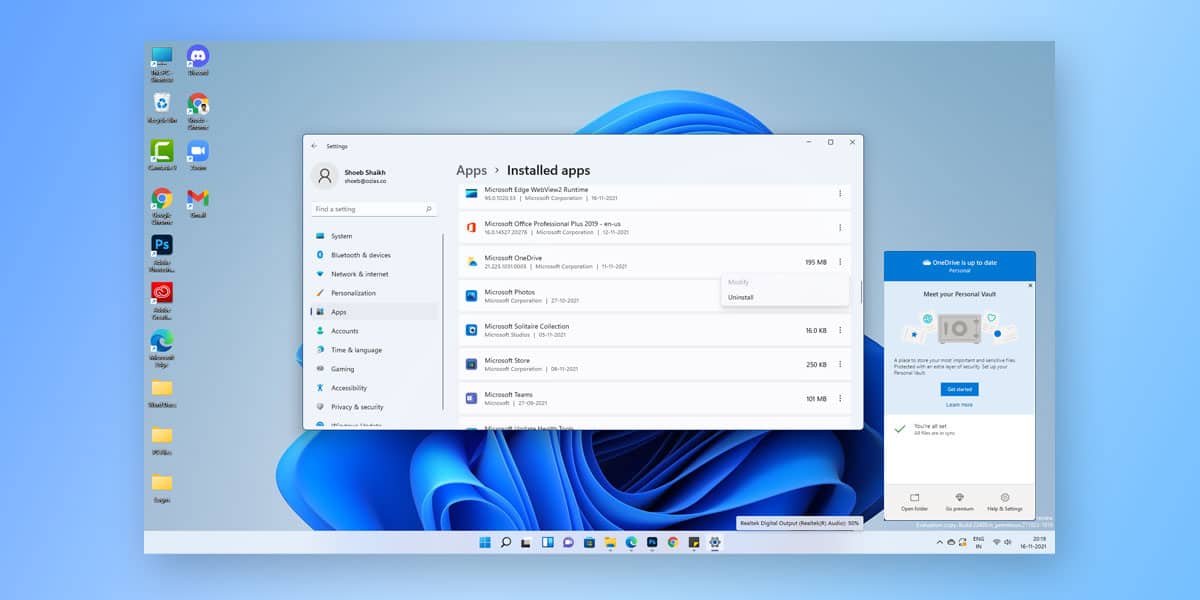
1. Uninstall OneDrive from Windows 11 via Settings
To uninstall OneDrive using system settings, follow the given steps
- Right-click on the Start Menu & Click on Settings
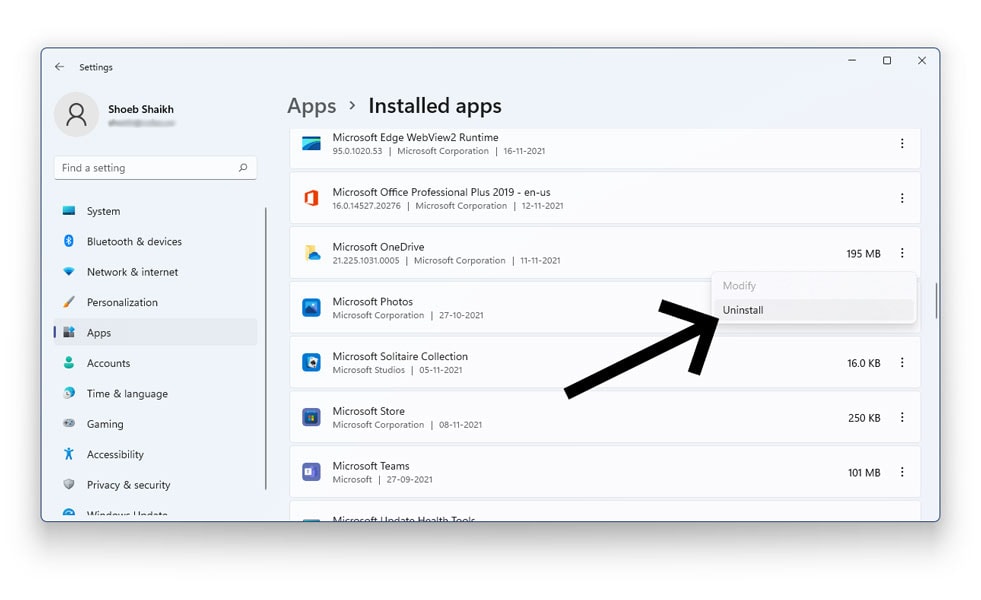
- Select Apps on the left navigation pane & Click on Installed apps
- Locate Microsoft OneDrive
- Click on the three-dotted menu beside it & Select Uninstall
- Click on Uninstall again in the confirmation box
- Windows will now uninstall OneDrive from your system
2. Uninstall OneDrive from Windows 11 via Command Prompt
To uninstall OneDrive on Windows 11 using a command prompt, follow the given steps.
Note: Before you uninstall OneDrive using the command prompt, you will need to understand whether you are running a 32-bit or 64-bit version of your Windows 11. To check which version is in progress, follow the given steps
- Right-click on Start Menu & Go to Settings
- Select System on the left navigation pane
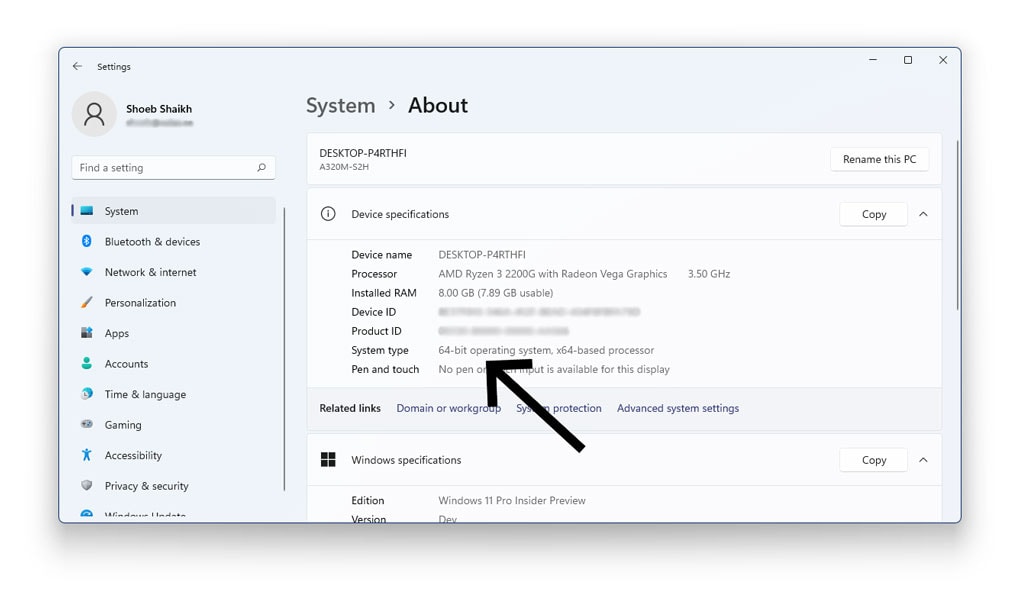
- Scroll down until you locate About
- Click on About
- Now, you will be able to see the version type in front of the System Type
Now that you know which version you are running, follow the given steps to uninstall OneDrive using CMD
- Go to the Start Menu
- Type Command Prompt in the search bar
- Run As Administrator
- Here, type and execute the following command
For 64-bit
taskkill /f /im OneDrive.exe
Now, execute the following command
%SystemRoot%\SysWOW64\OneDriveSetup.exe /uninstall
For 32-bit
taskkill /f /im OneDrive.exe
Now, execute the following command
%SystemRoot%\System32\OneDriveSetup.exe /uninstall
- Tap Yes when the prompt box appears
- Windows will now permanently uninstall Windows 11 from your system
- In case you wish to reinstall Microsoft OneDrive, you can always install it from the Microsoft Store
Conclusion
Cloud Storage is one of the greatest features of every modern-day PC. In the case of hardware failure or malfunction, you risk losing all your data. However, if your data is synced to the cloud, you needn’t worry about losing your data. Also, data backed up to your cloud account can be accessed anytime anywhere.
![How to Install & Set up Gmail in Windows 11 [2 Methods]](https://devsjournal.com/wp-content/uploads/2021/11/How-to-Install-Gmail-in-Windows-11-768x384.jpg)
Thanks, Shoeb, for all the information,
You forgot to mention one important setting – how to change the default folder of OneDrive on the PC.
Tamir