There are moments wherein a weak WiFi signal terribly hampers our Internet connectivity and leaves us fuming and frustrated. Whether it’s a client who needs a file right away or because you want to get back to your game lobby before it’s too late, the Wi-Fi connection at your home or workplace will either be the savior or destroyer of your day.
It becomes crucial to determine the root cause behind this problem in cases such as this. Finding and applying the solution becomes relatively simple once you find the reason behind a sloppy WiFi connection and lousy Internet connectivity.
In our article, we have given a detailed layout that aims to answer why your WiFi keeps dropping in Windows 11. Along with that, we have also listed a few fixes you can try and apply to fix the WiFi keeps disconnecting in windows 11.
Why my PC Keeps Disconnecting from WiFi?
From an outdated router to overlapping signals, multiple reasons can cause you to lose your Internet connectivity altogether. At times, the problem lies with your ISP (Internet Service Provider), who cannot deliver the connectivity he promised. Before you get to fix your Wi-Fi, you need to be familiar with all the root causes of Internet failure.
Therefore, here are a few of the reasons why you’re Internet keeps dropping every now and then.
1. Weak Wi-Fi Strength
This is one of the key reasons you cannot enjoy a fast, efficient, and stable Internet connection. If your device is located far away from your Wi-Fi router, then the range can cause the Wi-Fi strength to drop and lead you to lose your Internet connectivity altogether.
2. Radio Signal Interference
Some older routers tend to use the same frequency as the electrical appliances present in the house, such as a microwave, refrigerator, telephones, etc. All these appliances run on a 2.4 GHz frequency that can interfere with your Wi-Fi signal. This can cause the frequencies to overlap, thus congesting the Wi-Fi signal.
3. Too many Devices Connected to the Network.
If multiple devices are attached to the network, each device consumes a significant amount of bandwidth which ultimately leads to a drop in connectivity or loss of Wi-Fi signal altogether.
4. Outdated Firmware
Connectivity problems and frequent signal drops occur if your router’s firmware is outdated. The router’s firmware needs to be current for it to function efficiently. Therefore, the manufacturer always keeps track of every latest update available. These firmware updates come with additional enhancements that can primarily benefit your overall Wifi signal and range.
Also Read: WiFi Connected But No Internet in Windows 11
Ways to Fix “WiFi Keeps Disconnecting or Dropping in Windows 11”
If your Wifi keeps disconnecting or dropping in Windows 11, it can be a cause of concern. Losing your Wifi when in the middle of work or an important transaction or a high-profile online multiplayer match can leave you fuming. Although there are several reasons why your wifi keeps disconnecting or dropping in Windows 11, there are an equal amount of fixes designated to take care of the same.
1. Restart your Windows 11 PC/Laptop and WiFi Router/Modem
Restarting your computer is a proven way to flush your system of any bugs or errors that may be present and could be tampering with the system’s functioning. So, go ahead and restart your system to kick off the problem-solving process. To restart your WiFi router, simply press the button present either at the back or at the front of your router.
2. Forget and Reconnect your WiFi Network
Given the settings in place, Windows will always connect you to the set default network or the fastest network in the vicinity. However, these connections may well be the reason why your wifi keeps disconnecting every now and then. There is a high chance that some of these networks could be unstable and tamper with the wifi connection altogether. In such cases, tracing the given steps can help you solve the problem.
NOTE: Implementing this step will wipe out every trace of that particular network. Therefore, ensure that you remember the PASSWORD before implementing this step
- Click on the Wifi option at the right of your taskbar.
- You will now see a list of all Wifi networks available and the one you are currently connected
- Right-click on the Wifi network which you think is giving you trouble
- Click on Forget Network

- This will completely erase all data about that network present on your device
- Repeat the same process to forget any other network which you think might be troublesome
- Wait for a few minutes
- Click on the Wifi Network which you just Forgot
- Select Connect

- Insert the Password
- Wait for the connection to initiate
- Check to see if the problem still persists.
3. Run the Network Troubleshooter
Windows 11 has tonnes of built-in tools that allow the system to automatically detect, diagnose, and fix issues present. Hence, the first thing you need to do is run the network troubleshooter in your first line of action against the issue
- Right-click on Start Menu
- Go to the Settings
- Locate and Expand Troubleshoot
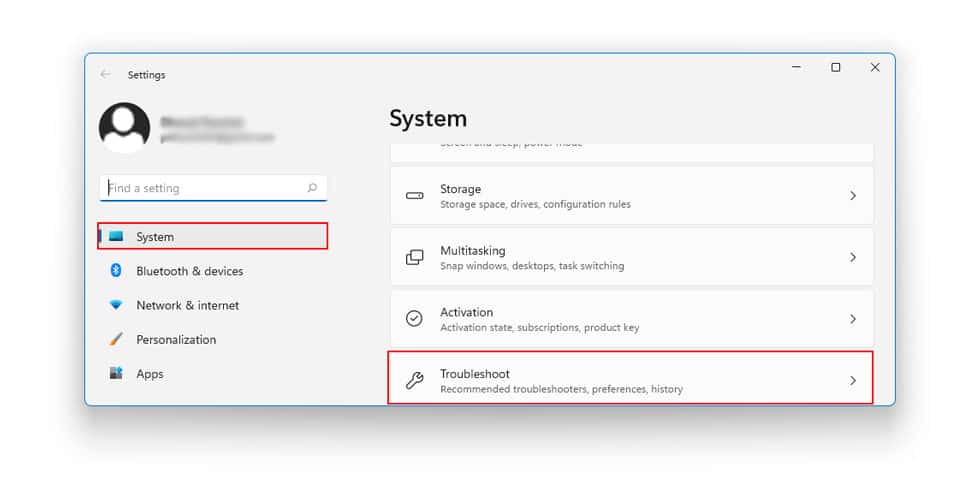
- Click on Other Troubleshooter
- Click on Run for Internet Connection Options
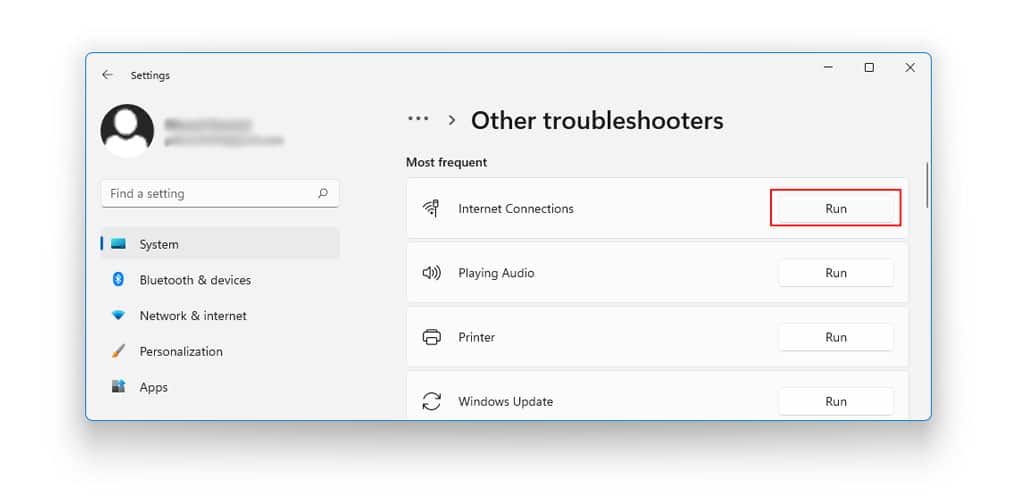
- Windows will now launch the troubleshooter, which will then check what went wrong
- When the process is complete, tap Close
- Restart your system
4. Update your WiFi Driver
One of the easiest solutions if your device is connected, but you might not be able to access anything on the network is updating your Wifi driver
- Right-click on Start Menu
- Go to Device Manager
- Locate and Expand Network Adapters
- Locate your Wifi Adapter network and right-click on it
- Select Update
- Click on Search Automatically For Drivers
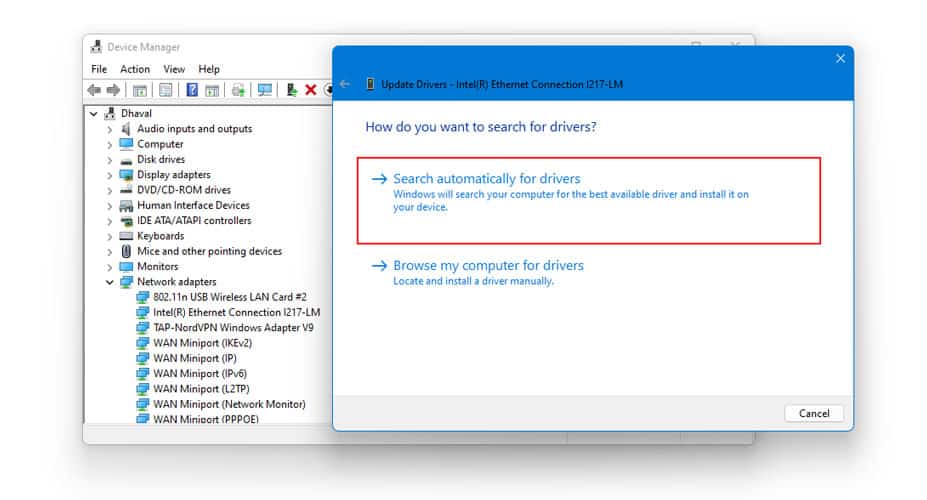
- Windows will now search for any new drivers
- Once Windows detects an updated driver, it will automatically install the Wifi driver on your system
- Post the update, restart your system
5. Enable/Disable Network Adapter
This is one of the most proven ways to get your Wi-Fi back on. Note that this step is slightly different than turning off your Wifi and then back on. Here, you will need to first disable and then enable your Wifi network adapter. To do so, trace the given steps
- Right-click on the WiFi icon on your taskbar
- Click on Open Network and Internet Settings
- Go to Advanced Network Settings
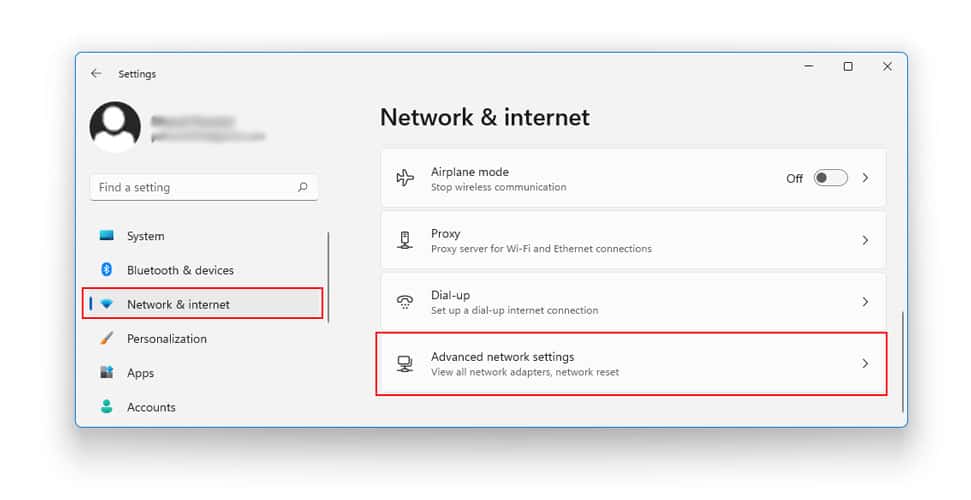
- Locate the WiFi network you are connected
- Select Disable
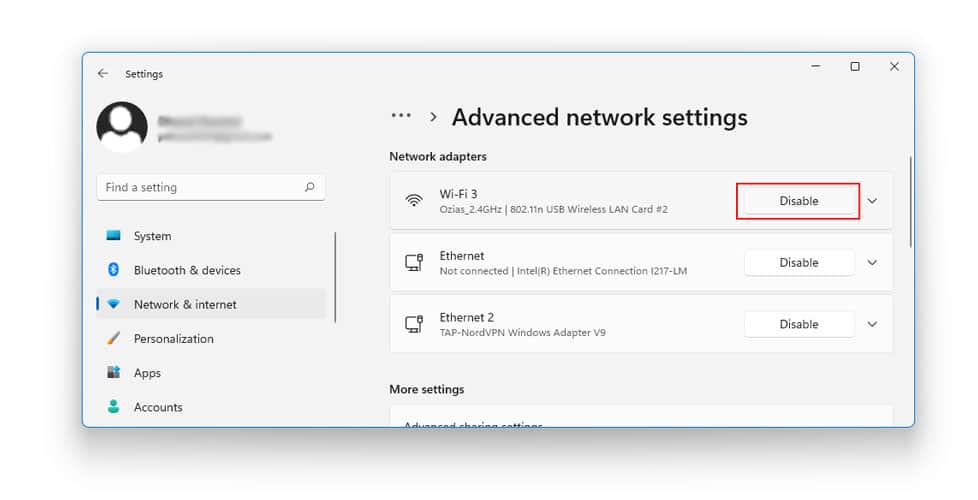
- The Wifi will now be disabled from your Windows altogether
- Wait for a few minutes
- Again, click on the Wifi network adapter
- Select Enable
- The Wifi system will be enabled on your Windows
- Reconnect to any Wifi network to check if the computer keeps disconnecting from Wifi
Recommended: Network Adapter Missing in Windows 11
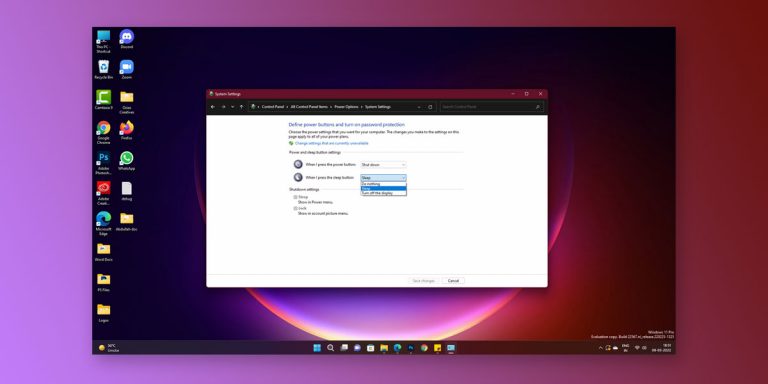
6. Change Power Management Settings
As the name suggests, Windows OS has a power management system in place that is in charge of allocating power the right amount of power of different drivers to ensure smooth and stable functioning of the same. But the majority of the network issues arise if the system is cycled through different sleep cycles. In such cases, you will need to check and change your power management settings accordingly
- Press Windows + R to open Run
- Insert the command below and hit Enter
devmgmt.msc
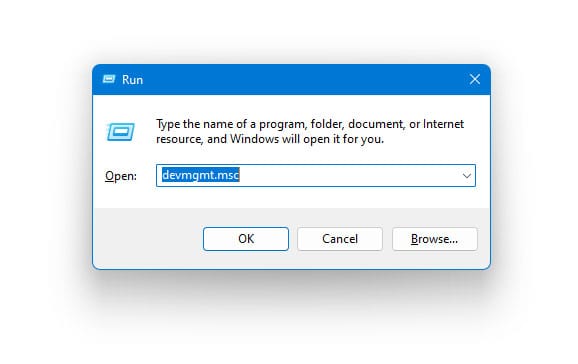
- Locate and double click on Network Adapters
- Locate and right-click on your Wifi Network Adapter
- Go to Properties
- Go to the Power Management tab
- Uncheck the box next to Allow The Computer to turn off this device to save power

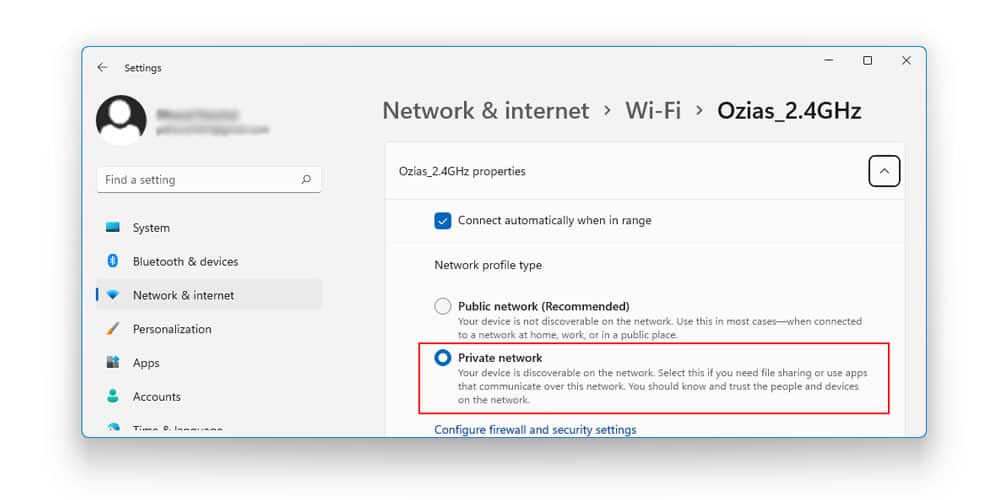
7. Change Network Profile Type (Public To Private)
If you have a public network type, anyone from the general public can connect to it and access the Internet. In other words, there are no restrictions or access rules in place in a public network. Here, changing your network profile from public to private will only allow the permitted members to connect to the given Wifi network. TO change your network profile type from public to private, trace the given steps
- Click on the Wifi icon located to the right of your taskbar
- Right-click on the Wifi network which you think might be causing problems
- Select Properties
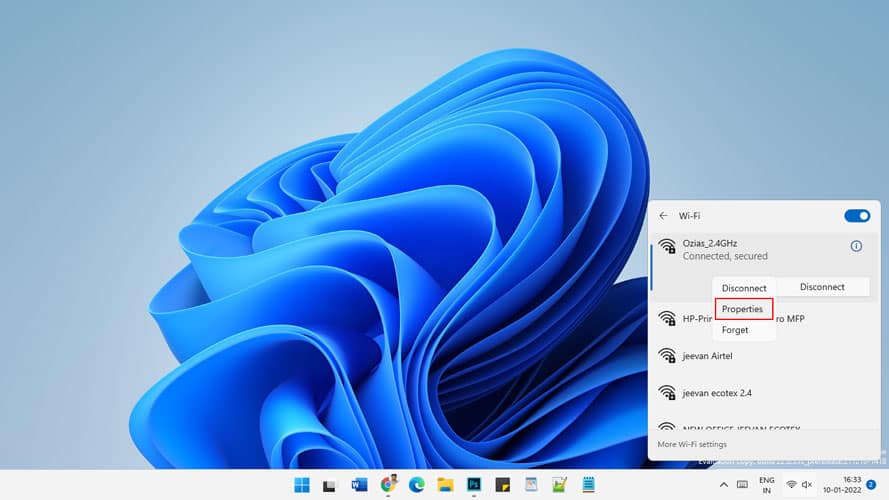
- Set network profile type to Private
- Check to see if the issue is dealt with
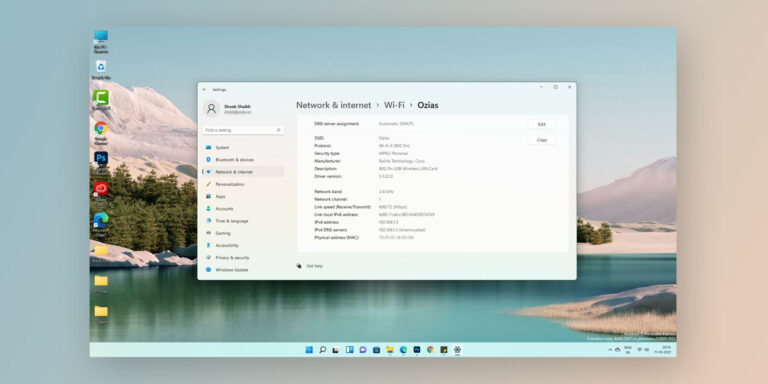
8. Change DNS
Changing your DNS is known to have resolved the wifi keeps disconnecting issue for many users. To change your DNS, all you have to do is trace the given steps
- Right-click on the Start Menu
- Select Settings
- Go to Network and Internet
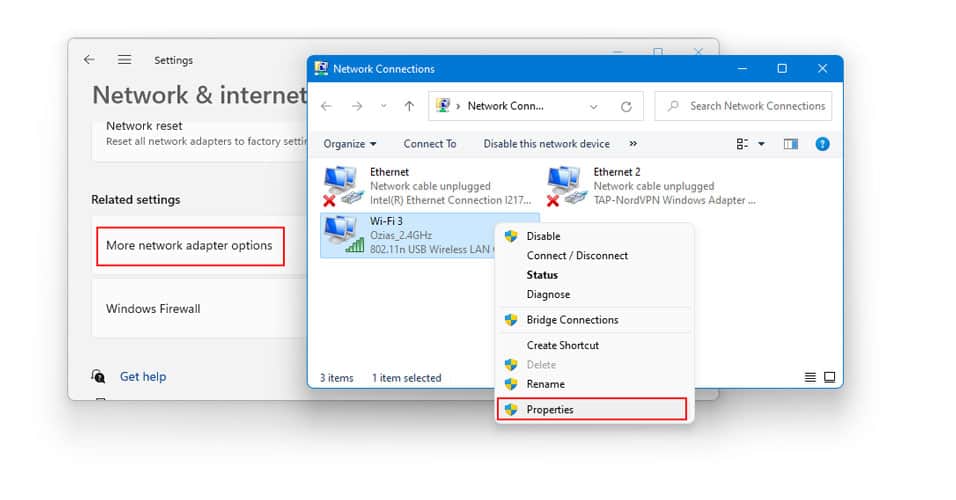
- Tap on Advanced Network Settings

- Next, select More Network Adapter Options
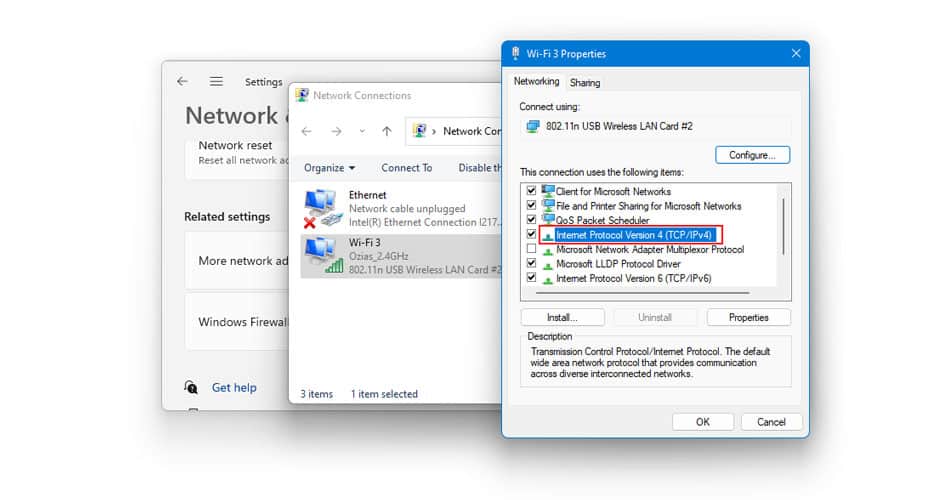
- Right-click on the Wifi network which you think is giving your trouble
- Select Properties
- Double click on Internet Protocol Version 4 (IPv4)
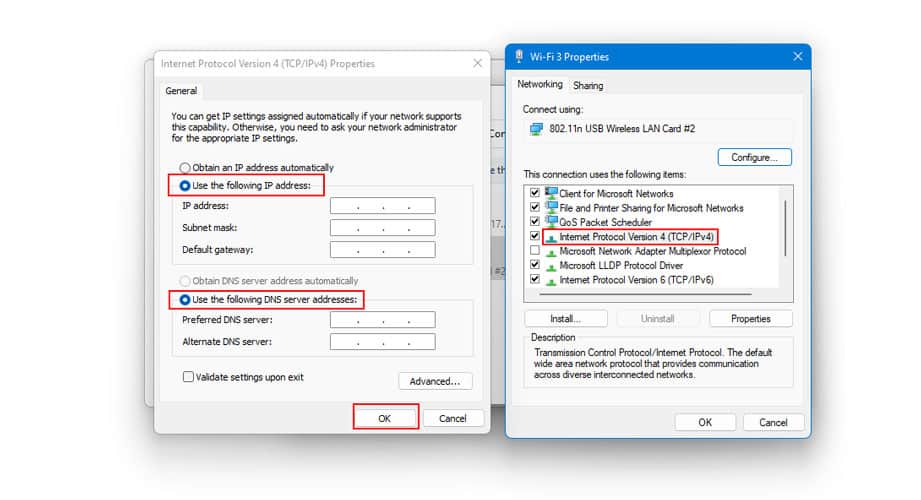
- Make the following changes
- Check the Use The Following Server Address circle
- In the Preferred DNS field, paste the following number 8.8.8.8
- In the Alternate DNS field, paste the following number 8.8.8.4
- Select Save
Also Read: How to Fix “Ethernet doesn’t have a valid IP configuration” in Windows 11
9. Make Fixes to your Router
If nothing has worked out for you so far, you need to make a few changes to your router. Here are some basic, simple, and quick fixes you can make to your router
1. Move Closer to your Router
The farther you go, the more your Wifi range will drop, which will ultimately result in the loss of Internet Connection altogether. A crisp solution to this is installing your router in close proximity to your office space so that range isn’t a problem. If you have a laptop or a smartphone, you can relocate closer to your Wifi router to enjoy maximum connectivity.
2. Radio Signal Interference
Various household appliances such as the radio, microwave, and so on tend to emit a specific radio signal which can interfere with the WiFi signal. These devices, when turned on, can take down your WiFi signal and disable your Internet connection for some time. A solution to this is to turn off the devices that interfere with your signal. Therefore, if your router runs on a 2.4 GHz frequency, try using a different channel to avoid frequency interference.
For example: If your WiFi is located close to the microwave, turn off the microwave if you aren’t using it or move your device away from the microwave
3. Adjust Router Settings
At times, having the incorrect router settings could be the reason why you’re Wifi keeps dropping every 5 seconds. Here are some of the ideal settings you can adjust your Router to help fix the problem
- Set your Beacon to 50
- Set the fragmentation threshold to 2306
- Set the RTS threshold to 2304
Configuring your router to the above-mentioned settings can help solve connectivity issues and prevent your Wifi signal from dropping.
4. Update Router Firmware
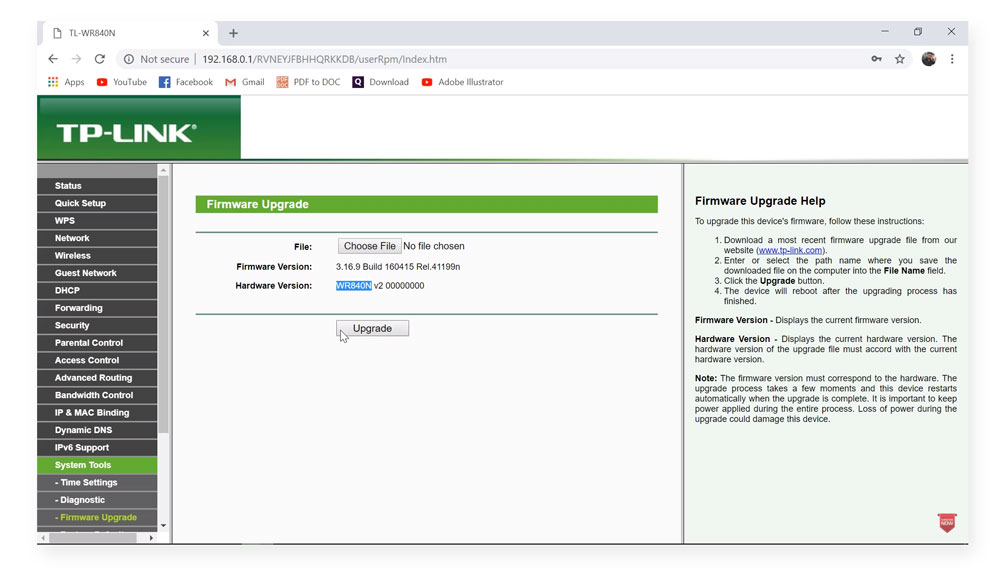
If your router is outdated, then it can lead to your Wifi signal dropping. Also, updating your router firmware entitles you to multiple benefits the router offers. It is vital that you update your router every time your manufacturer releases a new update. Upgrade the router’s firmware to the newest version. This isn’t a common task but could be what’s happening that’s causing your specific Wi-Fi connection problems.
5. Reset Your Router
To reset your Router:
- Locate a small “reset” button, typically located at the back of your router.
- Once you locate the reset button, use a pen/ paper clip and hold down the “reset” button for at least 10 seconds. Your router lights will flash, indicating that the router has been reset successfully.
- Log back into your router to check the settings.
- Restore all your settings (Wifi Password).
6. Get a New Router
If none of the above-mentioned fixes works for you, then it is time you faced the ugly truth and accepted that your router is in dire need of an upgrade. 802.11ax and 802.11ac routers are faster than the 802.11b, g, and n routers. These ac routers can connect to multiple devices simultaneously, saving you from the hassle of switching between devices now and then. You can opt for a mesh router that offers unparalleled consistency across multiple spaces.
Some of the best 802.11ax routers include:
- Netgear Nighthawk AX3000 (AX4) Review
- Tp-Link Archer AX11000 Review
- ASUS RT-AX89X (AX6000) Review
- ASUS RT-AX82U (AX5400) Review
- Netgear XR1000 (AX5400) Review
Some of the best 802.11ac routers include:
- Linksys MR9000 AC3000 Review
- Asus RT-AC88U (AC3100) Review
- Netgear Nighthawk X6S AC4000 (R8000P) Review
- Linksys EA7300 Review
- Asus RT-AC86U (AC2900) Review
Some of the best mesh routers include:
The Bottom Line
We hope our article was able to help you regain Internet connectivity. Note that the fixes mentioned above are arranged as per the severity of the problem and should be applied serially. It is always beneficial to have a clear idea about how home networking works. Even though the majority of the devices now come with a wireless connection, a wired connection will always deliver faster speeds, low latency, and great stability.