According to multiple tech experts, most of the computer’s problems are linked directly with the system’s storage space. We fail to realize that the more data we have on our system, the more it keeps eating away our storage space.
Therefore, to avoid your system from malfunctioning, you must undertake a habit of routinely freeing up space on your Windows system. However, this does NOT mean you should go and delete everything on your system.
If your system has only a single SSD or HDD, you are more likely to run out of space quickly. Also, having all your data stored on a single drive can make it highly challenging to look for a file when you need it. If you have a single drive on your system (SSD/HDD), partitioning a drive is an excellent way to get extra space for your files.
This article will walk you through the different ways to partition a hard drive in Windows 11.
What is Disk Partitioning?
When installing a new OS on your laptop or computer, the installer wizard sees a disk that is nothing but a huge chunk of unallocated storage space. In such cases, you will need to create a different segment so that your OS knows which part of the HDD or SSD to use. This entire process is called disk partitioning.
When you format a partition with a particular filesystem, so it’s usable by an OS, it’s known as a volume. Usually, every Windows system will have only one hard drive in place. This single partition space generally holds everything, including your OS Files, movies, music, games, and other application data.
Similarly, the majority of the devices will have a separate Recovery Drive. As the name suggests, this drive is primarily equipped for backup and recovery purposes. For example, if your Windows installation is corrupted, you can use the recovery drive to restore all the data.
Note: Do NOT tamper with the Recovery Drive present on your system.
Why Create Disk Partition in Windows 11?
Every time you buy a new laptop or desktop, it will come equipped with either an SSD or an HDD. The majority of these drives will have a single partition. While it will give you a decent amount of storage, it will make organization particularly difficult. Also, the more load you put on one single disk drive, the more it will affect your system.
One of the primary reasons to create partition disks in Windows 11 is because partitioning allows for easy organization of files and folders according to different categories. The more organized your system is, the more quickly you will access a particular file in a time of need. Partitioning SSD or HDD in Windows 11 allows your system to function as a combination of multiple independent systems.
Though all your partition drives run on the same hardware, separating your valuable files is known to minimize corruption risk. Another key benefit of creating disk partition in Windows 11 is that it vastly improves performance, manageability, and better availability of the system storage. It is recommended to make at least two partition drive on Windows 11 to use it.
For example: If you have a 1 TB HDD or SSD embedded in your system, it is recommended that you create at least 3-4 partitions of the same such as
- Operating System (C Drive),
- Personal Data 1 (D Drive),
- and Personal Data 2 (E Drive),
- Recovery Drive (F Drive)
Recommended: How to Delete Temporary Files in Windows 11
Advantages of Partitioning a Disk in Windows 11
As we mentioned above, creating disk partitions in Windows 11 tends to have a sizeable impact in improving performance. Though the partitions run on the same system hardware, it makes your overall system function as a combination of multiple independent systems.
If you are looking to partition your hard drive, here are some advantages of disk partitioning that may come in handy.
- Easy OS Installation/ Reinstallation
- Better Availability of Storage Space
- Simpler Backups
- Potential Improved Security
- Better File Organization
- Better Management of Storage Space
- Ease of Installing Multiple OS
- Using Many File Systems at Once
How to Partition a Drive in Windows 11?
There are different ways using which you can create a disk partition in Windows 11. You can either use the inbuilt system settings to manually create a disk partition or opt for a third-party application to create a disk partition in Windows 11 automatically. Below are some of the ways using which you can create a Disk partition in Windows 11
1. Shrink Disk Partition in Windows 11
If your PC has a single drive (SSD/HDD) that has taken up a lot of your storage space, you will need first to clean out space from the existing drive. To shrink Disk Partition using Windows disk management, follow the given steps.
- Close all running application
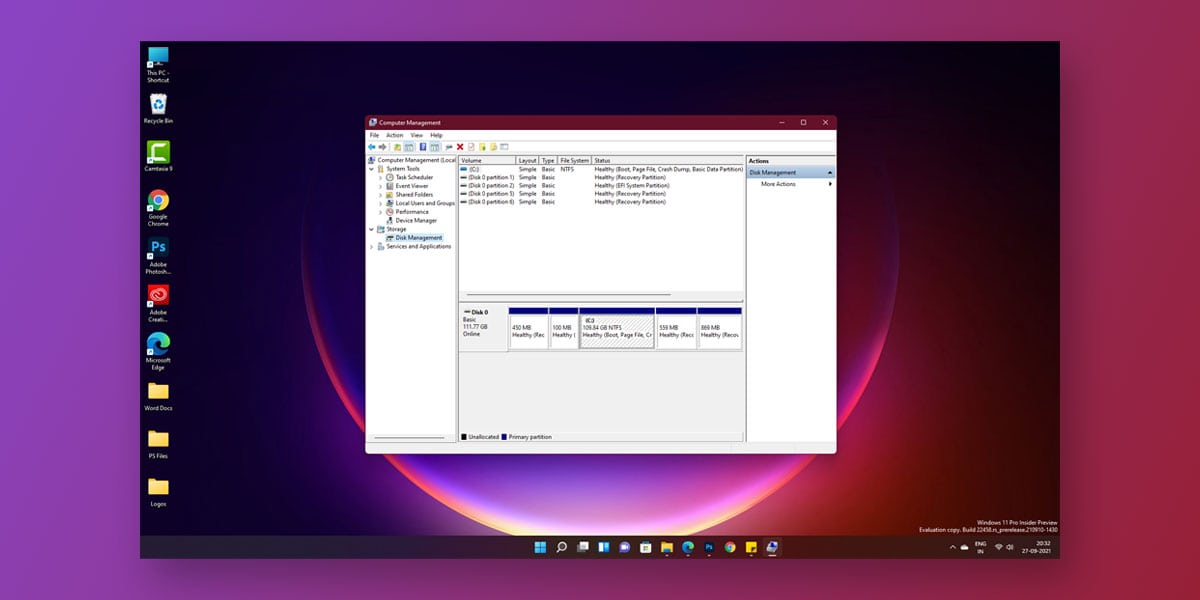
- Right-click on the Start menu > Computer Management
- Tap on Storage >Disk Management
- Now, locate and right-click on the partition that you wish to shrink
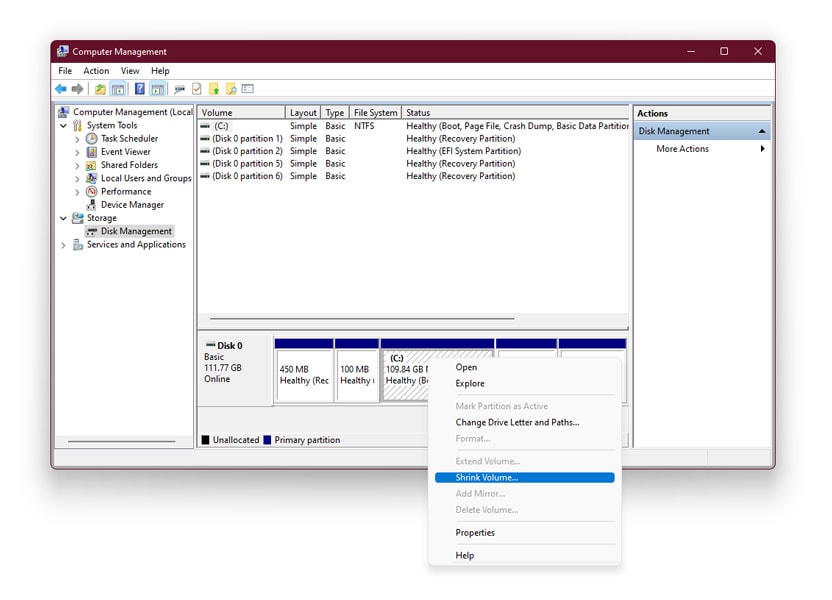
- Next, tap on the Shrink Volume option
- A pop-up window will now appear on your screen
- Type the size in MB that you want to free in the window that reads Enter the amount of space to shrink
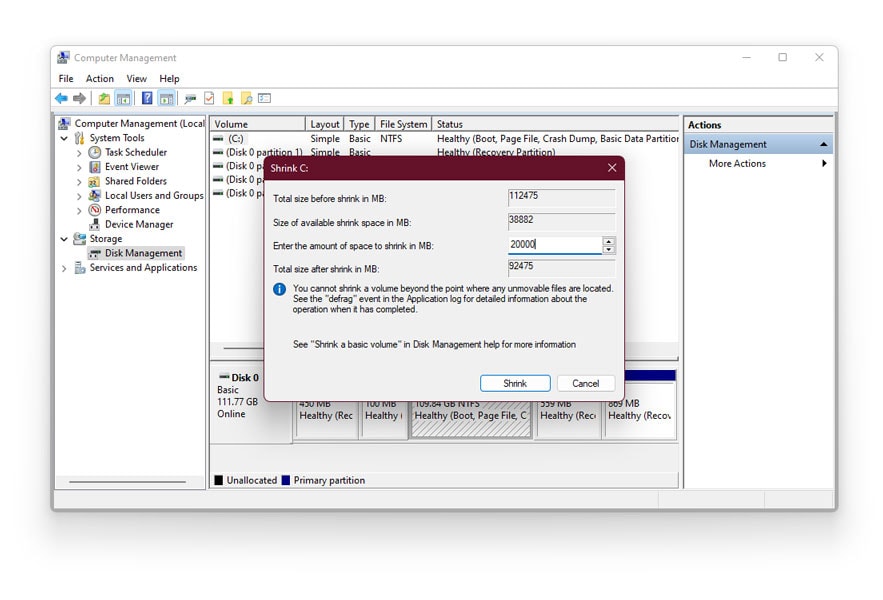
- Then, click on the Shrink button.
- You will now see an unallocated space next to your selected drive
- This means that the selected volume disk size has been reduced successfully.
2. Create a Disk Partition in Windows 11
If you have a single drive on your system (SSD/HDD), partitioning that drive is an excellent way to get extra space for your files. It is possible to partition your C drive into small separate drives and use them accordingly. Using the above steps, you might have shrinked a particular drive, so there’ll be some unallocated space in the system. We will use this unallocated memory to create a new partition in Windows 11.
To create and format a new partition drive, follow the given steps.
- Close all running application
- Right-click on the Start menu
- Go to Computer Management
- Tap on Storage then click on Disk Management
- Next, right-click on an Unallocated region on your hard drive
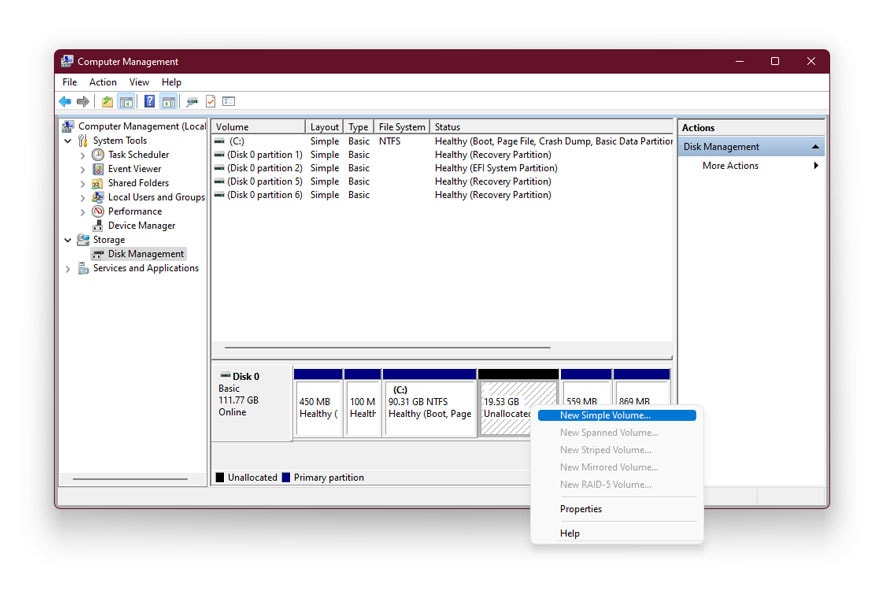
- Then, select New Simple Volume
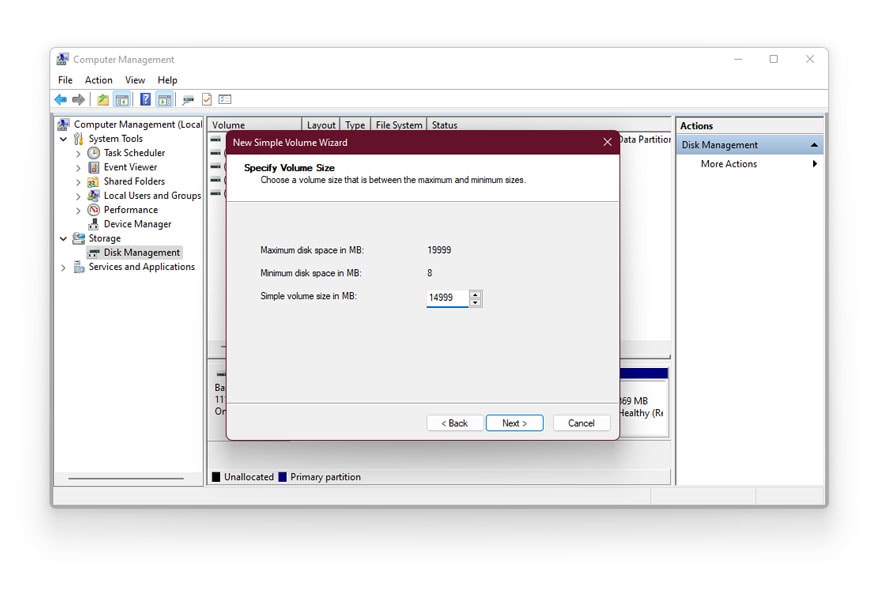
- In the New Simple Volume Wizard, click Next
- Select the volume size in MB. Keep it as it is to use the full unallocated memory
- Now, Choose your desired drive letter and Accept
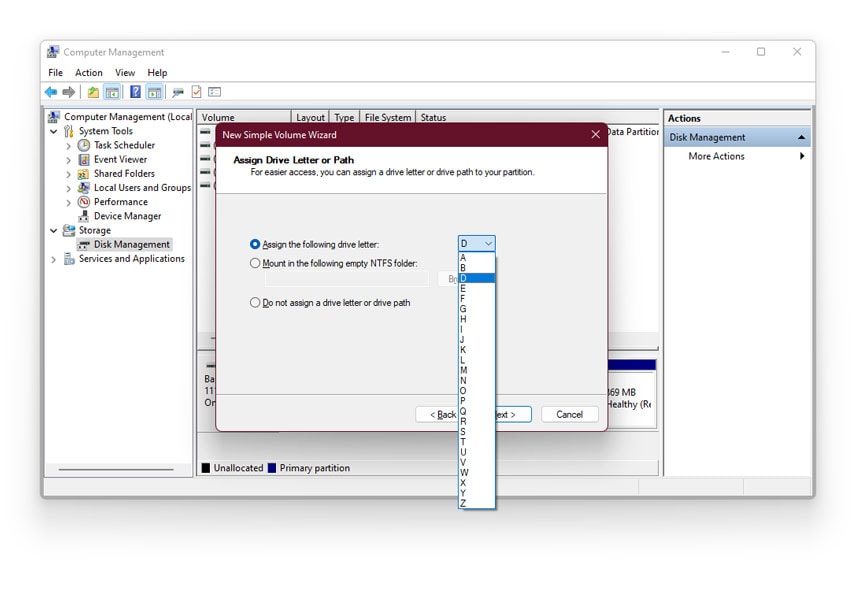
- Tap on Next
- The Format Partition dialog box will now be available on your screen
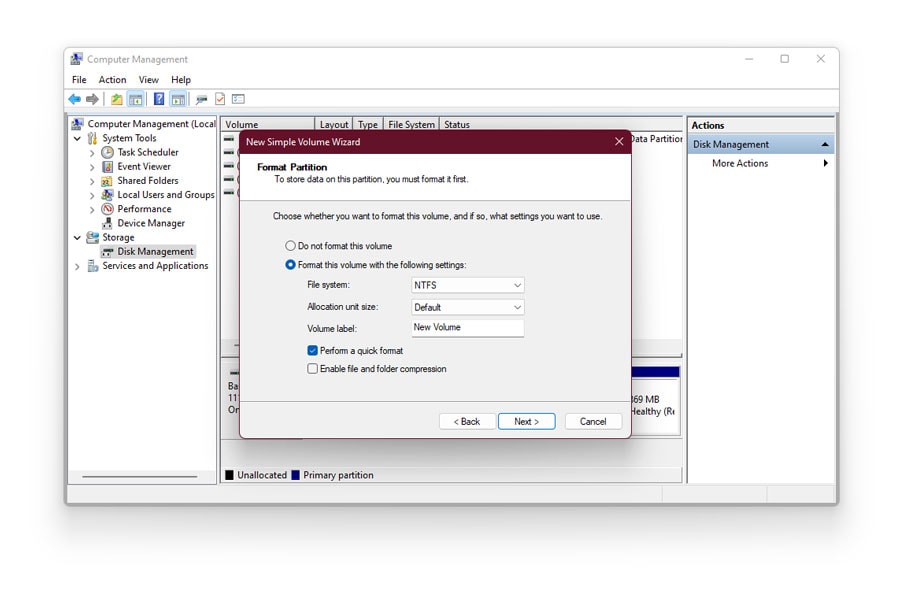
- In this box, do one of the following
If you don’t want to format the volume right now, select Do not format this volume and then select Next.
To format the volume with the default settings, select Next.
- Click Finish
3. Delete Existing Partition in Windows 11
At times, we tend to create unnecessary extra partitions. This can lead to further complexities and can cause potential security issues within your system. In such cases, deleting an existing partition can get your problem solved. To delete an existing partition in Windows 11 using windows disk management, follow the given steps.
- Go to Computer Management by right-clicking on the Start Menu
- Tap on Storage > click on Disk Management
- Right-Click on the disk partition, you wish to delete
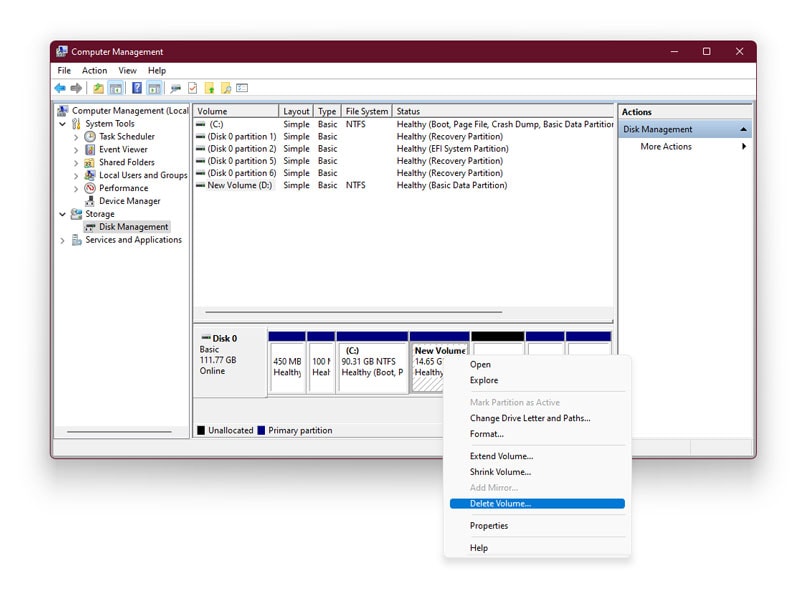
- Next, select the Delete Volume option
Note: Deleting an existing disk partition volume in Windows 11 will wipe out every ounce of data present on that drive. Therefore, ensure that you backup all your important data, files, and folders before deleting an existing volume and partition.
4. Extend an Existing Partition in Windows 11
If you find that either of your created volumes or disk partitions are running out of storage, you can choose to expand that existing volume or partition using the Windows Disk Management Tool. To extend an existing partition, follow the given steps
- Go to Computer Management by right-clicking on the Start Menu
- Tap on Storage > click on Disk Management
- Right-click on the volume or partition you wish to extend
- Then, click on the Extend Volume option
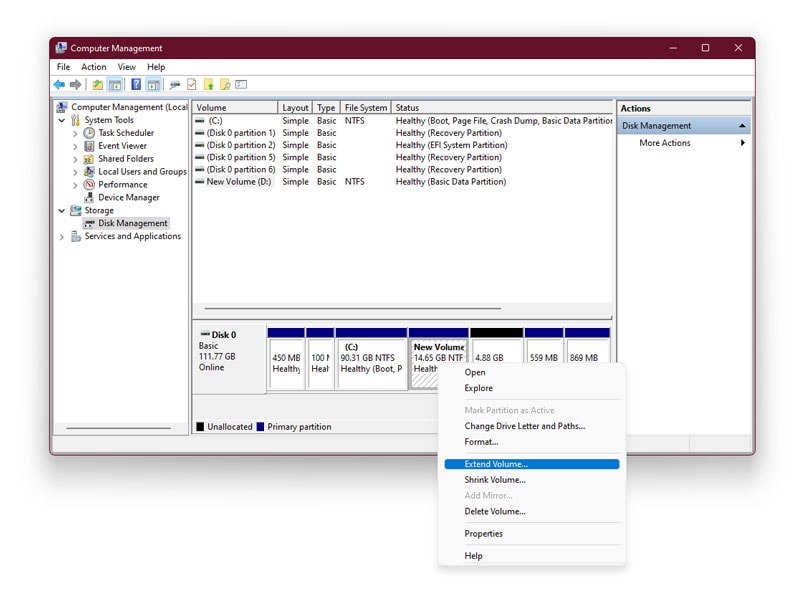
- Click on Yes when prompted
- Now, Windows 11 will automatically allocate free space onto the selected partition or volume.
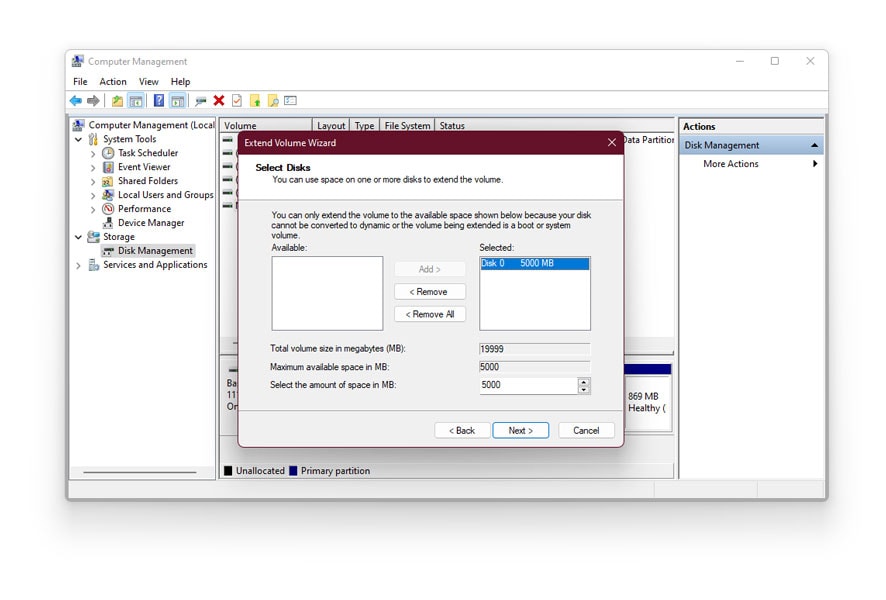
- Finally, click on Finish to merge all partitions
Also read: How to Hide Recent Files & Folders in Windows 11
Conclusion
We hope our article was able to successfully walk you through creating a partition disk on Windows 11. The majority of the modern-day Windows systems tend to have only a single storage drive on them. Before we know it, we tend to overload it with dozens of files. This can lead to reduced performance and can considerably slow down your system.
Partitioning your system can lead to better usability of the storage space present on your system. Creating disk partition in Windows 11 tends to have a sizeable impact in improving performance, manageability, and better availability of system resources. Though the partitions run on the same system hardware, it makes your overall system function as a combination of multiple independent systems.
![Microsoft Store “Something happened on our end” in Windows 11 [Fix]](https://devsjournal.com/wp-content/uploads/2022/03/Microsoft-Store-Something-happened-on-our-end-in-Windows-11-768x384.jpg)