We have come a long way into the world of computers. What has once deemed a luxury is now a necessity. Over the years, the age of technology has made significant improvements in both hardware and software that goes into a computer.
Although the hardware has evolved, the rate at which software is evolving remains unmatched. However, with each new software comes along a few new issues. Despite tremendous development, we are yet to experience a software update free of any annoyances or issues whatsoever.
But with software engineers working round the clock, we now have diagnostic tools that can easily detect and fix any major or minor issue you have with your system. Similarly, this article will be discussing how to start Windows 11 in Safe Mode using multiple methods.
What is Safe Mode?
Most of the time, Windows can be plagued with several issues that either causes it to malfunction or crash altogether. As such, booting your system into Safe Mode helps detect the origin of the problem while simultaneously working on a potential solution against the same.
Safe Mode limits our computer to essential functions, with only core drivers and network services available for use. If you happen to experience some problems after installing something on your computer, Safe Mode can help you figure it out.
- You can also uninstall previous programs that have potentially caused any issues like Windows 11 freezing randomly or a black screen with mouse cursor.
- Safe Mode can also help get rid of malware in your system using Windows Defender.
- If you opt for Safe Mode with Networking, you can download efficient antivirus software for your system’s overall protection and can even fix kernel security check failure BSOD in Windows 11.
- If there’s some stability issue, you can also run System Restore in Safe Mode.
Note: If your system crashes even when in Safe Mode, it is time to take it to an expert since it is likely that faulty hardware might be causing the problem.
If your hardware drivers cause system instability, you can always download and update Windows drivers from your manufacturer’s website directly on Safe Mode. Safe Mode doesn’t use your hardware drivers, so the instability issue is not affected.
Types of Safe Mode
There are three different types of Safe modes to boot into Windows 11.

1. Safe Mode
As easy as it gets. This is the most straightforward Windows 11 safe mode, which requires the least amount of drivers, and no-third applications are needed. It automatically installs all the basic drivers.
However, it hampers the overall graphics quality and gives you big and unclear icons on your screen. The mode is indicated by the words “SAFE MODE” written on all four corners of your PC screen.
2. Safe Mode with Networking
A step up from the traditional safe mode, this safe mode in Windows 11 installs the network drivers and services and the basic drivers that allow you to access the Internet and stay connected to the grid. However, it is NOT recommended to browse the Internet when your system is in safe mode.
3. Safe Mode with Command Prompt
This is by far the most complex Windows 11 Safe mode. Upon selecting this option, the system will present you with a unique strip-down session wherein only the command prompt BLACK window appears on the screen and no the GUI. This is generally used during advanced troubleshooting. Note that NO drivers are installed during this safe mode.
How to Start Windows 11 in Safe Mode
Once you have a clear idea about the three different types of Safe Modes in Windows 11, you will be ready to make the right call when prompted. Now, let us move on to discuss the various ways and methods using which you can boot into Windows 11 Safe Mode.
1. Boot into Windows 11 Safe Mode from Settings
To access settings, press “Windows + I” simultaneously on your keyboard. This will open the settings menu on your screen. When in the settings menu, follow the steps given
- In the Settings menu, look for “Update and Security.”
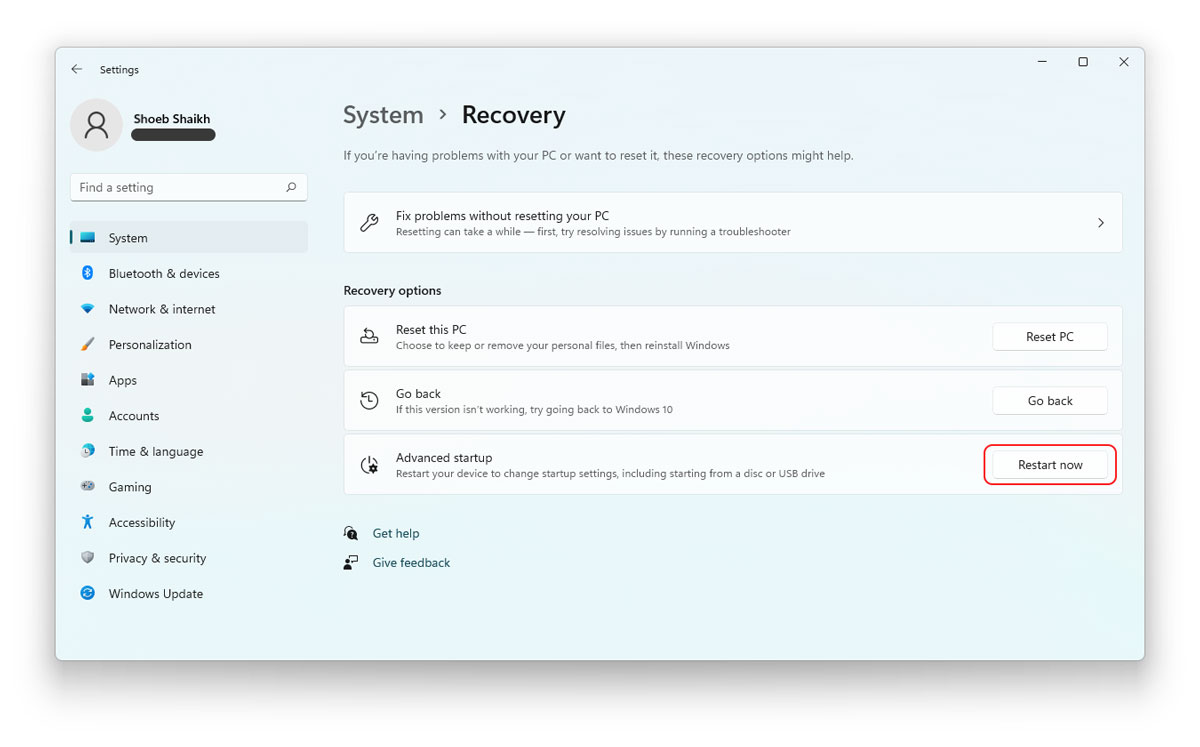
- Go to Advanced options and click on Recovery.
- Under “Advanced startup,” click “Restart now.”
- After a successful restart, your computer now shows an option screen. Just choose Troubleshoot > Advanced Options > Startup settings > Restart.
- After the Restart, you will see more options. If you want to enter Safe Mode without networking, hold down F4 or 4. If you’re going to boot to Safe Mode with Networking, press F5 or 5. You can now start troubleshooting your computer.
If you want to leave Safe Mode, and go back to regular operation, restart your computer.
2. Boot Windows 11 in Safe Mode from Start Menu
Using this method will NOT directly boot your windows 11 into safe mode. Instead, this method allows you to access the Windows RE (Recovery Environment) quickly.
To boot into windows 11 safe mode from the start menu, follow the given steps.
- Press the “Windows” key to launch the Start Menu
- Click on the “Power” button icon
- Hold “SHIFT” and click on “Restart.”
- Your Windows 11 will now restart into RE
- Select Troubleshoot
- Tap on Advanced Options
- Click on Startup Settings
- Click on the Restart option at the bottom right of your screen
- You will now different options marked from numbers 1-9
- Numbers 4, 5, and 6 are the three different types of safe modes available

- Press the number of the mode you want to boot Windows 11 ( 4, 5, or 6)
- This will now boot Windows 11 into safe mode
3. Boot into Windows 11 Safe Mode from Lock-Screen/Sign-in
To boot into Windows 11 Safe Mode from your lock-screen/sign-in menu, follow the given steps.
- Restart your computer.
- After starting up, you will see a sign-in screen.
- On the bottom right of the display, you will see a “Power” button.
- Now, tap “Restart” while holding down the “Shift key.”
- This will restart your computer again
- Your Windows 11 will now restart into RE
- Select Troubleshoot
- Tap on Advanced Options
- Click on Startup Settings
- Click on the Restart option at the bottom right of your screen
- You will now different options marked from numbers 1-9
- Numbers 4, 5, and 6 are the three different types of safe modes available
- Press the number of the mode you want to boot Windows 11 ( 4, 5, or 6)
- This will now boot Windows 11 into safe mode
4. Boot into Safe Mode from Command Prompt
To enter Safe Mode in Windows 11 from the command prompt, follow the given steps.
- Open Command Prompt
- When the Command Prompt BLACK screen is visible, type in the following code
shutdown.exe /r /o
- Press Enter
- Your system will now boot into Windows Recovery Mode
- Wait for a minute for your system to enter the Recovery Environment
- In Windows RE, select Troubleshoot
- Tap on Advanced Options
- Click on Startup Settings
- Click on the Restart option at the bottom right of your screen
- You will now different options marked from numbers 1-9
- Numbers 4, 5, and 6 are the three different types of safe modes available
- Press the number of the mode you want to boot Windows 11 ( 4, 5, or 6)
- This will now boot Windows 11 into safe mode
5. Start Windows 11 in Safe Mode by Adjusting System Configurations
Your system will boot into safe mode every time you use the methods mentioned above. Upon Restart, your Windows 11 will automatically return to normal mode. This will require you to launch your Windows 11 into safe mode after each Restart.
But if you are troubleshooting, you can make modifications to the system configurations. These modifications will launch your Windows 11 into safe mode every time you start your computer and restart. Also, this won’t launch your Windows into RE and proceed directly to Safe Mode.
To boot into Windows 11 safe mode by tweaking your system configurations, follow the given steps.
- Launch the Run command ( Windows + R )
- Type “msconfig” into the search box
- Press Enter
- This will now launch the system configuration window
- When in system configuration, navigate to the Boot tab
- Select the checkbox for Safe Boot under “Boot Options.”
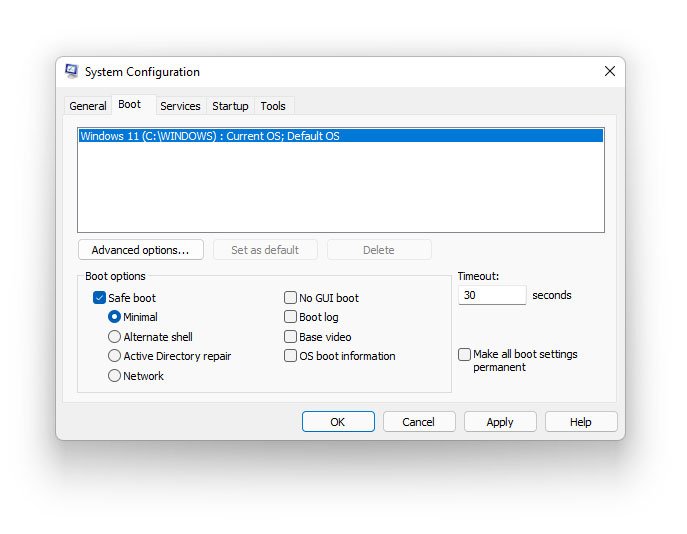
- Tap OK
- Click on Restart when the confirmation bar appears.
You have now successfully modified your system configurations that will start Windows 11 in safe mode every time you start or restart your system.
To launch Windows 11 normally, follow the steps mentioned above and UNCHECK the checkbox for Safe Boot under Boot options. Then, save the changes and click on Restart when the confirmation bar appears.
6. Boot into Safe Mode while Windows 11 is Shut Down
All the methods mentioned above only work when Windows can boot up normally. However, some issues can be severe enough to prevent windows from starting altogether. In such cases, you can fake crash your system and wait for Windows to boot up. Note that this method is only to be utilized if Windows doesn’t launch as it could potentially damage the system.
To boot into windows 11 safe mode using forced shut down, follow the given steps.
- Turn On your computer.
- Wait for Windows 11 to boot
- When Windows boots, immediately press and hold the power button to shut down your system
- Repeat this process thrice
- When you turn your system On for the 4th time, it will automatically enter Automatic Repair Mode.
- Windows will now run its diagnostics to detect and fix the issues
- However, it won’t find any issues since you fake crashed your system
- The Automatic Repair Window will now be visible on your screen

- Select Advanced Options
- This will prompt your system to enter Windows RE
- Wait for a minute for your system to enter the recovery environment
- Your system will now enter Windows RE
- Select Troubleshoot
- Tap on Advanced Options
- Click on Startup Settings
- Click on the Restart option at the bottom right of your screen
- You will now different options marked from numbers 1-9
- Numbers 4, 5, and 6 are the three different types of safe modes available
- Press the number of the mode you want to boot Windows 11 ( 4, 5, or 6)
- This will now boot Windows 11 into safe mode
Also read: How to Fix Automatic Repair Loop in Windows 11
7. Enter Safe Mode in Windows 11 using a Bootable USB Device
Note that this step is to be used only when all the above-mentioned methods yield no result. If you can’t fake crash your system, you will need to launch Windows 11 Safe Mode using a bootable USB device.
This will require you to have another PC in place to create a bootable USB device. Once a bootable USB device has been created, plug it into the malfunctioning device and turn it on.
To Boot Windows 11 in Safe Mode using a Bootable USB, follow the given steps.
- When the screen light comes, press ESC to enter the Startup Menu
- Look for “Boot Device Options” (F9)
- This will open the Boot Manager on your system
- Using the arrow keys, select the USB drive you have booted earlier
- Press Enter
- This process might take a few minutes, so do NOT turn off your system
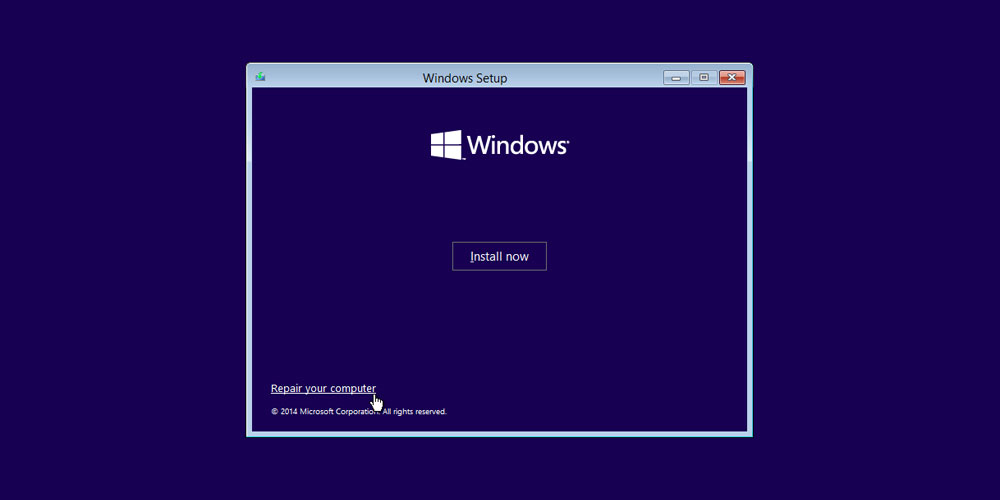
- When the Setup Loads, select the Language, time, and Currency Format
- Click NEXT
- Locate the Repair Your Computer option at the bottom-left of the setup window
- Select Troubleshoot
- In Troubleshoot, select Command Prompt
- When the CMD window appears, type in the following command.
- bcdedit /set {default} safeboot minimal
- Hit Enter
- Upon successful execution of the command, close the CMD window
- Tap Continue
Conclusion
Mentioned above are some of the methods using which you can boot into Windows 11 Safe Mode. Note that these mentioned methods are arranged as per the severity of the crash and should be applied serially.