Samsung’s new flagships S8 and S8+ are doing well in the smartphone market. They have their unique and all round capabilities. In fact, they are the best Android smartphones to buy for now. What’s more? Rooting, custom ROMs, kernels will push up the device boundaries, which Samsung has set to them. Here is our guide to unlock, flash TWRP and Root the Samsung S8 and S8+.
Prerequisites:
- Latest Samsung Odin (Samsung’s Flash Tool) and driver package
- Official TWRP for S8/ S8+ (.tar image)
- dm-verity and force encryption disabler zip to disable the encryption.
- Magisk zip, which enables the root access.
- A bit of patience and presence of mind to follow up the things.
- This process will erase all the data on the device.So, backup all the data on the target device.
Compatible Device models:
- Samsung Galaxy S8 – SM-G950F, SM-G950FD, SM-G950N, SM-G950X.
- Samsung Galaxy S8plus – SM-G955F, SM-G955FD, SM-G955X, SM-G955N.
- This guide is strictly for the Exynos variants, should not be followed by Snapdragon variants. We are not responsible for your errors. Follow this guide at your risk. Unlocking the device voids warranty of your device.
Initial Steps to follow:
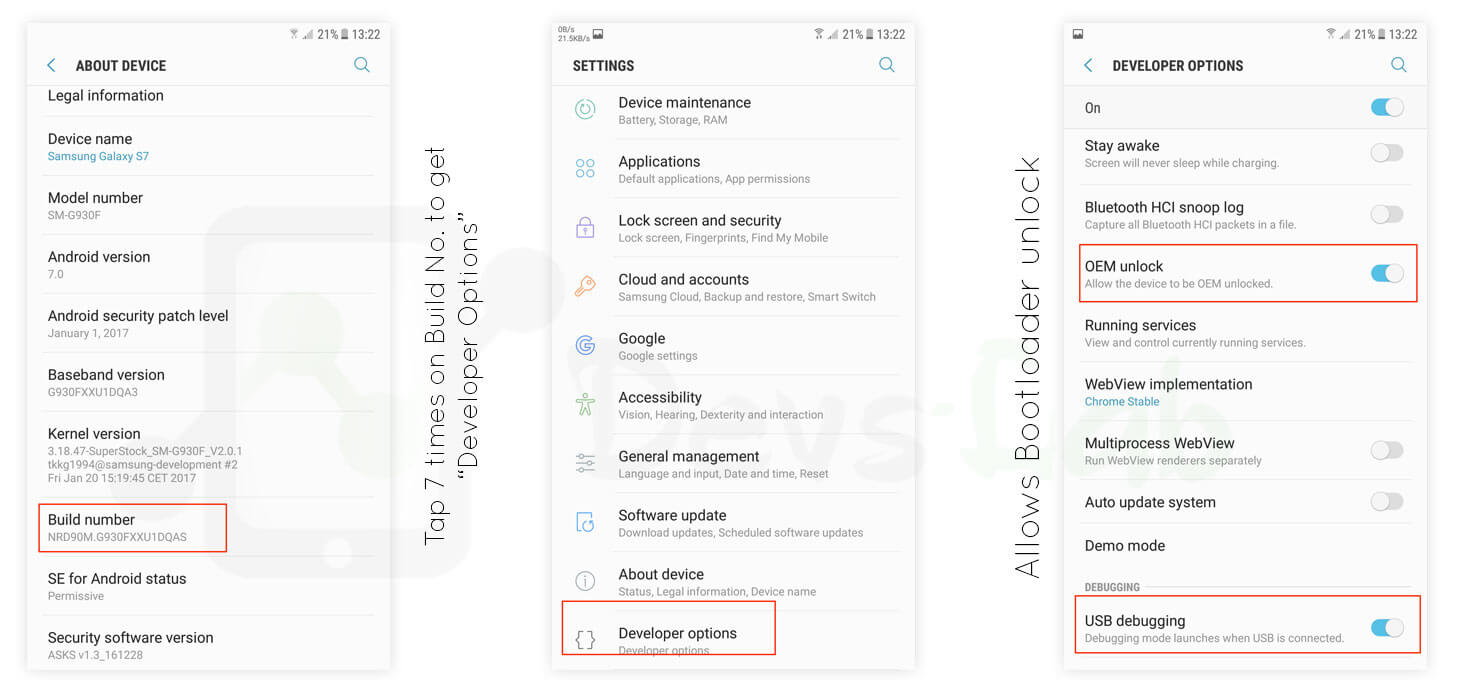
- In your device, go to Settings > about the device. Tap seven times on Build number to enable Developer options. Also, Match up your S8/S8 Plus’s model number.
- Then go to Settings -> Developer options and enable OEM Unlock option.
- Download and Install standalone driver package for Samsung Mobile Phones.
Unlock Galaxy S8/S8+ Bootloader & Flash TWRP:
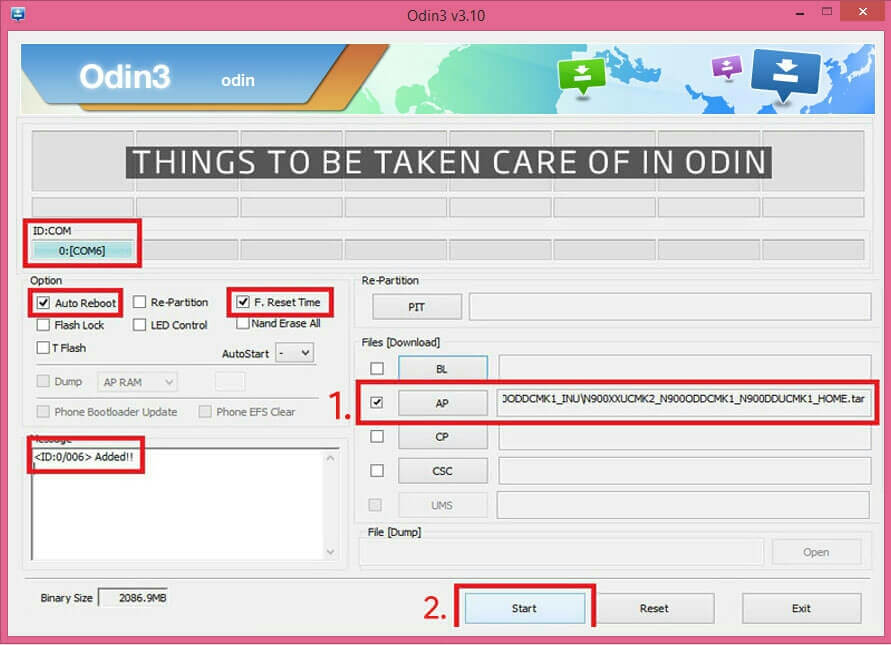
- Download Odin (Samsung’s Flash Tool) to your computer and Extract it. Select the .exe file, Right click>Run as adminstrator.
- Download the appropriate .tar image of TWRP from the official site.
- Power-off the target device.
- Press and Hold [VOLUME DOWN] + [BIXBY] and then press [POWER] button. A warning appears.
- Read the warning carefully, If you are ready to go ahead, press [VOLUME UP] to get into Download mode.
- Connect your S8/S8+ using C-type cable. If you have the drivers installed, your device should be detected.
- You should see Added in the ODIN Log box. Also, the ID: COM port will change into blue.
- Open Odin and place that TWRP tar file in the [AP] slot.

- Click the Options tab on Odin and uncheck the Auto Reboot option.
- Now click Start on Odin and wait for the TWRP installation process to finish.
- If the flashing completes successfully, you will see the box above the ID: COM port light up green with a PASS message.
- You need to boot your phone into the recovery mode. Hold [VOLUME DOWN] + [BIXBY] + [POWER] on your phone at same time.
- Immediately swap the Volume Up as soon as the screen goes blank while still pressing the Home and Power keys. DO NOT release [VOLUME UP] + [BIXBY] + [POWER] until you reboot into TWRP.
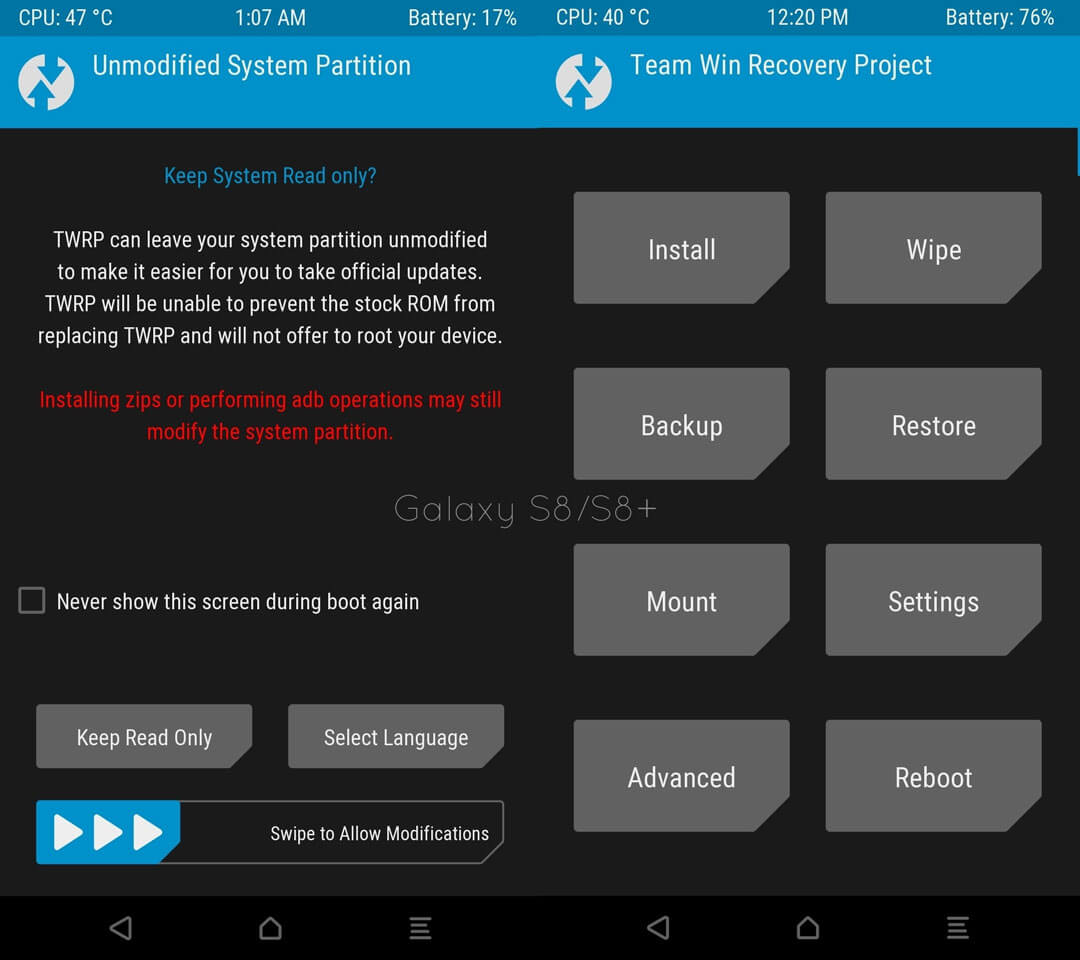
How to Initialize TWRP Recovery in Galaxy S8/S8+
Step 1. You should be in TWRP now. At this point, you will see a screen asking you to allow system modifications.
Step 2. Do not allow modifications at the first time. Tap on ‘Keep Read Only’ and then backup your unmodified system to sd card using TWRP. You can replace this backup in case you need OTA updates.
Step 3. Go to “Wipe” menu of TWRP, and you will find “Format Data.” Press “Format Data” and type “yes” to continue.
Step 4. Get back to “Reboot” menu and Press “Recovery” to reboot into TWRP.
How to flash Encryption Disabler zip file
Step 1. Download the latest dm-verity and force encryption disabler zip on your computer.
Step 2. Transfer the zip to your phone.
- Method 1: MTP: Connect your phone to the computer and just copy the zip to internal storage. If the device does not show up on your PC, Go to mount menu in TWRP and enable it.
- Method 2: Alternatively you can use ADB: Connect your phone with computer and run command “adb push /path/to/zip /sdcard/”
- Method 3: External SD: Copy the zip to an external SD and insert the card into your phone.
Step 3. Go to “Install” menu of TWRP and flash the encryption disabler zip. Get back and reboot into recovery. TWRP is initialized and fully functional now.
How to Root the Galaxy S8 and S8+:
1. Download the Magisk flashable zip. (You can try SuperSU, which is untested for now.)
2. Transfer the zip to your phone using any of methods mentioned above.
3. Go to “Install” menu of TWRP and flash the zip.
4. Reboot your Device. First boot may take time, so please be patient.
What Can I Do After I Have Rooted My Phone?
Rooting your phone allows you to do many things that you were unable to or now allowed to do on your stock Android, below are just a few examples of what you can do after rooting your phone.
1. Check if your phone is rooted:
The above steps should have rooted your phone, but to make sure that your phone is rooted we will download an app from the play store. You can download any root checker app from the play store and check whether your phone is rooted or not.
2. Backup Data:
Keep backing up your data, apps, contact list, messages especially if you keep flashing ROM in your device. The most used app to back up your data after your phone has been rooted is titanium backup.
3. Remove Bloatware:
One of the biggest advantages of rooting your phones is that you get to remove those annoying bloatware’s that are present on all stock Android phones. Bloatware’s don’t only take up space but also slow your phone down while forcing you to look at those apps. You can learn how to remove bloatware from our article “How to remove Pre-installed bloatware Apps from Android”.
4. Overclocking:
Overclocking is the process of making a computer or component operate faster than the specified clock frequency by modifying system parameters. Overclocking your phone indirectly also leads to an increase in battery life.
To overclock your phone, you would be required to flash a custom kernel. A Kernel is the core of the operating system, it manages the systems hardware to serve the needs of the application. Custom Kernels also allow you to improve and modify other aspects of your phone.
We then use an app to set the minimum and maximum clock rates. It is advisable to be conservative with the maximum values and slowly increase the maximum clock rate depending on how your device handles it. If your phone freezes or crashes, you have taken a step too far.
5. Install Themes:
The default home themes and icons can get pretty boring. After rooting it is possible to change these themes. You can also change the font and appearance of the navigation bar and the icons of your phone. There are loads of themes, icons and fonts to chose from, therefore never making it oring for you to stare at your phone. Here are a few free themes you can download.
6. Install Incompatible Apps:
After Rooting you can download apps that were previously incompatible with your phone. For eg: You will now be able to download that you were previously unable to download because of your region you are in. There are also apps that work better after your phone has been rooted. You can find some of the best rooted apps in our article “Top 10 Best Android Phone Apps For 2019“
Conclusion
Now that you have completed rooting your flagship device.You can check out our list of Top 10 Apps for Rooted Smartphones. We will notify you once Xposed Framework is ready for your device, stay tuned. If you are stuck in between, let us know from comments.


why “official twrp” they are too old vers. as examp. unofficial twrp
for my galaxy note 3 (n9000q) is 3.6.1-0 but official ist that 2.6
Everytime I try to install the No-Verity 6.1 Zip, it fails to install. Anyone know a fix
I get an error message, it says
Updater process ended with Error: 1
Error Installing zip file ‘/sdcard/no-verity-opt-encrypt-6.1.zip’
But how do I unlock the bootloader???
The article states directly starts from flashing TWRP.
How am I supposed to Unlock the bootloader first?
Thank you very useful.. you are the man
Thanks for this guide