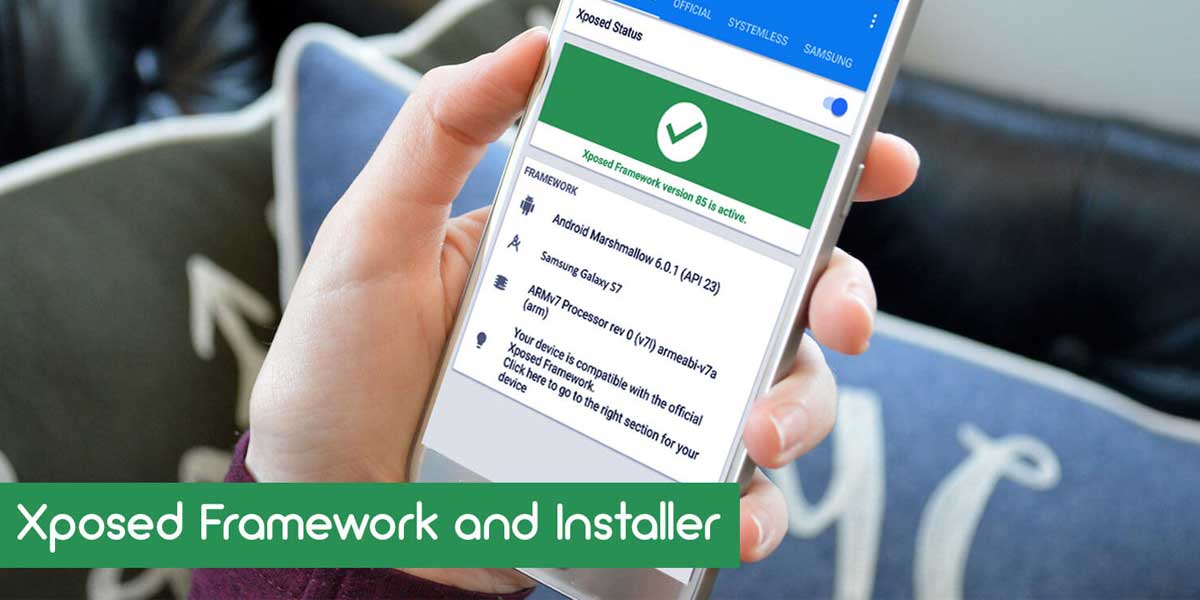
The Samsung Galaxy S7 and S7 edge has some great specs but comes with the new TouchWiz which I personally don’t like, as it looks more of like a Chinese Smartphone UI. To change few things, you can either install a custom ROM or install Xposed Framework to change just few parts that you don’t like. Today in this, I’ll explain you how to install the Xposed Framework and Installer in your Samsung Galaxy S7 or S7 Edge.
If you’re worried about damaging your device & you end up doing something that just broke your device or it stopped working, you can easily roll back to previous Stock firmware using the “Return to Stock” guide at the end of this article. In order to begin installing of custom softwares like the Xposed Framework, you need to have root access in your Samsung Galaxy S7 or S7 edge. You can refer our guide on: How to root Galaxy S7 and S7 Edge
How to Install Xposed on Samsung Galaxy S7 and S7 Edge
Prerequisites:
- Rooted Samsung galaxy S7 or S7 Edge: Guide
- FlashFire for your smartphone.
- Xposed Framework & Installer : Xposed for Galaxy S7 and S7 Edge
- Transfer all the ZIPs in your device’s internal storage
Installing Xposed Framework in Galaxy S7 and S7 Edge
Step 1. Launch FireFlash on your device and click (+) button and add the ZIP. To add the ZIP, select “Flash ZIP or OTA”. Now locate the downloaded Xposed Framework zip file & flash it.
Step 2. Now check “Mount/system read/write” and leave the rest unchecked.
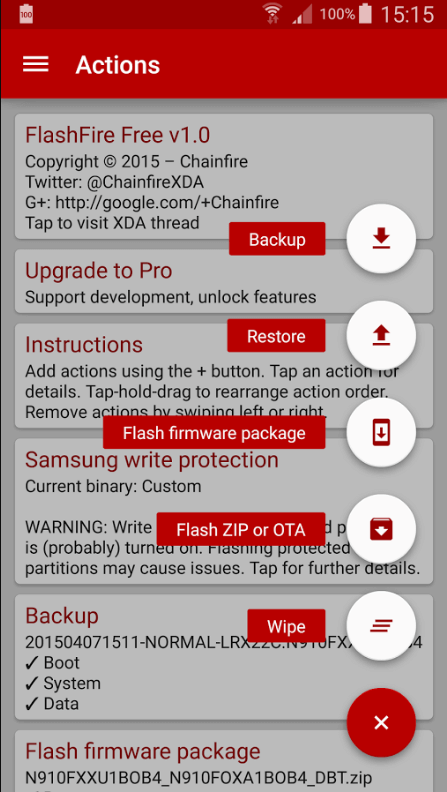
Step 3. Click (+) again. Now select Wipe and only choose wipe the “Dalvik Cache” and “Cache partition” (or you could format your device too as per your preference.)
Step 4. Now click “Flash” and you will notice the display flash before the device reboots twice.
Step 5. In the final boot, the animated screen can take a lot of time (3-5 minutes or longer) then it changes to “Android is starting…”, green screen with animated gears indicating that it is ‘optimizing’ apps
Step 6. Do not panic if it takes a little more time. The system is creating a new Dalvik cache which takes time. Once it reboots, enjoy your rooted device.
Step 7. Now that you’re done installing the Framework, we need to install the Xposed Installer apk.
Alternate Method:
You can also use the TWRP recovery to flash the Xposed Framework file. Everything remains the same, you just need to boot into recovery & flash the Framework zip file.
How to Unroot Samsung Galaxy S7 and S7 Edge
DISCLAIMER : This will ERASE all the data on your device so make sure you have a necessary backup of your device!
Prerequisites:
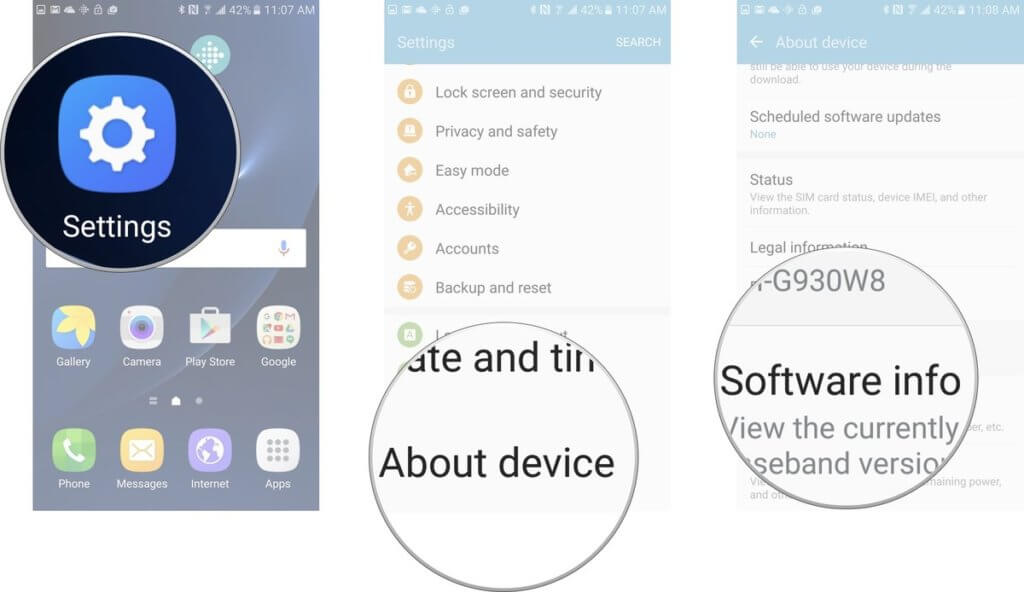
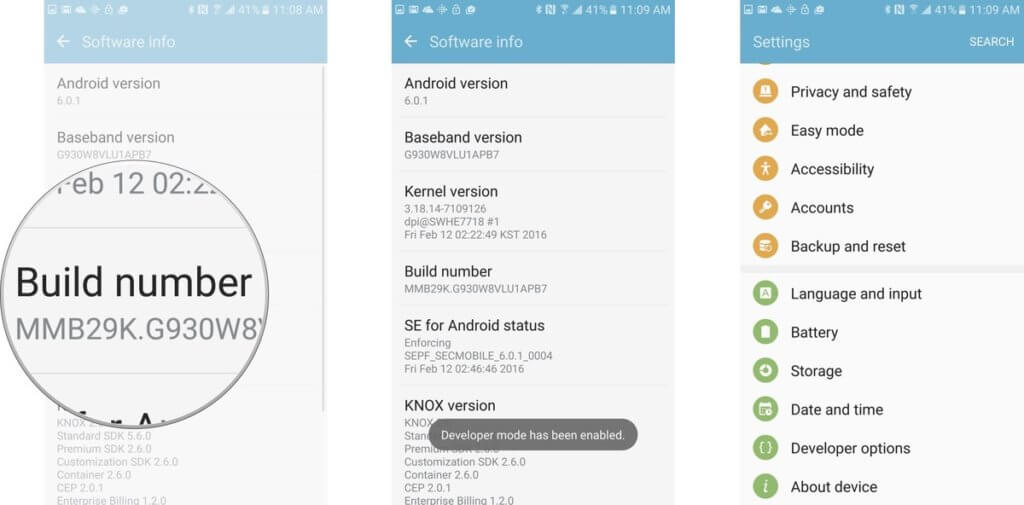
- Samsung Galaxy S7 or Galaxy S7 Edge. Also, note down the Build Number from Settings -> About Device.
2. Windows PC with suitable Galaxy S7 and S7 edge drivers installed.
3. ODIN for Samsung: DOWNLOAD
4. Search the stock firmware for Your device by model number: DOWNLOAD
Steps to Unroot Samsung Galaxy S7 and S7 Edge
Step 1. Power off your device and press and hold Volume Down + HOME + Power button simultaneously until you see a warning sign.
Step 2. Press volume UP to enter into ODIN download mode then connect your device to the windows PC.
Step 3. Unzip both ODIN and Stock Firmware files.
Step 4. Run Odin.exe from your extracted ODIN files.
Step 5. You should see a Blue box with a COM number. If you don’t, check if the drivers are installed properly then reconnect USB again.
Step 6. If your stock firmware has more than 1 file, you will need to flash them in the BL, AP, CP, and CSC boxes, just match them with the beginning of the file names. If you only see one file, choose “AP” and select the file.
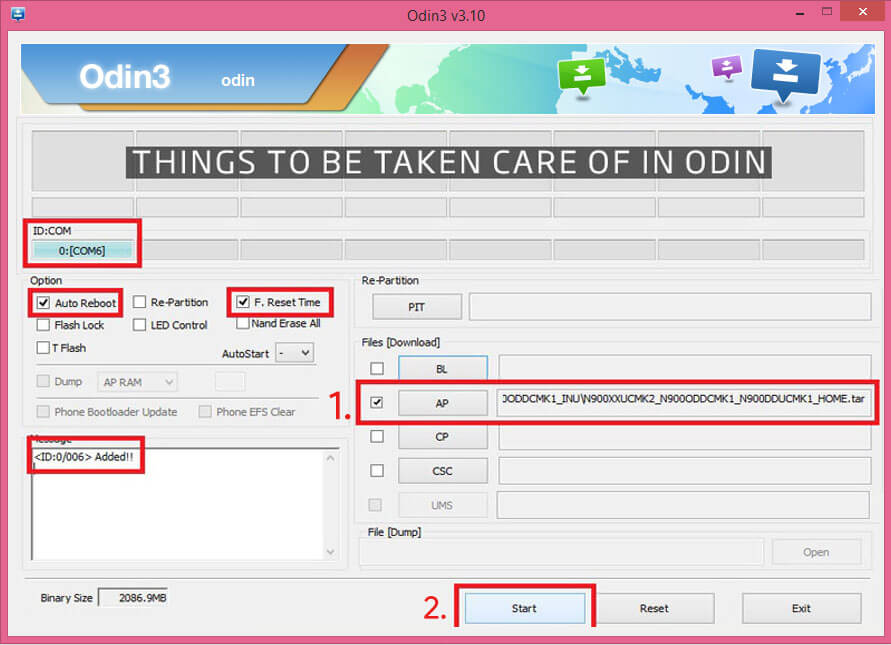
Step 7. Now click “Start.”
Step 8. The flashing process may take sometime. After it you’re device will reboot and you’ll be treated with the WELCOME screen.
Step 9. You’re Done! Enjoy your un-rooted stock device with stock firmware.
This method does not trigger the KNOX counter so you still retain your warranty.
Congratulation! You have now successfully reset your phone and now you can install your apps again or start over with Rooting process again. If you root you can easily uninstall the biggest problem of the software- Bloatwares and add additional functionality, improve your battery life, over-clock or under-clock the CPUs and install apps that requires ROOT functionality.