The Galaxy S8 and S8+ have the sexiest looking design & hardware this year but not everyone would say the same thing about the software. That is precisely why we are writing this Galaxy S8 & S8+ rooting guide. So, if you are one of those guys who is thinking the same thing, follow this easy guide and you should have a rooted Galaxy S8/S8.
Some XDA members have released a working root method for both the flagship duo. But keep in mind the method is specific to Exynos variants of the phone. How many Exynos variants, you ask? well, we list them below. But before you decide to pull the trigger, read this.
Disclaimer: Rooting your device in most cases voids warranty. Also, rooting a device is one of the more risky processes of Android customization. Even though we take care to detail steps as much as possible, you might end up with an expensive paperweight. Devs-Lab.com does not take responsibility for it.
Galaxy S8 models compatible with this root method
- SM-G950X
- SM-G950F
- SM-G950N and
- SM-G950FD
Galaxy S8+ models compatible with this method
- SM-G955X
- SM-G955F
- SM-G955FD and
- SM-G955N
How To Root The Galaxy S8 And S8+
In this detailed Galaxy S8/S8+ rooting guide, we will first flash TWRP using ODIN and then install Magsik zip files. First, we will list the prerequisites, then we will guide you to install TWRP, then finally install Magisk to complete the process.
Prerequisites
- First, confirm that you have one of the above variants of the Galaxy S8/S8+
- Install latest ADB USB drivers on your PC
- Enable USB Debugging and OEM unlock. (Both are found in the Developer mode in Settings)
- Backup all essential data and charge up your device to at least 50%
- TWRP recovery for the Galaxy S8
- TWRP recovery for the Galaxy S8+
- Latest version of ODIN
- Download disable dm-verity zip: no-verity-opt-encrypt-5.1.zip
- Latest Magisk: Download
How To Install TWRP In Galaxy S8/S8+
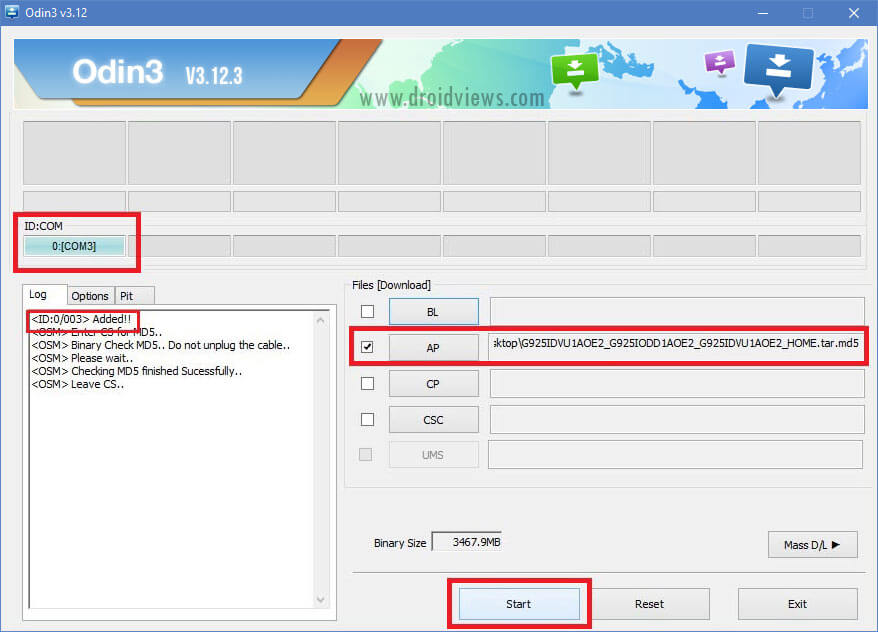
- First of all, unzip the ODIN files onto a new folder on your PC. Then open the ODIN3.exe file
- Next reboot your phone into download mode by pressing and holding the Volume Down+Bixby button+Power buttons at the same time.
- In download mode connect your phone to the PC. You should see the Added!! in the ODIN Log box as soon as your phone is detected and you have the latest drivers. The ID: COM port should also be highlighted in blue.
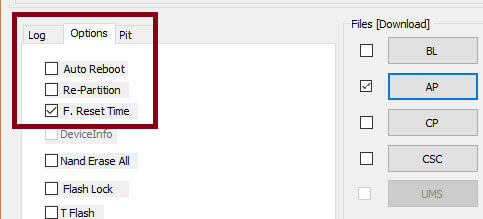
- Now, hit the AP/PDA button in the ODIN interface and select the respective TWRP recovery.tar file of the respective device. Also, uncheck the Auto Reboot option in the Options tab.
- Click on Start now, and this should finish the TWRP installation process. When you see the box above the ID: COM turn green with PASS written, it means the process was successful. Now you can disconnect your phone from your PC.
With this, we now have TWRP installed. Now we need to flash the latest Magisk files via recovery. Below is the process.
How To Root Your Galaxy S8/S8+
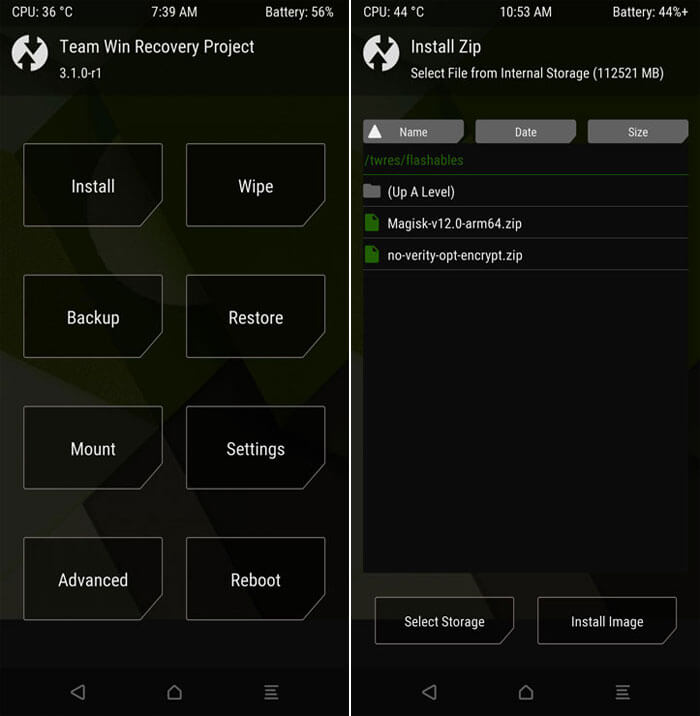
- Boot into TWRP by pressing Volume Down + Bixby + Power buttons and when the screen goes black, press the Volume Up button instead of the Volume Down. Keep the other two keys pressed.
- Then select Keep /system RO. Tap Wipe> Format Data and tap “yes”
- Now, go back and tap the Install button in TWRP. Choose the Magisk file and no-verity-opt-encrypt-5.1.zip file. If you copied these two files to the external storage you should have no problems finding them.
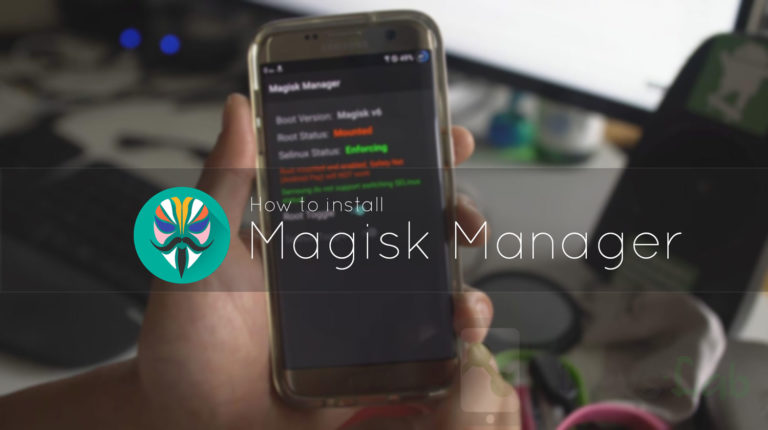
- Finally, swipe the installation confirmation slider to finish the process. When the install is complete, tap Reboot> system. Now when you open Magisk app you should see root verification.
What Can I Do After I Have Rooted My Phone?
Rooting your phone allows you to do many things that you were unable to or now allowed to do on your stock Android, below are just a few examples of what you can do after rooting your phone.
1. Check if your phone is rooted
The above steps should have rooted your phone, but to make sure that your phone is rooted we will download an app from the play store. You can download any root checker app from the play store and check whether your phone is rooted or not.
2. Backup Data
Keep backing up your data, apps, contact list, messages especially if you keep flashing ROM in your device. The most used app to back up your data after your phone has been rooted is titanium backup. You can also backup via flashfire.
3. Remove Bloatware
One of the biggest advantages of rooting your phones is that you get to remove those annoying bloatware’s that are present on all stock Android phones. Bloatware’s don’t only take up space but also slow your phone down while forcing you to look at those apps. You can learn how to remove bloatware from our article How To remove bloatware?
4. Overclocking
Overclocking is the process of making a computer or component operate faster than the specified clock frequency by modifying system parameters. Overclocking your phone indirectly also leads to an increase in battery life.
To overclock your phone, you would be required to flash a custom kernel. A Kernel is the core of the operating system, it manages the systems hardware to serve the needs of the application. Custom Kernels also allow you to improve and modify other aspects of your phone.
We then use an app to set the minimum and maximum clock rates. It is advisable to be conservative with the maximum values and slowly increase the maximum clock rate depending on how your device handles it. If your phone freezes or crashes, you have taken a step too far. To learn how to overclock in more details you can read our article here.
5. Install Themes
The default home themes and icons can get pretty boring. After rooting it is possible to change these themes. You can also change the font and appearance of the navigation bar and the icons of your phone. There are loads of themes, icons and fonts to chose from, therefore never making it oring for you to stare at your phone. Here are a few free themes you can download.
6. Install Incompatible Apps
After Rooting you can download apps that were previously incompatible with your phone. For eg: You will now be able to download that you were previously unable to download because of your region you are in. There are also apps that work better after your phone has been rooted. You can find some of the best-rooted apps in our article.

very good