
If you are interested in buying a premium smartphone, then there are very few options out there. And if you are looking specifically for an Android device, getting an iPhone is not a viable option. This primarily leaves you with Samsung’s Galaxy S and Galaxy Note lineups that are known to offer a lot of features.
While the Samsung Galaxy S lineup gets updated every year with new features and options, the older S10 series is still a great option for a lot of users. Even though it is an older phone, you can still find a lot of things on this phone that makes them a great option even today. The S10 lineup includes a total of three models including the S10e, S10, and the S10+.
Unfortunately, Samsung is known for delaying their updates when compared to other Android devices. As a result, you might be stuck on an older version of Android for a long time. Not only that but some of you might even feel a lack of customization options and might want even more.
To personalize your phone more, you should consider getting your Galaxy S10 rooted. It will allow you to do a lot of things on your phone once it is unlocked. We are here to show you how to root a Galaxy S10 so that you can customise it more. We have included all of the important steps required to root Galaxy S10 that you can find by going through this article until the end.
How to Root Galaxy S10/S10e/S10+ using Magisk?

Traditionally, Samsung smartphones are known to be a bit complicated when it comes to rooting. This is due to the lack of proper tools and a slightly different rooting process. Thankfully, getting your S10 rooted should be fairly easy. Not only does it have a simple to follow rooting process, but you can also find all of the necessary tools since it is a popular Android smartphone.
Another great thing about the Galaxy S10 rooting procedure is that it is highly universal and works with most models. In other words, you can get your Galaxy S10 Plus rooted as well as root S10e Verizon model using the same rooting procedure. This is possible as most of the tools and files used for rooting Galaxy S10 and its different models are the same.
While there are a few rooting methods out there that do not require the use of a PC, we highly advise against it. To successfully get your S10 or S10e rooted, you should use a computer and tools on it which ensure that you do not face any bricking issues.
Thankfully, the whole rooting process is quite easy to follow and carry out on your Galaxy S10 device. The process has been divided into three parts that are mentioned down below so that you can get your Samsung S10 rooted with ease.
Prerequisites
Before you go ahead and start the Galaxy S10 Plus rooting process, there are some things or prerequisites that you have to consider. These are essentially a few basic steps that have to be carried out before rooting S10 devices. Otherwise, you will not be able to root Samsung SM-G975U.
To root Galaxy S10 Plus, the first thing you have to do is to unlock the bootloader. While there are a lot of steps required for it, you have to ensure that OEM Unlocking is enabled on your device. It simply allows the bootloader of your Galaxy S10 to be unlocked using the process we have mentioned here later on. To enable OEM Unlocking on your Samsung smartphone, you can carry out these steps:
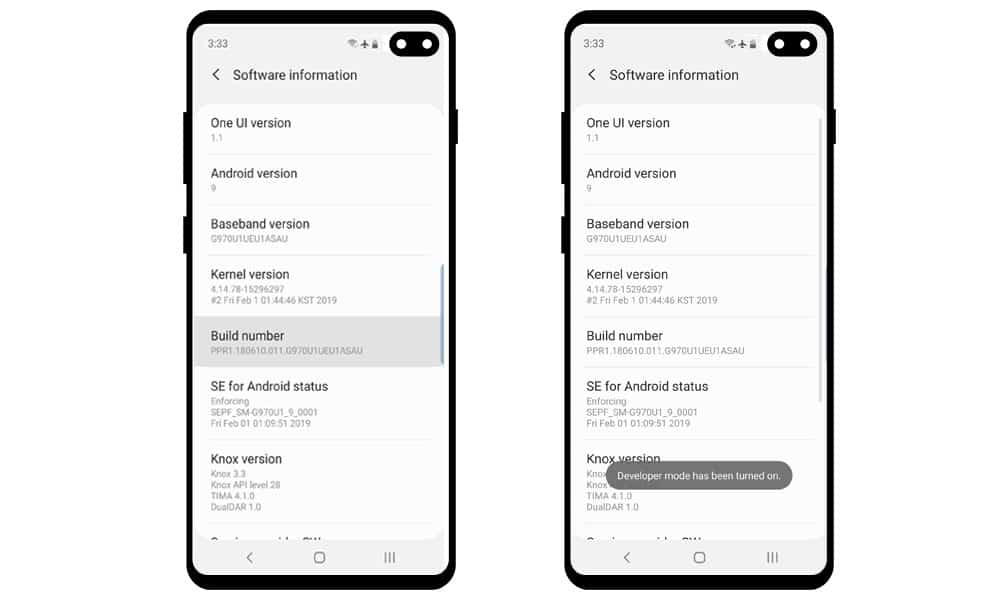
Step 1. Go to the Settings app on your Galaxy S10 and scroll down below to find the About Phone menu.
Step 2. In here, go to Software Information and tap on the Build Number value for 8 times at one go until you see the “You are a developer now” message which is required for enabling Developer Options in Android.
Step 3. Then, go back and head over to the Developer Options menu in the Settings app of your device.
Step 4. After opening the Developer Options, enable USB Debugging Mode, OEM Unlocking, and Advanced Reboot options in the Settings app of your device.
Step 5. Now your Galaxy S10 is fully ready to get its bootloader unlocked so that you can get your Galaxy S10 rooted.
Apart from making your Galaxy S10 root ready as its bootloader is unlocked, you also need to download a few things on your computer. This mainly includes installing a few drivers and tools that will be used to root the Galaxy S10 Plus. You have to simply download and install the Samsung USB Drivers and the latest version of Odin on your computer.
While the USB drivers are there to ensure that your computer can successfully root Galaxy S10 by detecting it when it is in the bootloader mode, as for Odin, it is a tool made for flashing firmware in the Samsung Galaxy phones, other than installing ROMs, it can even be used to get your Samsung S10 rooted.
After downloading the USB drivers and the Odin tool, there are a few other files that need to be downloaded. We have linked firmware’s which you have to download depending on the model of the Samsung Galaxy S10 phone you are using.
● Samsung Galaxy S10 Firmwares: Download
● Samsung Galaxy S10+ Firmwares: Download
● Samsung Galaxy S10e Firmwares: Download
● Samsung Galaxy S10 5G Firmwares: Download
Now that all of the required files and tools have been downloaded and installed, you can go ahead and successfully root Galaxy S10 Plus. But once your S10 or S10e rooting is complete, all of the files stored on it will be deleted. Therefore, it is advised to take a backup of all the files before starting the Galaxy S10 rooting procedure.
1. Unlock Bootloader
To root the Galaxy S10, its bootloader has to be unlocked so that you can flash a custom firmware on your device. As we have already enabled OEM unlocking in the prerequisites section before, there is nothing much left for the bootloader unlock process.
Although, versions of Android newer than Android Pie come with a security feature called Vaultkeeper. This feature is there to ensure that you do not unlock the Galaxy S10 bootloader even if the OEM unlocking option is enabled. While this feature is present in your Samsung S10 device for security purposes, you can still root your device by bypassing it as shown here:
Step 1. First, switch off your Samsung Galaxy S10 device by holding the power button and wait a few seconds.
Step 2. Once it is has been switched off, hold down the Bixby and Volume Down buttons together and connect your phone to your computer using a USB data cable while the buttons are pressed.
Step 3. After that, release these buttons and hold down the Volume Up button instead.
Step 4. Now, your phone will get wiped via a factory reset, and it will automatically reboot into the system.
Step 5. While the bootloader is already unlocked, you can ensure so by going into the Developer Options and check the OEM Unlocking option as it should be enabled and greyed out. If not, repeat all these steps once again to successfully unlock your device’s bootloader.
2. Download and Install Magisk
While most Android devices require you to install Magisk using a custom recovery like TWRP, that is not the case with the Galaxy S10 devices. Instead, you will be installing a modded firmware on your device that comes with inbuilt Magisk so that your device can get rooted. To create this modded firmware, you have to use the Magisk app as shown here:
Step 1. First, install the Magisk Manager Application APK downloaded earlier. Make sure that the Unknown Sources installation is enabled on your device before doing so.
Step 2. Now find the AP_xxxxx.tar file from the firmware files for your phone that you had downloaded earlier and copy it in the internal storage of your Galaxy S10.
Step 3. After that, open Magisk Manager and click on the Install button under the Magisk is not Installed message.

Step 4. Then, click on the Install option once again from the popup window that came on your screen.
Step 5. Here, you have to select the AP_xxxxx.tar file that you had copied to your smartphone’s internal storage earlier.
Step 6. Once that is done, you will find a magisk_patched.tar file in your phone that you have to copy to your computer from your Galaxy S10’s Download folder.
3. Flash Firmware to Root
The final step required to root your Samsung Galaxy S10 successfully is to flash the custom firmware using the Odin tool installed earlier. Once this firmware gets installed, you will find that you have rooted Galaxy S10 successfully. You can easily install the firmware using Odin as shown here:
Step 1. Switch off your Galaxy S10, once it is has been switched off, hold down the Volume Down and Bixby buttons and connect your phone to your computer using a USB cable while holding these two buttons.
Step 2. Now, you should get a warning message on your phone, when you do, press the Volume Up button to enter the Download Mode.

Step 3. Once this is done, open the Odin application on your computer that will be used for flashing the custom firmware.
Step 4. Click on the AP option in the Odin window and select the magisk_patched.tar file that you copied from your Galaxy S10 to your computer earlier.
Step 5. Then, go into the Options of the Odin tool and make sure that the Auto Reboot option is unchecked.
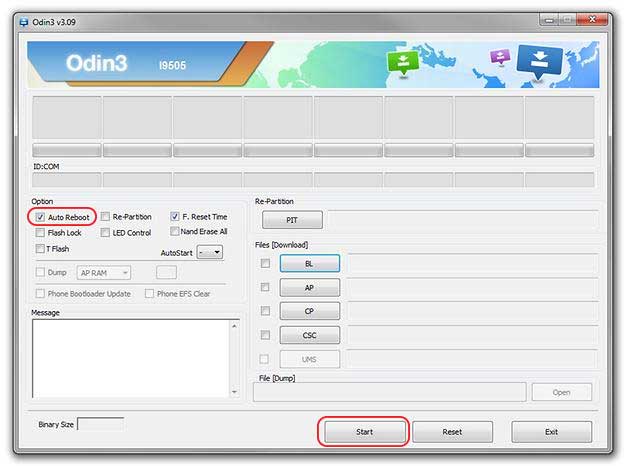
Step 6. After that, click on the Start button in Odin while your phone is connected via a USB cable. This will start the flashing process on your Galaxy S10 device.
Step 7. Once the flashing process is complete, disconnect your phone and hold down the Power button and Volume Down button to exit the Download Mode.
Step 8. Now, hold down the Power, Bixby, and Volume Up buttons at the same time. And just when the screen turns on, leave all the buttons except Volume Up to get into the Recovery Mode.

Step 9. In recovery mode, use the volume keys to scroll up and down to select the Wipe data/factory reset option and press the Power button to select it.
Step 10. After this is done, select the Reboot system now option from the Recovery Mode. Right after that, hold down the Power, Bixby, and Volume Up buttons at the same time. But this time, as soon as the bootloader warning comes, leave all of the buttons.
Step 11. Finally, your Galaxy S10 will be rebooted into the system where you will see the Magisk app installed. You can now start using your rooted Galaxy S10.
FAQs
Conclusion
Samsung is one of the largest smartphone makers out there with its Galaxy S and Galaxy Note series of smartphones being the flagship models. Even though the Galaxy S10 series is a generation older, it still offers a lot of things to the user for the given price. But, some of you might have an issue with the software update situation with Samsung’s smartphones.
This issue can be resolved by simply getting your SM-G975U rooted for modifying the firmware. It offers you a lot of customization options while allowing you to update your device using a custom ROM. You can also successfully get your Samsung S10 rooted by going through this article.
We have mentioned the complete guide on how to root a Galaxy S10 in this article. This includes all of the details that you will need to root Samsung Galaxy S10 successfully. If you still have any doubts about rooting S10 Plus, then make sure to leave your thoughts and questions in the comments section down below.
![[Official] Download Odin v3.14.4 for Samsung](https://devsjournal.com/wp-content/uploads/2016/10/Download-Samsung-Odin-downloader-tool-for-Windows-Mac-768x359.jpg)


My j7 …problem saying the binary is blocked by FaP .and when I try to restart it’s getting off. .plz help me
Does this works for the Samsung SM-G973U from Verizon (USA)?