Motorola Moto G 3rd Gen (2015) is powered by 5.0 inch Display,Snapdragon 410 Quad-core processor, 1GB Ram, Expandable storage and 2470 mAh battery. Rooting unlocks many hidden functionalities and gives a chance to tweak performance and battery life of your smartphone. Rooting not only provides more power but also better battery.
It allows you to remove Bloatware, install custom ROMs, flash different Mods, increase your device’s connection speed & the list goes on and on once you starting digging through the advantages. If you are new to the world of rooting, head over to this page to know more about unlocking and rooting an Android device. If you are familiar with rooting, then continue with this article to know how to Install TWRP and Root Motorola Moto G 3rd Gen (2015).
Benefits of Rooting Smartphone
- Boost your Phone speed & Battery Life.
- Remove Preinstalled crapware like System Apps.
- Remove Bloatwares, Apps like Facebook, Chrome Keep sucking your Ram & battery by running in background So, Among the smartphone geek crowd, applications like these are referred to as “bloatware:” they do nothing but bloat the software by existing as unnecessary applications.
- Tweak your phone like : Increase Video streaming speed, Increase Wifi Speed, Increase SIM detecting Speed, Increase SD read/write speed.
- Most Important & Best part, Install Custom Kernel & Custom ROMS ( I will explain about it in Installing Custom ROM section Custom ROM section )
- Finally, Truly Own your Device, Make it appear in the way you want.
Prerequisites & Downloads
- Motorola USB Drivers.
- Minimal fastboot and install it on desktop.
- TWRP 3.3.1 Osprey – Download
- Magisk Manager – Download
How to Root Moto G 3rd Gen
Stage 1. Unlocking Bootloader of Moto G 3rd Gen through ADB fastboot. Unlocking Bootloader allows flashing third party softwares & change system files from fastboot only.
Stage 2. Installing TWRP 3.3.1 Osprey Custom Recovery in Moto G 3rd Gen. By installing TWRP recovery, you can flash custom zip files like Custom ROMs, MODS & tweaks.
Stage 3. Flashing Magisk file to gain Root in Moto G 3rd Gen. Magisk hooks into your system files & acts as an intermidiate between apps that require root access & system files.
How To Unlock Bootloader In Moto G 3rd Gen
Step 1. First Install Motorola USB Drivers & Mniml ADB Tools in your PC.
Step 2. Turn off your device. Now, Turn The device ‘ON’ by holding volume down button and power key for 5 sec and release it. You will see Boot loader screen.
Step 3. Now, Plug in your device to PC.
Step 4. Goto C: > android-sdk > platform-tools OR Where you have installed Android SDK. Now Hold the shift key and right click on the mouse in any black area in SDK Folder, you’ll find an option as “Open Command window here”. Click on it.
Step 5. Type the below code in the command prompt / Terminal.
fastboot oem get_unlock_data
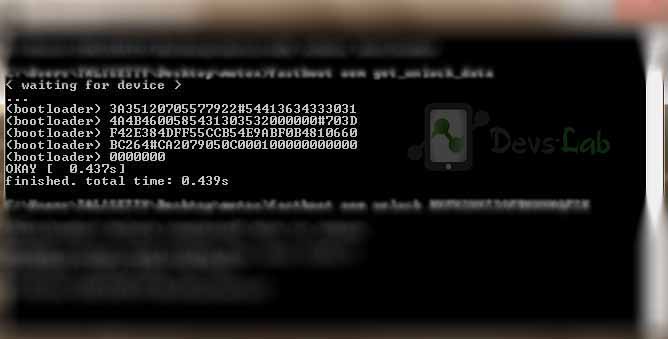
Example: On a Windows Desktop, the returned string format would be$ fastboot oem get_unlock_data
(bootloader) 0A40040192024205#4C4D3556313230
(bootloader) 30373731363031303332323239#BD00
(bootloader) 8A672BA4746C2CE02328A2AC0C39F95
(bootloader) 1A3E5#1F53280002000000000000000
(bootloader) 0000000
On a Mac OS Desktop, the returned string format would be INFO0A40040192024205#4C4D3556313230
INFO30373731363031303332323239#BD00
INFO8A672BA4746C2CE02328A2AC0C39F95
INFO1A3E5#1F53280002000000000000000
INFO0000000
Step 6. Paste together the 5 lines of output into one continuous string without (bootloader) or ‘INFO’ or white spaces. Your string needs to look like this:
0A40040192024205#4C4D355631323030373731363031303332323239#BD008A672BA4746C2CE02328A2AC0C39F951A3E5#1F532800020000000000000000000000
Step 7. Now, Goto Motorola’s Boot loader unlock site & login with Google. Paste the entire code in the input box which says, Check if your device can be unlocked by pasting the string by pasting the string in the field below & clicking can my device be unlocked.
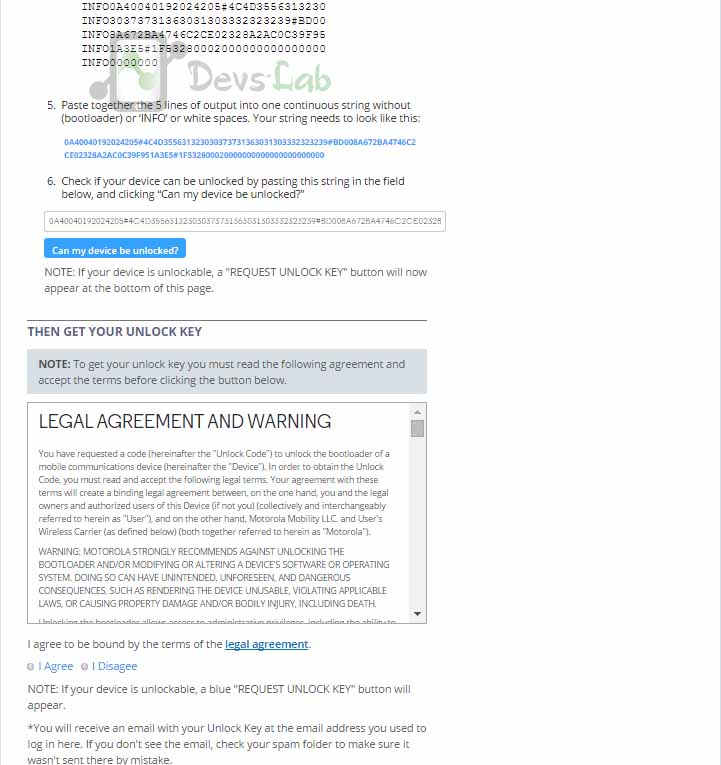
Unlock Moto G 3rd Gen
Step 8. After pasting click on “Can my device be unlocked.” After that, you’ll see a request unlock key option at the bottom of the page. Check I agree and click Request Unlock Key. You’ll receive the unlock key in your Gmail.
Step 9. Copy the key from your Gmail Account and paste in a notepad file, Open the previously opened Command prompt / Terminal & type:
fastboot oem unlock "YOURKEY" (Replace YOURKEY with the key you received)
Step 10. Congratulation, you have successfully unlocked the Bootloader of your Moto G 3rd Gen.
How to install TWRP Recovery in Moto G 3rd Gen
Step 1. Download the TWRP 3.3.1 Osprey recovery.img file from the above Prerequisites & Downloads section.
Step 2. After unlocking Bootloader of Moto G 3rd gen ,Copy Magisk zip in you Device memory that you downloaded from the above link.
Step 3. Now, turn off your device. Again turn on your device by holding (Volume down button and power button) at the same time for 6 sec and release it you will again see the bootloader.
Step 4. Now connect your device to your PC. Then copy twrp-osprey-3.3.1-.img that you Downloaded above and paste it in the mfastboot folder.
Step 5. Now navigate to mfastboot folder where you installed earlier. Hold the shift key and right click on the mouse the in any blank area in that folder you will see “Open command window here” click on that.
Step 6. Now type the below code in command prompt and hit enter. (Rename the recovery file you have downloaded to twrp.img)
fastboot flash recovery twrp.img
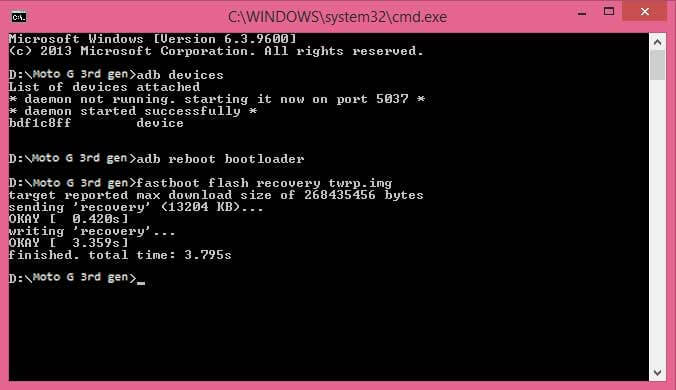
Step 7. You have successfully flashed TWRP Recovery in your Moto G 3rd Gen 2015.
How to Root Motorola Moto G 3rd Gen
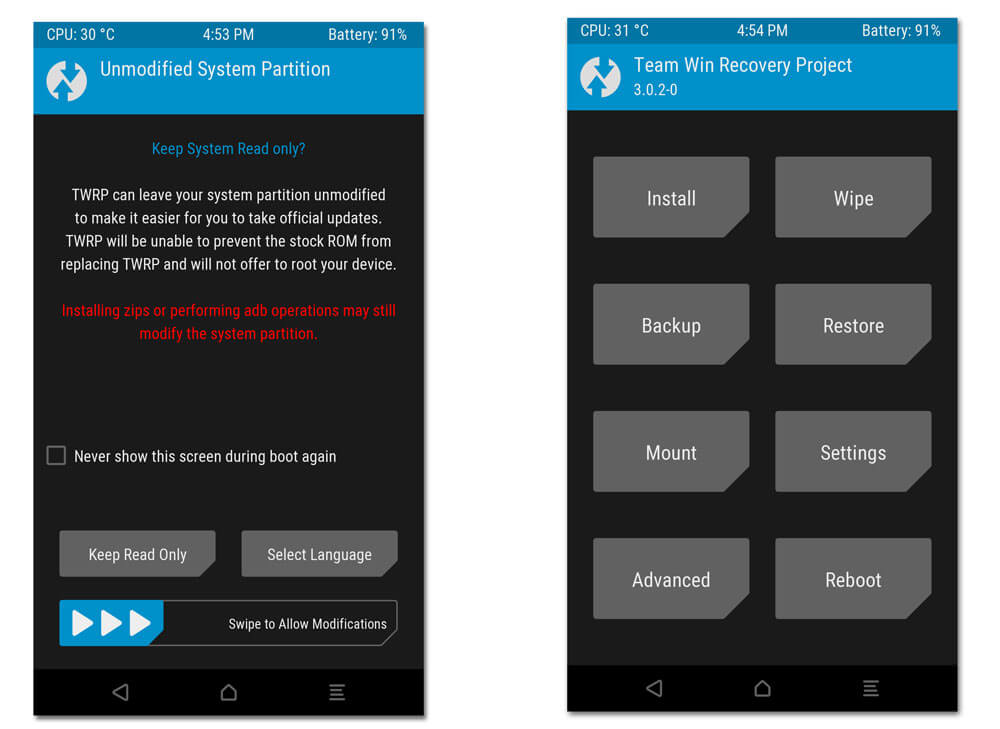
Step 1. Open TWRP Recovery, Select Install from sdcard Option using volume down button to navigate and power button to select it.
Step 2. Select install zip from SDcard then select 0 (0 is the location of internal storage ).
Step 3. Tap onMagisk file & wipe right to confirm flashing the zip file. Wait for installation to complete. It hardly takes 30secs.
Step 4. Now wait for few seconds until installation in progress.
Step 5. Now Select advanced > reboot to bootloader.
Step 6. Select reboot device. Don’t interrupt the boot process, give some time for the first boot.
Step 7. Congratulations You have successfully rooted you Moto G 3rd gen (2015) using Magisk.
Frequently Asked Questions
Conclusion
That’s it. If you followed every step correctly, your device should be rooted by now and will work flawlessly with an increase in battery life, performance, and power. You can check the root permissions by using any app requiring root/ Root checker apps. Also, you can check out our list of Top 10 Apps for Rooted Smartphones. For any queries/issues, please comment below.
![[Android P] LineageOS 16 for Motorola Moto G4/G4 Plus](https://devsjournal.com/wp-content/uploads/2017/01/LineageOS-for-Motorola-Moto-G4-Plus-768x384.jpg)
having problems with the twrp transfer