Windows 11 is here, and we can’t keep calm about it. Microsoft has officially unveiled the latest OS. While the official version is released to all the Windows 10 users, other Windows users have got a glimpse of what they can expect with Windows 11 with the help of the preview version.
Although the hardware has evolved, the rate at which software is evolving remains unmatched. However, with each new software comes along a few new issues.
Despite tremendous development, we are yet to experience a software update that is free of any annoyances or issues whatsoever. Such is the case with Windows 11. While the users expected Windows 11 to be free from all the issues Windows 10 had, it seems that isn’t the case.
Why Does Windows 11 Keeps Freezing?
Several users have complained about Windows 11 keeps freezing randomly. Since Windows 11 is currently under development, the majority of the users have linked the Windows 11 freezing to a graphics issue. Given that it is still in its early days of development, Windows 11 users are likely to experience issues with the GUI, such as instability and so on.
Another likely reason is that for Windows 11, freezing could be corrupt or the files that the system failed to install when upgrading over to Windows 11. Also, downloading Windows 11 from an unauthorized source could pave the way for malware to tamper with your system, because of which your computer freezes randomly.
Therefore, it is highly recommended not to install Windows as the main OS of your system. For those who have already made the shift from Windows 10 to Windows 11, rolling back to Windows 10 can be a viable option to keep your PC from freezing randomly.
10 Ways To Fix “Windows 11 Freezing Randomly” Issue
But with software engineers working round the clock, we now have diagnostic tools that can easily detect and fix any major or minor issue you have with your system. Similarly, this article will be discussing how the various fixes that can help to stop Windows 11 from freezing.
NOTE: All the fixes mentioned below are arranged as per the severity of the problem. THerefore, it is vital that you apply these fixes serially and do not jump directly to the last fix.
1. Change Screen Resolution
At times, your screen resolution may be higher for your GPU to process, due to which you are experiencing crash issues on your Windows 11.
- Right-click on the Start Menu
- Select Settings
- Tap on System
- Go to Display
- Hit the Menu under Display Resolution
- Select the screen resolution you want ( We advise you to go with the resolution that has recommended written next to it)
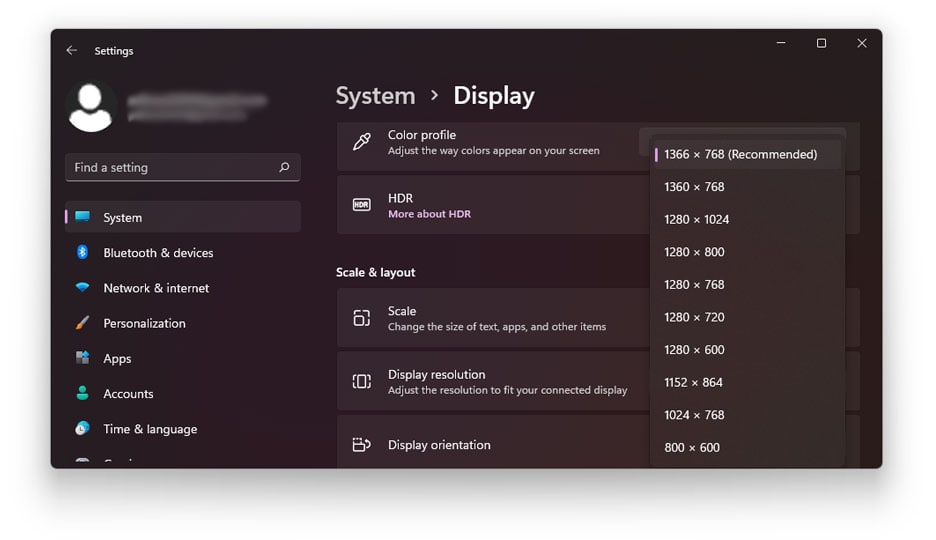
- Click on it
However, if you are unable to change your screen resolution, it could be because your system drivers are outdated. If you are unable to change your screen resolution, installing your drivers in Compatibility Mode can solve the problem.
2. Update Device Drivers
As we mentioned earlier, Windows 11 freezes randomly, primarily because of outdated drivers. In such a case, updating all the drivers at once can help solve the problem. To update your device drivers, follow the given steps.
- Right-click on the Start Menu
- Select Settings
- Go to Windows Update
- Hit the Menu under Advanced Options > Optional Updates > Driver Updates
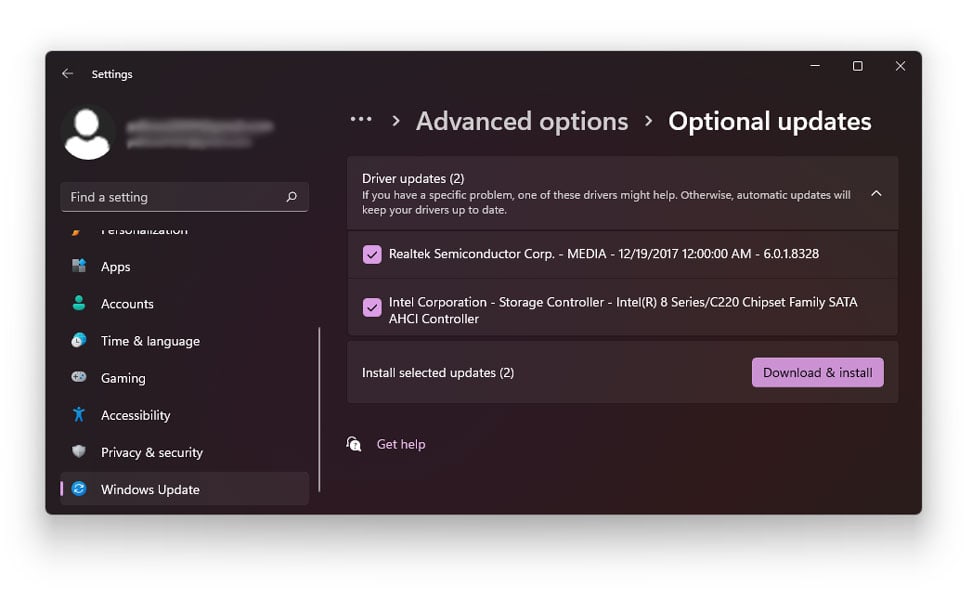
- Under Driver Updates menu, select the updates you want to install
Your system will now automatically scan for updates. If there are any updates available, your system will install them automatically.
3. Clear Your Temp Files
Every time we delete or uninstall an application on our system, it tends to leave behind a few residual temp files. These temp files pile up and can hamper the overall performance of your system. Therefore, you must delete temporary files after deleting any application or program on your system.
Also, these temp files tend to clog up your storage space. Windows 11 has many other temporary file types, including those leftover files after installing a new version, upgrade logs, error reporting, temporary Windows installation files, and more.
To clean the temp files on your system, follow the given steps.
- Right-click on the Start Menu
- Select Settings
- Go to System
- Tap on Storage
- Locate the Local Disk section
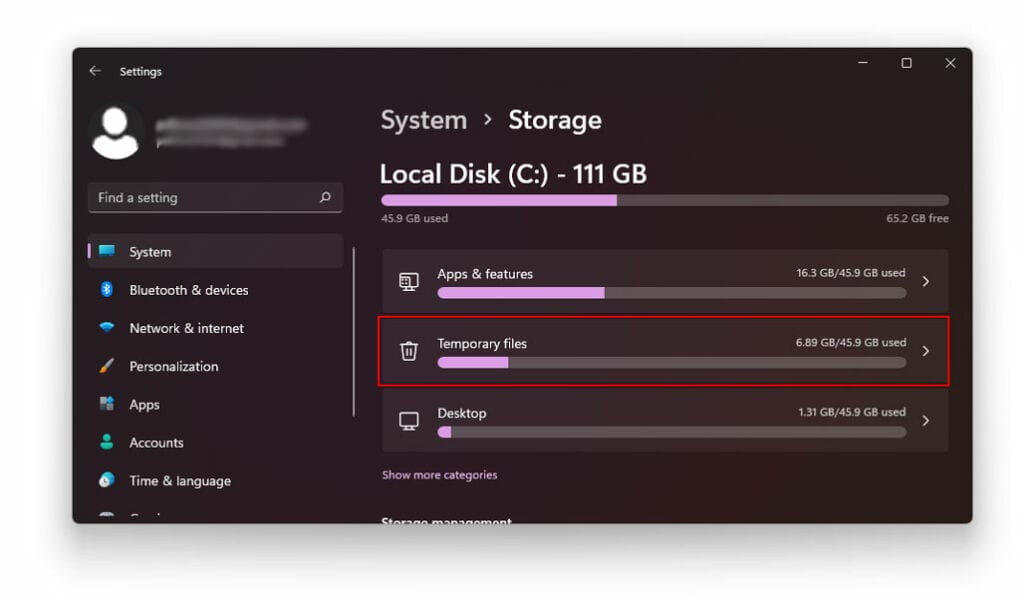
- Click on the Temporary Files action
- Select all the temporary files you want to remove
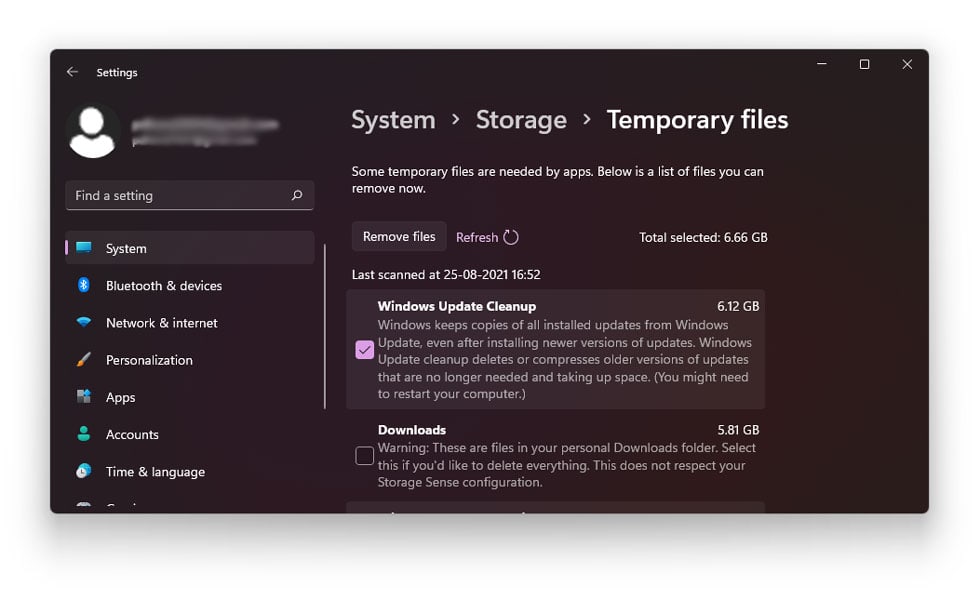
- When selected, click on the option which reads Remove Files.
Now, the system will automatically remove all the junk files on your system.
4. Adjust Virtual Memory
In case you have noticed, the majority of the time your applications slow down or stop functioning all together because your Windows ran out of RAM memory. In such cases, increasing the virtual memory automatically increases the empty space reserved for RAM overflow. Note that having enough space is vital for RAM and virtual memory to be in sync with each other.
To adjust your virtual memory, follow the given steps.
- Right-click on the Start Menu
- Select Settings
- In the search bar, type Performance
- Choose Adjust Appearance and Performance of Windows 11
- In the new tab, go to Advanced Tab under the Virtual Memory Section
- Tap on Change
- Now, check the recommended value given at the bottom of the window
- Compare the recommended value with the currently allocated one
- If the current allocated value is less than the recommended, uncheck the Automatically manage paging file size for all drivers
- Click on Custom Size
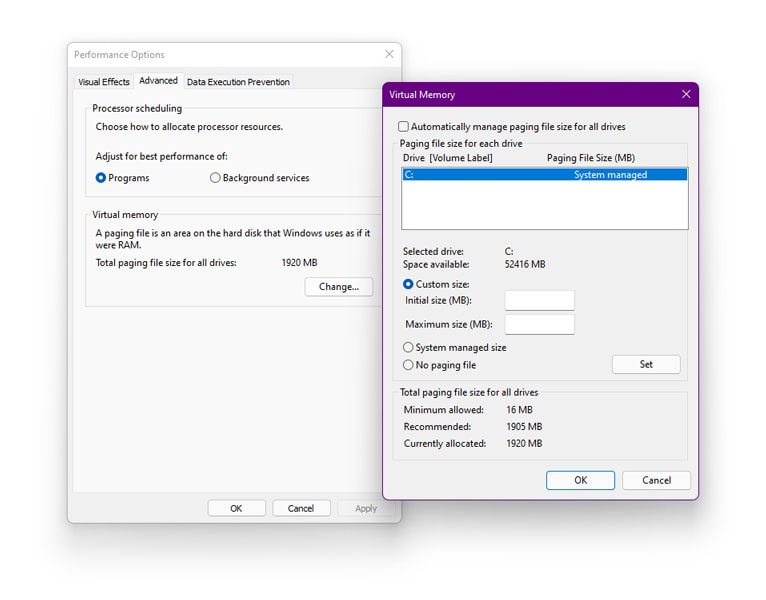
- Now, enter the Recommended Value into the Initial Size Box
- Add a larger figure in the Maximum Size Box
- Click OK and save the changes
To know more about Virtual Memory in Windows 11, you can refer to this article.
5. Run SFC Command
At times, your PC freezes randomly because it might have skipped or missed some files when you upgrade over to Window 11. Also, it might have installed a few corrupted files that can be causing your pc to freeze randomly. In such cases, running an SFC scan can help repair these files and fix the issue.
To run an SFC command scan, follow the given steps.
- Go to the Start Menu
- Type cmd
- Run as Administrator
- Inside cmd, enter the following command
sfc /scannow

- Press Enter
Your PC will now start searching for missing, skipped, or corrupt files in the system and will repair them automatically. Restart your system post completion of the scan
6. Run DISM Command
There can be, at times be problems with the system image. In such cases, run a DISM command to scan and repair any problems.
To run the DISM command, follow the given steps.
- Go to the Start Menu
- Type in cmd
- Run as Administrator
- Inside cmd, enter the following command
DISM /Online /Cleanup-Image /RestoreHealth
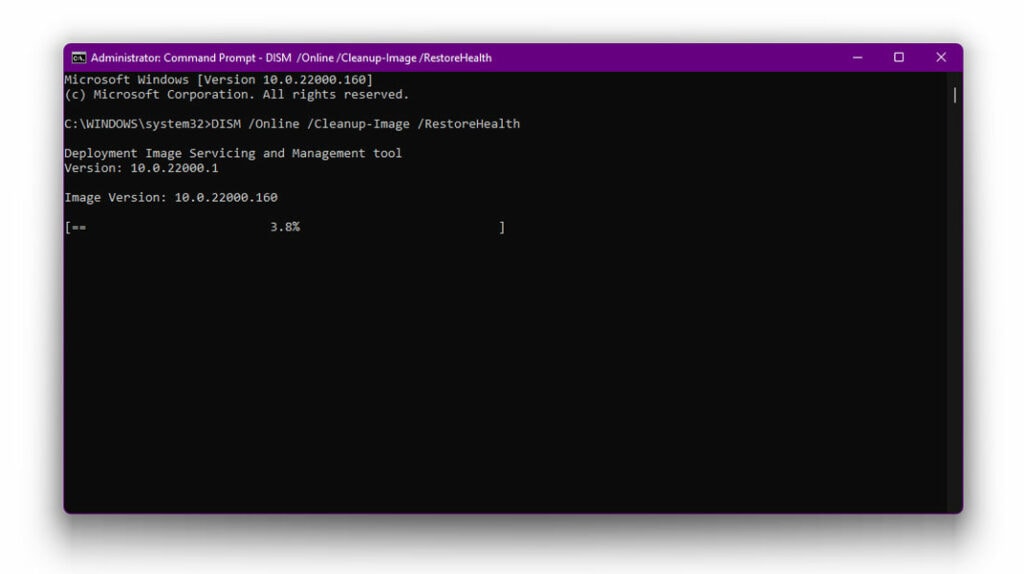
- Press Enter
The system will now run and verify any data corruption that may require fixing and will fix them accordingly. Restart your PC post the completion of the scan
7. Run Disk Check (Chkdsk Command)
This is yet another command aimed solely at identifying and fixing any problems with the hard drive.
To run a disk check, follow the given steps.
- Go to the Start Menu
- Type in cmd
- Run as Administrator
- Inside cmd, enter the following command
chkdsk
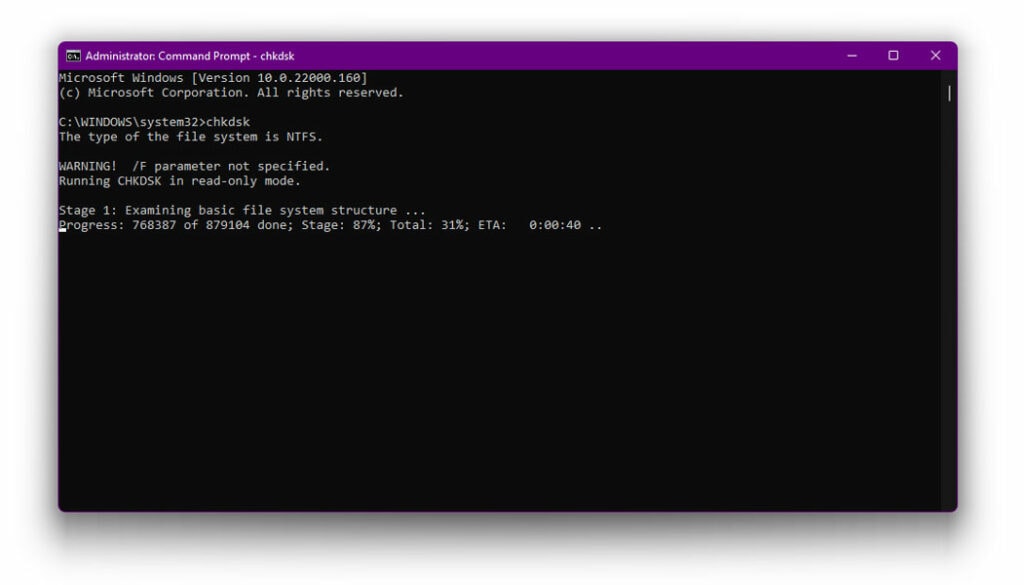
- Press Enter
Your system will now scan the drive for any errors. Repeat this procedure to check all the purposes present in your system. You will get a message pop on your screen stating that your drive was scanned successfully and no errors were found. However, if you see errors, then those errors are probably causing the problem. In such a case, stop upgrading the disk.
8. Run Startup Repair
If Windows 11 is unable to boot up and takes you to the login screen or the desktop, your first step should be to use Startup Repair.
To run the Windows startup repair, follow the given steps.
- Power on your system
- Hit F11 the minute your system powers up
- This will take you to the Windows 11 Advanced Startup Options
- Upon booting, tap on Troubleshoot
- Click on Advanced Options
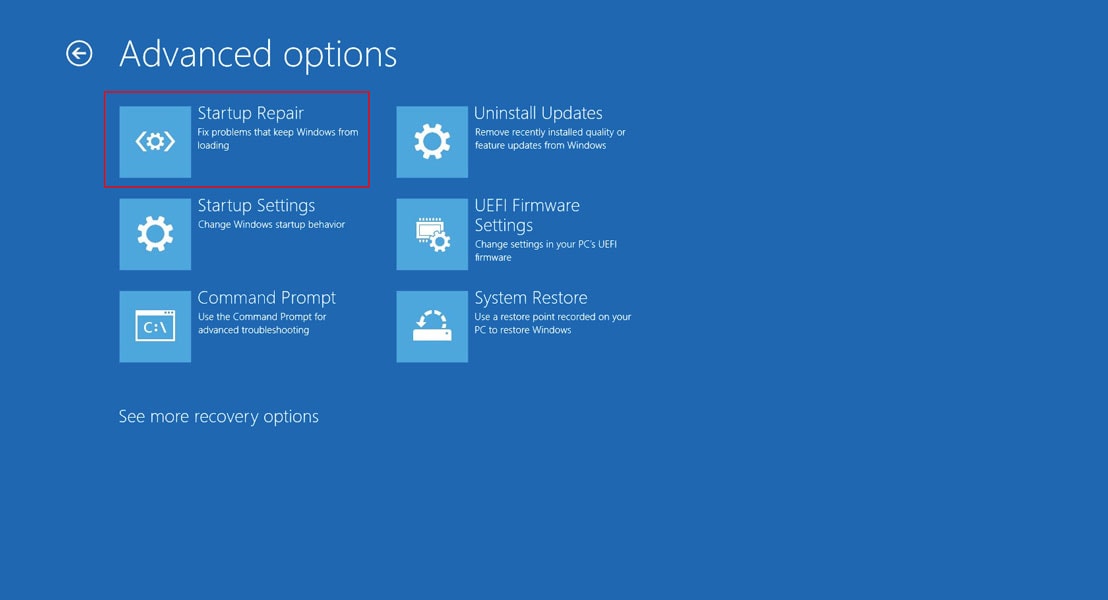
- Select the option which reads Startup Repair
Windows 11 will now diagnose the problem and work on repairing the problem automatically. Wait for a few minutes.
Also Read: How to Start/Boot Windows 11 in Safe Mode
9. Reset Windows 11
If none of the above-mentioned solutions work for you, then it could be because there is a problem with the overall installed OS all together. In such cases, resetting Windows 11 is the only solution to help solve the problem.
NOTE: This step is to be implemented only if the above-mentioned fixes fail. This step will erase all the data present on your system. Therefore, ensure that you backup all your important data before you reset Windows 11
To reset Windows 11, follow the given steps.
- Right click on Start Menu
- Select Settings
- Go to System and then select Recovery
- Select the option which reads Reset PC
- Click on Get Started directly under Reset PC
- Click on Remove Everything
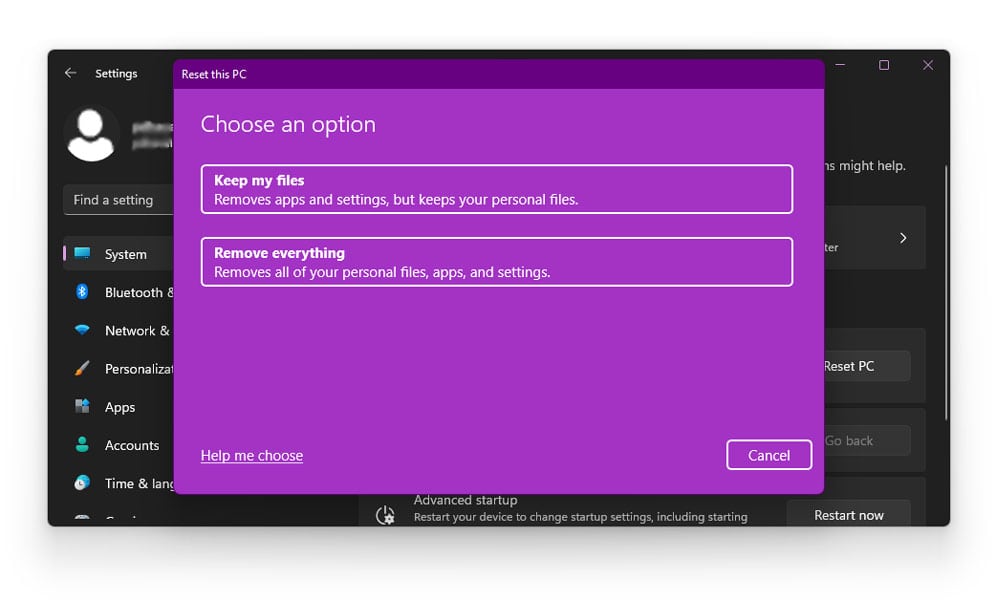
- Click Next if Windows warns you that won’t be able to roll back to a prior OS version
- On the message prompt, click Reset
This will completely erase everything from your PC. Therefore, it is vital that you backup all the important files, folders, images, and documents onto a portable drive. The above step is only applicable if you are able to access Settings upon startup. At times, the reason why your Windows 11 freezes could be severe enough to not let windows boot up.
In such case, accessing Settings is impossible. However, it is possible to reset Windows 11 via the sign-in screen. To format your system through the sign-in screen, follow the given steps
- Press Windows+L on your keyboard
- You will now come to the sign-in screen
- Do NOT log in
- Press and hold SHIFT
- While holding SHIFT, click on the Power Button and select RESTART
- This will now start Windows in Windows Recovery Mode (RE)
- On the option screen, select Troubleshoot
- Tap on Reset This PC
- Click on Remove Everything
- Click Next if Windows warns you that won’t be able to roll back to a prior OS version
- On the message prompt, click Reset
10. Perform A BIOS Reset
In case your aren’t aware, a system’s BIOS (Basic Input Output System) is an integral part of how the hardware operates. At times, a BIOS reset could set things in place and eliminate the errors that cause your PC to freeze randomly.
Resetting your BIOS will have your system diagnose problems (if any). Resetting your BIOS restores it to the last saved configuration, so the procedure can also be used to revert your system after making other changes.
To perform a BIOS reset, follow the given steps
- Right click on Start Menu
- Select Settings
- Go to System and Select Recovery
- Under Advanced Startup, click on Restart Now
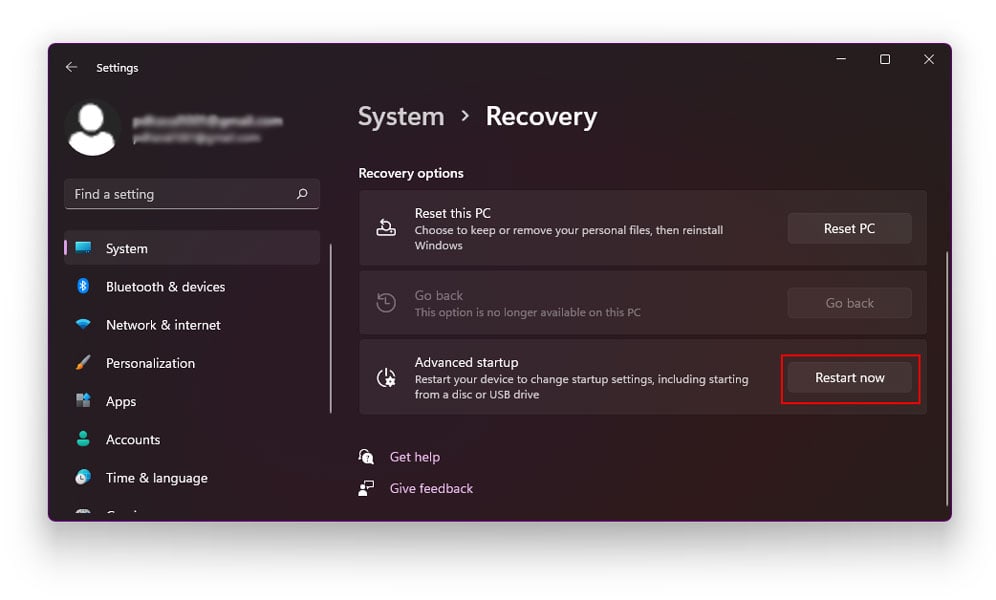
- Wait for the system to Restart
- Upon Restart, you will see a blue screen with advanced troubleshooting problems
- Select Troubleshoot
- Go to Advanced Options
- Choose UEFI Firmware Settings
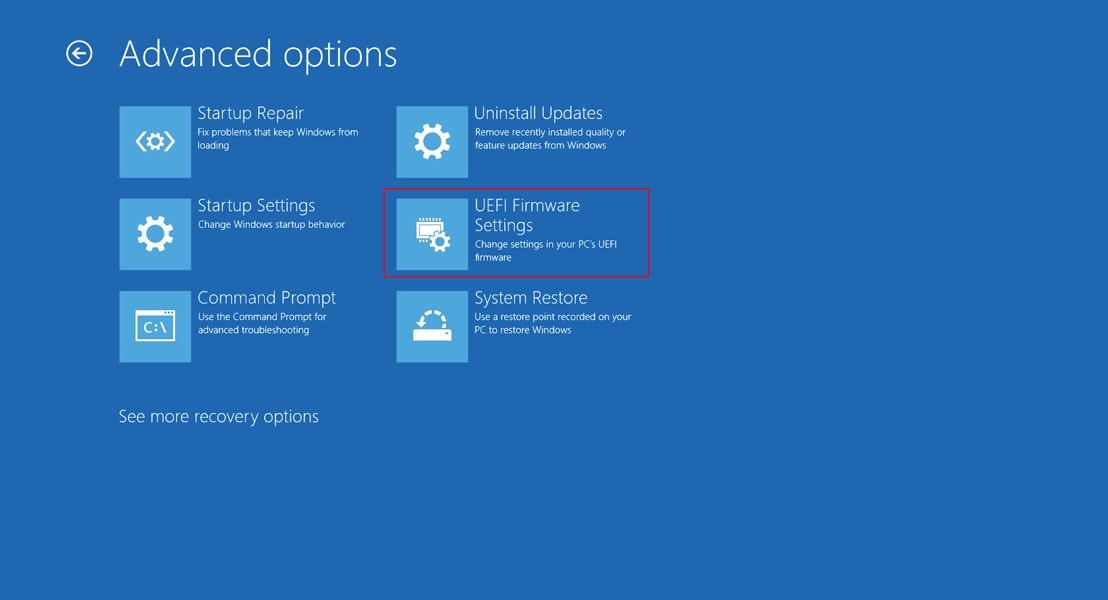
- Click Restart
- Upon Restart, look for options that either read Configuration, Security, or Exit
- Then look for phrases such as Load Default Options or Load Setup Defaults
- Select YES in the dialog box when prompted
- Exit and startup your system as usual
Also Read:
- Bypass TPM 2.0 and Install Windows 11 via Windows Update
- How To Activate Windows 11 For Free
- How to Enable Drag and Drop in Windows 11
The Bottom Line
We hope our article was able to successfully walk you through how you can stop Windows 11 keeps Freezing issues. Majority of the times, problems that causes your PC to freeze randomly could lie either in the installation file or the hardware.
Therefore, a thorough scan of the system can help solve the Windows 11 Freezing issue. All the fixes mentioned above are arranged as per the severity of the problem. Therefore, it is vital that you apply these fixes serially and do not jump directly to the last fix.

A great guide except for my Windows 11 PC now freezes and crashes MUCH MORE frequently.
The ONLY solution to fix the frequent freezing is for the users to ‘Upgrade’ their Windows 11 systems to Windows 10.
This is windows vista all over again. Windows 11 is not ready for a business environment. Given what I see now it may never be. It has disrupted our operations like no other OS has ever done. Very very poor job by microsoft.