As you might already know, the RAM in our computers is basically one of the most essential components. And, in case your system does not have enough RAM capacity, no wonder you will be facing a lot of issues running programs on your computer smoothly. Hence, adding new and higher capacity RAM sticks or migrating from HDD to SSD is very much preferable to tackle this situation. However, it is not the cheapest solution that you can try out to boost up your PCs performance.
So, what else can you try out to have a little bit of extra free RAM space on your system? Surely you can’t tweak and change the RAM capacity, but you can play with the virtual memory on your computer pretty easily. And, in case you are not much aware of how all that works, we will cover it all for you, and teach you How to change virtual memory in Windows 11. Therefore, stick around and read the article till the end because not only this method is going to save your PC from lagging, but will also save your hard-earned bucks.
What is Windows 11 Virtual Memory?
Generally, computers have two kinds of RAM, the one you are quite aware of already, and the other one is Virtual Memory. It is not any kind of stick that you can just pull out from your rig and change. Well, it can be tweaked but the procedures to do that are slightly different. As we know, when the computer runs any program, it loads up the files in the random access memory as it is much faster as compared to the hard drives on the computers.
On the other hand, the virtual memory is basically a hidden file (paging file) present on your hard drive that stores the data and files that are not used quite often. This helps to keep only the useful files on the primary memory so that your computer can process the tasks easily without facing any lags or getting locked up. Also, if the RAM doesn’t have enough capacity to hold the data, the files are paged out in pagefile.sys. You can read more in detail about this on “What Is Pagefile.Sys“.
In most cases, when the computer goes low on virtual memory, it does a pretty decent job to manage it by itself. But, if you are someone who is experiencing a lot of performance lag, and pop up messages like, “Your system is low on Virtual Memory”. We will prefer trying to increase the virtual memory on your system.
Also read: How to Fix High CPU Usage in Windows 11
How to Increase Virtual Memory in Windows 11
There are several ways to adjust Virtual Memory on your Windows 11 systems in case you want to slightly enhance the performance of your computer. The important thing to mention is that these methods are reversible as well and can always reset virtual memory anytime in case you have finally decided to put in an additional RAM stick.
In order to increase the virtual memory, there are two most simple methods that you can try on your Windows 11 systems are as follows:
- Increasing Virtual Memory using Settings.
- Increasing Virtual Memory using Command Prompt.
So, let’s start with our first method.
1. Increasing Virtual Memory using Settings
Although the methods are quite simple, you should always follow the correct procedure and don’t try to tweak any of your computer settings unless you have the proper knowledge about it. Because a single wrong action might end up turning your computer screen blue.
Step 1. First of all, click on the Windows or Search icon button on the taskbar.
Step 2. Now, find the Settings icon and click on it.
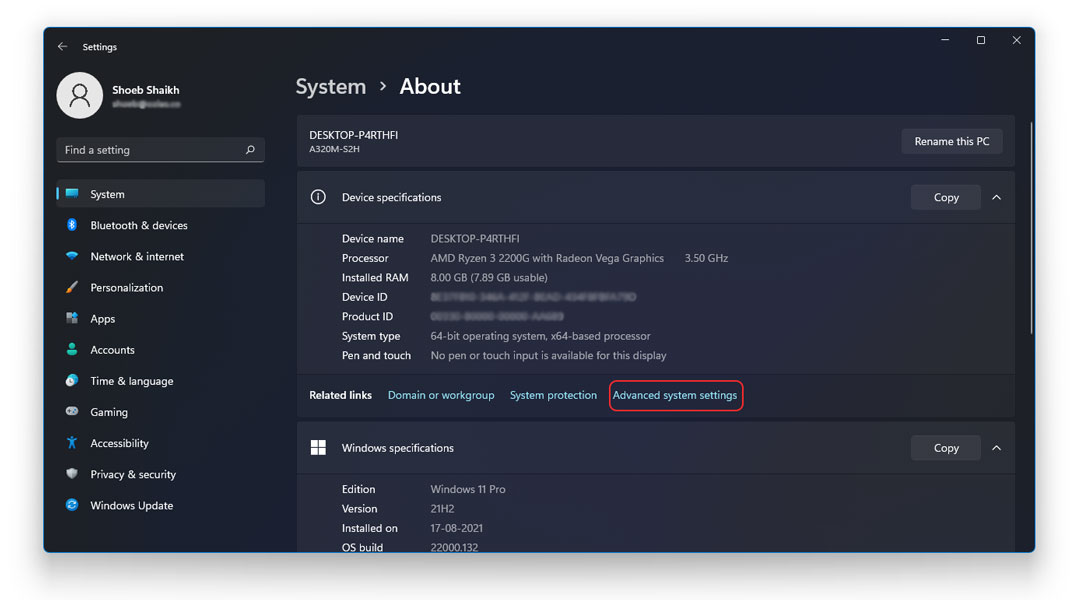
Step 3. In the Settings menu, under System settings, go to About
Step 4. Now, click on Advanced system settings
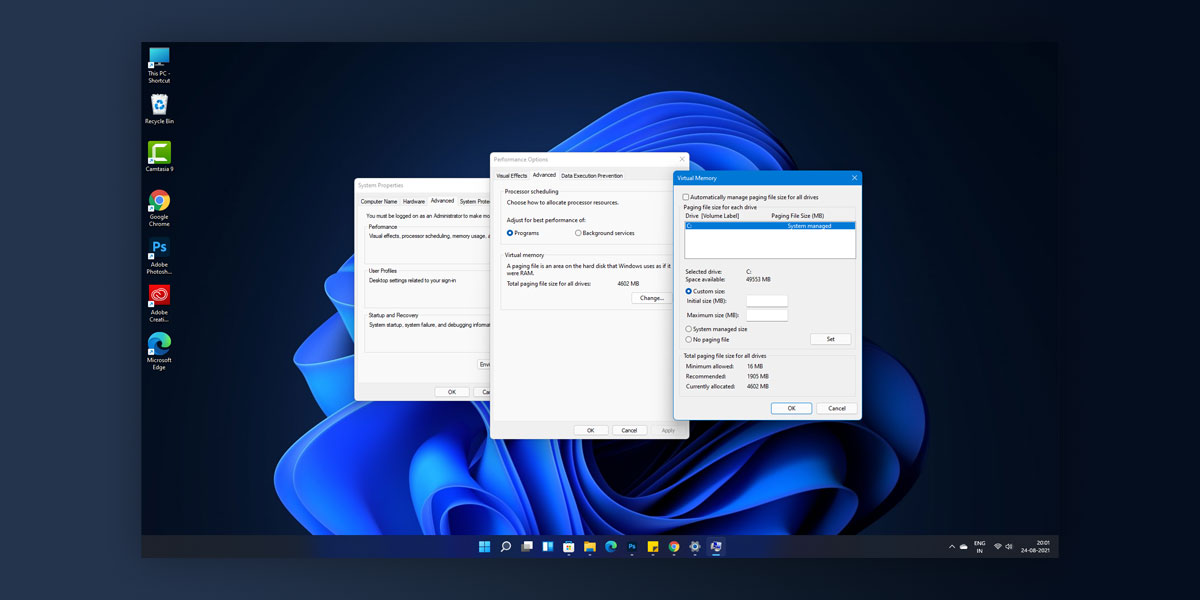
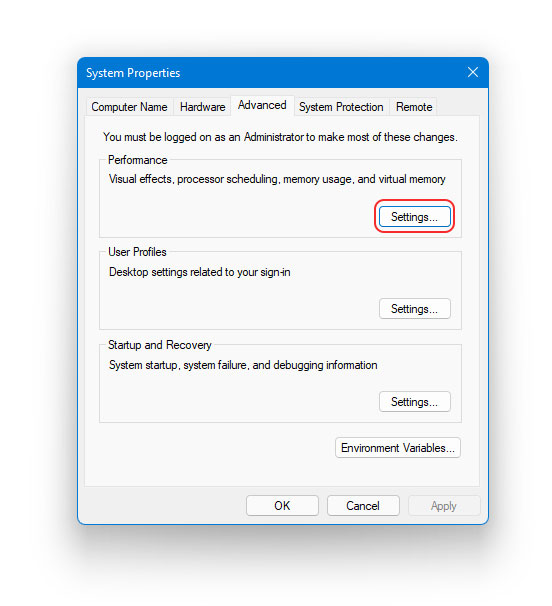
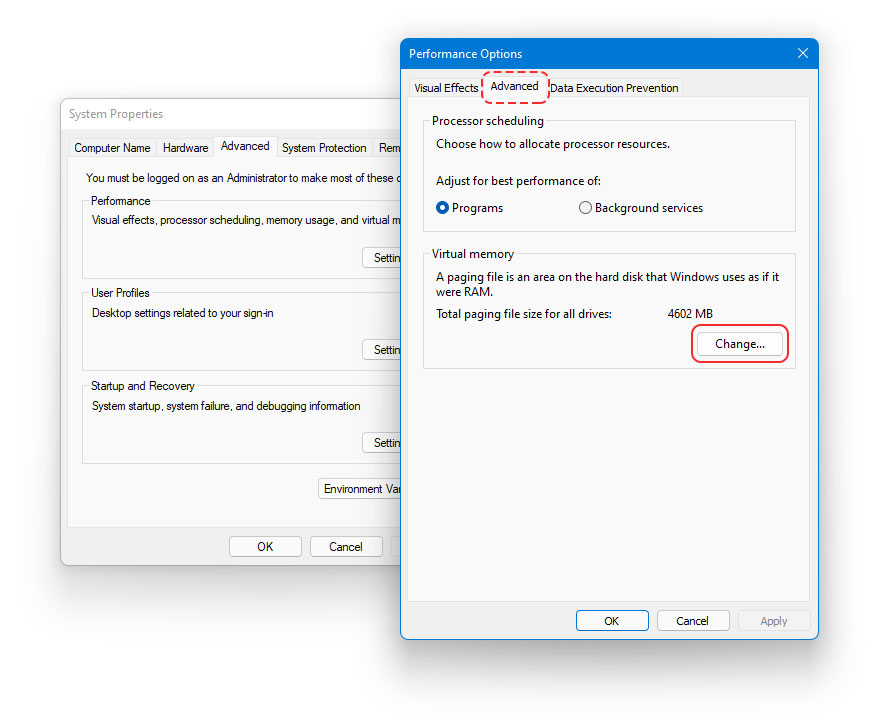
Step 5. A small window of System Properties will pop-up on the screen, go to the Advanced
Step 6. Now, under the Performance section, click on the Settings
Step 7. Again, in the next window, go to the Advanced
Step 8. Here you will find the Virtual Memory section, click on the Change
Step 9. On the next window, Uncheck the option that says, “Automatically manage paging files size for all drives”.
Step 10. Now, click on the Custom Size button to set Virtual Memory
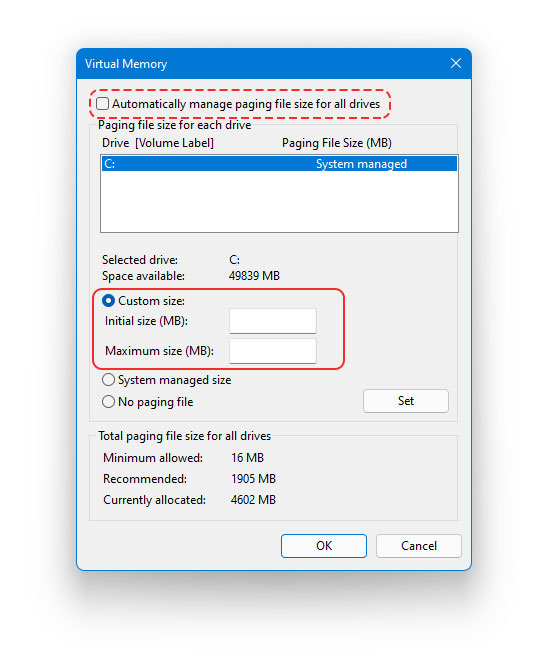
Step 11. Here, you can enter the initial size and the maximum size of Virtual Memory.
Step 12. Click on the Set
Step 13. Click the OK button to finish up.
Step 14. Lastly, reboot the system to apply the changes successfully.
Tip: There is no generalized size to set as the Virtual memory as this aspect is unique for each system. However, what you can try is to check the currently available RAM memory on your computer. And, put 1.5x of the available memory as the Initial, and 3x the available memory as the Maximum Virtual memory.
As soon as you reboot the system, the new settings will be applied. Although, as we said earlier, these are not permanent changes and you can reset Virtual memory anytime. For that, you will need to follow this same procedure all the way till Step 9, and click on the “Automatically manage paging files size for all drives” button. As simple as that!
2. Increasing Virtual Memory using Command Prompt
Step 1. Click on the Windows or Start icon
Step 2. Now, search “Command Prompt”.
Step 3. Right-click on the command prompt option, and select Run as Administrator.
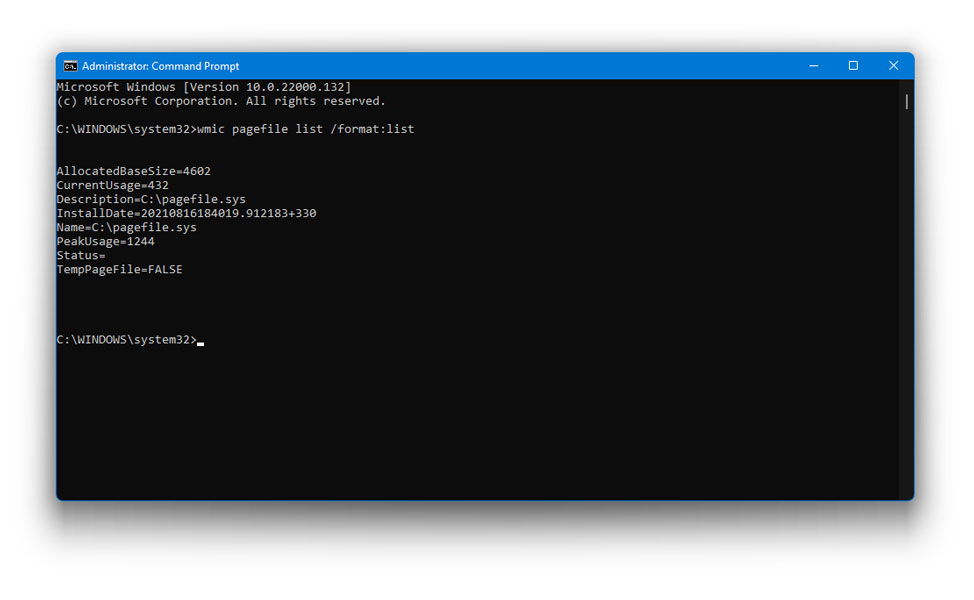
Step 4. To check out the current status of the paging file or virtual memory, type in the following command and press Enter
wmic pagefile list /format:list
Step 5. For the next step, you will have to disable the feature that manages auto management of the paging file. To do so, type in the command and hit Enter
wmic computersystem where name="%computername%" set AutomaticManagedPagefile=false
Step 6. Now, to set up the initial and maximum virtual memory size, type the following command
wmic pagefileset where name="C:\\pagefile.sys" set InitialSize=YOUR-INITIAL-SIZE,MaximumSize=YOUR-MAXIMUM-SIZE
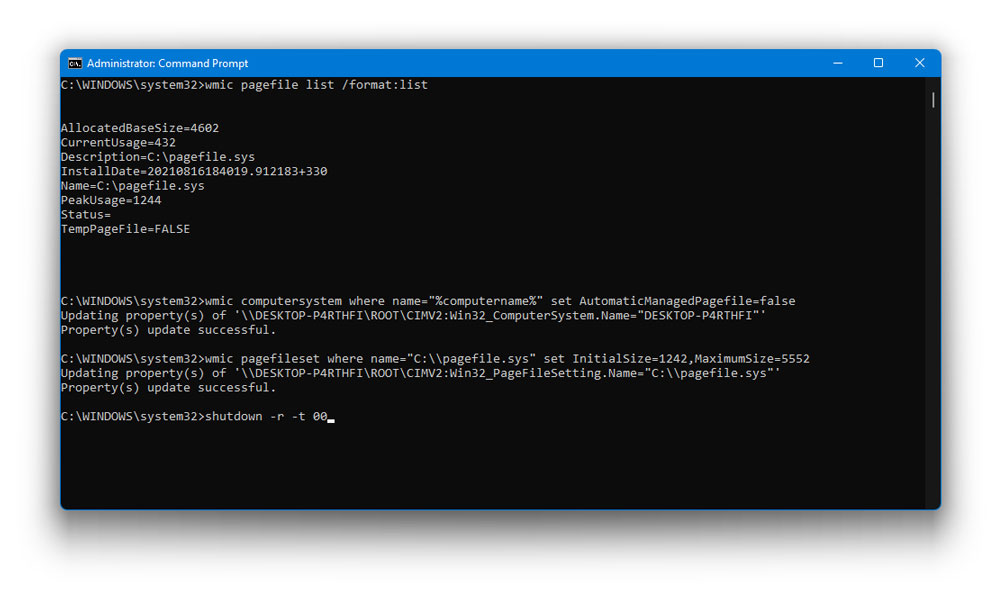
Step 7. Lastly, enter the following command to restart your computer
shutdown -r -t 00
Like the previous method, you can adjust the virtual memory in Windows 11 easily and also reset the virtual memory. To do so using the command prompt, all you need to do is follow this same procedure till Step 5, and type in true at the last instead of false in the command given in step 5. Otherwise, you can copy the below-mentioned command and reboot the system to save the changes.
wmic computersystem where name="%computername%" set AutomaticManagedPagefile=true
Recommended: How to Free Up Disk Space in Windows 11
How to increase Virtual Memory in Windows 10
You can follow the same procedure given above to increase virtual memory in Windows 10. The first method might have some changes based on the Windows update in Windows 10.
How to increase Virtual Memory in Windows 7 and WindowsXP
Some of you might still have some old computers at home that still operate on 32-bit Windows systems such as the Windows 7 and Windows XP/Vista versions. For such an audience, we have a simple solution to increase the Virtual RAM up to 3 GB. Hence, giving a new life to that old PC is not going to be too hard for you.
Please note that following the proper procedure is a must, otherwise you might end up ruining your computer. Hence, to be on the safer side, always make a backup of Boot.ini before following these steps.
These are the steps that will help you to make a backup of your file:
- On the My Computer icon, Right-Click, and go to Properties.
- Go to the Advanced
- Now, click on the Settings button in the Startup and Recovery Section.
- In the System Startup section, click on the Edit
- A file will open in Notepad, here, click on the File button, then select Save As
- In the Save As window, right-click on the empty space to create a New Folder.
- Now, type the folder name as Temp and hit Enter to save.
- Double-click on the newly created Temp Folder and Click on the Save button to save the Boot.ini file there.
Increasing Virtual Memory on 32-bit Windows XP/Vista versions to 3GB
To change the Virtual Memory on 32-bit Windows XP/Vista versions to 3GB, we will need to edit the Boot.ini file. Follow the following steps:
- Right-Click on the My Computer icon and go to Properties.
- Go to the Advanced Tab and open Settings in the Startup and Recovery
- Click on the Edit button in the System Startup
- A file will open in notepad. On the last line, add a space, then type /3GB.
- Go to File, and Save.
- Restart your system to successfully apply the changes.
Increasing Virtual Memory on 32-bit Windows 7 versions to 3GB
- Click on the Start button and search for Command Prompt.
- Right-click on it, and select Run as Administrator.
- Now, type this command in the cmd prompt, BCDEDIT /set increaseuserva 3072
- Type in Exit to close the window.
- Restart your computer.
Bottom Line
Changing Virtual Memory is definitely a good option in case your system’s performance is slowing down because of less memory space available. However, you should not change any settings on your computer unless you are in dire need of it. These methods might help you a little bit in increasing the overall performance of your computer. But, adding extra RAM on your computer is still the best thing you can do to fix this issue properly.