As promised, Apple finally unveiled the iPhone 13, iPhone 13 Pro, and the iPhone 13 Pro Max back in 2021. These flagship models come with several new hardware updates. Unfortunately, it seems that the latest iPhone 13 is off to a rocky start as several users have reported that their iPhone 13 screen keeps dimming.
This can make it difficult for many to work and puts your eyes under a tremendous amount of strain. If you have recently purchased the latest iPhone 13 model (iPhone 13/13 Mini/13 Pro/13 Pro Max) and find your iPhone 13 screen keeps dimming, then you’ve come to the right place. In this article, we will walk you through why your iPhone 13 brightness keeps dimming and will also arm you with the solutions to troubleshoot these issues.
Why My iPhone 13 Screen Keeps Dimming
At times, your device dims automatically. This could be the result of some of the brightness features that are available in your iPhone device. Some features automatically adjust your iPhone’s brightness to match with the environment. However, if your iPhone 13 screen keeps dimming constantly, here are some of the probable causes behind the same.
- Low-Quality Screen Protector
- Non-Apple Display
- Using an App that lowers Screen Brightness
How to Stop iPhone 13 from Dimming
Now that you know the different causes behind the problem, it is time to move on with the fixes. Note that if none of the fixes work out for you, you will need to see your nearest Apple service center. Having said all that, let’s move on to the fixes to help solve your iPhone 13 screen keeps dimming problem.
1. Restart Your iPhone 13
One of the simplest and easiest fixes in the book is restarting your phone altogether. At times, there could be a bug present in the system that isn’t a severe bug but can tamper with your device’s functioning. In such cases, your best bet is to restart your phone and start afresh. Hence, we suggest you restart your iPhone and then see if the issue is dealt with.
2. Turn-Off Auto-Brightness and Manually Increase the Brightness
Every smartphone has an auto-brightness feature that allows the phone to adjust the brightness as per the surrounding. However, this can cause your iPhone to run out of battery quickly. To turn off this auto-bright feature,
- Launch Settings on your iPhone 13
- Go to Accessibility and Select Display & text size
- Toggle off Auto Brightness
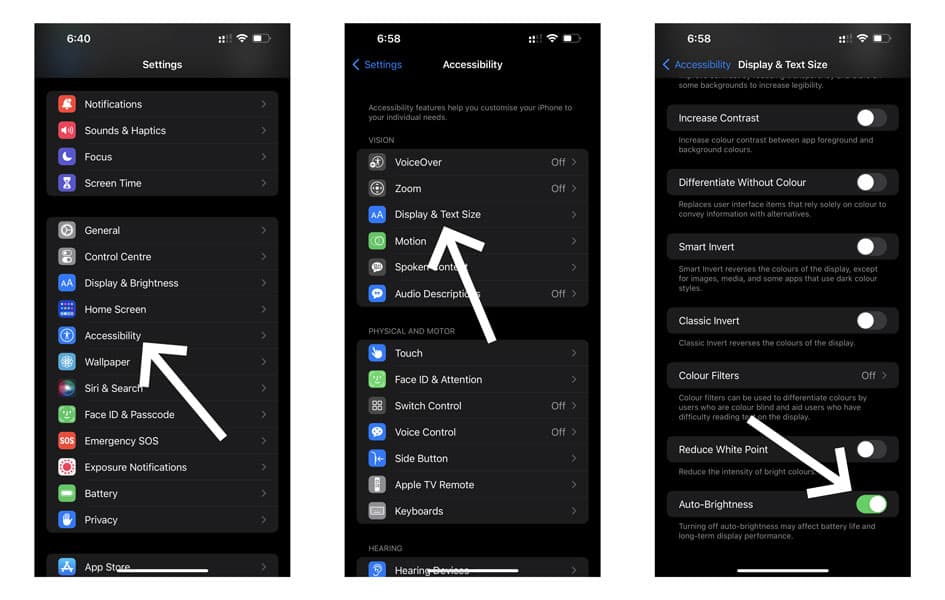
Now, to manually increase the brightness, go to Settings > Display & Brightness and adjust the slider under Brightness.
3. Turn-Off Dark Mode, Night Shift and True Tone
Everyone knows that iPhone 13 comes with a Super Retina XDR OLED display that guarantees the smoothest of experiences and the most stunning visuals. However, this is a feature that hogs the most power. In such cases, switching to dark mode can improve efficiency and battery optimization. However, if the dark mode is enabled, then it is probably why your iPhone 13 screen keeps dimming.
Meanwhile, the True Tone feature adjusts your iPhone’s lighting according to ambient lighting conditions. Doing so ensures maximum color consistency to match every environment you are in.
On the other hand, the Night Shift feature gives your device a warm orange tint that helps you get a good night’s sleep.
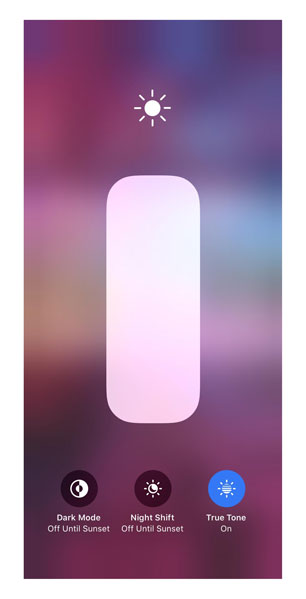
- Go to the Control Centre on your iPhone
- Press and hold Brightness Control
- This will open up the expanded view
- The Dark Mode, Night Shift, And True Tone are visible at the bottom of your iPhone 13
- Now, tap Dark Mode to disable Dark Mode
- Next, tap on Night Shift to disable Night Shift
- Finally, tap on True Tone to disable True Tone
4. Increase Auto Lock Duration
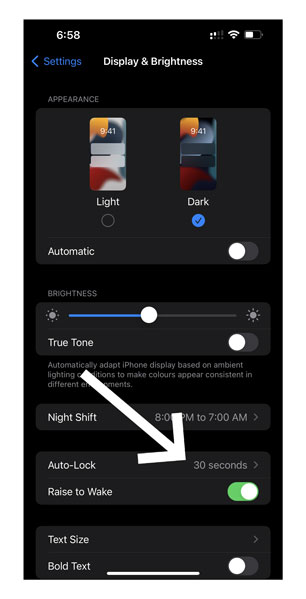
To change your auto-lock settings,
- Go to Settings
- Tap Display And Brightness
- Go to Auto-Lock
- Select a length of time before your iPhone locks
Note: If your iPhone is in Low Power Mode, the option to change Auto-Lock will be grayed out. This is because Low Power Mode locks the Auto-Lock function at thirty seconds.
5. Reset All Settings on your iPhone 13
Note that this step is only to be implemented if no other step mentioned in the article has worked out for you. If your iPhone 13 screen keeps dimming despite several attempts to fix it, you will need to do the hard thing and reset your iPhone 13, iPhone 13 Pro, iPhone 13 mini, or iPhone 13 Pro Max.
Note: Implementing this step will completely restore all the settings back to their default version. Therefore, ensure that you remember your Wifi password before proceeding with this step
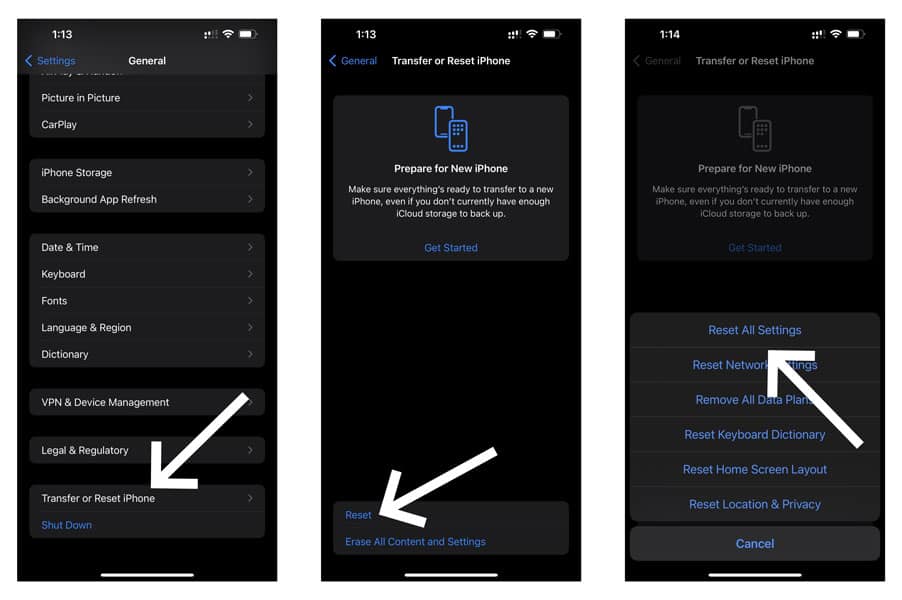
- Launch Settings
- Go to General
- Scroll to the bottom and select Transfer or Reset iPhone
- Now, select Reset & then on the nest screen click on Reset All Settings
- Wait for the reset to finish
- Restart your iPhone
- Check if the issue is taken care of
6. Turn-Off Attention Aware Features
To disable the attention aware features on your device, trace the given steps
- Go to Settings
- Tap Accessibility
- Go to Face ID And Attention
- Toggle off Attention Aware Features
- Enter your device’s password when prompted
- This will disable the attention aware features on your device.
7. Turn Off Reduce White Point
If you have enabled white point on your iPhone, it could be why your iPhone 13 keeps dimming and constantly has low brightness. In such cases, turning off this feature can help
- Go to Settings
- Tap Accessibility
- Select Display & Text Size
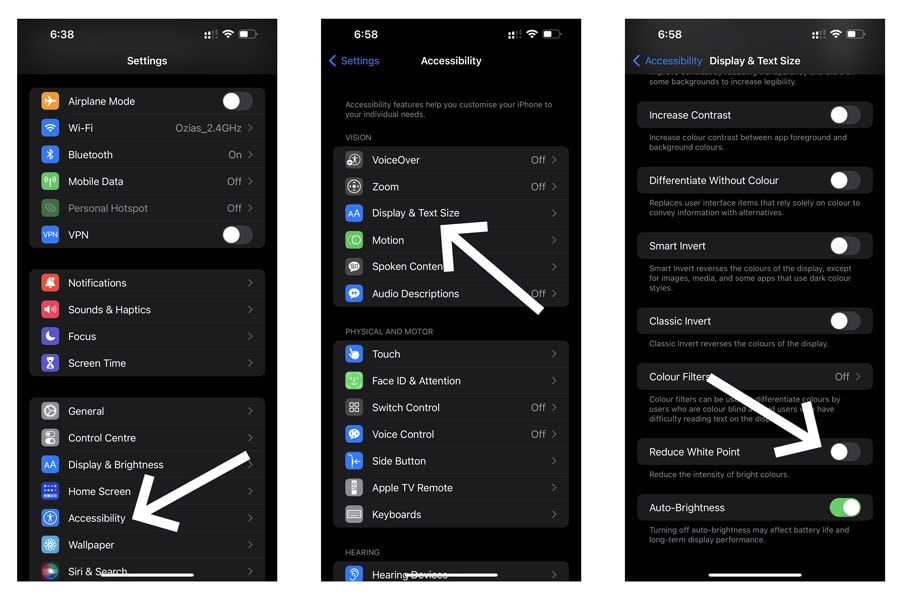
- Toggle Off Reduce White Point
8. Update Your iPhone
If you haven’t run a software update for quite some time, it is time you get around it. This is because running an outdated version can tamper with your system in one way or another. So if you have no service on new iPhone 13, we suggest you use the steps given below to update your iPhone 13.
- Launch Settings on your iPhone 13
- Select General
- Select Software Update
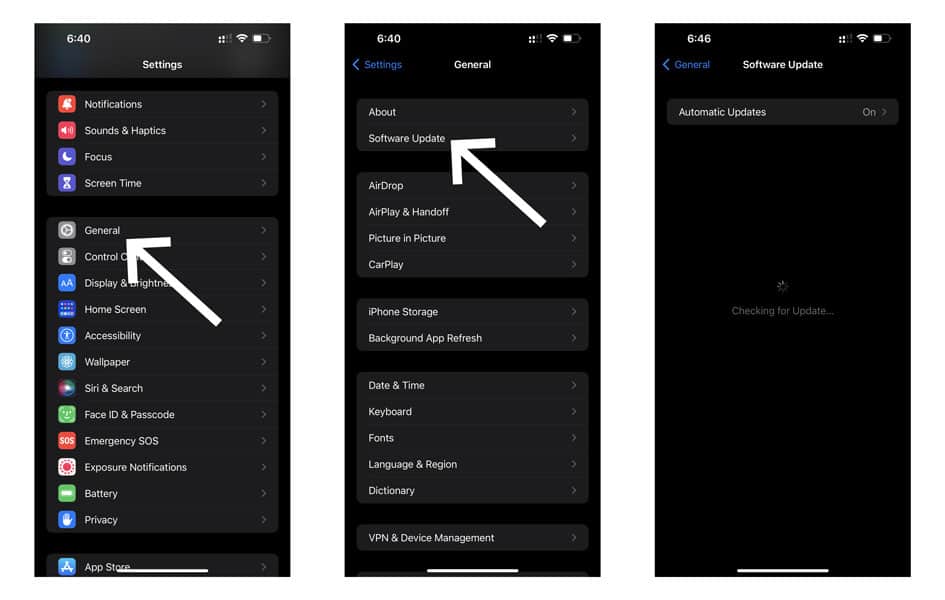
- Your iPhone will now search for available updates
- If an update is available, download it
Conclusion
We hope our article successfully walked you through the causes of why your iPhone 13 screen keeps dimming. In addition, all the fixes mentioned will help you troubleshoot these issues. Note that it is very likely none of these fixes will work out. If that happens, we strongly advise you to contact your nearest Apple service center at once.
