Unquestionably a pathetic situation for Microsoft’s very own anti-malware program to undergo such issues. Windows Security (formerly known as Windows Defender), which is famously known for offering real-time protection against software threats if suddenly stops working and denies to turn on, it’s something quite real to concern about.
After the release of the Windows Anniversary Update, many users have been found reporting on official forums that Windows Defender is not getting started automatically, and even when tried to turn on manually, it’s reverting an error code.
Fortunately, there aren’t many but only a few reasons that have primarily suspected of causing the problem. And the good news is, you can fix it. For knowing how-to-do, you’ll be required to head start with the following workarounds.
How To Fix Windows Defender
Due to the reason being subjective to the devices, it’s not feasible to provide an all-in-one sort of ideal method to fix the issue with your Windows Defender. Therefore, I’ve provided a few solutions that you’ll have to implement to check and possibly diagnose the problem.
Most likely by now, you may have already restarted your PC once, and if not yet, do it. Because many times a simple restart can resolve the system issues.
1. Uninstall Third-party Antivirus Programs

Windows Defender is designed in such a way that it triggers conflict when detects any third-party antivirus program installed and shuts itself off; for the same, you can see the notification in Action Center. Therefore, if you have any third-party antivirus or antispyware actively working on your system, consider uninstalling them and then reboot your PC to check if the issue persists.
It may be possible that even after removing other security software, Windows Defender still remains unfunctional. And this usually happens because while uninstalling apps, sometimes some files and properties left undetected, thus not get removed entirely and cause trouble later on.
This is where antivirus removal tools (view the list) come into rescue. These are antivirus service-specific software, so scroll through the list and download the appropriate uninstaller for the antivirus you have previously used or installed on your PC. Run it and select the program, and it will delete all files and registry entries linked.
Alternatively, you can make use of any uninstaller software available for Windows such as IOBit Uninstaller or Revo Uninstaller to get rid of unwanted applications or parts of it from your computer.
2. Clean Boot your PC
The primary objective of doing “Clean Boot” is to determine if any background program is conflicting or interfering with other software to run. It starts Windows with a minimal set of drivers and startup programs, and this way, we can effortlessly dig out the application preventing Windows Defender from turning on.
How-to-do:
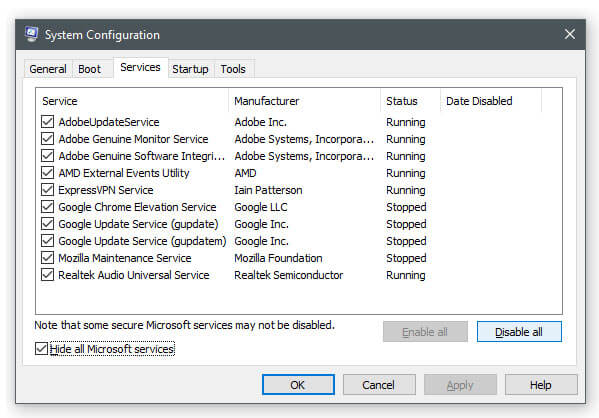
- Press Windows key + R and type in msconfig in the box appeared and hit Enter.
- “System Configuration” dialog box will show up your screen. Click on the Services tab and select Hide all Microsoft services checkbox and then tap on Disable all button.
- Next, navigate to the Startup tab, and click on Open Task Manager.
- On the “Task Manager” window, you will see a list of the startup items. Now one by one right-click each entry on the list and Disable them.
- Once done, disabling all the programs listed, go back to the Startup tab and click on Apply and then OK.
Now restart your PC and try to run Windows Defender, and if you don’t see any issue occurring, it means the problematic application is among the disabled startup items.
While consecutively turning on the services and restarting the PC each time would eventually hand you that particular service or application that’s causing the issue, but doing it this way is indubitably a time-consuming task.
So instead of going after one by one, you can group test them by enabling half of the items at a time and systematically rebooting the system. Repeat the process until you caught that one program that’s interrupting Windows Defender to operate properly.
And once found, disable or possibly uninstall that application from your PC to initiate the proper functioning of Windows security software.
3. Run SFC Scan
If your windows defender won’t turn on try using the SFC method. System File Checker (SFC) is a Windows utility that helps in scanning and repairing corruption in system files. Since Windows Defender shares fair chances of getting corrupted, it’s worth running an SFC scan.
How to run SFC Scan
If you are having Windows 8 or later versions, you will be required to run the DISM tool prior to running System File Checker. After the latest Windows update, a bug has been surfaced that’s causing SFC to incorrectly flag Windows Defender PowerShell module files as corrupt.
Therefore, it’s mandatory to use the DISM tool to repair the Windows image files on computers that might have been affected.
Step 1. On the search bar, type “cmd” and under the best match appeared right-click on Command Prompt and select Run as administrator.
Step 2. Now on CMD window copy-paste the following command and hit Enter
DISM.exe /Online /Cleanup-image /Restorehealth
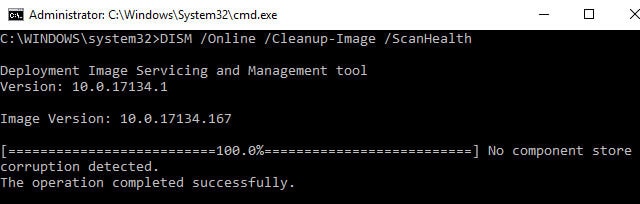
DISM scan may take some time up to 20 minutes, so it’s advisable to wait until it gets finished. After you run the above command, you will see a “percentage counter” underneath, which would help you track the scan status.
Step 3. Next, for the SFC scan, run the following command.
sfc /scannow
This command will scan all system files and replace the corrupted ones with a cached copy, usually located in a compressed folder.
Step 4. After the completion of the verification, if you get an error message displaying something like “File not found,” make sure that Install.wim file is accessible, and for that, you will have to run the following commands.
DISM /Online /Cleanup-Image /RestoreHealth /Source:WIM:c:\install.wim:1 /LimitAccess

sfc /scannow
Also Read: How to completely disable Cortana in Windows 10
4. Restart Security Centre Service
As reported on a few official threads, restarting security center service has resolved the issues with Windows Defender, you should give it a try.
How-to-do:
- Press Windows key + R and type services.msc within the Run dialog box, and tap OK
- On the Services window appeared, scroll down to the Security Center, right-click on it and select Restart
That’s all. Now head over to Windows Defender and see if it’s working.
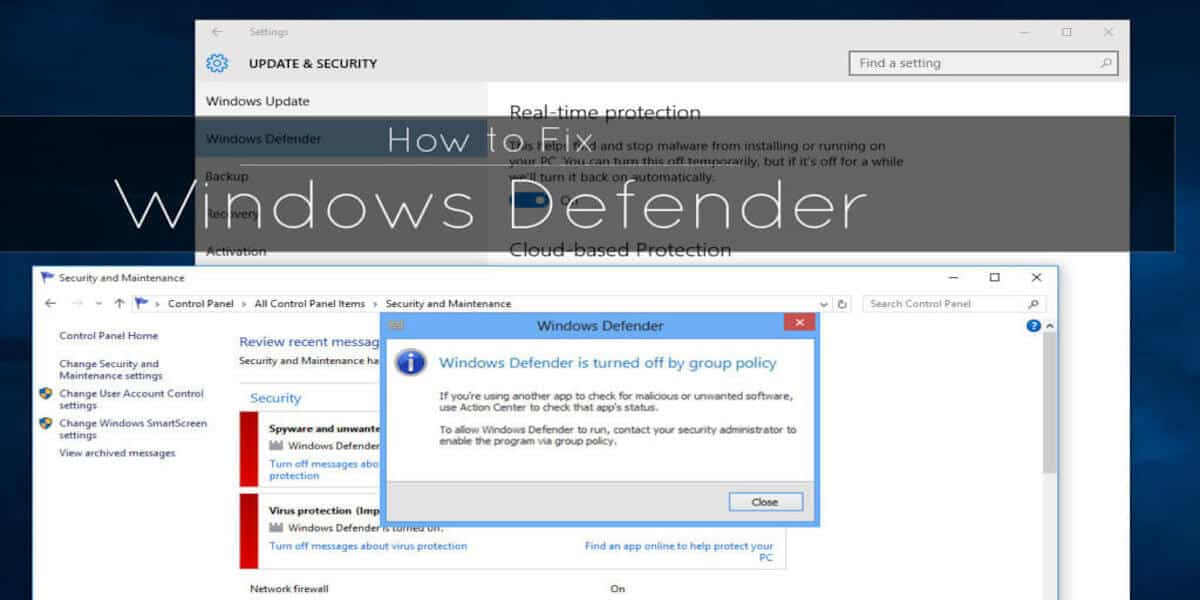
5. Change Group Policy

The Group Policy Editor is a Windows administration tool that can be used for various proposes. While turning on Windows Defender if you are getting an error resembling “This app is turned off by Group Policy,” that means you have to enable the antivirus program manually by following the steps mentioned.
- Press Windows key + R and type gpedit.msc in the Run dialog box and tap OK
- Now, on the right pane, click on Computer Configuration >> Administrative Templates >> Windows Components and scroll through the Windows Defender Antivirus and click on it.
- Double click on Turn off Windows Defender Antivirus and select either “Disabled” or “Non-Configured.”
- Lastly, tap Apply and OK to save the changes.
6. Modify Windows Registry
By modifying the Windows registry, we can tweak system configuration settings for Windows Defender that could make the program working.
Step 1. Press Windows and R button on the keyboard, type regedit and hit Enter.
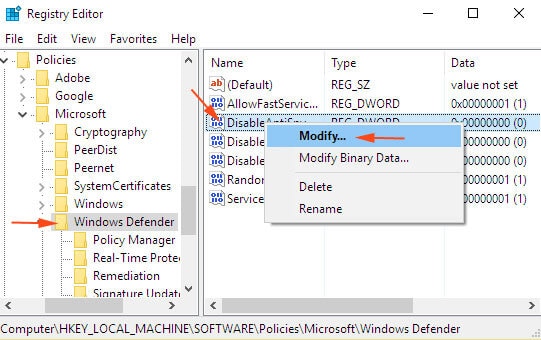
Step 2. Next, on Registry Editor navigate to the following path “HKEY_LOCAL_MACHINE/SOFTWARE/Policies/Microsoft/Windows Defender”.
Step 3. On the right pane, locate DisableAntiSpyware key and double click on it. And if this registry key is not available, to add it right-click on the empty space and click on New and select DWORD (32-bit) Value.
Step 4: Now change “Value data” to 0 and tap on OK to save changes.
Using the Windows registry, you can also delete the conflicting malicious entry injected by malware apps that tends to block the antivirus from running.
Step 1. Open Registry Editor using the same method given above and head over to the following path
HKEY_LOCAL_MACHINE\Software\Microsoft\Windows NT\CurrentVersion\Image File Execution Options
Step 2. On the left pane, if you find any entry for MSASCui.exe, MpCmdRun.exe, or MsMpEng.exe, right-click on it and select Delete.
If you have correctly followed the methods as instructed above, by now, you should have fixed your Windows Defender. So do let me know, particularly which method helped you turning the Windows antivirus program back on. But, if this guide did not solve your issue and you don’t want to reinstall windows, then using any third party antivirus may help you