Just like we humans have priorities in our life; the computer system also has its priority system for apps. If you are a Windows user, then you might be aware of Task Manager that allows users to check and find all the running applications in the background. You would only find few of the Applications that you’re actually using; while you won’t have any idea about the other processes showing up in Task manager. Here we are going to see, how to Set CPU Priority to Prefer Foreground App in Windows 10.
CPU Priority is one of the complex processes of your computer. It is decided by your processor when your computer is performing different task. Now if you check your task manager or ever checked it before you have seen that a lot of processes and services are running which you have not open. So what are these processes?
Windows is a collection of thousands of small processes, and some of them are especially important and some of the processes aren’t so crucial for the functioning. Windows has its priority levels that you need to adjust as there are so many factors which affect windows services. Moreover, windows will set priority levels and adapt run Windows Apps smoothly. However, many of the time these process depends on which chip you are using and time is taken to run Windows Apps services.
What is Set CPU Priority to Prefer Foreground?
CPU Priority can be described as the importance or power provided by the CPU to a Service or Program running in a particular system. Now according to Microsoft, these priority levels are fixed. The priority levels range from highest priority process which to lowest priority (generally background Apps). Windows uses 32 priority levels, ranging from 0 through 31. These values divide up as follows:
- Sixteen real-time levels (16 through 31)
- Fifteen variable levels (1 through 15)
- One system level (0), reserved for the zero page thread
It’s important to note that, Giving a process a higher priority won’t make it go faster. Your programs will never use more CPU time than they need (or more than 100% obviously). It just means that if you have two processes that both want CPU time, the one with a higher priority will get it.
So, if for example, you’re doing some background task that might take a while, and it’s making a game stutter, you can lower the priority for the background task (or raise the one for the game, though that might interrupt other things you might want going on) to stop the stuttering. Generally it’s not advisable to set user programs with higher priority as it may compete with system resources/shell/gui and cause problems.
We all know that Programs on Windows 10 run on the basis of how the CPU is set to function. However, there are many scenarios when your Windows 10 computer slows down for programs like your browser and more. Generally poorly coded Media players and browser set their priority to maximum and causes havoc when it crashes as your system is not able to complete the highest priority program.
Many background processes take a lot of CPU resources which means foreground apps face slowdowns.
Note: Always remember you cannot set CPU Priority to prefer Foreground Apps manually; however, you can change them for a while.
Set CPU priority to prefer foreground Applications
Method 1: Adjust Foreground Apps
The first method which will help you to set CPU Priority to prefer foreground apps by changing performance mode in Windows 10. Initially, you need to sign into the Windows 10 with administrator privileges account.
Follow this guide carefully and Adjust CPU priority using Foreground Apps.
Step 1. Open Control Panel
Press Windows + R Key simultaneously to open the run window, and type “control panel” to Control Panel window.
Step 2. Navigate to System & Security
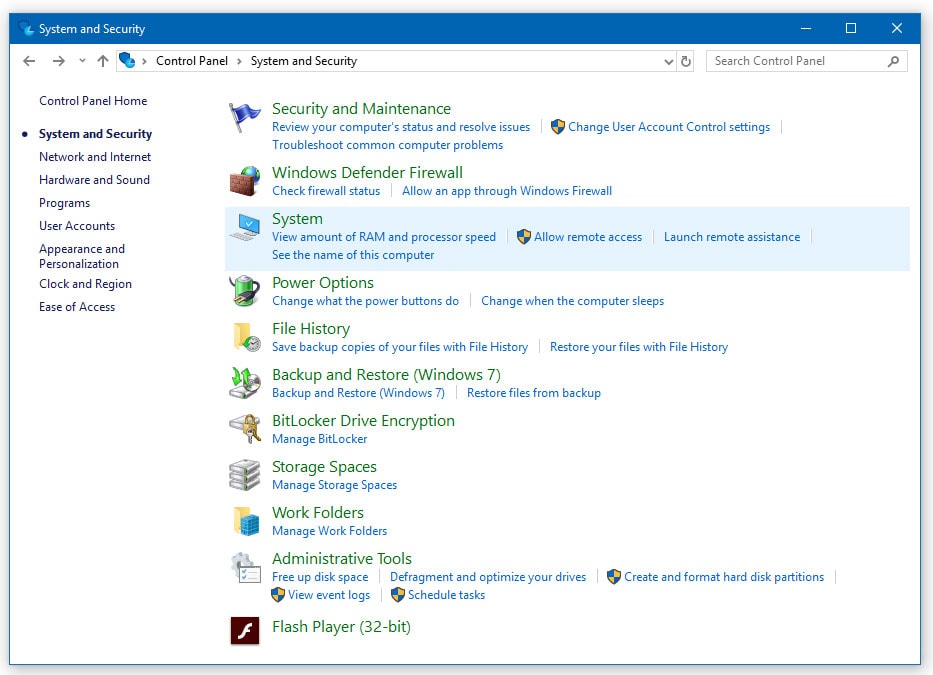
Once you have opened up the Control Panel at the top, you can see ‘System & Security’ option. Tap on it and go to the Settings and click on the System Option.
Step 4. Go to Advanced System Settings
Click on the System and navigate to the Advanced System Settings option in the left pane in the System Windows. After hitting the enter button, the system will open the System Properties Window.
Step 5. Open the Performance Options Window
In the system properties dialog box, head towards the Advanced tab and then go to settings under the Performance category. It will open up the Performance Options Windows.
Step 6. Select the Circle Against programs

Once you have opened the Performance Options Window, again navigate to the Advanced Tab, and check mark the circle against Programs under Adjust for best Performance of Programs.
Go to Advanced Settings >> Select programs to ‘Adjust for best Performance of Programs’
Step 7. Click OK to apply the changes
At last, you have to tap on the OK button and then Apply to complete the process. It will adjust the CPU Priority for the best performance of applications.
Usually, Windows has this as default settings. However, if your system doesn’t have these default settings, you can learn from the guide mentioned above.
Method 2: Adjust DWORD Value using Registry Editor
The second method which helps you to Adjust CPU Priority is via Registry Editor. You can change CPU priority by changing the DWORD value refer to the foreground apps.
Here’s the guide which helps you to do Set CPU Priority using Foreground Apps.
Step 1. Open Run Window
Press Windows + R key simultaneously you’ll see the Run dialog box. Type regedit in the search box and hit the enter button to open the Registry Editor.
Step 2. Navigate the given below Key
Once you’ve open the registry editor, now navigate to the Registry key given below: “HKEY_LOCAL_MACHINE\SYSTEM\CurrentControlSet\Control\PriorityControl”
Note: Remember this key defines the foreground vs background priority differential. The possible default values for Win32PrioritySeparation are REG_DWORD 0, 1, or 2, that specify the priority to be given to the application running in the foreground.
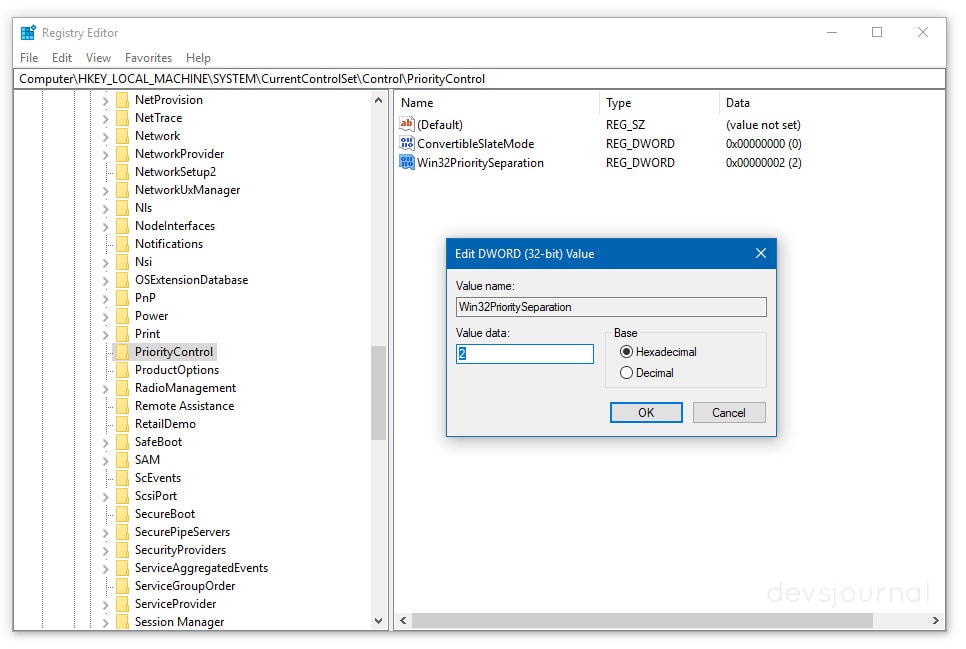
Step 3. Change the Value Win32PrioritySeparation
Double click on the Win32PrioritySeparation >> Earlier the value data is 2 >> Change it to the 26.
Well, if you want to adjust the best performance of Windows for the background, you have to set the Value data as 18.
Step 4. Reboot your PC
Click on the ‘OK’ button and finish the procedure. Now, reboot your PC
You have successfully changed the DWORD value in the Registry editor in order to set the CPU Priority to prefer foreground apps.
Read: 5 Methods to Create Bootable Windows 10 USB or Disc
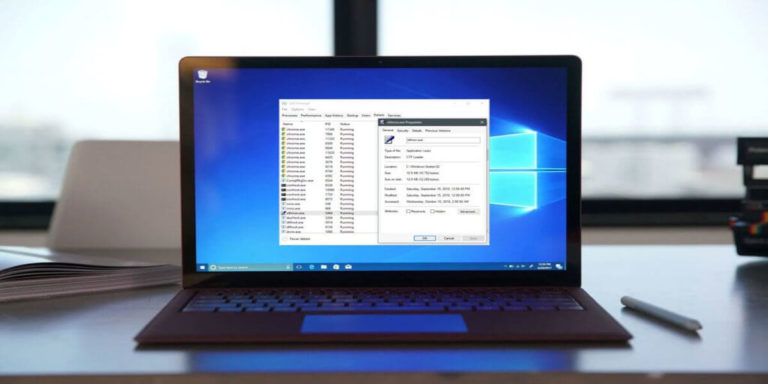
Method 3: Manually Setting CPU Priority using Task Manager
When you set the CPU priority to foreground apps, the application which is running in the front, such as Google Chrome which CPU will automatically prioritise when it comes to CPU utilisation. This will improve the performance of the system; however, it also has the chance to destabilise your system and leads to malfunctioning.
Well! You can avoid this malfunctioning of the system by manually setting the priority for the app using Task Manager.
Step 1. Open Task Manager
First, you have to open the task manager by the following process: Press the Ctrl + Shift + Esc Key simultaneously.
Step 2. Check for the apps to Prioritise
Move to the details section and look for the application which you want to prioritise.
Step 3. Set the Priority of the App
Right click on the app and then move to Set Priority > Tap on Real-time/High.
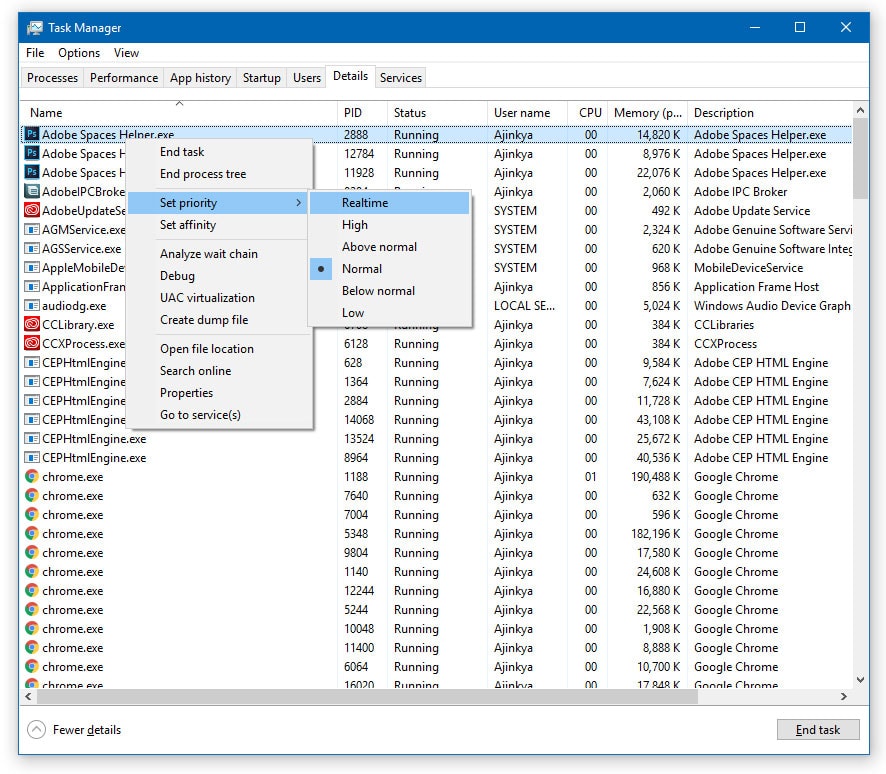
Step 4. Choose the Real-time depending on your needs
Once you have open the Set Priority options, you can decide the priority according to your needs.
This method as mentioned above is the only way of manually setting the priority of the chosen apps. Apart from this, we have earlier said that changing the priority of the system might cause malfunctioning in the system and destabilise; however, as of now you know how to change it, you can change it back to default whenever you want to do.
Conclusion
Changing or Setting CPU priority helps us to enhance the performance of our favourite apps. Now, we have featured three methods which surely helps you to set the CPU priority to prefer foreground applications. You just have to follow the guide carefully and by doing so you can easily set the CPU Priority for different apps.
It is quite useful to enhance the performance by switching your CPU priority between programs and background services based on or your task you’re performing. Make sure you don’t create unnecessary confusion in the system. We hope that we have solved the issue regarding CPU priority and help you out. What do you think, is it really helpful to switch Priority in Windows?