
The most alluring part of buying an Android gadget is the huge array of customization possibility this operating system has to offer. Unlike the iOS, Android is an open system which lets you personalize your device with outside software integrations, and not to mention that super speedy USB-C charging.
As you’re here, you probably already own an android device and are well aware of the pros of Android over other operating systems, and are pretty happy with the customization that the phone offers. But might be curious about the buzzword “root android phone” and probably wondering wow! There’s more?
There sure is. While we don’t have to sell you on the benefits of Android, we thought it would be a great time to curate a simple and elaborate guide which could help you understand how to root your phone and start using your Android to its full potential.
Rooting and it’s Benefits
If you’ve already done some digging on how to root an android phone, you probably also came across some scary terms like “bricking” but wait till you see what amazing things your phone is capable of doing post-root, all these risks will seem worthwhile for sure. Let’s start by understanding what rooting really is.
To put it simply, rooting your android phone gives you access to the superuser mode. That’s right. Normally, whenever a user starts using the phone, they are assigned a specific user ID, and depending on the clearance privileges, the user gets access to different permissions like installing and uninstalling applications on the system.
While, when using the root access, the superuser gets advanced control privileges, s/he can install or uninstall anything and access functionalities which default users could never reach. Here are some of the common benefits you can expect to see once you’re done rooting your device:
- Improved battery life and speed – After rooting, you’ll have access to settings that will allow you to kill those battery hogging apps and run your android faster.
- Remove Pre-installed crapware like System Apps – Well we all love that don’t we?
- Remove Bloatwares. Apps like Facebook, Chrome Keep sucking your Ram & battery by running in background. So, Among the smartphone geek crowd, applications like these are referred to as “bloatware”. They do nothing but bloat the software by existing as unnecessary applications.
- Tweak your phone in ways like: Improve Video streaming speed, Increase WiFi speed, Increase SIM detecting speed, Increase SD read/write speed, and so on.
- Most Important & the best part, you can Install Custom Kernel & Custom ROMS (We will discuss these briefly in the coming sections.)
- Finally, personalization at it’s best. Make your phone appear the way you like!
General Rooting Terminologies
Many newcomers face trouble when developers start using technical jargons to explain the methods involved in rooting, and the whole thing starts to demotivate the user. Nonetheless, we wouldn’t let that happen to you and that’s why we decide to get rid of this problem in the very beginning. Let’s take a look at some of the generally used rooting terminologies.
| Terms | Description |
|---|---|
| Root | Rooting means that you are trying to get root access to your device, i.e., it can run sudo commands and will have enhanced privileges. |
| ROM | This is a modified version of your Android. Using a custom ROM can offer extra features, speed improvement, personalized look, and also enable you to install the latest versions of Android on your older models. |
| GApps | All apps developed and controlled by Google. |
| Stock | Stock Android means the android version built by Google and it has no extra UI changes. In some instances, Stock also means the version of android your phone came with in factory settings. |
| Kernel | This component of the OS is responsible for handling communication between the software and hardware. Note: Remember the term bricking which we talked about earlier? This is where it comes in and therefore, you need to be careful with custom kernels. |
| Flash | Flashing means installing something on your device. Be it ROM, a custom Kernel, or a recovery file. Which brings us to Recovery. |
| Recovery | This software enables you to make backups on your phone, flash custom ROMs, and more. |
| Bootloader | Think of this like the minimum food you need to survive. That’s it. This is the lowest level of software necessary to start and run the operating system of your device. |
| ADB | The Android Debug Bridge is an interface for your OS. This lets you transfer data from your computer to the smartphone and vice versa. |
Should I Root my Android phone?
Rooting your phone is not just for the fun stuff, it’s also a way to improve your smartphone’s speed, functioning, and add more robust security features. It all comes down to whether you think all these amazing functionalities and performance improvements are worth giving up the manufacturer’s warranty, risk of bricking, and potential bugs.
Given due consideration to all the benefits discussed before, we think that now you’re capable enough to make an informed choice on your own. With these things out of the way, let’s delve into the world of rooting android phones and check out some of the preferred applications for this.
Preferred Rooting apps
There are plenty of excellent applications which improve functionality of the OS and prepare your device to become a performance monster. When you start off with looking for ways to root your android phone, you’ll probably find a lot of websites and articles mentioning different tools and applications which assist you in rooting the smartphone. While they’re all right in their contexts, we just want to set you off in the right direction before you end up on the wrong path without even knowing it.
The traditional way to root takes a lot of technical knowledge and frankly, who wouldn’t mind a tool helping them along the way right? So before you do choose the one for yourselves, you need to consider the compatibility of that software and the model of smartphone you’re using.
For example, a lot of new entrants in this market don’t have versions to work with older versions of Android such as the Android Marshmallow. If you would like to get some more information on this, be sure to check out the comparison between Magisk and SuperSU which are the two major players in the Rooting world.
Rooting Android Phone
I see you’re with us so far, which means you’ve decided to go ahead and get this over with. Alrighty then. Let’s get started. Now, since rooting is closely related to the operating system and interrelations of hardware and software, it’s worth noting that there’s no one-for-all method to root an android device. The way you have to follow varies depending on the type of your device, brand, and the version of android installed on it. Some tool compatibility also change for variants of the same handset.
For example, in order to get root access in your Samsung smartphone, you will have to use a program named Odin, which is a free utility for Samsung users and helps in making advanced system alterations. It can help you flash any files on your system which makes it risky too as any mistakes or bugs could lead to hard-bricking of your phone (your device won’t respond at all and unbricking tools will be required.)
Before rooting your device though, we suggest you do a backup check, and then buckle up and sit down with the information tools, the instructions and follow each one of them very carefully. Welcome to the exciting world of Android where with a little caution, everything is possible!
1. Unlock Bootloader
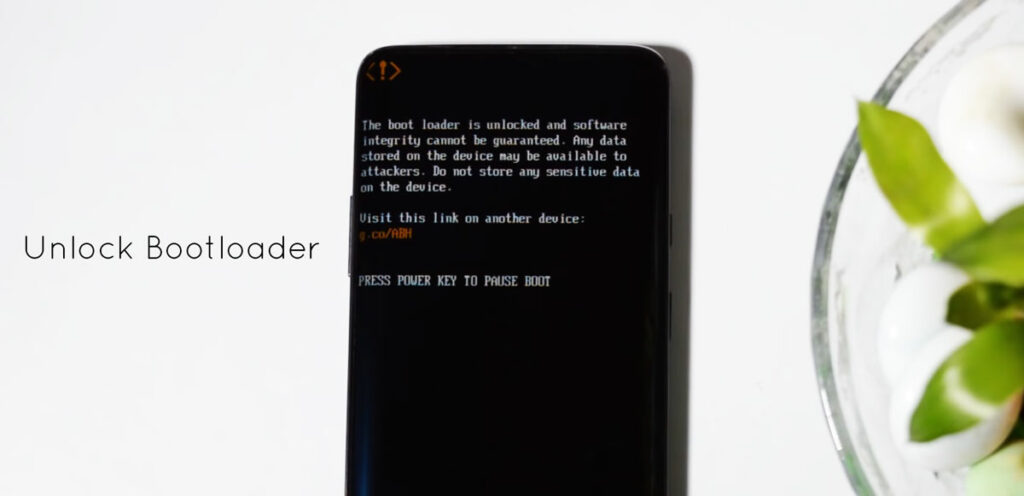
Most Android devices ship from factories with a locked bootloader, this means that if a user wants to flash new images on the smartphone, you need to unlock the bootloader first. Since the android OS is open source, and is available on a variety of hardware, every other manufacturer has his own version of the bootloader depending on their hardware requirements.
For instance, Motorola included a command called eFuse in their smartphones, which doesn’t allow users to flash a custom ROM and could permanent-brick their phones if they tried to. Therefore, if you want to root your device, you’ll also need to install a custom ROM on your smartphone once you’re done getting root access, and for that, the bootloader on your stock needs to be unlocked.
Helpful Tip: It is at this stage, once you unlock your stock bootloader, you lose your phone’s warranty. Also, it will completely erase all internal memory so remember: backup!
What is Bootloader?
To explain it simply, the bootloader instructs your OS Kernel how to boot normally. That is, it is a code which gets executed before any OS begins to run. Since it is the first code to run, the bootloader is extremely processor specific and that is why every manufacturer has their own bootloader for the motherboard.
Why is bootloader locked?
But why is it locked? The reason is quite simple actually. Imagine yourself as being the smartphone manufacturer. Now, would you like your users to use the Android OS version you designed and intended to be used on the device? Or would you grant them access to install any version they want? Personally, I would prefer the former of the two. This is why the bootloaders on your devices are locked by default, and the risks of voiding warranty and potential bricking stand guard.
What is ADB?
ADB & Fastboot are different protocols used via PCs to perform various commands through USB and help in ROM, Recovery and bootloader unlocking. Developers use the Android Debugging Bridge in identifying and fixing bugs in the OS. Therefore, while unlocking the bootloader, you’ll need to set up ADB and Fastboot on your computer and enable USB debugging and OEM unlock on your android smartphone.
2. Custom Recovery
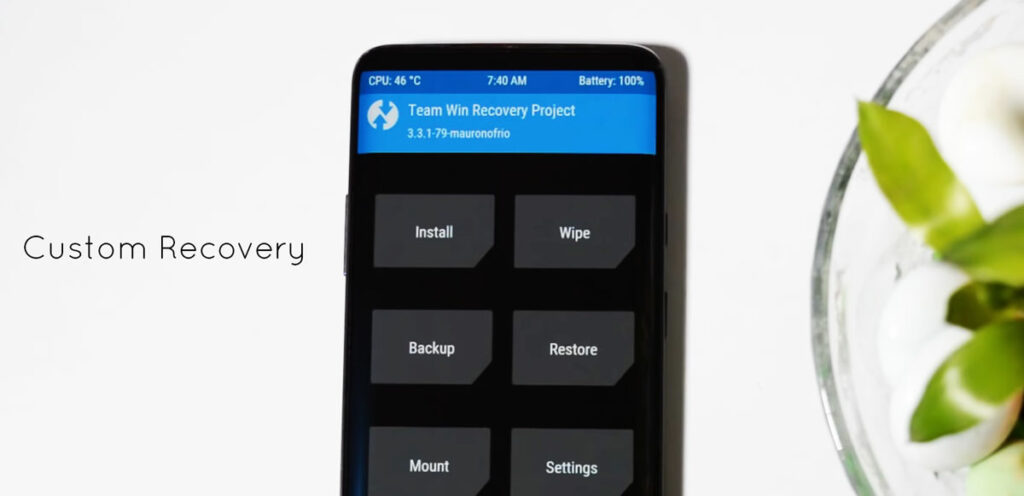
If you’re stuck and thinking how you will flash those custom ROMs, create backups on your phone, and restore from those backups, you need to install a Custom Recovery on your root journey. The method of installation of a custom recovery differs from phone to phone but in general, you will be needing USB drivers, a custom recovery file, and Android SDK (Software Development Kit).
Two of the prominent and popular recoveries are TWRP, and ClockWorkMod (CWM). So, once you’ve completed the first step and unlocked your bootloader, you need to install a custom recovery on your smartphone. They are incredibly helpful when you’re toying around with custom ROMs or if you’re really just looking for some powerful backup option.
What is Custom Recovery?
But what exactly is a custom recovery right? Well you see, all Android devices include a default recovery environment built by Google (also known as Stock Recovery.) You can do some basic stuff using this like resetting your device to factory settings, or flashing OTA update files (that too only the ones provided by the manufacturer).
But, overall the stock recovery is a minimalistic design and limited system at best. The Custom Recovery is basically a third-party recovery environment which offers additional features like creating and restoring backups, installing custom ROMs (Bingo!).
Why Install a Custom Recovery?
As we mentioned before, the main reason why you should be looking into custom recoveries is when you’re either planning to play around with custom ROMs on your smartphone or you’re looking for an effective backup feature. Although we wouldn’t recommend you go through all this trouble just for the latter, as the stock recovery environment can do that job pretty well for you.
What is TWRP?
The Team Win Recovery Project (better known as TWRP), unlike the other recoveries, is a touch-based recovery environment. Once you have installed TWRP you won’t have to press the volume and power buttons to make it work, instead there is a simple screen with function tabs to select from. You can perform functions like installing a custom ROM, Wipe, Backup/Restore, Mount, Reboot and more.
What is a Nandroid Backup?
NAND flash memory is a non-volatile storage technology which does not require power to retain data, and technically speaking, a Nandroid backup is strictly a digital duplicate data of the one stored on your smartphone’s NAND memory.
Confused? Allow us to make it simpler for you. You will be employing the features of this backup once you have gained the root access to your Android’s OS in order to try out those custom ROMs. How, you ask? Well, the recoveries that we talked about previously create full NANDroid backups on the SD card before they execute a new ROM. Such backups also come in handy when your phone catches some annoying malware and you want to restore it.
3. Custom ROM
Finally coming to the much awaited part, Custom ROMs. A custom Android ROM would make so much sense in today’s world if only people realize how much these Tech giants mine your information. Thanks to Android’s open-source (to some extent, a few would argue) environment, there exists a large ecosystem full of alternatives to the stock version of Android OS.
Some of the catchy advantages of installing a custom ROM on your smartphone include the means of escape from an outdated version of Android, privacy reasons, and perhaps even the outlook of having advanced control over one’s device.
What is Custom ROM?
You know how we told you that your smartphone’s manufacturer intends for you to use their officially developed software on the device? Well, a custom ROM is basically a customised firmware which replaces that software on your phone.
Users who like having control on the way their device functions, want to prolong their smartphone’s battery life and are looking for ways to get rid of the unnecessary preloaded applications, custom ROMs lead the way for them by providing creative features, useful tweaks, and platform updates which one wouldn’t be able to find in an official ROM.
Most Popular Custom ROMs
This is a list of some of the most popular custom ROMs the users have been increasingly using these days.
- LineageOS – Successor of the well-known CyanogenMod, the LineageOS aims to compete at the OEM level and believes in keeping the source code of both ROM and device open-source.
- OmniROM – A lot of ROM providers fail to perform well on stability of their firmware but the OmniROM is one of the most stable ones out there, and is quite popular for its features such as OmniSwitch and Open Delta.
- Remix OS Resurrection – Deriving its functionalities from many ROMs, the Remix OS has been around for quite some time now, and witnesses continuous development based on user preferences.
- Paranoid Android (Quartz 10) – This one provides a custom firmware for Xiaomi and OnePlus users. It is one of the oldest players in the community and was known to be a decent alternative to the CyanogenMod.
- Pixel Experience – As the name suggests, it’s developed for users wanting to experience the Google Pixel interface. It supports a wide range of models and all the GApps come pre installed.
Now, that you know the theory part, its time to execute the learning. Check out our articles given below to root your android device.
What to do after Rooting Phone
Since you’re new to the rooting world of Android phones, you’re probably wondering well all of the benefits being talked about sound good and all, but what am I supposed to do once I’m done rooting my phone? Sit back and check out some of the cool things you can do after you gain root access to your smartphone.
1. Xposed Modules

Given that this module has seen some decline in its popularity over the years but it’s still a fantastic framework to have on your rooted android phone. Xposed is a simple framework which allows a superuser to install add-ons on the ROM. A few of the Samsung smartphone users might face some issues while using the Xposed modules but it works fine overall. Download Xposed framework from here.
Some really cool modules become awesome when used as Xposed. For example, the Xposed Greenify module lets you hibernate apps when the phone is locked. Some other useful modules let you play around with the UI of your operating system.
Recommended: 25 Best Xposed Modules
2. Custom Kernel

In our previous discussion, we explained to you what a Kernel is. Suppose you change the brightness of your screen by moving the slider, the kernel is the one responsible for delivering that command from software to hardware. Whereas, a custom Kernel is capable of adding some additional features like setting faster CPU clock speeds, analysing idle times and controlling battery usage.
Since a kernel has virtually complete control over the system, it is wise to choose a custom kernel carefully. Some of the famous custom kernels in the market are ElementalX, Franco Kernel, blu_spark and more.
Be sure to make sure the one you go for is known to be compatible with the device you intend to use it for as wrong and incompatible custom kernel installations can be very risky.
3. Remove In-Built Apps from Android

We all have experienced the tough times of low storage space on our smartphones. Not going to lie, it blows! The worst part is, we can’t do anything about those unnecessary and unwanted pre installed applications that come packaged with our device.
Unless we root our android, there’s no other way to get rid of those annoying applications as the OS does not allow a normal user to delete them in any case. Be that as it may, once you have root access, as a superuser of your OS, you can easily remove those in-built applications hogging your memory space for no reason. Go figure!
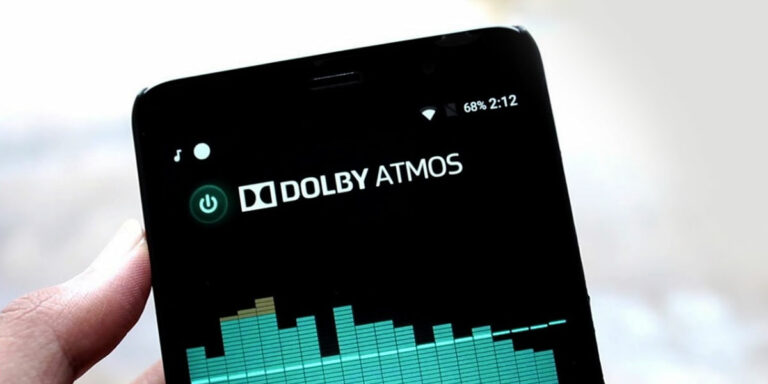
4. Install Dolby Atmos on Android

For all the music aficionados in the house, we recommend installing the Dolby Atmos on your Androids once you get root access. Atmos is known for its distinctive 3D surround sound. That means, this software is going to kick in as soon as you put your headphones on, and those spatially encoded digital signals are going to emulate that smooth 3D audio effect like never before.
Most phones have it installed as default these days but hey! Even if you don’t, you’ve got root access now. Go ahead and install Dolby Atmos on your smartphone and enjoy your favorite music in an improved environment.
5. Increase Battery Life

By now, it’s pretty obvious that getting root access is going to boost your smartphone’s performance and save a lot of juice for times when most needed. As a super user, not only can you improve your phone’s performance, personalise and customize the interface features, but with the Xposed modules like Greenify, you will gain full control over which app has the privilege to run in the background and which does not.
If you’ve tried all the non-root routes and still struggling with reduced battery life, then root is your final way out. Let us know how it helped you out.
Conclusion
After all the discussion and mining for information, if you’re still confused whether or not to root your android smartphone, let me tell you that it all boils down to the purpose of using the device. If you have a specific use in mind which your device won’t be able to perform as a normal user, and given you understand all the risks and vulnerabilities associated with rooting on android, there is nothing wrong in trying to gain a little more independence and control over your own device.
However, that being said, nowadays it’s possible to do most of the stuff that one needed root access for in the olden days. So our final say would be to go for root on your older models while keeping the newer ones clean while they’re still receiving updates and enjoying the warranty period. This way, you can have it both ways! Alrighty, time to wrap up. Do let us know if the article helped you out in any way. Drop your feedback or thoughts in the comment section down below. See you next time.
![Fix: Android 13 Fast Battery Drain Problem [8 Effective Fixes]](https://devsjournal.com/wp-content/uploads/2023/07/Android-13-battery-drain-768x384.jpg)


Hi Anjikya
Thanks for the reply but actually my main concern is about rooting whether it should be be done after flashing custom ROM or before flashing custom ROM(does flashing custom ROM require a rooted device?).2,Also when install/flashing Gapps does it require the device to be rooted first.3,Instead of flashing SuperSUroot.zip via TWRP,is it possible to root the device first using root apps & next install the non root SuperSU APK file4.
Hi Govin,
1. Before flashing a rom, you don’t need to root the device. You can just unlock bootloader > Install TWRP & Install ROM directly.
2. For flashing Gapps, you need to have TWRP installed.
3. You can root the device in anyway you like, you just need to unlock your bootloader before doing that.
Hi;
1.I would like to know whether one can install custom ROM before rooting or is rooting Android device a prerequiste to installing custom ROM
2.Does flashing a prerooted ROM in Android device ensure a rooted device thus making rooting the device via SuperSU or Majisk later unnecessary
Hi Govin,
1. If installing a custom ROM is your final goal, you can just install TWRP. No need to install SuperSU or Magisk for it.
2. Yes, you can install a pre-rooted custom rom to avoid the hassle of rooting it afterwards.
do i have to root my android phone (samsung note 2, / 4.4.2 vers.) to have an access on quick boot ?
hai Ajinkya……..im am sai krishna vardhan……..pls develop lollipop or atleast kitkat rom for karbonn titanium s5+…..it is made of chipset mtk6582……all are saying that kitkat is not available for mtk6582 chipset but xolo made kitkat roms for xolo q1010 and q1010i…..which are made of same chipset and features…….pls try to develop lollipop or kitkat rom for Karbonn titanium s5 plus……..
I will try my best to build kitkat for S5+. But this might take some time.