While Samsung is getting ready to launch next iteration of their J series smartphones, surprisingly last year’s J series models are still famous and popular. Irrespective of time, Samsung J5 has good specifications that can satisfy an average user. Besides respectable specifications and features, Samsung is also a well known and trustworthy brand. Samsung also has thousands of stores and support centers all over the country, So buying a J series smartphone is never a bad idea.
Rooting a J series smartphone gives an extra edge by allowing users to tweak performance and battery life. If you never heard the terms unlocking and rooting, please read few important things here to know more about rooting. Now, let us move forward with Unlocking and Rooting your Samsung J5 (2016) smartphone.
Why Root Samsung Galaxy J5 (2016)?
Samsung Galaxy J5 (2016) phone has only 2GB RAM and with latest apps and features, it is likely to lag and have prolonged performance. When you root a device, your device’s performance improves by 30-70%, its battery life is improved, it removes pre-installed system apps, it removes bloatware apps that take up a lot of RAM space and it increases device’s speed in all terms like video streaming, Wifi speed, SIM detecting speed and SD card read and write speed.
By rooting you unlock all the potential of your current device. The only major disadvantage of rooting your device is that you loose your manufacturer’s warranty for the phone. Samsung Galaxy J5 comes with a flexible bootloader. This means, this smartphone can be easily rooted. For rooting, we install TWRP recovery. It is a custom recovery file which is to be installed for rooting your device. With the following simple steps, you can easily root your Samsung Galaxy J5.
Pre-requisites:
- Samsung Odin.
- TWRP recovery.
- SuperSu zip.
- Backup your personal data on the device. Unlocking will erase the internal storage of the device.
How to Unlock and Install Flash TWRP on Samsung J5 (2016)?
Step 1: Download Odin (Samsung’s Flash Tool) from here and extract the zip file. Select the .exe file, Right-click > Run as administrator.
Step 2: Also, Download the appropriate USB drivers and .tar image of TWRP recovery.
Step 3: Power off your device and boot into the download mode (Press and Hold VOLUME DOWN+HOME+ POWER).
Step 4: Right-click on Odin.exe and choose Run as an administrator. then connect the device using the USB cable
Step 5: As soon as you connect the device, a blue mark appears and says Added in the ODIN Log box.
Step 6: In the Odin, place the TWRP tar file in the [AP] slot.
Step 7: Also, uncheck the Auto Reboot option from the Options tab of Odin.
Step 8: Now Start the TWRP installation process and wait for the finish.
Step 9: You should see the box above the ID: COM port light up green with a PASS message.
Step 10: Now unplug the device and long-press the POWER button until it switches off (or simply remove and reinsert the battery).
Step 11: Restart your device, the First boot may take some time so please be patient.
How to Root Samsung Galaxy J5 (2016)?

Step 1: Download and Transfer Supersu zip and transfer it to your device storage.
Step 2: Reboot into TWRP custom recovery using key combinations. (VOLUME UP/HOME/POWER).
Step 3: Tap on Install option, search for Supersu zip you have transferred earlier and selected it.
Step 4: Confirm the process of flashing by swiping right.
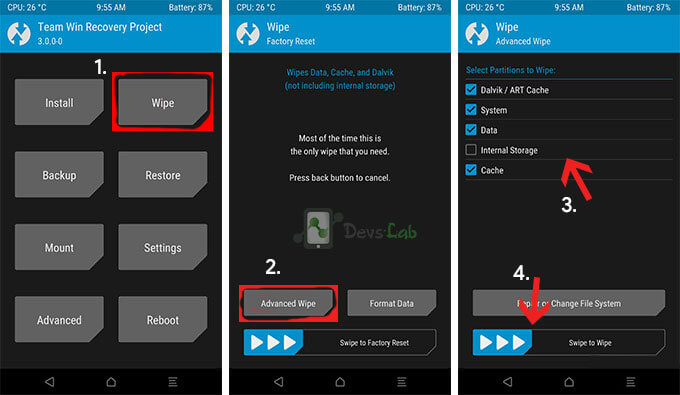
Step 5: Once completed, also wipe Cache/Dalvik and reboot the system.
That’s it. Your Samsung J5 2016 should be rooted now. You can check the root access by installing a root checker app from playstore. Also, take a look at our 10 best Android apps for rooted users. For any queries, please comment below

![Fix: Wi-Fi Not Working On Android 13 [10 Fixes]](https://devsjournal.com/wp-content/uploads/2023/06/Wifi-not-working-on-android-13-768x384.jpg)


Mine just stopped on boot. “Set Warranty Bit: kernel” can be seen on the top corner left of the screen. Is this normal?
Mine just stopped on boot. “Set Warranty Bit: kernel” can be seen on the top corner left of the screen. Is this normal?