
If you have a rooted Galaxy J5 model you might try flashing a custom ROM,custom recovery images, installing custom kernels,removing bloatware, overclocking or undervolting CPU frequencies etc . You should be prepared for all the possible scenarios. Of which, bricking your smartphone at least once, is not a big thing to worry about.
Usually, the most common Android software problems are issued while you are tweaking your Samsung Galaxy J5. In this post, I’ll guide you How to unbrick Samsung Galaxy J5. So, first of all, if you manage to brick your Galaxy J5, don’t panic. Relax and read all the lines from this step by step guide. Then, choose the proper troubleshoot solution/solutions to apply to your smartphone.
We’ll be using a flashing tool named as Odin, Odin is an official tool, developed by Samsung and especially used on update procedures. So, you have nothing to worry about as everything will be carried out using Official tools. Make sure you are using this method only if your are unable to access Custom Recovery.
Odin can be also used for performing a downgrade operation, if you have a previous version of the Android system downloaded on your computer. This manual update procedure is great as by performing it you can troubleshoot various software related issues (like boot loops, lags, bugs force close errors, battery drain, heating issues, screen freeze, total blackouts and more) and you can revoked root access on your Galaxy J5 as your phone will be restored back to its initial state.
Everything can be fixed. However, it is important to know how to prevent further problems from happening. In that respect, from time to time clear some space and uninstall the apps that aren’t used any longer.
Pre-requisites:
- A Windows based PC.
- Original Samsung Galaxy J5 USB Cable.
- Disable Antivirus Protection in your PC as it might interrupt the flashing process.
- If you are following this method to manually update your Galaxy J5, then you can backup your Personal data like Contacts & all the files in your Internal memory. Backup IMEI.
- Download Samsung KIES to install the USB drivers of Samsung Galaxy J5. Skip this if you have already installed USB drivers.
- If you can’t switch on your Galaxy J5, charge it for around 2hrs. Make sure the battery is above 50%
How to Unbrick the Samsung Galaxy J5:
Method 1. Perform a Factory Reset from Recovery (Hard Reset)
Many a times hard resetting your device solves the issue. Sometimes the problem is associated with some Apps or any malware installs. Major symptoms of this are random freezes that last until the device is restarted. Too much force close errors, RAM hogging, Too much CPU usage & the worst is device not starting up! You can easily fix it by doing a factory reset from recovery.
Step 1: Press and hold the Power, Volume Up and Home buttons at the same time on your Samsung Galaxy J5.
Step 2: Keep pressing these keys until the recovery mode menu is being displayed. In recovery use the Volume Up and Down buttons in order to scroll up and down and the Power key to select.
Step 3: From recovery, after selecting “wipe data factory reset” on the hard reset process, choose “wipe cache partition”.
Step 4: Select “reboot system now”. That’s it! Check if your device works. If you are still not able to start your device, follow the procedure of flashing stock firmware below.
You can refer below video to understand much better:
Method 2. Reinstalling the Stock J5 2016 Firmware
Now, this operation will restore your device back to its initial state and all the problems will be eventually addressed.
Step 1: Download the official stock firmware & Odin from the bottom of this post. Install Odin on your PC.
Step 2: Switch off your device & boot into download mode. You can refer the below video for “How to boot Galaxy J5 in download mode.” (Method is same for all J5 models)
Step 3: Launch Odin & Connect your smartphone with your computer; use the USB cable in that matter. Odin will recognize your device – the “added” message will be showed and the ID: COM field will be turned yellow or blue.
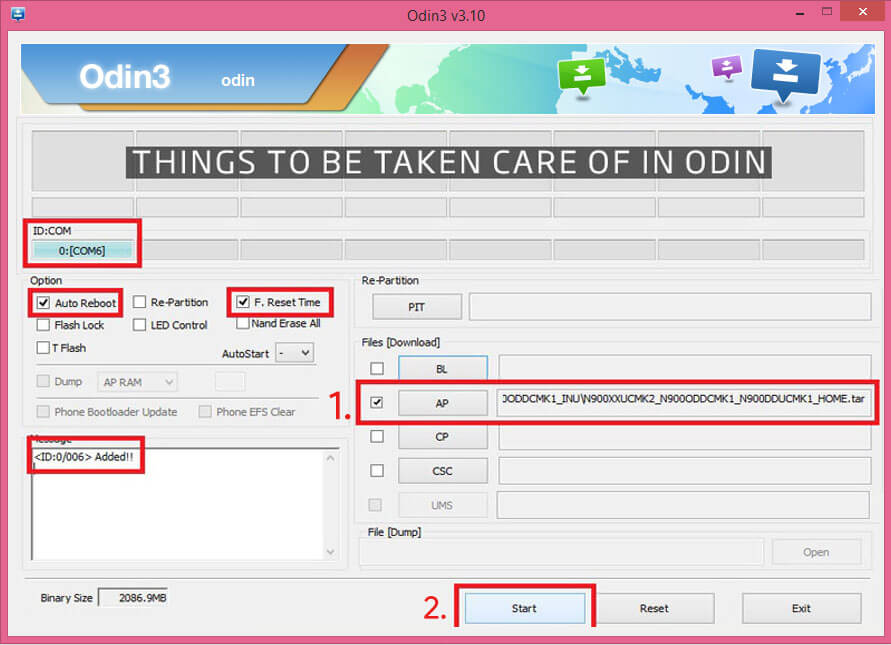
Step 4: Next, from Odin click on the PA option and load the Android software package. Don’t check the Re-partition option. Click on Start when done.
Step 5: The stock Android OS will be now installed on your Samsung Galaxy J5. You will be done when the “pass” message will be displayed on Odin; moreover, the ID: COM field would turn green.
Step 6: Unplug the USB cable and reboot your phone. If it will get stuck in a boot loop, go to recovery mode and from there select “wipe data factory reset” followed by “wipe cache partition”.
Downloads:
You finally fixed your Galaxy J5 model without paying big bucks to the repair guy. Isn’t that great? Enjoy and let us know how things worked for you by using the comments field from below.


It really worked!! I was so freaked out about it for the past 2 days. Thanks a ton.
Glad it worked for you!
what if I’m not able to enter in the download mode as per procedure 2?
IT WORK!!!!
Thanks.
I’m so happy.
Mil Gracias
IT WORK!!!!
Thanks.
I’m so happy.
Mil Gracias
It really worked!! I was so freaked out about it for the past 2 days. Thanks a ton.
Glad it worked for you!
what if I’m not able to enter in the download mode as per procedure 2?
did you recieve any help. im stick here too