If you have a broadband connection at your home, all of the things related to your internet connection are managed by your ISP or Internet Service Provider. This includes everything from hardware devices to the software side of things. And if you are familiar with the working of the Internet, then you must know that all ISPs offer a DNS service so that you can access the various websites on the Internet.
But for most users, it is generally not a good idea to use the default DNS service of your ISP. In case you do not know, we are here to show Why you Shouldn’t use your ISP’s default DNS Server and also, we will make a comparison of OpenDNS vs Google DNS.
You can also learn more about the working of DNS servers and the security concerns related to them. Therefore, if you are still using the default DNS server, make sure to follow this article until the end.
What is a DNS Server?
DNS stands for Domain Name System, which is essentially a system or server used to resolve domain names. Any website that you access on the Internet has two different addresses for accessing it. While one is the physical address in digits, the other is a domain name in English, which is easy to remember.
Thus, every time you open google.com, this domain name gets resolved into its physical address or IP address to be accessed. This whole process is done by the DNS server, making it highly crucial to access the Internet using modern devices like computers and smartphones. Generally, this process is done by a DNS server handled by your internet service provider that can have issues in some cases.
Why you shouldn’t use your ISP’s Default DNS Server?
Since a DNS server is so essential for accessing the Internet, some of you might be wondering why not use the default DNS server of your ISP. This is because all the data coming from and to your devices go to your ISP’s DNS server first. This can result in privacy and security concerns for many users since the ISP has access to this DNS server and all of the data coming to it.
To hide the sites you visit from the ISP; you could also use a VPN. You can find some of the best VPNs for Android available in 2022 in our article. You can face the following issues while using the default DNS server of your ISP:
1. ISP can Access Browsing History
Whenever you access any website on your devices using its domain name, the domain name gets transferred to your ISP. This is done so that the DNS server of your ISP can use it. And as you know, this DNS server then redirects you to the website you want to access using its physical or IP address.
But since the ISP can access the DNS server and all of the data coming to it, your ISP can access your browsing history. If you care about your online activity privacy, securing this is highly important.
2. Better Internet Speed with other DNS Servers
While it is not true for downloading large files, your internet speed can be affected quite a lot by your selected DNS server while browsing multiple websites and web pages at once. This is because the time taken by a DNS server to convert a domain name into a physical address can take some time.
And this is especially true for the default DNS server of most ISPs out there as they are a bit slow. On the other hand, a third-party DNS server might resolve a domain name faster, resulting in better internet speed while browsing websites. Besides this, there are other methods you can use to improve internet speed on a Windows laptop.
To avoid these issues you can either opt for OpenDNS or Google DNS. If you wonder, is OpenDNS safe? or is Google DNS safe? or which is better between the two, then read on further.
OpenDNS
OpenDNS currently has over a billion active users with 24 data centers spread across the globe. Every single of these data centers is updated a million times per second, making the system brighter at every step.
OpenDNS is a recursive DNS that gives you high-speed Internet connectivity, automatically blocks phishing sites, and has 100% uptime. A free DNS plan provides you with email support, parental controls, web-filtering, and dozens of other features.
In addition, an OpenDNS also sports features such as Smart Cache, whitelist/blacklist modes, typo correction, and so on. You get all these DNS services for free. However, you will need to create an account if you want to use ALL the remaining features.
Those who prefer something extra every time can prefer the DNS premium that gives you extra limits for whitelist/blacklist modes and access to premium support.
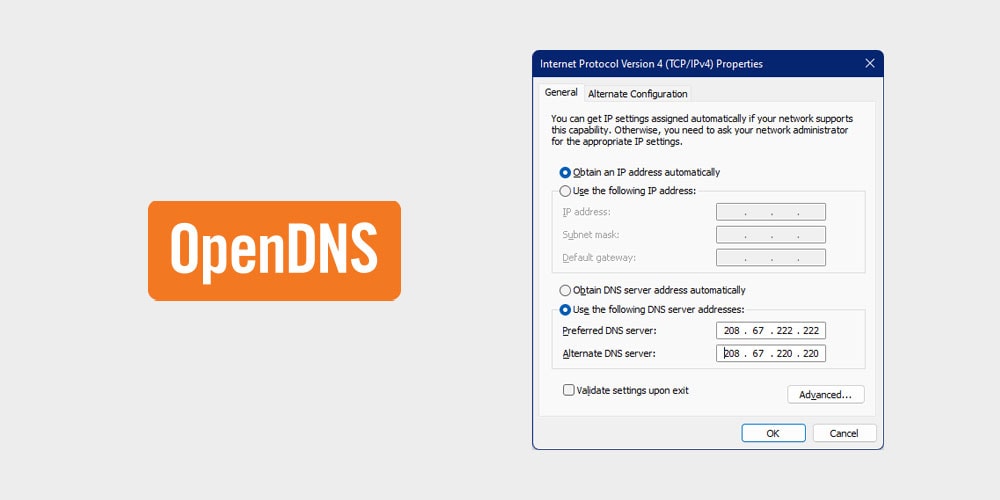
Given the data available, OpenDNS can predict and tackle attacks before they even take place. It protects you from threats you haven’t even heard of. All you need to do is spare a few minutes, and you’re set. To establish OpenDNS on your network, you will need to configure your network settings as mentioned below.
- OpenDNS IPv4 Addresses
Nameserver: 208.67.222.222
Nameserver: 208.67.220.220
- OpenDNS IPv6 Addresses
Nameserver: 2620:119:35::35
Nameserver: 2620:119:53::53
Google DNS
If you want to replace your ISP’s old and outdated DNS server, the Google DNS server is the perfect replacement. Introduced back in 2009, Google DNS provides a fast, secure, and reliable alternative to the traditional Internet DNS server. Setting up Google DNS on your network results in improved Internet speeds, valid search results, and excellent overall security on your network.
Unfortunately, Google DNS falls short on the privacy front. However, efforts are continuously making Google DNS better than OpenDNS or the ISP’s default DNS server. For example, unlike OpenDNS, the Google DNS service does not have a whitelist/blacklist mode which means it won’t automatically block websites for you. But just like the OpenDNS, you can enjoy all the basic features for free without having to create an account.
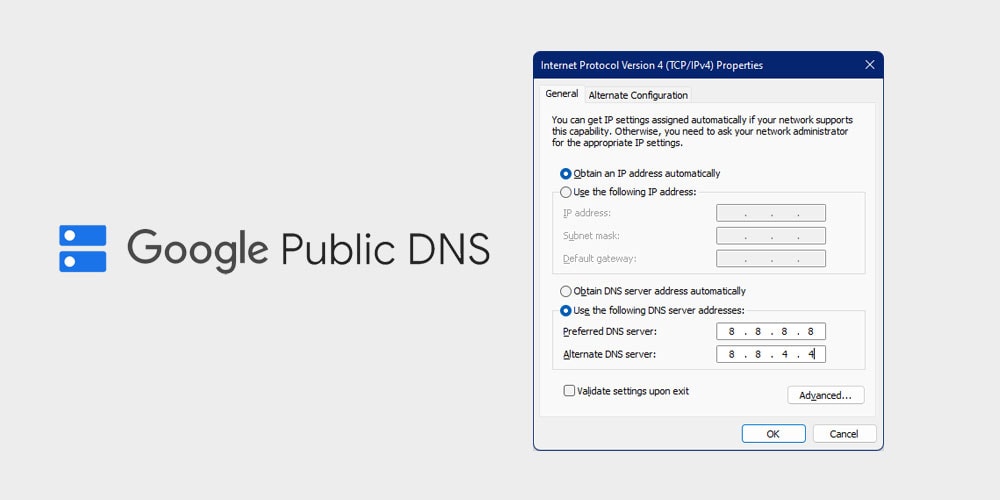
To set up Google DNS on your network, configure your network to the below-mentioned settings
- Google DNS IPv4 Addresses
Nameserver: 8.8.8.8
Nameserver: 8.8.4.4
- Google DNS IPv6 Addresses
Nameserver: 2001:4860:4860::8888
Nameserver: 2001:4860:4860::8844
Also read: How to Fix DNS_PROBE_FINISHED_BAD_CONFIG Error in Chrome
OpenDNS vs GoogleDNS: Which one to choose?
Both OpenDNS and Google DNS come with their unique share of perks. While the Google DNS will significantly improve overall Internet speed, with OpenDNS, you won’t need to worry about your privacy.
Google DNS is free to use without needing to create an account. Similarly, OpenDNS comes with a Premium and a prosumer version that will give you additional settings.
Despite having everything at your disposal, making a choice is always challenging. Therefore, we have mapped out a few differentiations between Google DNS and OpenDNS so that you can get a better understanding of what these hold in store for you, ultimately helping you to make the right choice.
1. Performance
There is very little to separate the two in terms of performance. Both open and google DNS provide you with all the essential features for free without creating an account. However, the Google DNS is believed to deliver a better and stable performance irrespective of the location. Meanwhile, the OpenDNS works great across the United States but falls short in performance in Asia and South America.
2. Speed
If you shift from your ISPs DNS to Google DNS, you will notice a significant improvement in your overall Internet speed. The Google DNS delivers faster browsing speeds and precise search results. Meanwhile, you will need to upgrade to OpenDNS premium or the Prosumer version to get the maximum Internet speed.
Having said all that, the rate of both these DNS varies from one location to another. DNS resolution speed depends on how far the DNS server is physically located relative to your site. The closer it is, the faster it will translate the domain name to its corresponding IP address.
To test which of the two is the fastest, you will need to manually try Google and OpenDNS from your current location to determine the fastest.
Note: Changing your DNS server will have NO effect on your Base Internet Speed.
3. Security
Both these DNS servers are extremely thoughtful when it comes to security. These DNS automatically block phishing websites and also has a blacklist mode present. However, the OpenDNS comes with configurable parental controls, giving it a significant edge over its counterpart.
Meanwhile, the Google DNS isn’t the first choice for many privacy-oriented users. Although, the Google DNS provides maximum security for the messages sent between your device and the DNS server. Similarly, OpenDNS shines brightly when it comes to blocking data-snapping ISPs.
4. Reliability
Reliability generally refers to the server’s uptime. If your DNS server is down, it will automatically lead to a DNS error when browsing through websites. However, this problem generally arises when your ISP’s DNS is on your network.
Google and OpenDNS servers cancel out these issues since they rarely have any downtime. Choosing any one of the two DNS servers will automatically guarantee reliability when it comes to server uptime.
5. Features
Both these DNS comes loaded with dozens of features. The basic versions of both OpenDNS and Google DNS servers give you an easy-to-use DNS service to help you enjoy faster internet speeds and secure browsing. These servers are automatically configured to block malicious websites and come with configurable parental controls.
However, OpenDNS servers come with three different versions that give you an additional layer of security. Apart from blocking phishing websites, there is also the typo correction feature available in OpenDNS. So if you are looking to choose based on the features, then the OpenDNS server is suitable for you.
How to Switch to Google DNS or OpenDNS?
The majority of the users generally tend to use the traditional ISP DNS server. A vital drawback of this DNS server is the severe downtime that can result in relatively slower Internet.
A simple solution to all this making to switch to using either an OpenDNS or Google DNS server. You will first need to know the IPv4 and IPv6 addresses for both Google and OpenDNS to switch between Google and OpenDNS.
To switch your DNS settings, follow the given steps.
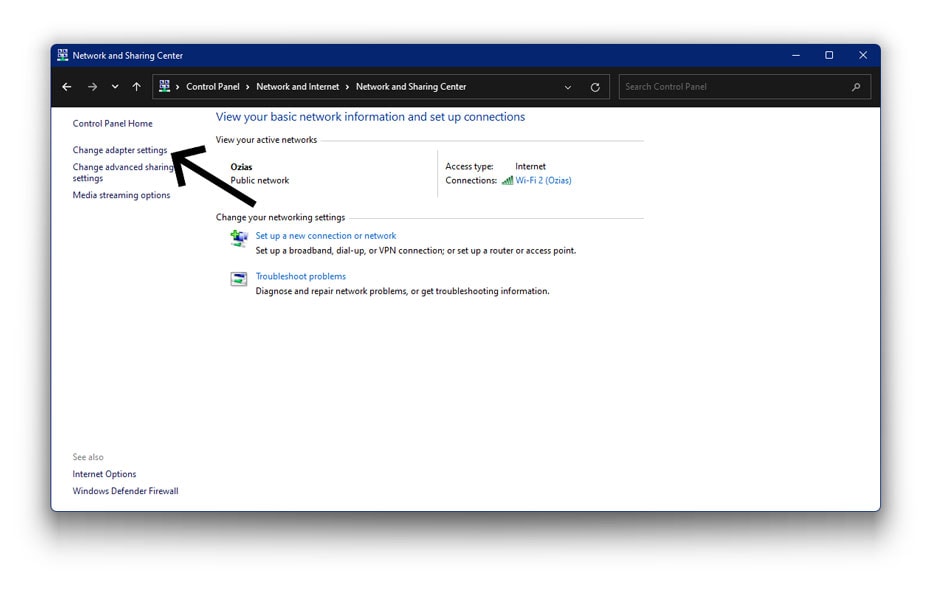
Step 1. First, open the Control Panel on your Windows computer and go to Network and Internet > Network and Sharing Center.
Step 2. In here, open the Change adapter settings, which you can find on the left side menu. This menu will open a new window on your screen.
Step 3. Now, right-click on your default network adapter and open its Properties.
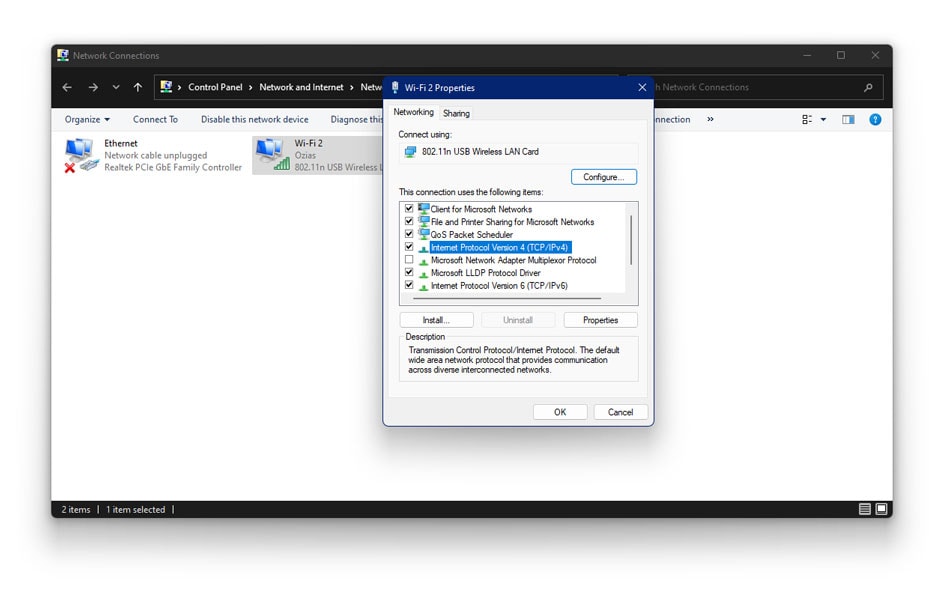
Step 4. Once you are in the Properties window, double click on Internet Protocol Version 4 from the list in the Properties window.
Step 5. If you are using OpenDNS server, then enter the below IP addresses in the boxes given
Nameserver: 208.67.222.222
Nameserver: 208.67.220.220
If you are using Google DNS server, the enter the below IP addresses on the boxes given
Nameserver: 8.8.8.8
Nameserver: 8.8.4.4
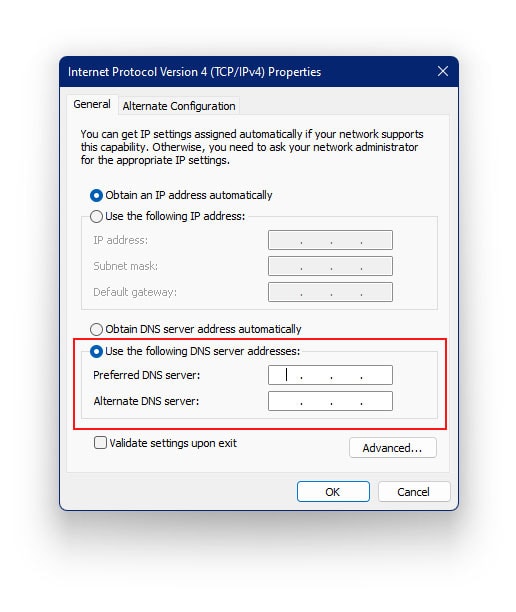
Step 6. After that, click on OK to save your settings and restart your Windows computer to switch to the Open or Google DNS server right away.
Conclusion
Now that you have gone through all of the details related to DNS present in this article, you must know a lot about DNS servers. You might have even changed to a different third-party DNS server by now.
If you still have any doubts or thoughts regarding the DNS server or anything related to it, make sure to leave your thoughts in the comments section below.


