Did you know Windows reserves around 20% of your Internet connection’s bandwidth for the operating system and the applications installed on it. So mostly at any point in time, you are not able to use 100% of your internet connection speed. This reserved bandwidth doesn’t matter much if you have a high-speed internet connection, but for those of you who have a slow internet connection, removing the 20% bandwidth limit can significantly speed up your web browsing experience and increase download speeds.
Unfortunately, the group policy editor is only available on Pro, Enterprise and Ultimate versions of Windows and it can only be accessed if you are using the computer with administrator rights. However there are several tweaks available on the internet to enable it on an unsupported version of Windows, but be warned that doing so can make your computer unstable. Therefore if you are looking for a tried and tested method to increase internet speed on Windows, then you can go ahead and remove the bandwidth limit. Doing so will instantly increase your internet connection speed by 20%.
Removing the bandwidth reserve limit on Windows can be tricky for some Windows users since you need to make some change in the group policy editor. But if you follow the instructions provided below carefully, you’re good to go. For those who want to increase internet speed by 20%, here’s how you can use the group policy editor in Windows to do so.
Increase Internet Speed By Using Gpedit
GPEdit.msc or Group Policy Editor is a configuration manager for Windows which makes it easier to configure Windows settings. Instead of going through Windows Registry, the user can configure different aspects of the Windows Operating System through a group policy editor. We can increase the internet speed in windows 10 by removing the reservable bandwidth limit set by Windows.
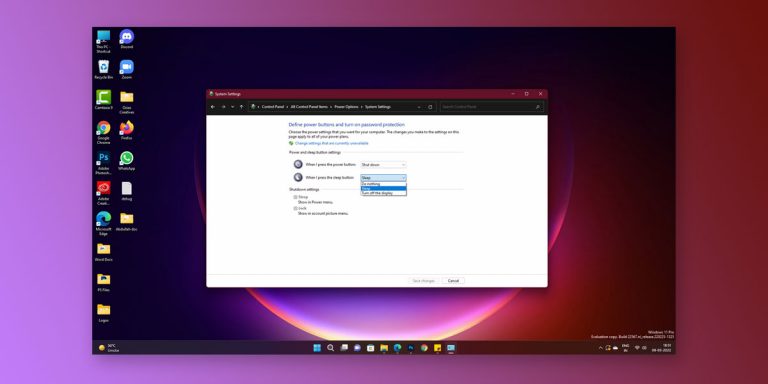
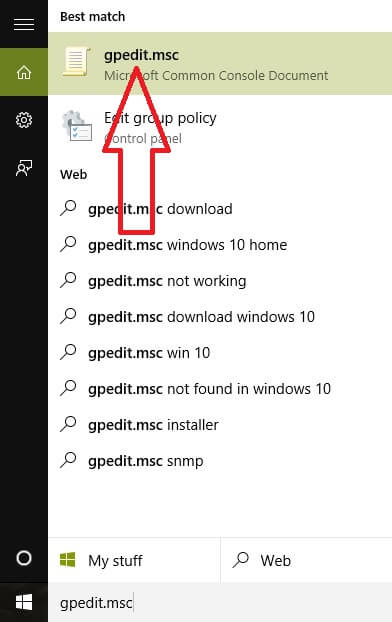
Step 1: Type in Gpedit.msc in the Windows search box and press enter.
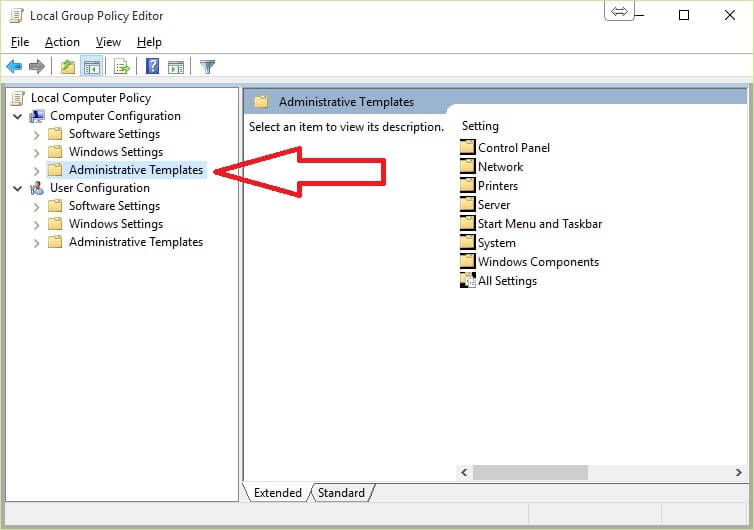
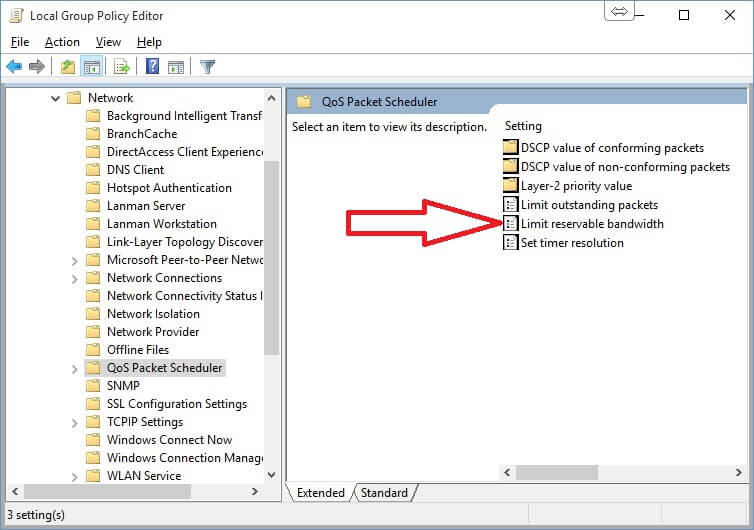
Step 2: Navigate to Computer Configuration -> Administrative Templates
Network -> Qos Packet Scheduler
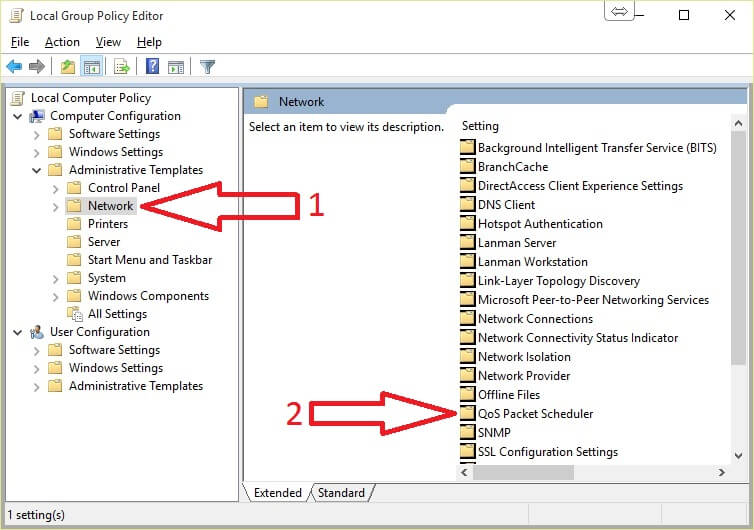
Limit Reservable Bandwidth
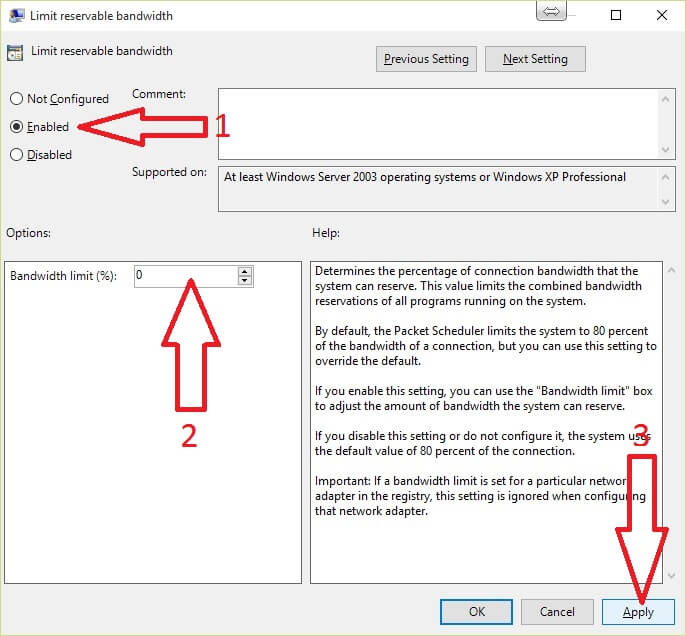
Step 3: Select the enabled radio button and then change the bandwidth limit from 20 to 0. Finally Click on Apply to save the changes.
That’s it; you should be now able to use 100% of your internet connection bandwidth. The Windows Os reserves a fixed percentage of the total internet bandwidth. Windows Os uses the bandwidth reserves for things like the windows update, license removal. When the bandwidth limit is removed it allows other application to use the reserved bandwidth therefore increasing the computers internet speed.
Note: This will also affect the operating system activities like automatic windows updates.
How to Increase Internet Speed Using CMD in Windows 10
1. Speed up the internet using cmd
TCP Chimney Offload is a networking technology that helps transfer the workload from the CPU to a network adapter during network data transfer
Step 1: Open command prompt as administrator
Step 2: Type “Netsh int tcp show global” and press enter
Step 3: Type: “Netsh int tcp set chimney=enabled” and press enter
Step 4: Type “Netsh int tcp set global autotuninglevel=normal” and press enter
Step 5: Type “Netsh int set global congestionprovider=ctcp” and press enter
2. Don’t forget to Drain out DNS Cache
When you access any website over the internet, their ISP’s DNS Server provides them with an IP address, which is machine-readable information. The operating system stores this information at hidden places, on the user’s machine. This collection of information is called DNS Cache and can affect the Internet speed on Windows 10. So it is advised to clear the DNS cache from time to time for the better speed. If you are wondering how to do it, then we have provided the steps below:
Step 1: Open Start menu/screen, type ‘CMD’
Step 2: In the search results, locate Command Prompt, right click it, then select Run as administrator from the menu
Step 3: Confirm your action by clicking Yes, if prompted
Step 4: In the displayed black window, type ‘IPCONFIG /FLUSHDNS’ and hit Enter
You have successfully deleted the DNS Cache. You can close the command prompt now.
3. Using the Netsh INT Ip Reset
When you use this command, any changes in the IPv4 settings will be reset. Furthermore, this will modify the two registry keys related to internet protocol. resettcpip.txt log file will record the actions you are taking in the whole procedure.
Step 1: Open Command Prompt as an administrator
Step 2: Type “netsh int ip reset c:\resetlog.txt” and press Enter.
4. Using Pings To The Default Gateway (WiFi Only)
By using this method you may experience a temporary speed boost, depending on the strength of the WiFi signal. However, in the case of LAN, it won’t affect speed.
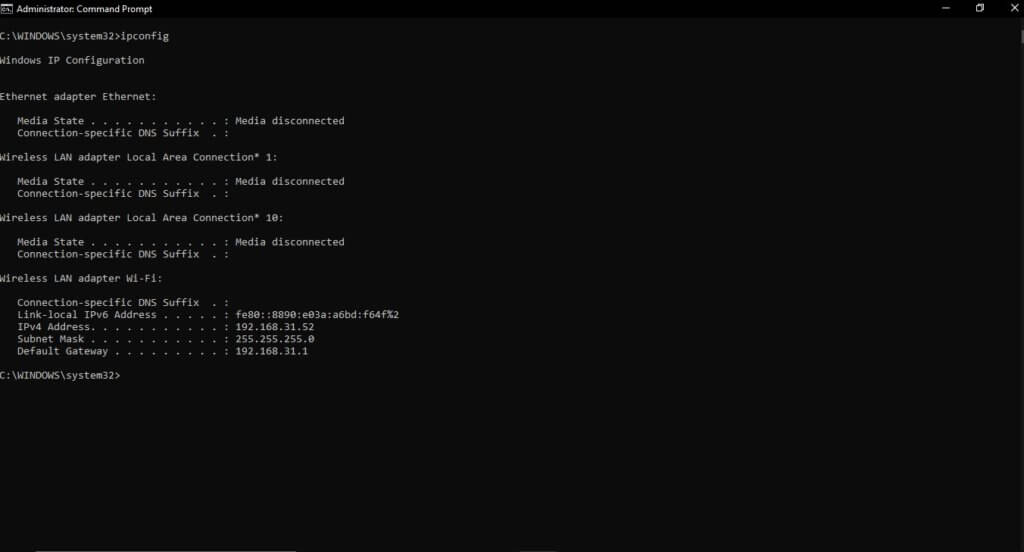
Step 1: Open Command Prompt as an administrator
Step 2: Type “ipconfig” and press enter
Step 3: Check Your Default Gateway
Step 4: Type “-t” followed by the default gateway ID. Make sure to leave a space between “-t” and your “default configuration”
Tips To Increase Internet Speed in Windows 10
If you are also the kind of person who doesn’t mind to share your internet then first and foremost you must have to stop sharing your internet connection in order to get high-speed internet on Windows 10. The number of people using your internet creates congestion which is the cause of your slow internet despite having a high-speed internet plan.
2. It can be your Wireless Router fault
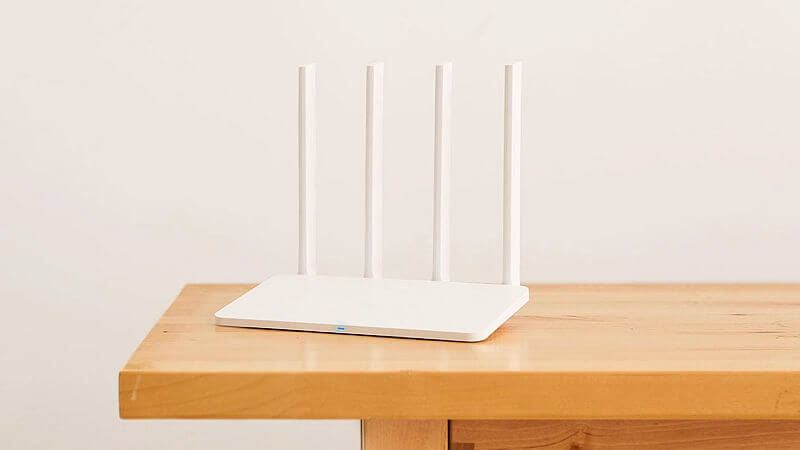
Yes, you heard it right! Wireless Routers play a very important role in your internet speed. There are number of factors which are involved in providing you the best Internet speed from your router. If configured properly, your current router can help you increase the internet speed.
As per the official data, since most routers still use the 2.4 GHz range, you can try to alter the channel frequency and see what works best for you. You can also use a third party program like SSIDer (Windows) or WiFi Explorer (Mac) to see all the wireless networks around you and which channels they are using.
Also, the location and the placement of your wireless router also matter. If you have placed your router inside a closed room, then it may not work to its fullest potential to put your router in a more open area like in a hall or living room to experience the best internet speed.
3. Update Network Card Driver
To ensure the quality network and internet speed, make sure that you have incorporated the correct and up-to-date drivers for your network card. To update your network card, follow the instructions given below.
- The very first thing to do is to identify the Make and Model of your LAN Adapter
- Go to the manufacturer’s website and search for your model in the driver’s update area
- Download and Install the concerned utility.
Although there is an alternate way to update your WLAN drivers which is described as under.
- Proceed to Start menu/screen, type and open ‘device manager’
- In the Device Manager window, locate Network adapters
- Double click Network adapters to view your Wired and Wireless LAN devices
- Right-click your hardware, and choose Update Driver Software
- Choose Search automatically for updated driver software
- Windows will automatically search for the latest drivers and install them for you
- Exit Device Manager and reboot your Computer. That’s it.
4. Make sure to disable unnecessary running services
In the latest version of Windows like the Windows 10 and 8, there are some services which automatically start as soon as you open up your computer. These Windows services usually consume an adequate level of memory to slow down the speed of your internet. You can disable these services to manual startup status in order to cut down the delay time in internet browsing. The process of doing the same is shown below.
- Press Windows key + R to open Run box
- Type ‘services.msc’ and hit Enter, to open the Services window
- Double click the services that you need not to start automatically
- Set Manual against Startup type and press OK to save changes and exit.
Note: If you don’t know what services to disable then there are some which you can disable like Diagnostic Policy Service, Distributed Link Tracking Client, Offline Files, Performance Logs & Alerts, Program Compatibility Assistant Service, Secondary Logon, Windows Error Reporting Service, Windows Image Acquisition (WIA).
5. Update firmware and software regularly
Many people underestimate the power of regular updates. Your router/modem actually has its own software that you need to update regularly for the better functioning. You also need to update your operating system from time to time as the wireless settings become less compatible over time.
6. Perform a virus scan
Sometimes, the cause of slow internet speed can also be the viruses. So you need to make sure that no virus itself is causing you to slow down. Sometimes viruses can live on your computer and suck resources away from what you are doing thus slowing down your speeds. In order to avoid these situations, make sure to scan your complete pc for the viruses using the antivirus software of your choice.
Verdict
So, these are some of the tips and tricks which you can use to increase the speed of your internet in Windows. Do you know any other ways to increase internet speed on Windows? If yes then I would be really interested to hear them. Feel free to leave your tips and tricks in the comments section, and we will add them into the article. And also if this post has helped you, please consider giving it a little share on social media.