While there are a lot of Android smartphone manufacturers present, OnePlus is one of the best, especially in terms of the software. You can find a wide range of features and options in the OnePlus’ Oxygen OS that allows you to customise and modify your smartphone easily.
If you want to add more features and unlock your device, you can go and root your OnePlus Android smartphone. This is where OnePlus devices like the OnePlus 7 and OnePlus 7 Pro excel when compared with other devices. Even though these devices are one generation older, a lot of users still use them, and they are quite powerful, even according to today’s standards.
Thus, today we are here to show you How to Root OnePlus 7 Pro with all of the details that you will need to know. Since the OnePlus 7 and OnePlus 7 Pro use the same chipset, the rooting process is the same. We have provided all of the details as well as all of the files that you need to download on your smartphone in order to root it. Hence, if you also want OnePlus 7 Pro root, make sure to go through this article until the end.
How to Root OnePlus 7 Pro
Just like any other Android smartphone out there, there are various methods available that you can follow to get your OnePlus 7 unlocked. Normally, we would use these methods to root your Android phone, but all of these methods might not work successfully for you as not all of them are made for the latest version of the Oneplus 7 firmware.
Therefore, we will be using the Magisk method to ensure that you can get your OnePlus 7 Pro rooted successfully. While this is one of the easiest methods out there for unlocking OnePlus 7, you still have to follow specific steps correctly. Hence, if you want to know How to Root OnePlus 7 Pro, make sure to go through the following steps.
1. Unlocking the Bootloader on OnePlus 7 & 7 Pro
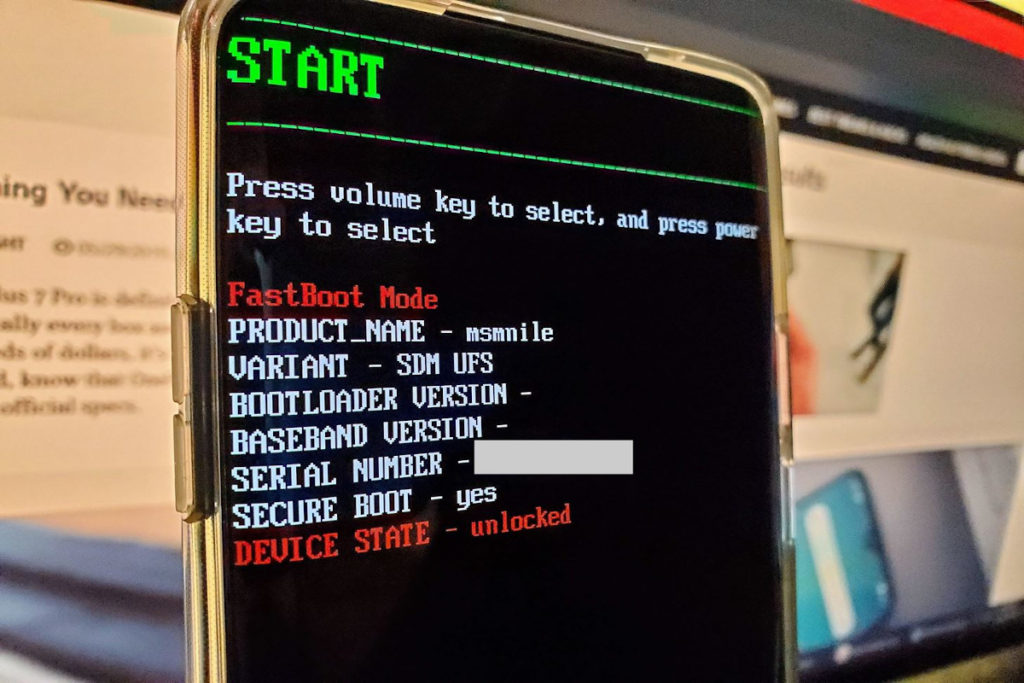
The first step required to get your OnePlus 7 rooted is to unlock its bootloader. If you are familiar with unlocking and rooting Android smartphones, then you must know that this step is crucial. In any Android smartphone, the bootloader allows the user to connect the device to a computer and install different kinds of firmware.
As a result, you can use it to install something like a custom recovery for installing different scripts and apps on your smartphone. And we will be using that to root your phone later on.
How to enable OEM unlockin &, Advanced Reboot in OnePlus 7 & 7 Pro
To unlock the bootloader of your OnePlus smartphone, you have to change a few settings on your device to allow bootloader unlocking. This feature is there to ensure that your Android device stays safe and secure.
By default, all Android devices, including the OnePlus 7, do not allow the user to unlock the bootloader so that no one can access your data or interfere with the firmware. But if you want to root your device, you have to first enable bootloader unlocking as shown here:
Step 1. Go to the Settings app on your OnePlus smartphone and go to the “About Phone” section in the bottom. Here, tap on “Build Number” value 7 times quickly and rapidly to unlock the Developer Options on your smartphone.
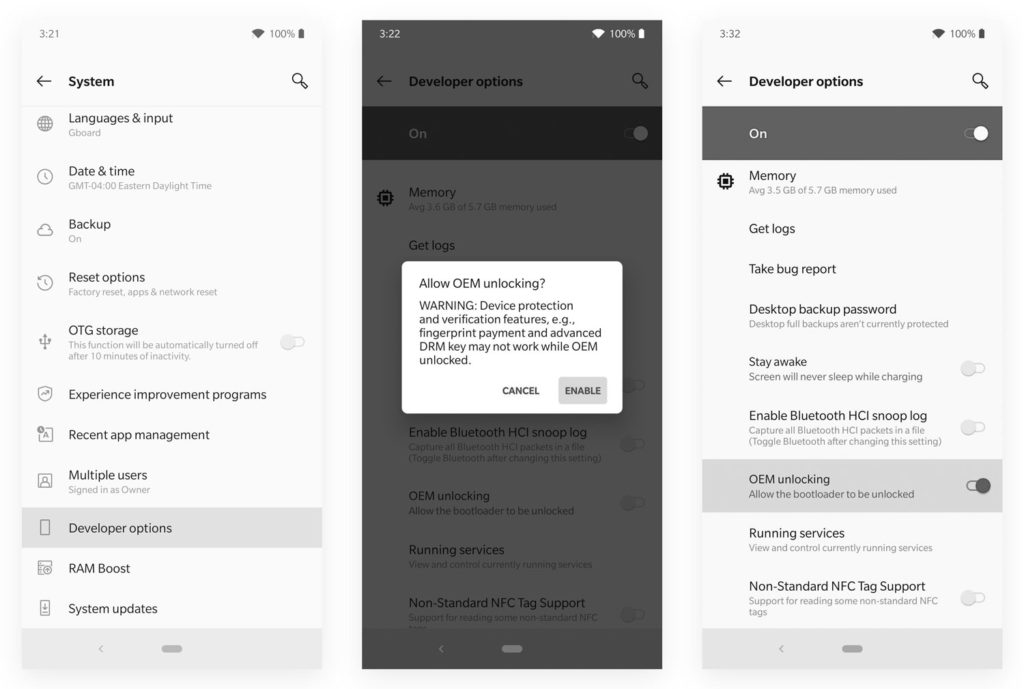
Step 2. Then, go back into the settings of your smartphone and go to the Developer options and find the “OEM unlocking” option and enable it. When you try to enable this option, you will get a popup warning message on your screen where you have to tap on Enable. Doing this will enable bootloader unlocking on your OnePlus 7 that means that you can go ahead and root it. But since you will need to be in the bootloader for rooting, accessing it is also essential.
Step 3. Hence, enable the “Advanced reboot” option in Developer options as well that will allow you to go to the bootloader of your smartphone directly from the power menu.
Step 4. You also have to enable the “USB debugging” option from the Developer options so that you can execute all of the ADB commands successfully later on.
Once you have enabled the unlocking of the bootloader of your OnePlus device, it means that you can go ahead and unlock it. Although this can only be done using a computer with a feature called ADB or Android Debugging Bridge.
ADB can be used to perform various options including unlocking the bootloader as well as rooting your phone as we will see later on. But before that, you have to go through the given steps one by one to unlock the bootloader of your OnePlus smartphone:
Note: You should remember that when you unlock the bootloader, all the files present in the device are deleted. It is therefore recommended to take a backup of all the data present in the device. Once you have done that, it is quite easy to do using the advanced reboot menu.
Steps to Unlock the Bootloader on OnePlus 7/7Pro
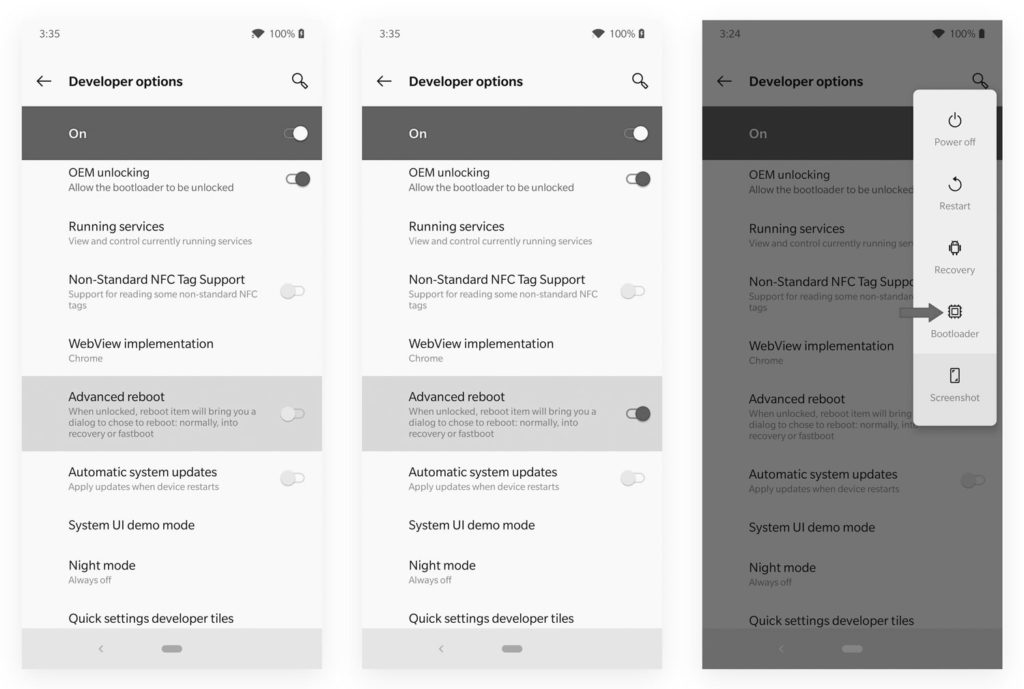
Step 1: Reboot into bootloader by holding the power button of your smartphone and select the Bootloader option to boot your phone into the bootloader mode.
Step 2: Once that is done, connect your phone to your PC using a charging and data transfer cable. Make sure that your smartphone has more than 30% of battery before leaving it connected to your computer in the bootloader mode.
Step 3: Download ADB files on your computer. After downloading this file, simply extract it and open the newly created folder.
Step 4: In here, launch adb.exe file from the extracted folder. It should open a command prompt window. To check if the ADB connection is working, type below command. It will provide a device code and if it doesn’t provide any, make sure you have followed all the procedure. (It can also happen due to USB Drivers, install ADB drivers if you see this error)
adb devices
Step 5: Then, go into the command prompt window and type below command, and press enter. Just per its name, this command is used to unlock the bootloader of a smartphone.
fastboot oem unlock
Step 6: After executing this option, you will get an option to unlock the bootloader on your smartphone that can be selected using the volume keys and the power button to confirm.
Step 7: Finally, your smartphone will reboot into the Android system, after which the bootloader will be unlocked. You can now proceed ahead to rooting it using TWRP and Magisk.
2. How to install TWRP on OnePlus 7 & 7 Pro
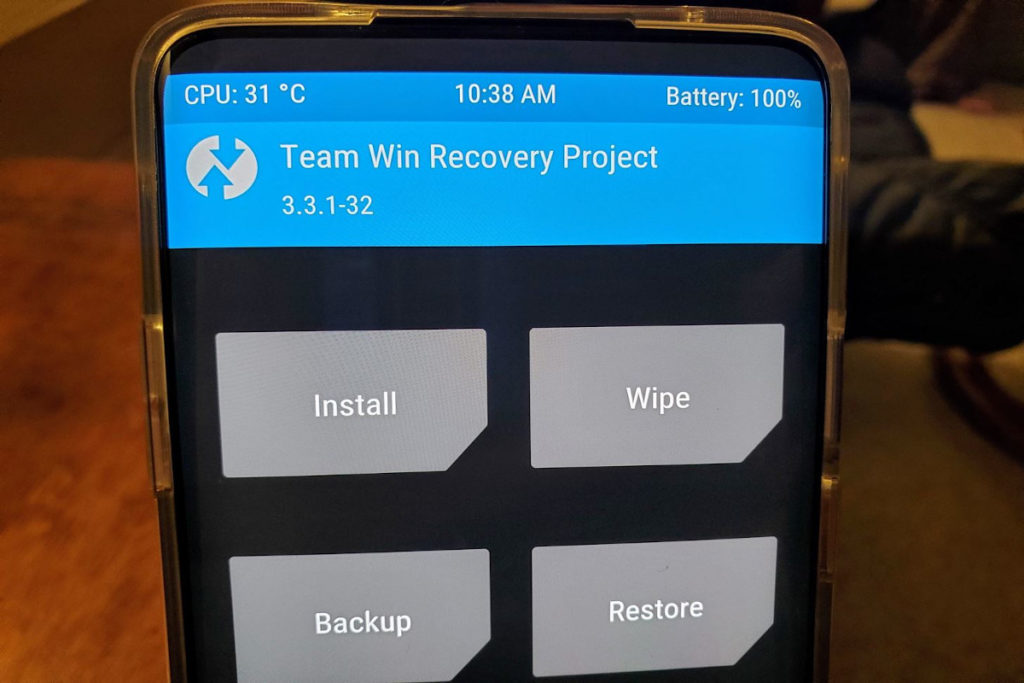
As mentioned earlier, TWRP is a custom recovery available for a wide range of smartphones. This means that you can also get it for your OnePlus 7 and use it to install all kinds of apps like Magisk on your smartphone. Hence, you need to install TWRP on your OnePlus smartphone before you can root it.
While you need an unlocked bootloader to install TWRP on your smartphone, that should not be an issue since we have already provided a method for unlocking the bootloader earlier. If your bootloader is unlocked, you can follow the given steps to install TWRP on your OnePlus 7 or OnePlus 7 Pro:
Steps to Install TWRP after Unlocking Bootloader
Before you can install TWRP on your smartphone, you need to download all of the required files on your computer. If you are familiar with firmware and recoveries for Android devices, then you must know that these are img files. Similarly, you have to download TWRP img file before you can install it on your smartphone.
You will have to download different versions of TWRP for Android 9 and Android 10. After downloading the correct file, you can easily install it on your smartphone. But instead of permanently installing it, we will be temporarily booting into TWRP just for the rooting process. This is much faster as you are not installing any custom ROM and sticking to Oxygen OS. You can easily boot into TWRP custom recovery as shown here:
Step 1. Just like earlier, go into the bootloader mode on your smartphone via the power menu by long pressing the power button of your smartphone. (Step 1 & 2 of unlocking bootloader)
Step 2. After booting into the bootloader mode, connect your phone to your PC using a charging and data transfer cable and leave it connected.
Step 3. Then, go to the Minimal ADB folder on your computer that we had downloaded. In here, launch the adb.exe file. (You can check the ADB connection by following Step 4 of unlocking bootloader. If you have done it previously, no need to do it again.)
Step 4. Now, rename the TWRP file downloaded earlier to “twrp.img” and copy it into the “Minimal ADB” folder so that ADB can access it.
Step 5. Once that is done, go into the command prompt and type below command and press enter on your keyboard.
fastboot boot twrp.img
Step 6. After executing this command, your computer will go into TWRP recovery mode where you can access all of its options. You will also be able to access the storage of your smartphone directly from your computer while in this mode. So, make sure to keep your smartphone connected to your computer as we will use it later on.
Download and Flash Magisk via TWRP
Now that you have installed TWRP or booted into it on your smartphone, it means that you can use all of its features. This even includes the installation of different apps like Magisk that is required to root your phone. But just like TWRP, you have first to download Magisk and all of its files before you can install it to root your device.
Thankfully, Magisk is a universal application which has a single version that works on all smartphones. You can download the latest version of Magisk. And once that is done, it can be installed on your OnePlus smartphone to root it as shown here:
Step 1. On your computer, copy the Magisk installer file downloaded earlier to the internal storage of your smartphone. This can be done while your phone is in the TWRP recovery and connected to your computer via a data transfer cable.
Step 2. After copying the file, move over to your OnePlus smartphone and go into the Install menu in TWRP. Here you can see the internal storage of your smartphone and all of the files in it including the Magisk installer file.
Step 3. Now, locate the Magisk installer file by scrolling down and open it in TWRP. Then, swipe the slider to the right for confirming the flashing process.
Step 4. This process will take a bit of time. Once done, you can click on Reboot System to go back to Android.
Step 5. Finally, your Android device will reboot, and it will be successfully rooted.
Once your phone is rooted, you can learn how to use the Magisk manager to hide the root.
Verify OnePlus 7 Pro Root after Magisk installation
You should now be able to use various kinds of root apps and enjoy all of the benefits of rooting your OnePlus smartphone.
But, to be on the safer side, you should verify that your OnePlus 7 Pro is successfully rooted. This can be done quite easily using any root application like Root Checker found on the Google Play Store. Hence, follow the given steps to verify root access on your OnePlus 7 or 7 Pro:
Step 1. First, open Google Play store on your OnePlus smartphone and search for Root Checker.
Step 2. Now, select any of these apps and click on the Install option to download and install it on your OnePlus smartphone.
Step 3. Then, go ahead and open the newly installed app on your smartphone. As soon as you open the app, you should get a root access prompt from Magisk Manager.
Step 4. Once you allow root access, the app will show that your phone is successfully rooted. Although, if you are not able to get the prompt and the Magisk Manager app is missing from your phone, you should try carrying out all of the steps once again.
Conclusion
We hope that now you have gone through this article and have successfully rooted your Oneplus 7 Pro. Once you are done verifying the root, you can download root apps on your phone. In case you are facing any issues related to root on your OnePlus 7 or have any doubts, you can leave your thoughts and questions in the comments section down below.
