While Windows 10 has been there for quite some time now, it hasn’t been able to make a mark, unlike its previous counterparts such as Windows 7, 8, Vista, and more. The number of users currently using Windows 10 is almost nearing a billion. As the number keeps increasing, people are still facing the same recurring problem.
The problem is related to sound. The majority of the users have reported the “Windows 10 No Sound Realtek” error pop-ups on their system post upgrading to Windows 10 or after running an update.
Several users across the globe have complained about their Realtek sound not working. Unfortunately, despite implementing numerous solutions, users continue to face the “Realtek audio no sound” issue on their respective systems.
If you have been plagued with the same problem, then this article is for you. In this article, we will be listing some of the potential fixes you can implement to troubleshoot the “Realtek Audio No Sound” troubleshoot issues.
Note: These fixes have been mentioned as per the severity of the problem. Therefore, we suggest implementing these fixes serially to curb the “Realtek No Sound” recurring issue.
What Causes Realtek No Sound in Windows 10
This is one of the most common and recurring problems in Windows devices. The majority of the time, this issue could result from improper settings or corrupted audio drivers. However, incompatibility issues may also arise if you’re using outdated software to run a particular audio file.
A Reddit survey found several users reported the “Realtek No Sound Issue” pop-up error after upgrading to Windows 10 or updating Windows 10 to the latest version. In addition, users have reported noticing “Realtek No Sound” in their system tray on the bottom right notification area.
Also read: How to Fix Sound Problems in Windows 11
Fixing “Realtek No Audio” Issues due to Human Error
Before we jump on to the methods which deal with computer software, please make sure that you rule out any possible human error. Firstly, check whether you’ve accidentally left your volume settings on mute. Next, check if your headphones are plugged in and the volume is turned up.
Once you rule out all the possible human errors and the problem persists, you can start implementing the methods given below. These are some of the best fixes to help you solve the “Realtek No Audio” issues. Just ensure that you apply these fixes serially.
How To Fix “Windows 10 No Sound Realtek” Issues?
Most of the time, users receive the “Realtek No Audio” error because of minor errors that occur with the system’s hardware or software. However, these problems may sometimes occur even when you’ve made no significant changes to your system whatsoever. This is why we have listed a few fixes below to fix the “Windows 10 No Sound Realtek” issues that are constantly occurring in your system.
Note: These fixes have been mentioned as per the severity of the problem. Therefore, we suggest implementing these fixes serially to curb the “Realtek No Sound” recurring issue.
1. Cable Check
There is a pretty good chance that you might have messed up with the cables. First, make sure that all the connections are correct and there are no loose or damaged cables. Once you confirm that all your cables are in order, check your volume controls to see if they are muted and slide the volume bar up to un-mute it.
Also, inspect the wires since even a worn-out cable could be the reason you’re facing the “Windows 10 No Sound Realtek” problem on your system. It is always better to replace worn-out cables with new ones.
2. Update Sound Drivers
This is of the primary reasons why you have no audio on your system. Not just your audio driver, but you must keep all your device’s drivers updated to ensure smooth and stable performance throughout.
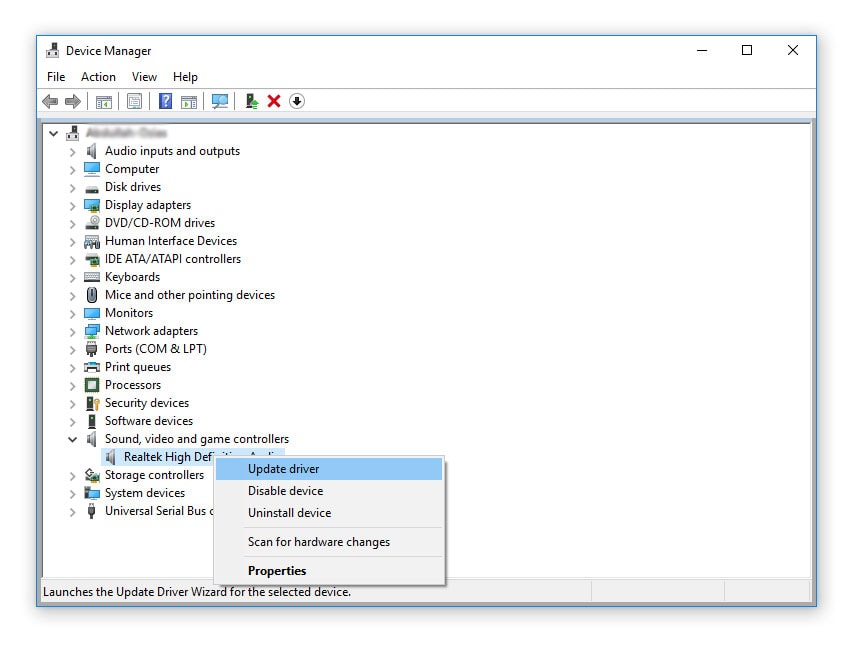
To update the sound drivers using Device Manager,
- Go to Device Manager on your Windows 10 system (You can search “Device Manager” in the search bar)
- Now, locate “Sound, Video, and Game Controllers” and click on it
- Under that, you’ll find your Audio driver, right-click on it
- Select Update Driver and then select “Search automatically for drivers.”
Alternatively, you can take the help of third-party applications which will scan your desktop computer and search for the latest drivers. You can check our article to get the Best Free Driver Updater Software for Windows 10.
Once you have updated the driver, restart your system and wait for the update to take place.
3. Change the Default Sound Format
At times, you may have the wrong sound format in place, which is why you are facing the “Windows 10 no sound” issue on your PC. Changing your default sound format might do the trick. To change the default sound format, follow the given steps.
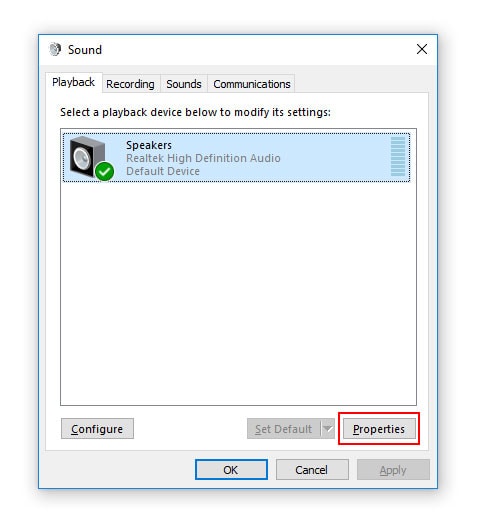
- Right-click on the Sound Icon to the bottom right of your taskbar.
- Tap on Sounds
- Go to Playback and Click on your Audio Device
- Click on Properties
- Go to the Advanced tab
- Change your default sound format to one of the following options.
24 Bit/44100 Hz
24 bit/192000 Hz
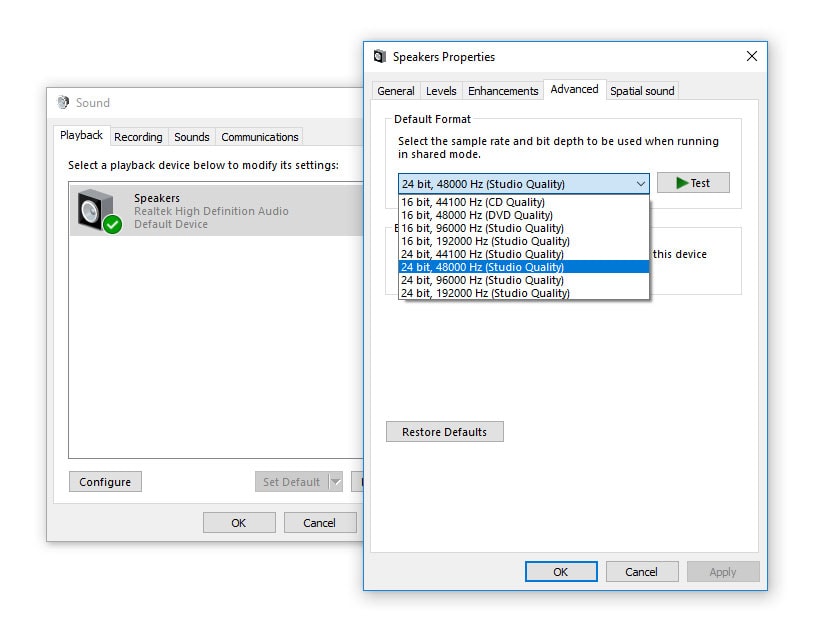
- Click on Test
- Keep testing until you find the right audio combination
- Select the default sound format according to your speaker configuration
- Click on “Apply” and then “OK” to save the changes
Also read: Top 20 Best Rainmeter Skins for Windows 10/8.1/7
4. Disable Audio Enhancements (If Any)
Many times, we make changes in our audio settings to get maximum audio output. For example, we refer to dozens of YouTube videos and enable audio enhancements. But this could lead to the Realtek speakers not working windows 10 issue arising on your system. To disable the audio enhancements, follow the given steps.
- Right Click On The Sound Icon in your taskbar
- Tap on Sound
- Go to Playback and Click on your Audio Device
- Click on Properties
- Go to the Enhancements tab
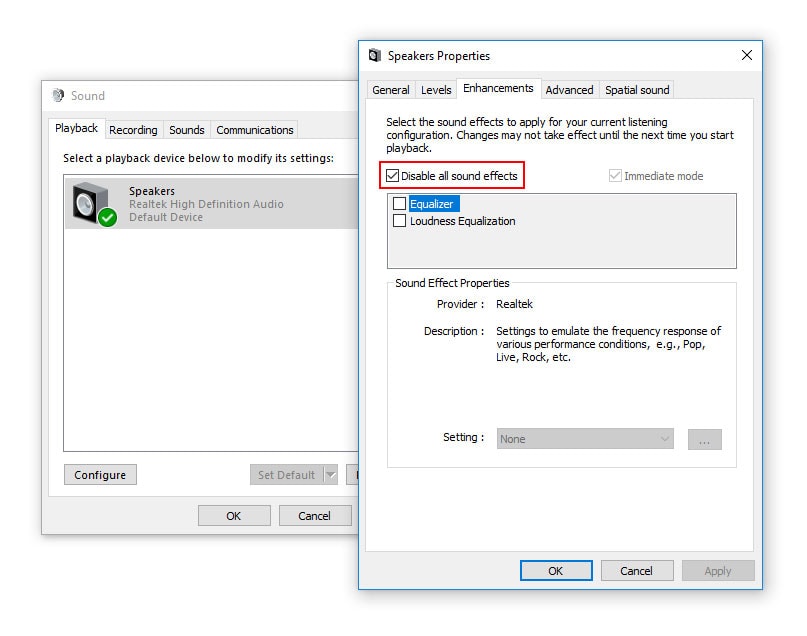
- Check the box which reads “Disable all sound effects.”
- Click on “Apply” and then “OK” to save the changes.
5. Download and Reinstall Realtek HD Audio Driver On Windows
If none of the above-mentioned fixes are working for you, then the driver may be at fault. In such cases, it is always better to uninstall the existing driver and reinstall the same driver once again. To uninstall the Realtek HD Audio driver on Windows 10, follow the steps given.
- Right-click on the Start Menu on the bottom left
- Select Device Manager
- Locate Sound, Video, and Game Controller
- Expand the list
- Right-click on Realtek HD Audio Driver
- Tap on Uninstall Device
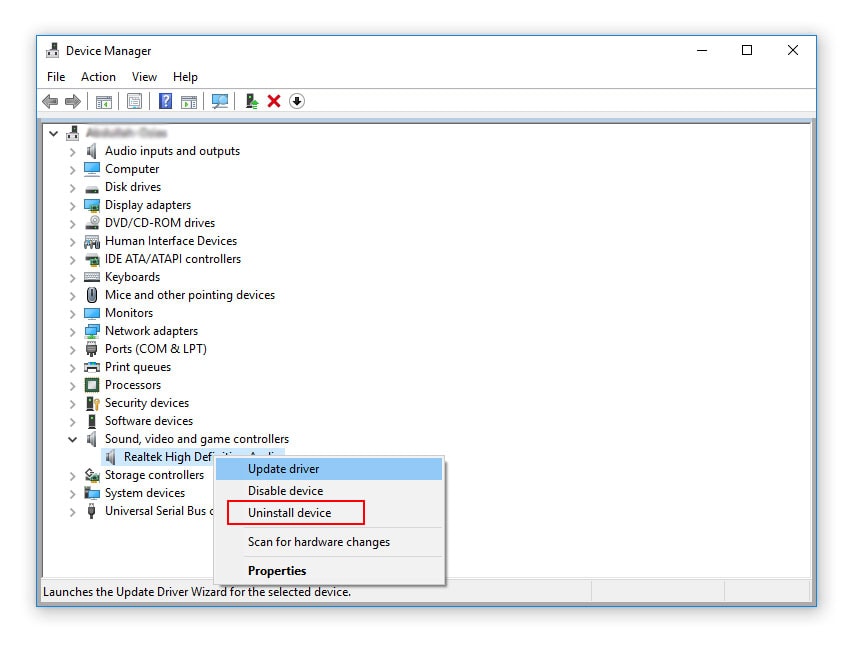
The System will now uninstall the Realtek HD audio manager from your device. Once the uninstalling is finished, restart your system.
Now, download the Realtek HD Audio driver from this link.
Once the download is finished, follow the given steps to reinstall the driver in your system to eliminate the Realtek audio no sound issue on your system.
- Double Click on the downloaded driver file
- Follow the on-screen instructions
- Wait for the installation to finish
- Restart your system to check whether the issue has been resolved.
6. Using “High Definition Audio device” provided by Windows 10
If none of the above methods worked for you, you could try switching to the generic audio driver provided by Windows 10. To switch to Windows 10 generic audio driver, follow the steps given below:
- Right-click on the Start Menu on the bottom left
- Select Device Manager
- Locate Sound, Video, and Game Controller
- Expand the list
- Look for your sound card driver, right-click on it and click on the Update Driver Software option.
- On the next window, click Browse my computer for driver software
- Tap on the option which reads, “Let me pick from a list of device drivers on my computer”
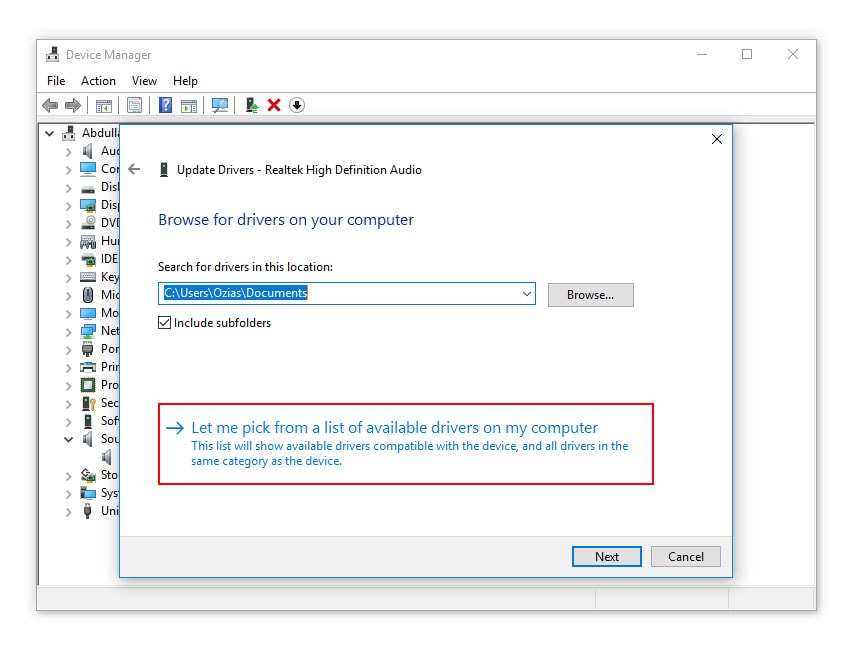
- Choose High Definition Audio Device and click Next
- A confirmation box will pop up; click Yes
Wait for the installation to complete. Once the installation is complete, restart your system for the changes to take place. We are hopeful that this fix could help solve the “Realtek No Sound” issues on your system.
7. Disable Front Panel Jack
This could be a simple fix that can help solve the issue for you. Several Reddit users have noticed that disabling the front panel jack can help solve your computer’s “Realtek No Sound” issue. To disable the front panel jack, refer to the steps below
- Open Realtek Audio Manager
- Go to Advanced Settings
- Click on “Disable front panel jack detection.”
8. Restart Your Audio Services
At times, the problems may be invisible to the naked eye. This is when we may see when the issues may be appearing behind the scenes. Your system’s audio services can, at times, get disabled automatically. So, giving them a jump start can help the “Realtek No Sound” audio issue on your system.
To restart your audio service, follow the given steps.
- Go to the Search Box in the Start Menu
- Type Services and press Enter
- Locate Windows Audio
- Check whether the service has stopped for any reason
- If it has, double-click on Windows Audio
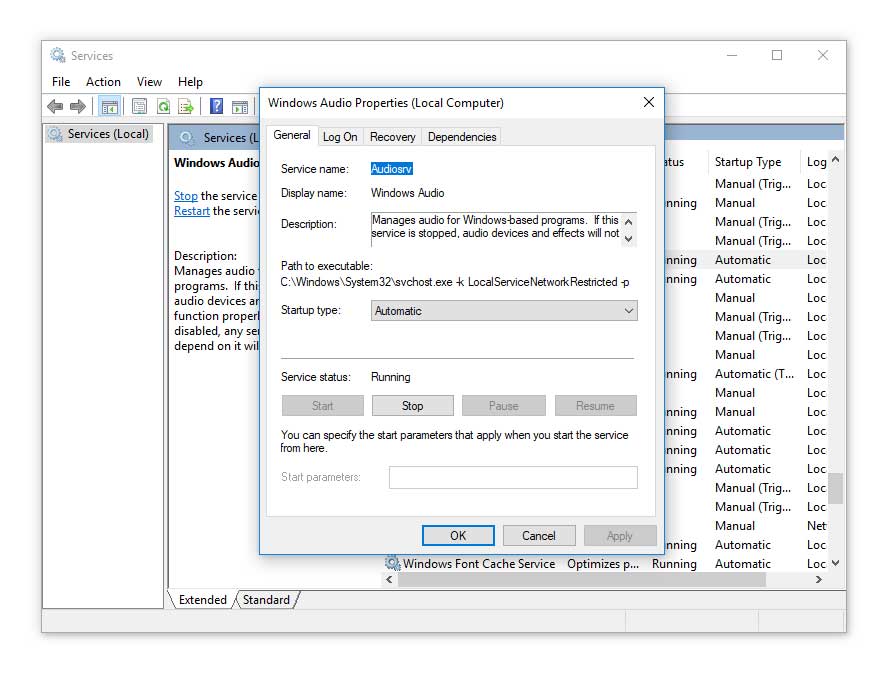
- Hit Start
Note that your audio services should be set to Automatic by default. However, if there are any other settings in place, such as Automatic (delayed start), manual, or disabled, change it back to Automatic.
Conclusion
We hope our article solved your “ Windows 10 no sound Realtek” issue on your system. Common audio problems can keep us from enjoying many things on your system. Therefore, using a reliable tool is always the better option for solving audio issues in Windows 10.
These fixes have been mentioned as per the severity of the problem. Therefore, we suggest that you implement these fixes serially to curb the “Realtek No Sound” recurring issue on your system. We are confident that either of the fixes mentioned in this article will help solve the problem.
However, if all these fixes do not affect your system’s no sound issue, consider having your system checked by an expert at once. An expert can easily spot it and fix the problem. Also, try to update your Windows 10 OS frequently as Microsoft keeps releasing periodic updates to enhance the functionality of the OS.
