Google has released its latest software version, Android 13. While many people are enjoying the all-new Android 13, there may be a few bugs in it, including issues with Bluetooth, random phone reboots, Google Assistant, and Wi-Fi on Android 13 devices.
In this article, we will specifically discuss the problem of Wi-Fi not working on Android 13 devices. If you are an Android 13 user experiencing Wi-Fi issues, this article will provide you with simple methods to fix it. By following these tips, you will be able to resolve the Wi-Fi problem in just a few easy steps.
Reason Behind Wi-Fi Not Working After Android 13 Update
There can be several reasons why the wifi on your android 13 device is not working properly. Sometimes after the update, your wifi settings get changed which might be the reason for it not functioning properly on your Android 13 device.
You must also check if your wifi router has been having issues as it may be the router and not your device. Sometimes, it is due to some bugs or glitches in the software. It can also be caused if the wifi chip in your hardware has been damaged.
How To Fix Wi-Fi Problem on Android 13
If you are facing issues with the wifi on your Android 13, try following these tips to get rid of it.
1. Toggle the Wi-Fi Button
The first solution you can try to resolve the WiFi issue on your Android 13 phone is the toggle WiFi button method. Open the control panel of your device by swiping it down from the top of your screen. Now toggle the wifi button a couple of times by clicking on it, this will refresh the wifi settings and help you connect to the wifi.
![Fix: Wi-Fi Not Working On Android 13 [10 Fixes]](https://devsjournal.com/wp-content/uploads/2023/06/wifi-toggle.jpg)
2. Connect the Wi-Fi to Other Devices
Next solution is, connecting wifi to other devices to see if it works for others. There might be a problem with the wifi, thus, try connecting the wifi to other devices and check if it is functioning over there, if wifi is not working on other devices you must contact your wifi service provider and get it fixed.
3. Enable Autoconnect For Wi-Fi
Autoconnect is a feature provided by Android 13, which helps you connect to the wifi automatically after you have connected it once. As soon as the wifi is in the range of your device it will connect your device to it. You can switch it on by following these steps:
- Open the “Settings” app on your Android device.
- Select “Wi-Fi” from the list of options.
- Tap on the three dots in the upper-right corner of the screen and select “Advanced.”
- Toggle the switch next to “Auto-connect” to the “On” position.
Using this feature will connect your device to the known wifi connection and can help with the wifi connectivity issue you have been facing with your android 13 phone.
![Fix: Wi-Fi Not Working On Android 13 [10 Fixes]](https://devsjournal.com/wp-content/uploads/2023/06/autoconnect-wifi.jpg)
4. Use Default MAC Address
A media access control (MAC) address is a specially assigned identifier to any network for use as a network address in communications within a network segment. However, using default MAC address is not a suggested method to connect your device to the wifi. However, if you wish to do, you can follow the following steps:
- Go to the settings app on your Android device
- Select “Wi-Fi” or “Wireless & Networks”
- Find the network you want to connect to and select it
- Tap “Advanced Options” or “Network Info”
- Find the MAC address field and enter the MAC address of the access point or router
- Save the changes and try to connect to the network
5. Restart the Wi-Fi Router
If your android 13 device is not able to connect to the wifi, it won’t be a major problem, it could be solved simply by restarting the wifi router. This will refresh the wifi system and allow it to start again without any complication. Refreshing the router by restarting it might result in it working efficiently again.
6. Disable Battery Saver
When you switch on the battery saver mode of your android 13 phone. It will limit all the excessive activity to conserve the battery and make it last longer. Sometimes, it also limits your network usage to preserve the battery. Thus, try switching off your battery saver and try to reconnect your wifi. You can simply turn off the battery saver by swiping down the control panel.
Here are the steps on how to disable battery saver mode on Android 13:
- Open the Settings app.
- Tap on Battery.
- Toggle off the Battery Saver switch.
![Fix: Wi-Fi Not Working On Android 13 [10 Fixes]](https://devsjournal.com/wp-content/uploads/2023/06/battery-saver-option.jpg)
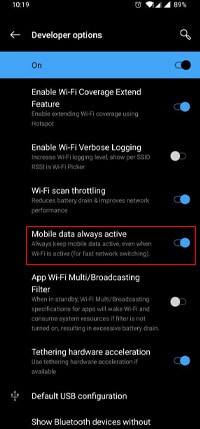
7. Disable the Always On Mobile Data Option
Android provides a feature with which you can prioritize the usage of mobile data. This can be done when you enable always-on mobile data. This will prioritize using mobile data even when wifi is available and connected. By turning this feature off you will be able to access the wifi without any disturbance.
Here are the steps on how to disable the Always on mobile data option for Android 13:
- Open the Settings app.
- Tap on System.
- Tap on Developer options.
- Scroll down and find the Mobile data is always active option.
- Toggle off the Mobile data is always active switch.
8. Restart Your Android 13 Device
Restarting your Android 13 phone will always help it to refresh all its processors and user interface. It can help clear out any glitches or bugs that might’ve been detected or acted up during the usage of the device. Thus restarting your phone and then trying again to connect to the wifi can help you fix your problem’
here are the steps on how to restart an Android phone running Android 13:
- Press and hold the power button for 5-10 seconds.
- The power menu will appear.
- Tap Restart.

9. Reset Network Settings
If you encounter any issues with your Wi-Fi on your android 13 phone, resetting the network settings can often resolve the problem. However, it’s important to note that resetting the network settings will remove all saved Wi-Fi networks and paired Bluetooth devices. Therefore, it is advisable to save the details of any important connections before proceeding.
Here’s how you can reset your network settings on Android 13:
- Open the Settings app on your phone.
- Navigate to the System section and select Reset options.
- Tap on Reset Wi-Fi, mobile & Bluetooth.
- Click on Reset settings.
![Fix: Wi-Fi Not Working On Android 13 [10 Fixes]](https://devsjournal.com/wp-content/uploads/2023/06/reset-network-settings.jpg)
After resetting the network settings, make sure to turn on Wi-Fi and select your desired network. You will need to enter the correct password to connect to the network successfully.
10. Update Your Android 13 Device
Keeping your device updated to the latest version is very important as with every update, your device becomes smarter and more efficient. There might be bugs in the current software that you are running on your device, by updating your android 13 device to the latest version you can get rid of all these bugs, resulting in a more efficient and smooth performance of your device.

Conclusion
Wifi connective issue is not a major bug or problem with Android 13. It may be caused by some mere reasons which can be fixed easily without technical support. We hope the tips and methods mentioned above will help you fix your problem.

![Fix: Mobile Data Not Working On Android 13 [6 Working Fixes]](https://devsjournal.com/wp-content/uploads/2023/07/mobile-data-not-working-on-android-13-768x384.jpg)