Windows 10 does come with its own set of bugs and annoying errors, but the most common ones are related to Windows Updates like the 0x80070643, 0xc19001e1, 0x80070424 and the error 0x8007000d is one of them.
The main reasons behind the error code 0x8007000d are missing or corrupt system files or any bugs in the Windows Update Components. Depending on your case, something as basic as running the Windows Troubleshooter might fix the error or in other cases, you may be required to reset the Windows Update Components manually.
Whatever the case may be, we have an effective troubleshooting guide that will help you get rid of the Windows Update error 0x8007000d in your machine.
What is Error 0X8007000D
| Problem Event Name | 0x8007000d |
| Error Message | Some update files are missing or have problems. We’ll try to download the update again later |
| Error Cause | Corrupt or missing system files |
| Common Solution | Repair Windows Update |
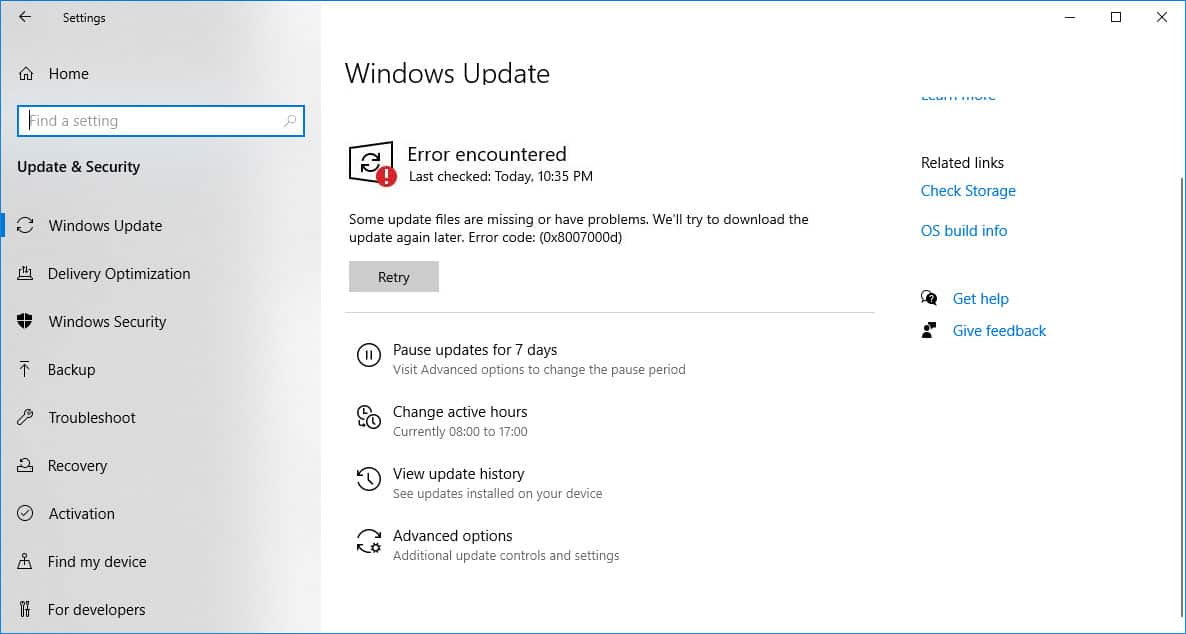
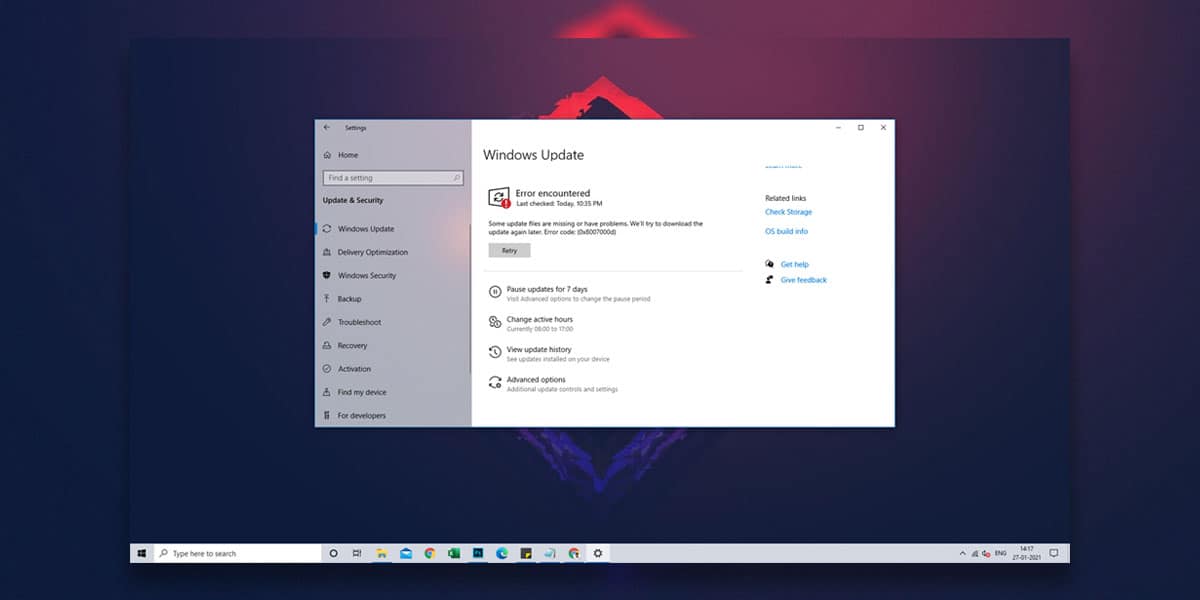
You may experience this error when you’re trying to activate Windows or are installing the latest Windows Updates. Your system will keep displaying the message “Error code: (0x8007000d)” and either the progress bar will be stuck for long periods or fail to install any new updates entirely.
This needs to be resolved at the earliest otherwise you won’t be able to download the latest security patches and firmware upgrades leaving your system vulnerable to malware, viruses and other threats.
Causes of error code 0X8007000D
The error 0x8007000d usually means that a specific file is required by Windows Update to progress, but that file is either missing or damaged. But it can also occur when the Windows Update Components on your system have become outdated, in which case you need to run DISM scan or reset the update components.
Fortunately, there are some common fixes that seem to have worked for many users, and which you can try to fix the 0x8007000d Windows 10 error for yourself possibly.
How to Fix Windows Update Error 0X8007000D
Now that you know the details of the error and what are the most probable reasons behind the same, let’s quickly discuss some effective ways to get rid of it. The methods here are required to be followed in the same order as discussed.
1. Run Windows Update Troubleshooter
The built-in Windows Update Troubleshooter can come in quite handy for diagnosing and repairing any issues related to Windows Update. This is a good starting point as the tool may also help identify any other issues you might come across during the update process, besides the error 0x8007000d.
Step 1: Open the Start menu and launch Settings.
Step 2: Click on Update & Security, and then click on the Troubleshoot tab on the left column.
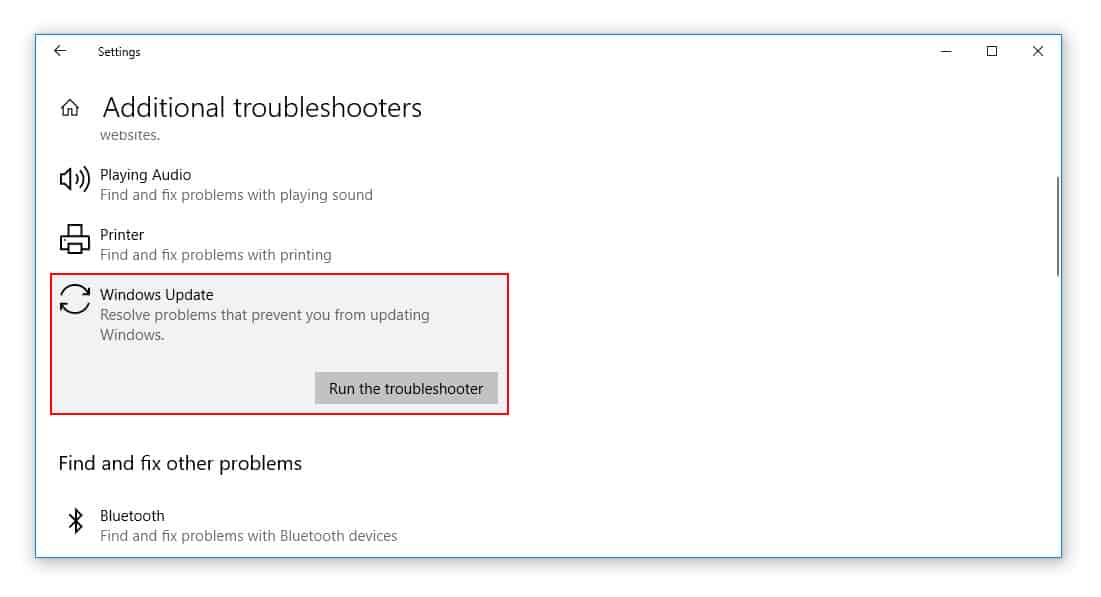
Step 3: Locate the “Windows Update” section, and then select the button that says Run the troubleshooter.
Note: As per the New Windows update you can locate the Windows Update troubleshooter by navigating through Update & Security > Troubleshoot > Additional troubleshooters > Windows Update > Run the troubleshooter
Step 4: Wait for the troubleshooting to finish and Restart your system afterwards.
2. Empty the Content of the Software Distribution folder & Update
There might be some old Windows Update Download files that can interfere with the update process, and you need to delete them. This won’t affect your current installation of Windows. Here are the steps to do so:
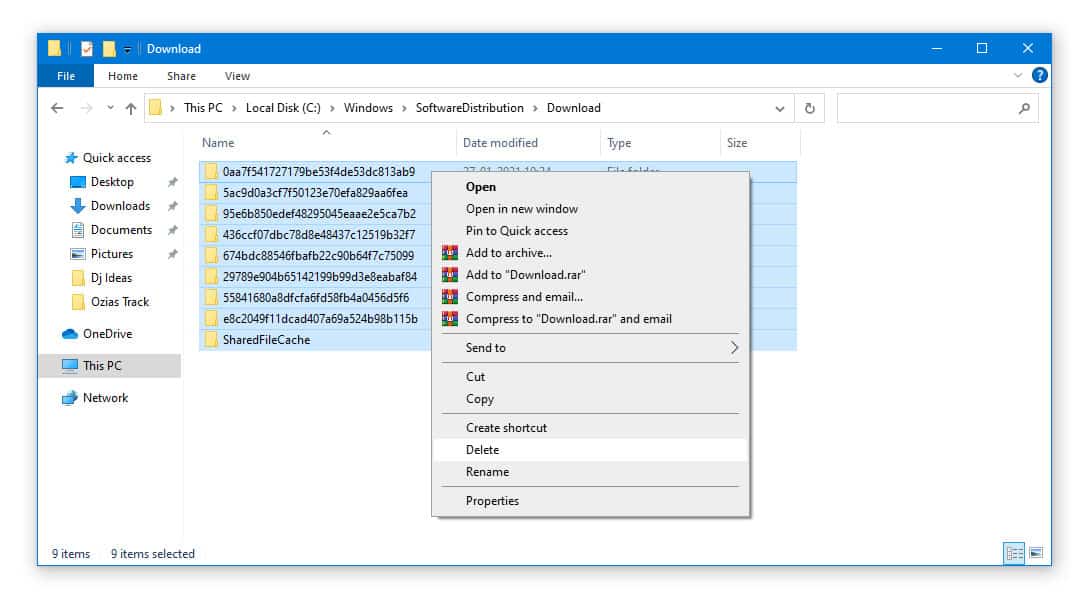
Step 1: On your PC, go to C:\Windows\SoftwareDistribution\Download.
Step 2: Now delete all the contents of the folder. Click OK if prompted.
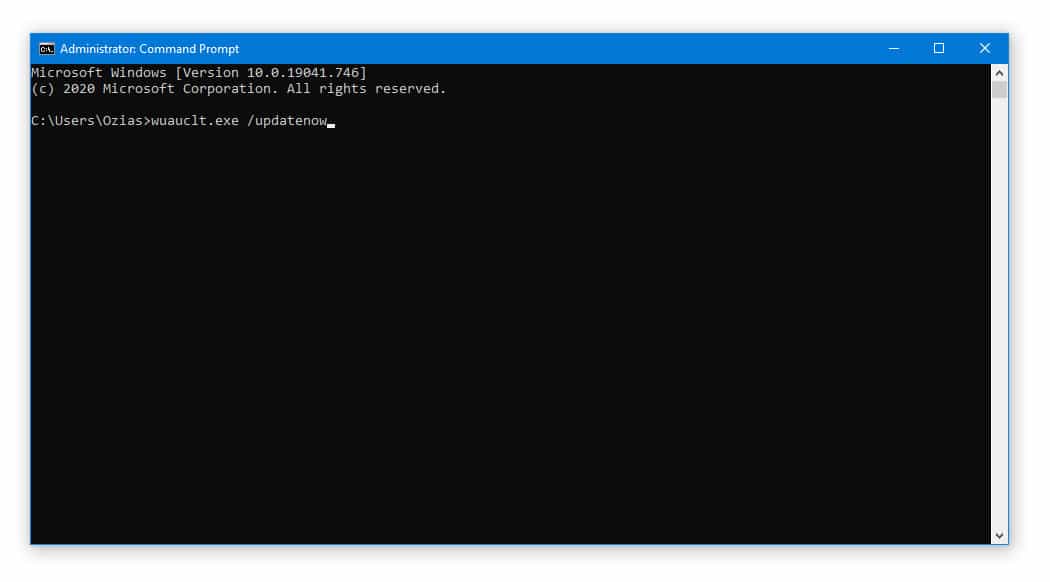
Step 3: Press Windows key + X and open the Command Prompt (Admin)
Step 4: In the command prompt window, type wuauclt.exe /updatenow and hit ENTER.
Step 5: Open Settings > Windows Update and Windows 10 should begin downloading.
3. Run DISM
If there doesn’t seem to be any problem with Windows Update, you can also try running DISM (Deployment Image Servicing and Management), which is a built-in tool to repair and restore system files.
Step 1: Press Windows Key + X and open the Command prompt (Admin).
Step 2: In the cmd window, type the following commands one-by-one and hit ENTER after each one finishes.
dism.exe /Online /Cleanup-Image /CheckHealth
dism.exe /Online /Cleanup-Image /ScanHealth
dism.exe /Online /Cleanup-Image /RestoreHealth
Step 3: Wait for the scan to complete, and then restart your device and try updating Windows again.
If this doesn’t fix the Windows Update error 0x8007000d, then you need to manually enable or reset Windows Update using the methods explained below.
4. Use Group Policy Editor
Sometimes the Windows Update might get disabled without being in your knowledge. This may result in the error code 0x8007000d while performing an OS upgrade. In this case, all you need to do is enable Windows Update components by going into the Group Policy Editor. Here are the steps to do so:
Step 1: Press Windows Key + R to open the “Run” dialog box.
Step 2: Type gpedit.msc in the run command and click OK.
Step 3: Browse to Computer Configuration > Administrative Templates > System.
Step 4: Scroll down to the policy that says “Specify settings for optional component installation and component repair”. Double-click on the policy.
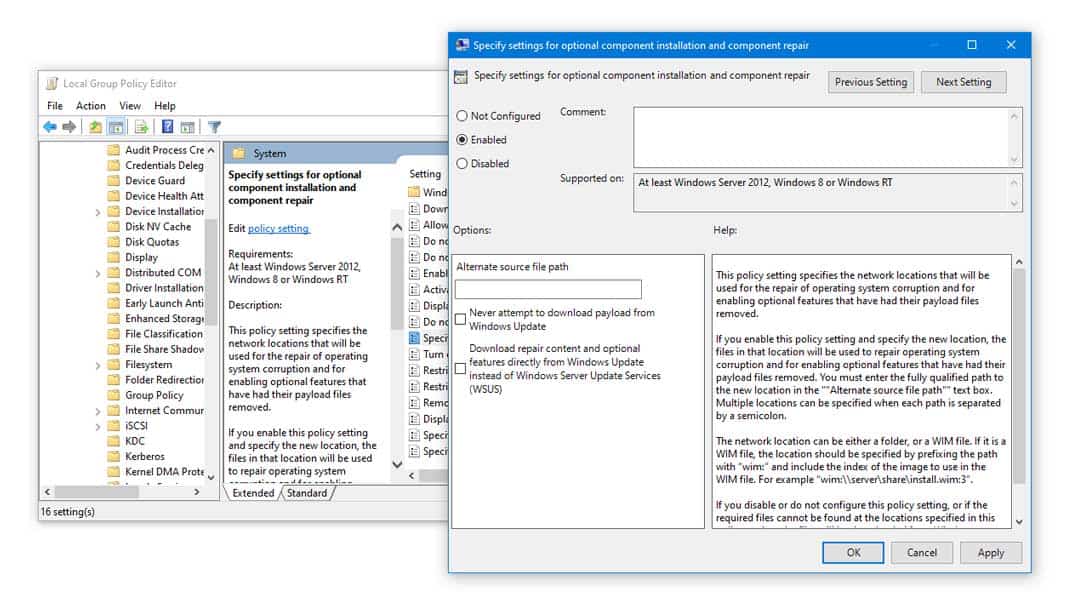
Step 5: Check the Enabled option and press OK.
Step 6: Restart your computer and check for Updates.
5. Manually Reset Windows Update Components
If none of the methods above seem to have worked for you, you should try resetting the Windows Update Components which will likely resolve all the update related errors.
Step 1: Press Windows Key + X and open Command Prompt (Admin).
Step 2: In the cmd window, you need to type the following command one-by-one:
net stop bits
net stop wuauserv
net stop appidsvc
net stop cryptsvc
Step 3: Afterwards, delete the qmgr*.dat by entering the following command in the cmd panel.
Del “%ALLUSERSPROFILE%\Application Data\Microsoft\Network\Downloader\qmgr*.dat
Step 3: Now you have to restore and re-register BITS and Windows Update files. To do that, first navigate to the system32 folder by typing the below command in the command prompt.
cd /d %windir%\system32
Step 4: Once in the system32 directory in command prompt, type the following commands one-by-one and press ENTER after each one.
regsvr32.exe atl.dll
regsvr32.exe urlmon.dll
regsvr32.exe mshtml.dll
regsvr32.exe shdocvw.dll
regsvr32.exe browseui.dll
regsvr32.exe jscript.dll
regsvr32.exe vbscript.dll
regsvr32.exe scrrun.dll
regsvr32.exe msxml.dll
regsvr32.exe msxml3.dll
regsvr32.exe msxml6.dll
regsvr32.exe actxprxy.dll
regsvr32.exe softpub.dll
regsvr32.exe wintrust.dll
regsvr32.exe dssenh.dll
regsvr32.exe rsaenh.dll
regsvr32.exe gpkcsp.dll
regsvr32.exe sccbase.dll
regsvr32.exe slbcsp.dll
regsvr32.exe cryptdlg.dll
regsvr32.exe oleaut32.dll
regsvr32.exe ole32.dll
regsvr32.exe shell32.dll
regsvr32.exe initpki.dll
regsvr32.exe wuapi.dll
regsvr32.exe wuaueng.dll
regsvr32.exe wuaueng1.dll
regsvr32.exe wucltui.dll
regsvr32.exe wups.dll
regsvr32.exe wups2.dll
regsvr32.exe wuweb.dll
regsvr32.exe qmgr.dll
regsvr32.exe qmgrprxy.dll
regsvr32.exe wucltux.dll
regsvr32.exe muweb.dll
regsvr32.exe wuwebv.dll
Step 5: Now reset the network services Winstock and Proxy by typing the following commands.
netsh winsock reset
netsh winhttp reset proxy
Step 6: Finally restart the BITS and Windows Update services using these commands one-by-one.
net start bits
net start wuauserv
net start appidsvc
net start cryptsvc
Step 7: Restart your computer. Windows 10 should begin updating normally now.
Conclusion
Hopefully, the 0x8007000d Windows 10 error is resolved by now and you’re able to install the latest Windows Updates normally. Most of the methods can be done by yourself if you’re careful enough and don’t require any professional help. But feel free to do so if you have any concerns or doubts regarding them.
That was it for this troubleshooting guide for the Windows error code 0x8007000d. If you have any other effective solutions that seem to have worked for you, don’t forget to share with the community. If you need to ask any other questions regarding one of the solutions we discussed, feel free to drop a comment below.