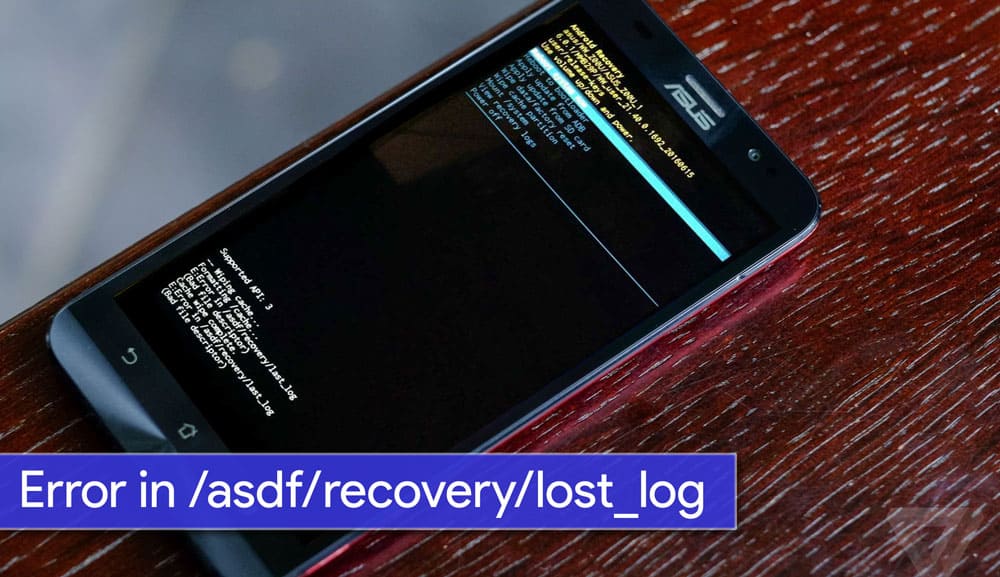
Android being an open source platform, has few drawbacks too. You might come across few errors & bugs that will make you think, What did I do wrong? Few errors are caused manually by the users while the others are caused Internally due to different partitions. Getting an error in non-rooted devices is very rare as compared to any root access. Rooted devices are prone to errors as you’re allowed to play with files. If you’re an Asus Zenfone user, you might come across this error “Error in /asdf/recovery/” which is pretty normal while flashing OTAs or performing factory reset.
This error was really pissing me off as I didn’t do anything wrong. Even after searching through the entire Internet, I didn’t find any solution. After a few experiments, I was successful in fixing this issue. I am writing this detailed guide to fix “/asdf” error in Stock recovery.
How to fix Unable to Mount Error in /asdf/recovery
To solve this error, we need to Clear “/asdf Partition” of our Android Device. Stock Recovery doesn’t provide option to clear any of your partitions except factory reset. So, in order to clear this partition, we need a temporary recovery. In this guide, we’ll checkout method to clear /asdf partition for both Rooted and Non-Rooted Android smartphones.
Pre-requisite:
- You must have a windows PC.
- Install USB drivers for your Asus Zenfone 2 Laser ZE550KL.
- Enable USB Debugging in Your Android Device: Go to Settings -> About and tap multiple times continuously on “Build number” to active “Developer options” and then Go to Settings -> Developer options and enable “USB debugging” option.
Downloads:
- Minimal ADB Fastboot Tool
- ADB USB Drivers
- Asus Android USB Driver
- TWRP Recovery (Install TWRP)
- Stock Boot And Recovery Files
For Rooted Device Users
As your Android device (In my case, my device is Asus Zenfone 2) is Rooted, I assume that your device’s bootloader is unlocked. If your device’s bootloader is locked, refer the guide for Non-rooted devices.
Step 1: Download all the above tools and install it on your Windows PC.
Step 2: Extract ‘ADB Fastboot Tool.rar’.
Step 3 Move ze550kltwrp.img into extracted ‘ADB Fastboot Tool.rar’ folder.
Step 4: Now in ADB Fastboot folder, open command windows by Pressing Shift+Right click > open command windows here. You can refer the image.

Step 5: Now Enter the Following command in Command Window. (click Ok if Prompt on Your Device)
adb Devices
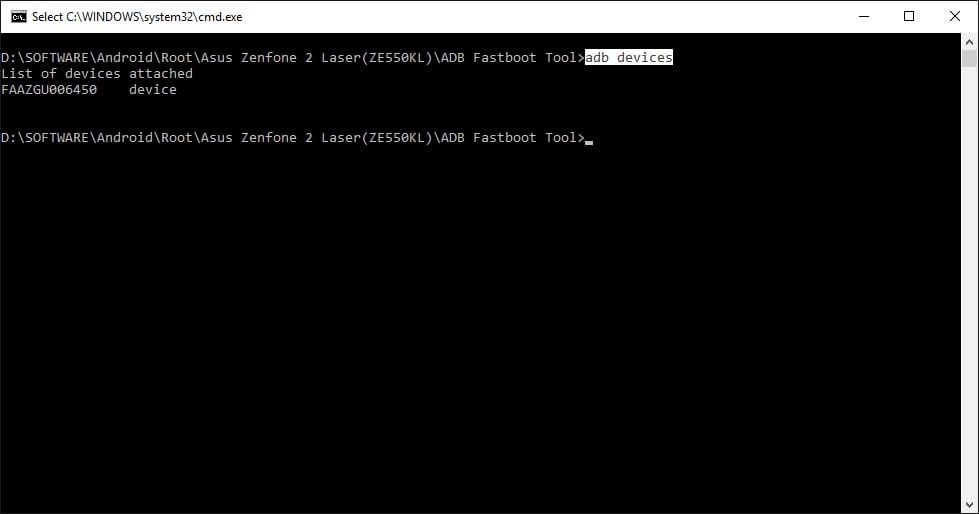
It will return your device code which confirms that you have installed all the files properly. If it doesn’t return to any device code, check if you have installed ADB Drivers properly. If you have installed everything properly, jump on to Step 7.
Step 6: Reboot your device into Fastboot mode which allows flashing files, enter the below command in command prompt. or else you can manually reboot To Fastboot Mode By turning off Your phone and Pressing Volume Up + Power Key together.
adb reboot bootloader
Step 7: Now, Boot in to TWRP recovery by just entering the below command.
fastboot boot ze550kltwrp.img
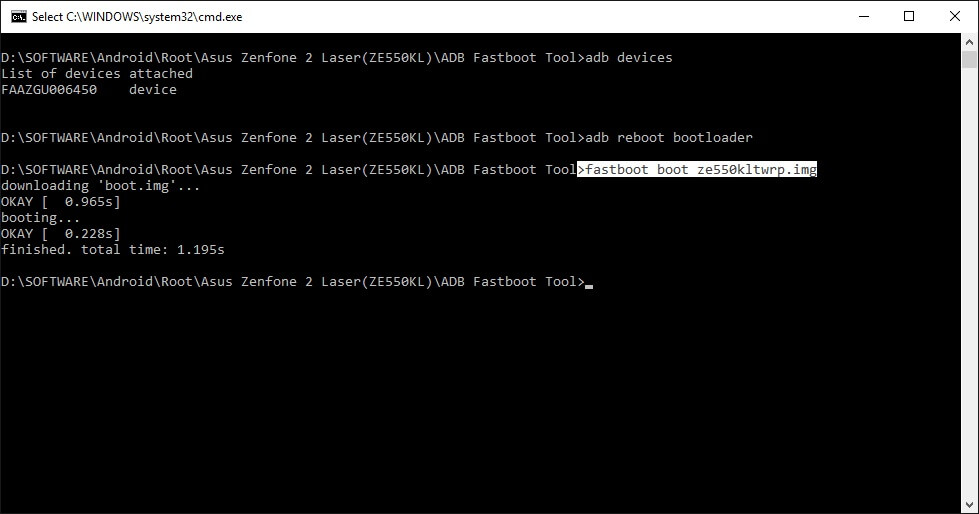
This command will not flash the TWRP Recovery in your device but will allow you to boot the recovery image making it as a Temporary recovery.
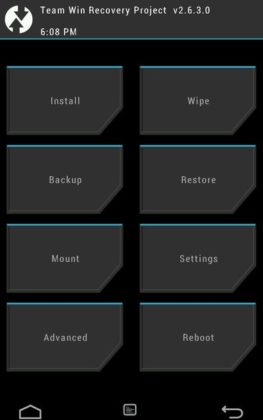
Step 8: Now In TWRP Recovery Select Wipe > Advance Wipe > Select √ ASDF > Swipe right to confirm wipe.
Step 9. Now boot your device into recovery mode. That’s it! You’ll not get asdf partition error again.
For Non-Rooted Device Users
Before Following this guide I request you to check your device’s current version by going into Settings > About Phone > Build Number. We need it at Step 9.
Step 1: Download all the above tools and Install It in Your Windows PC.
Step 2: Extract ‘ADB Fastboot Tool.rar’ which you have downloaded.
Step 3: Move ze550kltwrp.img into extracted ‘ADB Fastboot Tool.rar’ folder.
Step 4: Now in ADB Fastboot folder open command windows by Pressing Shift+Right click > open command windows here. See In below image for easy understanding.!

Step 5: Now enter the following command in command window. (Click Ok if you see any permission window in your device)
adb devices
It will return your device code (check above images) which confirms you have installed all the files properly. If you do not return to the device code but are sure that you have installed all the drivers, then move forward to Step 6.
Step 6: Now to reboot your device into Fastboot mode (which allows flashing files), enter the below command in command prompt or else you can manually reboot to fastboot mode by Switching your phone off and then pressing Volume Up + Power Key Together.
adb reboot bootloader
Step 7: Now boot into TWRP recovery by just entering the below command.
fastboot flash boot ze550kltwrp.img
Once the flashing process gets completed, reboot your device by below command:
fastboot reboot
Step 8: Now in TWRP Recovery Select Wipe > Advance Wipe> Select √ ASDF > Swipe right to confirm Wipe.
Step 9: Now, to make your device Work Normally Again, Click Here and download boot file which was installed before in your device.
Step 10: Now, to reboot your device into Fastboot mode (which allows flashing files), enter the below command in command prompt or else you can manually reboot to fastboot mode by Switching your phone off and then pressing Volume Up + Power Key together.
adb reboot bootloader
![[Solved] Unable to Mount (Error) "/asdf/recovery/" in Android Recovery](https://devsjournal.com/wp-content/uploads/2019/11/twrp-wipe-screen.jpg)
Step 11: Move downloaded boot file into ADB folder and flash it by using below command.
fastboot flash boot boot.img
Once the flashing process gets completed, reboot your device by below command,
fastboot reboot
Step 12: That’s it. Now reboot into recovery mode. You’ll find the stock recovery with all the issues fixed.
If you don’t want to void your device’s warranty, you can contact your near by service center to get it fixed. However the service might be chargeable. I’m really not sure if this will really void your warranty or not. Anyways, if you’re still facing the error, you can comment below. I’ll try to get back ASAP!

Les liens ne fonctionnent pas..Comment réinitialiser alors que le sentons ne démarre plus donc impossible d’activer USB debugging …
De plus mon zenfone est (ZD551KL). Ou récupérer les fichiers img.
Merci
Les liens ne fonctionnent pas..Comment réinitialiser alors que le sentons ne démarre plus donc impossible d’activer USB debugging …
De plus mon zenfone est (ZD551KL). Ou récupérer les fichiers img.
Merci
entered twrp mode but there is asdf partition on my phone.also cannot exit twrp now.please help
what about “zd551kl” z00ud 2g ram recovery and boot file ?? can you give me a link