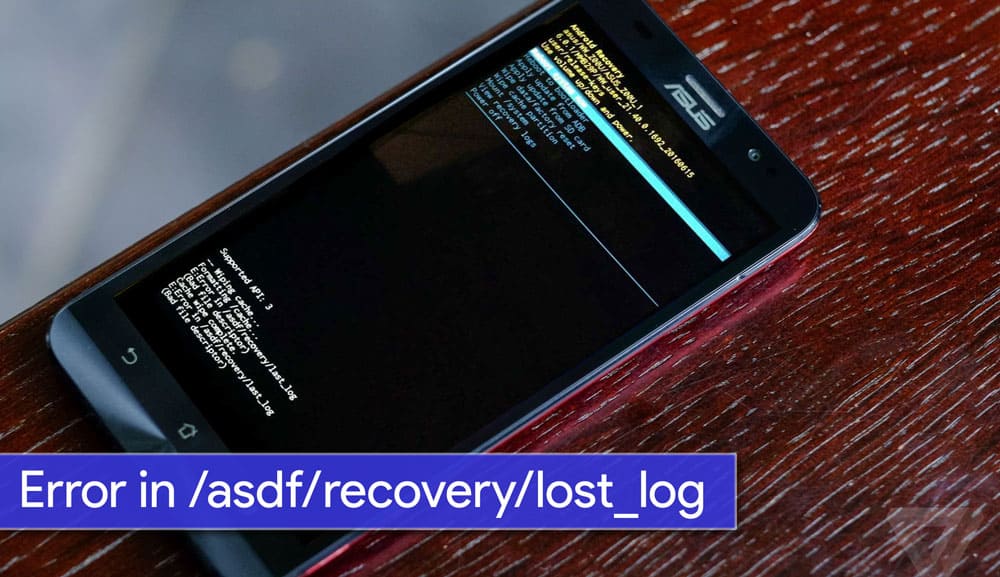
Android being an open source platform, has few drawbacks too. You might come across few errors & bugs that will make you think, What did I do wrong? Few errors are caused manually by the users while the others are caused Internally due to different partitions. Getting an error in non-rooted devices is very rare as compared to any root access. Rooted devices are prone to errors as you’re allowed to play with files. If you’re an Asus Zenfone user, you might come across this error “Error in /asdf/recovery/” which is pretty normal while flashing OTAs or performing factory reset.
This error was really pissing me off as I didn’t do anything wrong. Even after searching through the entire Internet, I didn’t find any solution. After a few experiments, I was successful in fixing this issue. I am writing this detailed guide to fix “/asdf” error in Stock recovery.
How to fix Unable to Mount Error in /asdf/recovery
To solve this error, we need to Clear “/asdf Partition” of our Android Device. Stock Recovery doesn’t provide option to clear any of your partitions except factory reset. So, in order to clear this partition, we need a temporary recovery. In this guide, we’ll checkout method to clear /asdf partition for both Rooted and Non-Rooted Android smartphones.
Pre-requisite:
- You must have a windows PC.
- Install USB drivers for your Asus Zenfone 2 Laser ZE550KL.
- Enable USB Debugging in Your Android Device: Go to Settings -> About and tap multiple times continuously on “Build number” to active “Developer options” and then Go to Settings -> Developer options and enable “USB debugging” option.
Downloads:
- Minimal ADB Fastboot Tool
- ADB USB Drivers
- Asus Android USB Driver
- TWRP Recovery (Install TWRP)
- Stock Boot And Recovery Files
For Rooted Device Users
As your Android device (In my case, my device is Asus Zenfone 2) is Rooted, I assume that your device’s bootloader is unlocked. If your device’s bootloader is locked, refer the guide for Non-rooted devices.
Step 1: Download all the above tools and install it on your Windows PC.
Step 2: Extract ‘ADB Fastboot Tool.rar’.
Step 3 Move ze550kltwrp.img into extracted ‘ADB Fastboot Tool.rar’ folder.
Step 4: Now in ADB Fastboot folder, open command windows by Pressing Shift+Right click > open command windows here. You can refer the image.

Step 5: Now Enter the Following command in Command Window. (click Ok if Prompt on Your Device)
adb Devices
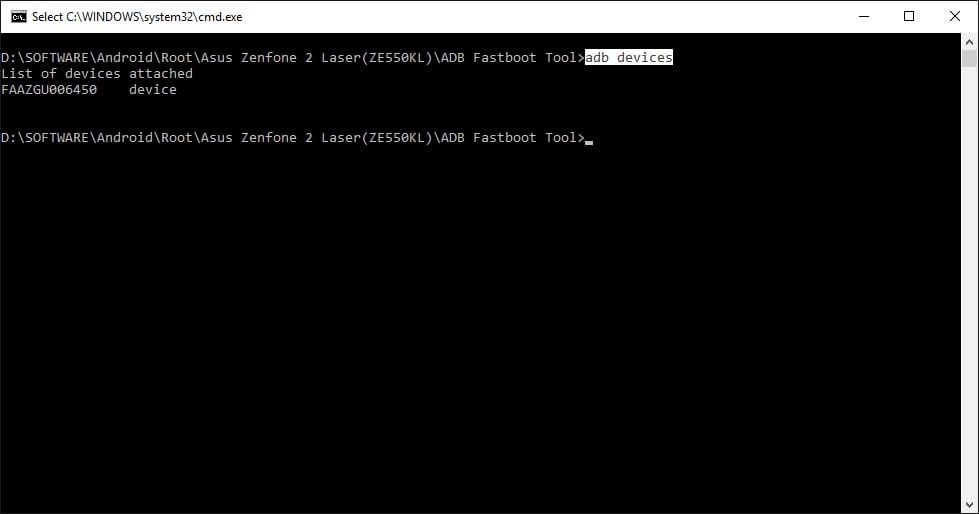
It will return your device code which confirms that you have installed all the files properly. If it doesn’t return to any device code, check if you have installed ADB Drivers properly. If you have installed everything properly, jump on to Step 7.
Step 6: Reboot your device into Fastboot mode which allows flashing files, enter the below command in command prompt. or else you can manually reboot To Fastboot Mode By turning off Your phone and Pressing Volume Up + Power Key together.
adb reboot bootloader
Step 7: Now, Boot in to TWRP recovery by just entering the below command.
fastboot boot ze550kltwrp.img
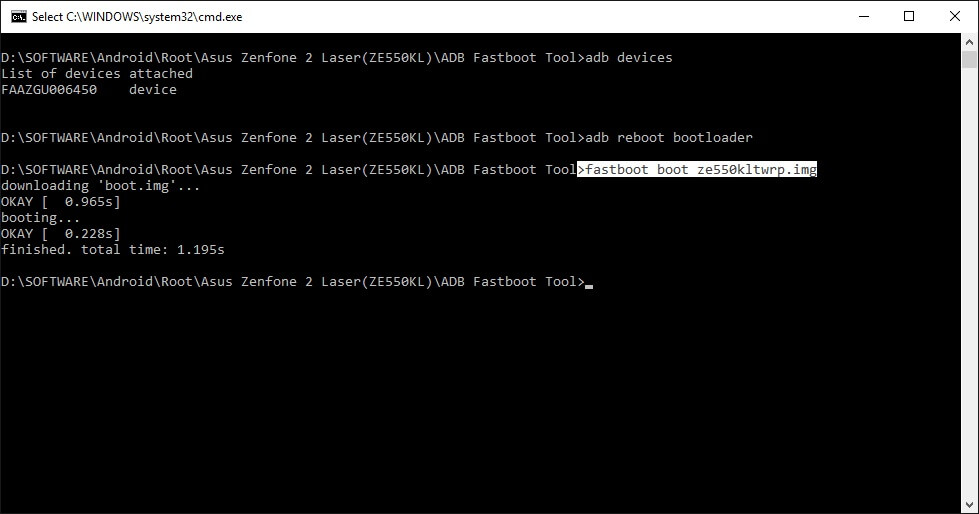
This command will not flash the TWRP Recovery in your device but will allow you to boot the recovery image making it as a Temporary recovery.
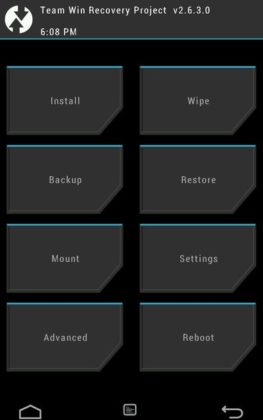
Step 8: Now In TWRP Recovery Select Wipe > Advance Wipe > Select √ ASDF > Swipe right to confirm wipe.
Step 9. Now boot your device into recovery mode. That’s it! You’ll not get asdf partition error again.
For Non-Rooted Device Users
Before Following this guide I request you to check your device’s current version by going into Settings > About Phone > Build Number. We need it at Step 9.
Step 1: Download all the above tools and Install It in Your Windows PC.
Step 2: Extract ‘ADB Fastboot Tool.rar’ which you have downloaded.
Step 3: Move ze550kltwrp.img into extracted ‘ADB Fastboot Tool.rar’ folder.
Step 4: Now in ADB Fastboot folder open command windows by Pressing Shift+Right click > open command windows here. See In below image for easy understanding.!

Step 5: Now enter the following command in command window. (Click Ok if you see any permission window in your device)
adb devices
It will return your device code (check above images) which confirms you have installed all the files properly. If you do not return to the device code but are sure that you have installed all the drivers, then move forward to Step 6.
Step 6: Now to reboot your device into Fastboot mode (which allows flashing files), enter the below command in command prompt or else you can manually reboot to fastboot mode by Switching your phone off and then pressing Volume Up + Power Key Together.
adb reboot bootloader
Step 7: Now boot into TWRP recovery by just entering the below command.
fastboot flash boot ze550kltwrp.img
Once the flashing process gets completed, reboot your device by below command:
fastboot reboot
Step 8: Now in TWRP Recovery Select Wipe > Advance Wipe> Select √ ASDF > Swipe right to confirm Wipe.
Step 9: Now, to make your device Work Normally Again, Click Here and download boot file which was installed before in your device.
Step 10: Now, to reboot your device into Fastboot mode (which allows flashing files), enter the below command in command prompt or else you can manually reboot to fastboot mode by Switching your phone off and then pressing Volume Up + Power Key together.
adb reboot bootloader
![[Solved] Unable to Mount (Error) "/asdf/recovery/" in Android Recovery](https://devsjournal.com/wp-content/uploads/2019/11/twrp-wipe-screen.jpg)
Step 11: Move downloaded boot file into ADB folder and flash it by using below command.
fastboot flash boot boot.img
Once the flashing process gets completed, reboot your device by below command,
fastboot reboot
Step 12: That’s it. Now reboot into recovery mode. You’ll find the stock recovery with all the issues fixed.
If you don’t want to void your device’s warranty, you can contact your near by service center to get it fixed. However the service might be chargeable. I’m really not sure if this will really void your warranty or not. Anyways, if you’re still facing the error, you can comment below. I’ll try to get back ASAP!

how much time it will take for flashing?
Thank you bro, I successfully updated my ASUS ZENFONE 2 LASER ZE550KL to 1998.
Please help me how to update Lenovo VIBE P1m a40 to marshmallow, now it’s currently running with 5.1.1 lollipop version.
Using this method I successfully update from 1708 to 1794 version.. But I am unable to update to 1877 version from SD card. It says can’t install this m package less than 20160426.
Hello, is this method suitable for 5.0.2 lollipop users?
getting the error “cannot load twrp file”?
hi, if i did this step will it also wipe all the data on my internal storage?
i just simply want to wipe my phone cache, not the data. thanks
Hi, how can i find boot file which installed before on lm device?! My device is on bootloop
first you have to come out of TWRP bootloop. follow this procedure to come out of TWRP boot loop:
1. if you know your earlier version build number, then download BOOT.img file from google drive of devslab mentioned downloads section – Stock Boot And Recovery Files; example : https://drive.google.com/drive/folders/0B0aDjdU4gTwZcXBqVnJ3eFRTSDQ
and then copy that img file into your phone internal memory.
2. After that go to install option in TWRP and install boot.img file. And reboot your phone. Then u can come out of TWRP loop.
3. If you doesnt know your earlier your build number, then download any lower version/ build number’s BOOT.img file and follow point 1&2. After point 2, your phone takes lot time to boot as there is mismatch of build number. Then to find your exact build number press power button and volume down. you will enter into recovery mode.there you can see your earlier build number on top.
4.This time you download correct build number BOOT.img and follow 1&2 points.
i hope that helps you
I could solve the error with these steps, thanks a lot VJ:)
Thanks for this post.
Advice for users: If somehow your phone got disconnected before booting original boot.img/ fastboot tool showing waiting for device and rebooting to TWRP don’t panic.
Download the boot.img to your SD card (in supported phones) and use install option from TWRP and flash it as boot.
problem solved
Just one thin more, now that the download links mentioned in the post have been updated, step 2, step 3 and step 7 needs to change.
step 2: minimal adb tool is in exe format, so no need to extract it.
step 3: latest TWRP has different name “twrp-3.0.2-5-Z00L.img”
step 7: same as step 3.
Thanks for this post. Helped alot.
In the step 9 for non rooted devices, is it necessary to download boot file which was installed before in the device, or can we download the latest boot file.
Also please elaborate step 9.
To retain your warranty, you need to lock the bootloader & any signs of it. It’s necessary to install the boot file that was present before unlocking the bootloader.
Ok….thanks for the reply.
sir downloaded folder contains two image files one is boot.img and recovery.img. please tell me which one is to be flash or both file should be flashed..If both file is to be flashed,which one flashed first….thank you
Thank you.. I have fixed the error. Really appreciate your time and effort. Keep up the good work.
Thank you so much.. You are the only one who provided all the info( like root,downgrade etc.) for zenfone 2 ZE550KL. I did it successfully. Thank You once again.. Really Appreciate your time and effort..
How to select root ASDF ?
We have updated the guide with new TWRP link. You can find asdf option in latest TWRP. Have a great day!