We do believe that using a Wired internet connection such as an Ethernet connection is much more reliable than a Wi-Fi connection. Because there is no other medium in which the signals have to travel. Apart from that, when we connect our computers directly to the modem or router, the computer automatically fetches up all the data and starts working with the internet connection.
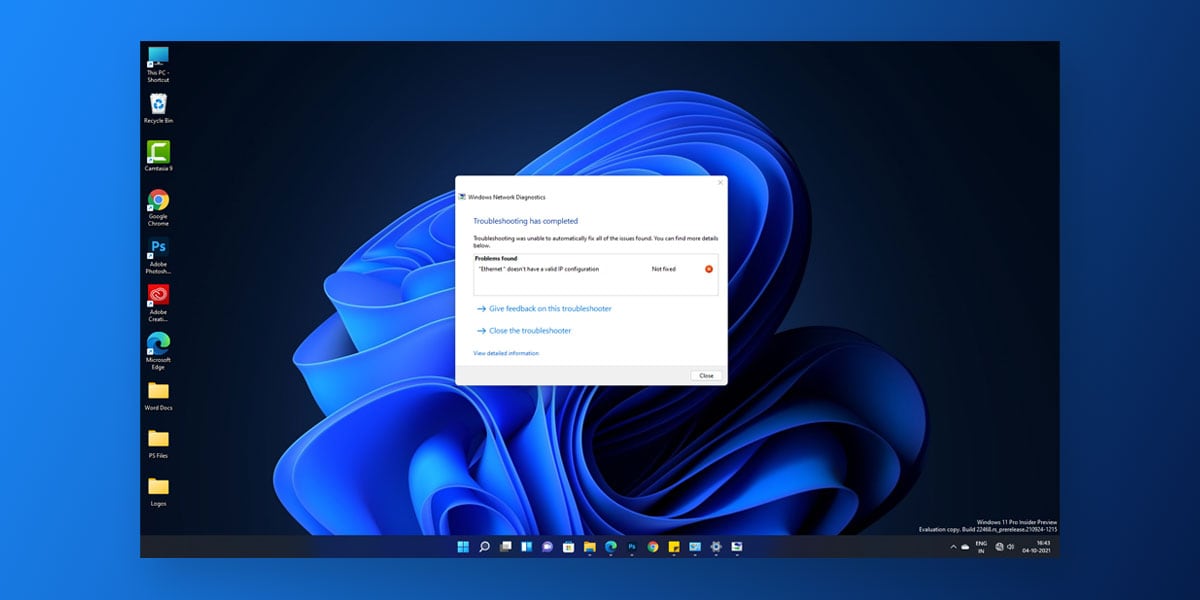
However, sometimes due to some kind of errors or faults in our router’s or computer settings that do not allow us to use the connection properly and pop up error messages like, “ethernet doesn’t have a valid IP configuration” in Windows 11. Hence, we will be sharing some easy fixes by which you can troubleshoot this error and eliminate it entirely from your PC.
Causes of “Ethernet doesn’t have a valid IP configuration” Issue
There can be several reasons behind the “windows 11 ethernet doesn’t have a valid IP configuration” problem. There is a proper channel of devices that work in coordination to provide you with an internet connection. Thus, even a single fault in any device can ruin the entire channel and cause such errors like, “ethernet doesn’t have valid IP configuration”.
The most common reason for this error to occur is that your computer is unable to fetch the IP address correctly from the DHCP servers such as your modem, router, etc. However, whatever be the reason, we can fix it very simply by using some troubleshooting methods.
How to Fix “Ethernet doesn’t have a valid IP configuration” in Windows 11
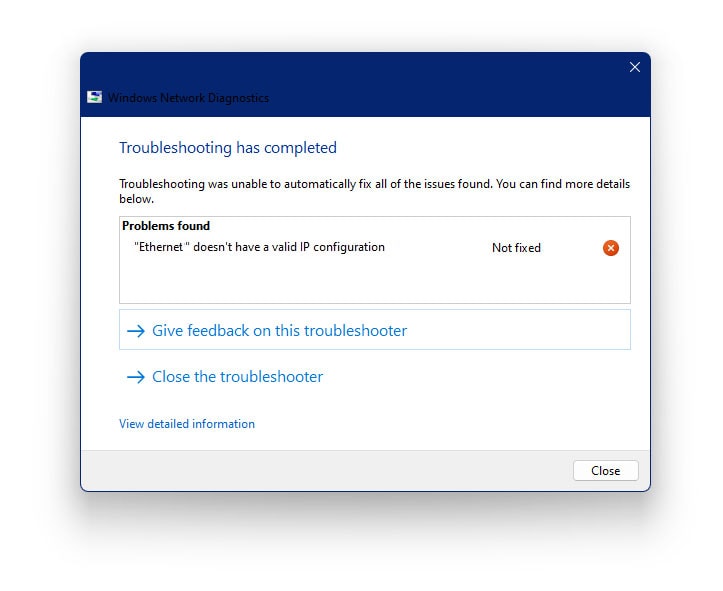
Since there might be multiple reasons causing this kind of error on your PC, and it also varies from individual to individual. We suggest you follow this article and try out all the methods until the problem gets resolved. Some of these methods consist of tricky steps, so make sure to follow the methods according to the instructions.
1. Restart the router
To fix the “ethernet doesn’t have a valid IP configuration” in Windows 11 or any other internet related problem, the simplest method that you can try out is to restart the modem or Router to reset the connection settings quickly. Usually, it fixes most of the router related issues since it is quite common to have technical problems from your ISP’s side.
Make sure you wait for at least 5 minutes after turning the router back on to get the best results. Also, along with the router, you can even shut down your computer and do a complete restart in case the problem is occurring because of your system itself. If you have an old machine, you might need to replace with a new router.
2. Check Ethernet cable
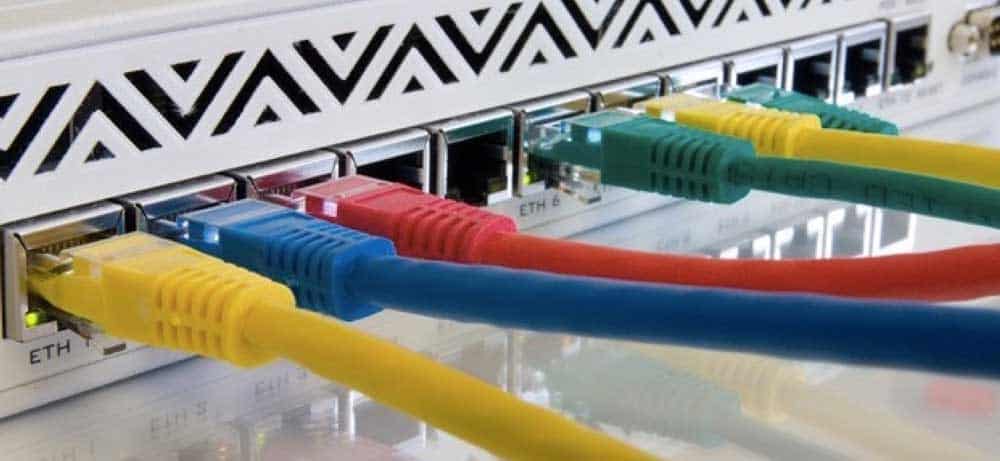
Most people believe that it is occurring because of some technical issues while the major reason behind the error comes out to be the faulty ethernet cable or a poorly connected cable. The first thing that you should check out is that if the ethernet cable is connected properly at both ends.
Even if the problem is still occurring, you can test out the connection with several other Ethernet cables to ensure if the connection is working or not. If it works with other ethernet cables perfectly fine, it is obvious that the previous Ethernet cable had some kind of damage.
3. Connect your Powerline adapter to a different outlet
Apart from the ethernet cable, you must check all the connections properly, including the connection of the powerline adapter as well. Generally, the powerline adapter can misbehave due to bad power connection and eventually configuration errors. Hence, the simplest way to fix that is to try out to connect the powerline adapter to a different outlet and see if the router starts working fine or not.
4. Reset TCP/IP Settings
Resetting the Internet protocol settings on your computer can fix most of the errors related to your internet connection, IP and DNS effectively including the “ethernet doesn’t have a valid IP configuration windows 11” too.
Step 1: First of all, search “cmd” in the Start menu below and click on “Run as administrator”
Step 2: Now, for the next step, we will need to enter some commands, so make sure you enter them properly. Otherwise, the method will not work.
Step 3: Enter the following command to reset the Winsock protocol:
netsh winsock reset
Step 4: Afterward, enter the following commands, one by one to reset the TCP/IP settings:
netsh int tcp reset
netsh int ip reset
Step 5: Once the process completes, close the command prompt window and reboot your system to confirm the changes.
5. Manually Configure TCP/IP Settings
Sometimes, resetting the TCP/IP settings doesn’t work that effectively, so we have to take things into our hands and configure the TCP/IP settings manually to fix the “ethernet doesn’t have a valid IP configuration windows 11” problem.
Step 1: For this method, we will have to enter the Network and Sharing Center on our PC. You can do so by clicking on the Start button and type Control Panel.
Step 2: In the Control Panel, go to the Network Settings and click on Network and Sharing Center.
Step 3: Here, the ethernet connection that you are using right now will be shown in blue letters on the right-hand side of the window. Click on it.
Step 4: Click on Properties.
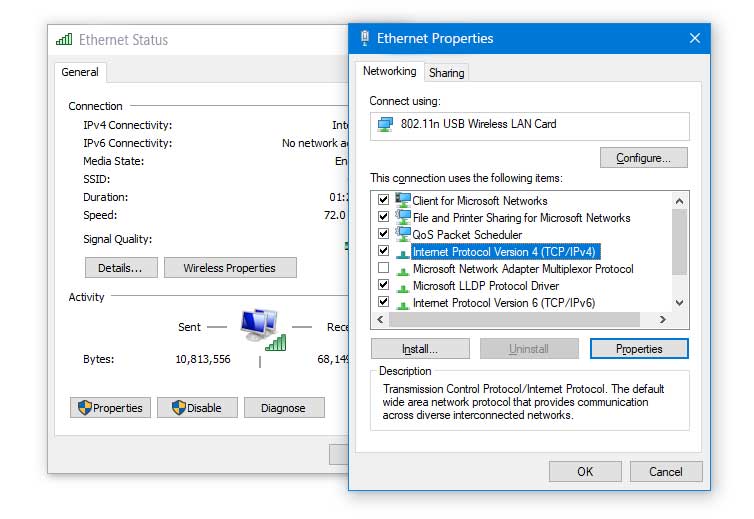
Step 5: Make sure that the Internet Protocol Version 4 (TCP/IPv4) option is selected. If you are currently using the IPv6, then Internet Protocol Version 6 (TCP/IPv6) should also be selected in the list.
Now, after you have selected these two options from the list, double click on it to further adjust the settings.
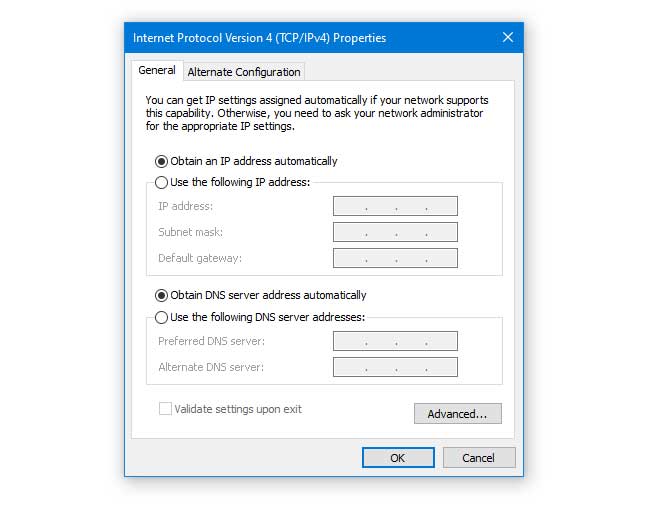
Case 1: Most people who play LAN multiplayer games or connect multiple PCs on the same network tend to set up a static IP address. In case your protocol’s IP address is also set to some static IP, then make sure to select the “Obtain an IP address automatically” option and “Obtain DNS server address automatically” options are selected.
Then, simply click on the OK button to confirm the changes. We believe it will solve the “ethernet doesn’t have a valid IP configuration windows 11” problem on your PC.
Case 2: In case the options are selected for automatically fetching up the details, and you are still facing the IP configuration problems, then we can try out just the opposite of what we tried in case 1.
Using some static details can also be a helpful trick to solve the issue. Thus, we will be entering the LAN IP address, Subnet Mask, Default Gateway, and DNS Server by ourselves.
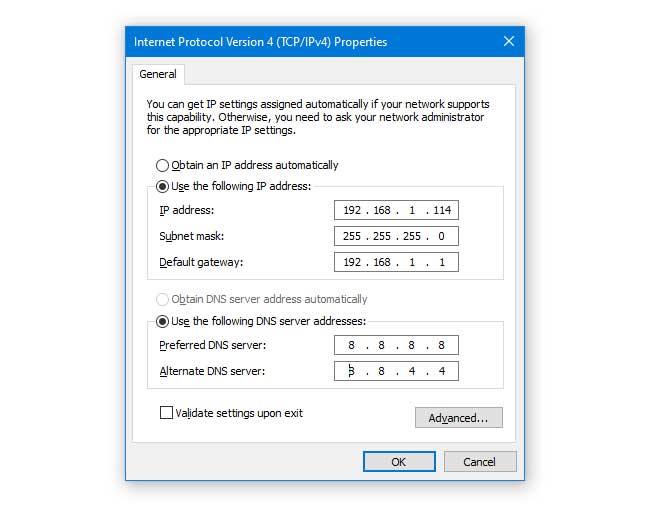
For instance, you can set the following as your connection details:
- IP address: 192.168.1.114
- Subnet mask: 255.255.255.0
- Default gateway: 192.168.1.1
- DNS server: 8.8.8.8 and 8.8.4.4
While entering the IP address and the Default Gateway details, there are some things to keep in mind.
Firstly, the default gateway which you enter is the IP address of the modem or router from which the internet connection is coming via the ethernet cable. Don’t write anything unnecessary here; otherwise, it won’t work.
Secondly, since you are entering your computer’s IP address here, you don’t need to enter the same as we have given as an example. You can try other variations as well by changing the last 3 digits of the IP address. In 192.168.1.XXX, here the XXX can be any number lying between 2 to 255. But, make sure the IP address you enter is unique and not similar to any other device connected to the same network.
6. Cleanup network cached files
To clean up the cached network files, we will require to enter some simple commands in the command prompt.
Step 1: Search “cmd” in the Start menu below and click on “Run as administrator”
Step 2: In the command prompt window, enter the following commands one by one:
ipconfig /release
ipconfig /flushdns
ipconfig /renew
Step 3: Once you execute all these commands successfully, make sure to reboot the system at least once. Then, you can check whether the problem is still occurring or not.
7. Update firmware on your network devices
One possible reason behind the “ethernet 2 doesn’t have a valid IP configuration” error can be that your network devices are not working on the latest firmware. That can cause multiple conflicts while establishing an internet connection. So, make sure to update the firmware on all the network devices by visiting their respective official websites. You will find a complete procedure on updating the firmware there as well.
8. Reinstall your Network Adapter
Reinstalling the Network Adapter is a better option than simply updating it since we clean up the residual files first and then install the latest adapters, so there are lesser chances of any faulty files being left on our PCs.
Step 1: Use the Windows Key + R hotkey to open the Run dialogue box.
Step 2: Type in hdwwiz.cpl and hit the Enter key.
Step 3: Here, open the Network Adapter and expand it further.
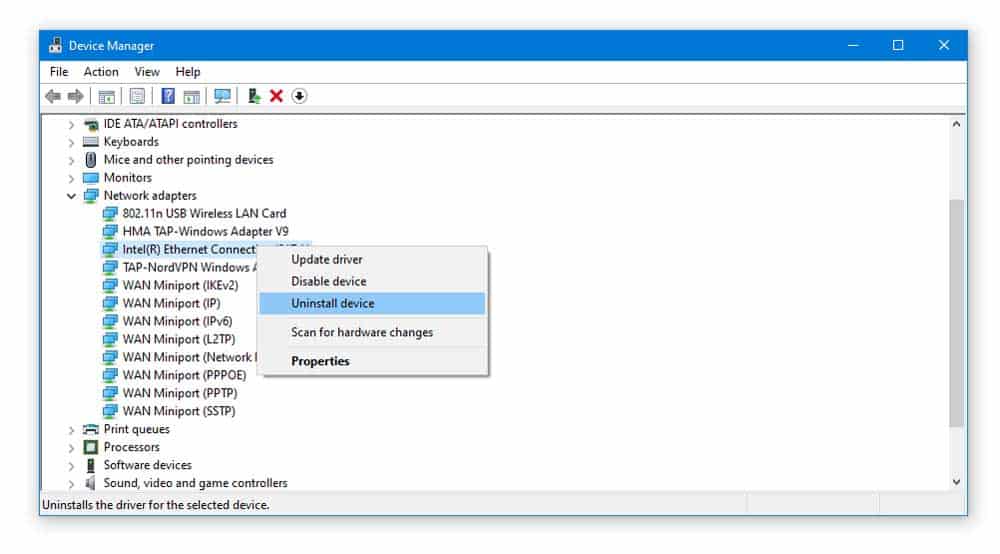
Step 4: Find the ethernet card (NIC) from the list that you are currently using and right-click on it and select the Uninstall option.
Step 5: Lastly, click on Action, and then select the “Scan for hardware changes” option from the menu and follow the on-screen instructions to reinstall the network adapters.
9. Disable Microsoft Kernel Debug Network Adapter.
Any additionally installed network adapter on your computer can interfere with the default network adapters which eventually cause conflicts that result in errors like “windows 11 ethernet doesn’t have a valid IP configuration”. So, disabling the Microsoft Kernel Debug Network Adapter can be a significant fix for this error.
Step 1: Open the Power menu options by pressing Windows Key + X on the keyboard simultaneously.
Step 2: Select the Device Manager option from the list.
Step 3: Here, select the View Option from the Header menu, and select Show Hidden Devices option.
Step 4: The Microsoft Kernel Debug Network Adapter will now be visible in the list under network adapters, right-click on it and Disable it.
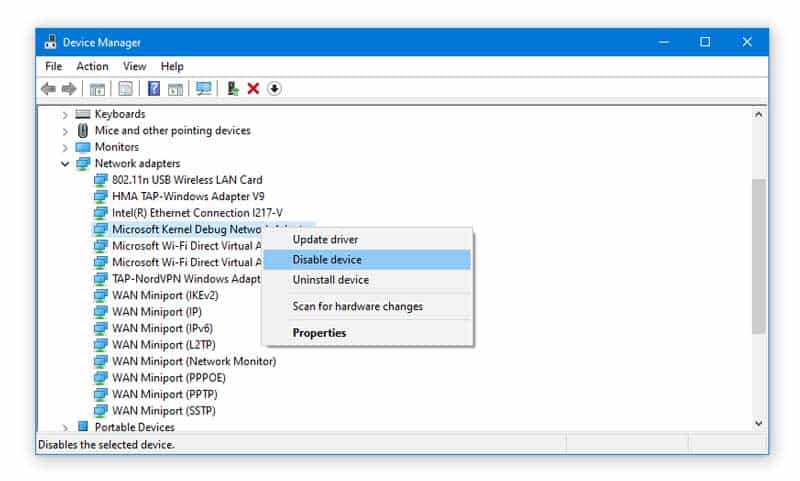
Step 5: Click on Yes, and reboot the PC to save the changes.
10. Assign a MAC address to your network card
To establish a good and stable connection, the MAC address should be assigned to the network card in the first place. In case it is not registered on your computer, it seems to be quite common to face internet-related issues which also includes the “ethernet doesn’t have a valid IP configuration windows 11” problem.
Step 1: Open the Run dialogue box by pressing Windows Key + R key simultaneously.
Step 2: In the Run field box, type cmd and hit Enter.
Step 3: Execute the following command: ipconfig/all
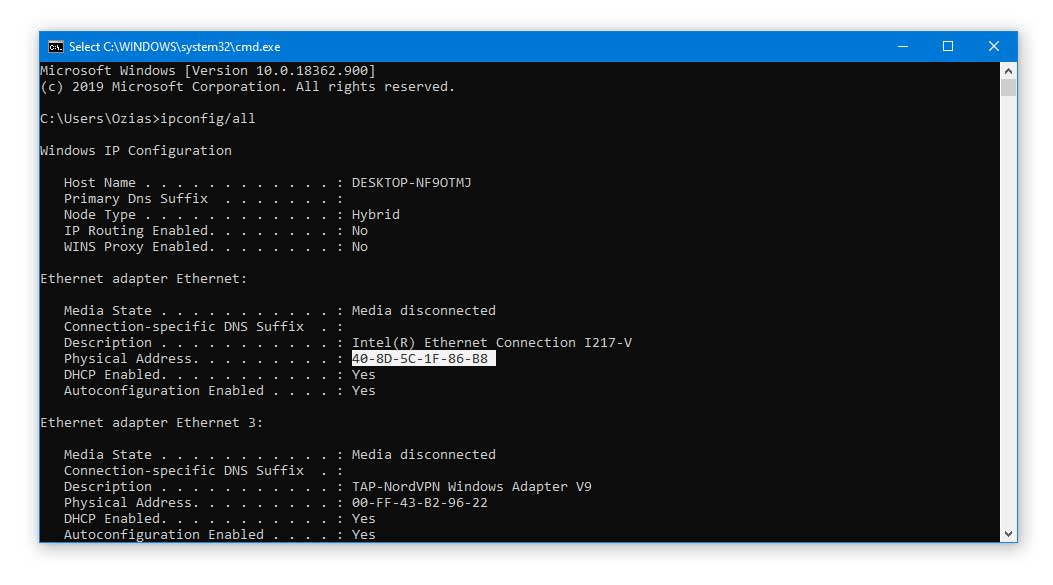
Step 4: A list of details will appear in the command prompt, copy down the Physical Address.
Step 5: Now, move your mouse cursor to the taskbar and right-click on the Network icon in the System Tray.
Step 6: Click on “Network and Internet Settings”.
Step 7: Now, go to Advanced network settings & Click on More network adapter options.
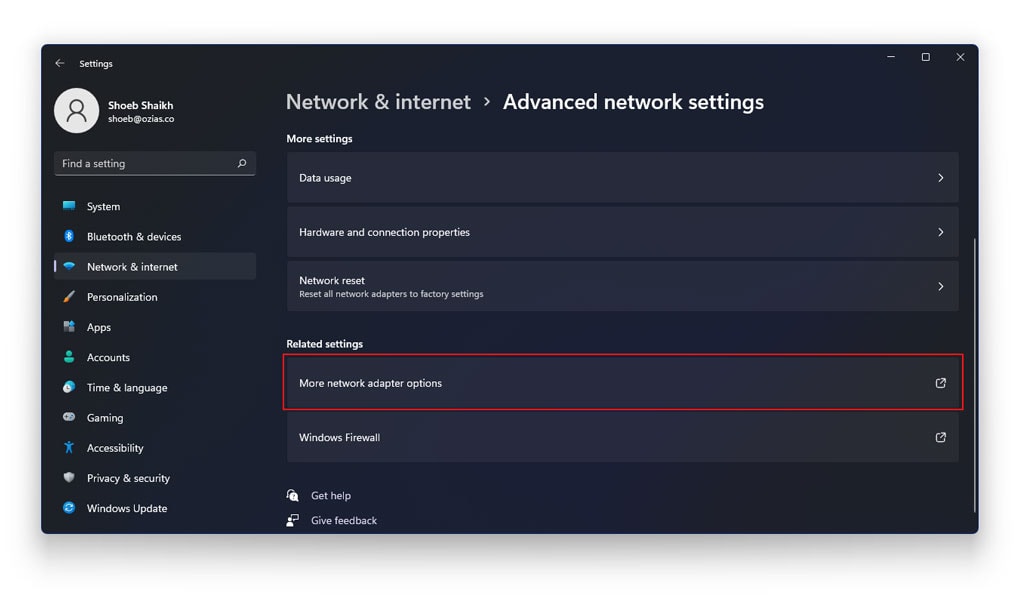
Step 8: Here, you will find the currently connected Ethernet connection, right-click on it and go to Properties.
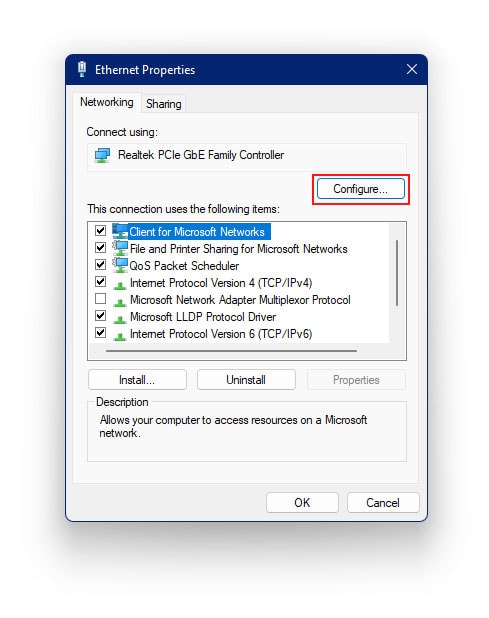
Step 9: In the Ethernet Properties window, click on the Configure button.
Step 10: Click on Advanced > Network Address, and make sure the Value option is checked.
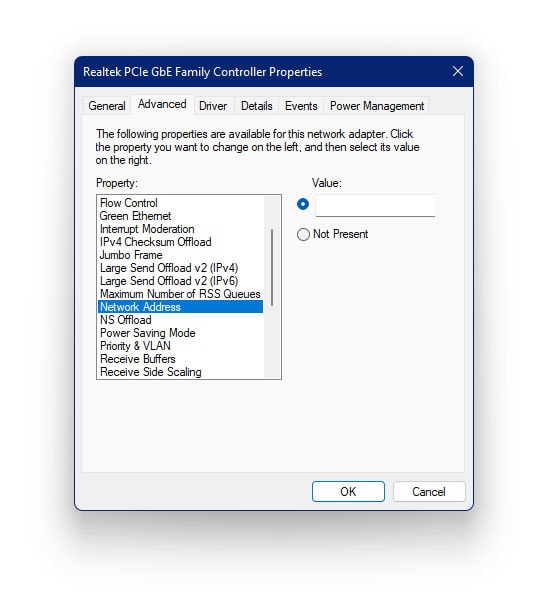
Step 11: Now, enter the Physical Address that we copied in the 4th step.
Step 12: Click on Ok and reboot the system afterwards.
11. Enable DHCP
Usually, the DHCP feature on your computer is responsible for fetching all the necessary details on its own. If for any reason, it is not enabled on your computer by default, you can follow these steps and enable DHCP.
Step 1: Open the Run dialogue box by pressing the Windows Key + R key at the same time.
Step 2: Type services.msc in the Open field and hit the Enter key.
Step 3: The Service Window will appear on the screen, double-click on the DHCP client.
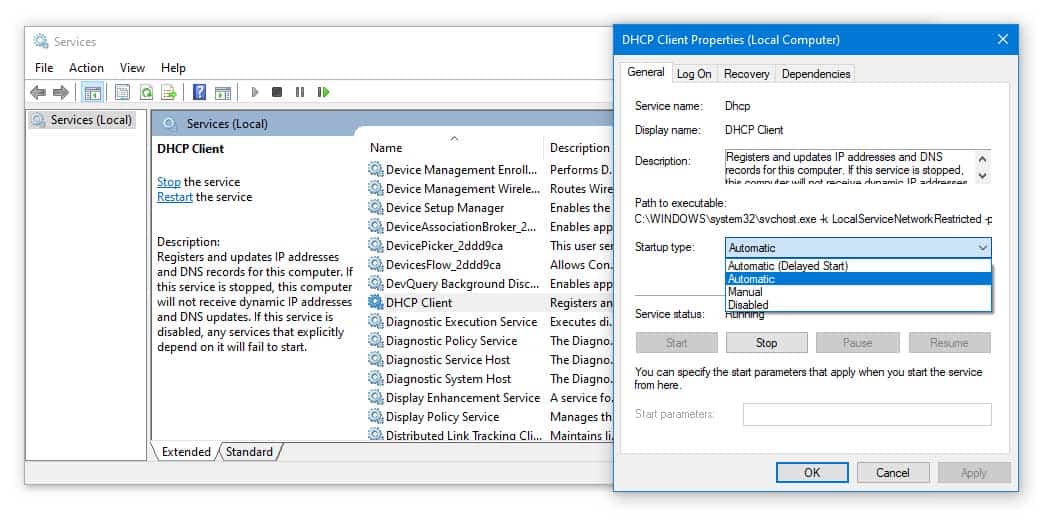
Step 4: From the Startup Type drop-down menu, set it to Automatic.
Step 5: Then, click on the Start button to activate the service immediately.
Step 6: Now, go back once again to the Services Window and right-click on the DHCP client option.
Step 7: Select the Restart-Service option from the menu and click on Yes to confirm.
12. Connect your PC directly to your router
In case you have connected your PC to some network repeater via the ethernet, try out to ditch this method and connect your PC directly to your router. Sometimes, a chain of multiple network devices can cause various ambiguities in the network resulting in errors like “ethernet doesn’t have a valid IP configuration”.
Hence, make sure there is no other network repeater or any kind of device in between the connection. Afterwards, check if the problem gets resolved or not. If the problem gets resolved, then the actual fault is with the additional network devices, and you should get them fixed in case you want to use them back again.
13. Make adjustments to your registry
Making some slight adjustments in the registry values have significantly solved the Ethernet doesn’t have a valid IP configuration error. Hence, here are the steps that will help you make similar adjustments on your PC as well.
Step 1: Press Windows key + R key to open the Run dialogue box and type in regedit and hit Enter.
Step 2: In the Registry Editor, navigate to the following path:
Computer\HKEY_LOCAL_MACHINE\SYSTEM\CurrentControlSet\Control\Nsi
Step 3: Double-click on Nsi to expand it and then double-click on the first sub-key to expand it further.
Step 4: Select the value 26 and right-click on it.
Step 5: From the menu, click on Permissions.
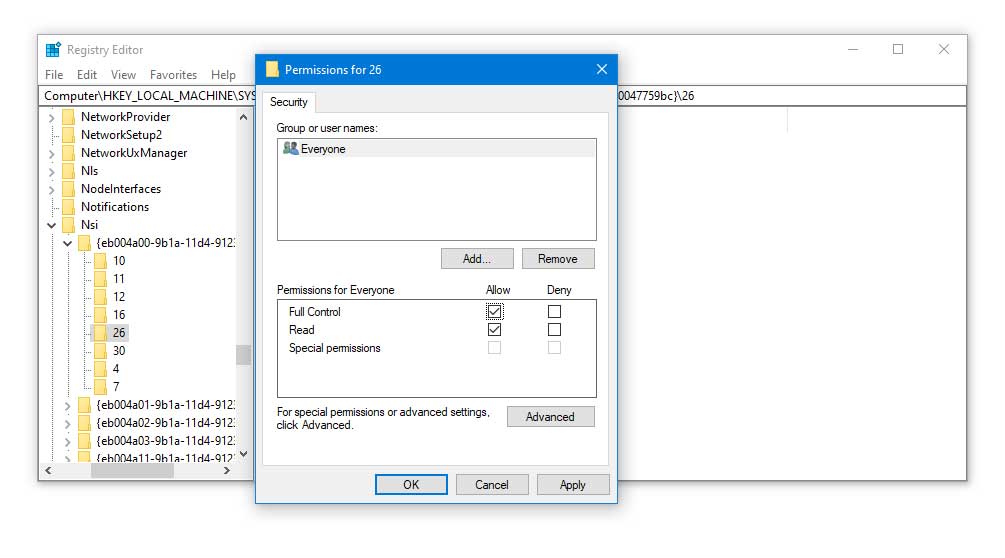
Step 6: In the Permissions for 26 Window, make sure to checkmark the Allow option for Full Control and Read options.
Step 7: Lastly, Click on Apply and OK to save the changes. Then, reboot your system.
14. Disable QoS on your router
Several users have reported that disabling the QoS feature, found in Netgear C7800, Netgear Wi-Fi 6 Mesh and many other routers can significantly solve the Ethernet doesn’t have a valid IP configuration error. It is quite common that the router’s configuration settings get altered. In such cases, experiencing these errors is not very rare.
For this fix, you will need to enter your router settings, by entering the respective username and password after visiting the default gateway IP address of the router.
From there, you can simply disable the QoS feature and see if it makes any difference and solves the problem.
15. Sync Powerline adapters one by one
Usually, people try to sync all the powerline adapters altogether, but that might not be the right way to do that. Hence, one possible method that you can try out to fix the error is that synchronizing the powerline adapters one after another to reduce the conflicts.
By synchronizing the powerline adapters one by one, the “ethernet doesn’t have a valid IP configuration” error has been resolved for many users, so do give it a try as well.
Conclusion
The “ethernet doesn’t have valid IP configuration” can occur anytime on your computer since there are so many things associated together to obtain a stable internet connection. However, with the help of all these useful methods and fixes, you will be able to fix the issue pretty easily.
Since the cause of the error might be different for every reader, we recommend trying out all the methods until you find the root cause and fix the error. In case of any further queries or suggestions, you can discuss it with us in the comments section freely.
