Introduction to CWM Recovery
CWM is a customized recovery for Android that allows users to overcome certain limitations imposed by Google’s recovery environment. It gives more sophisticated control over numerous system-level operations such as recovery, restoration, installation, and maintenance.
While you can perform a lot of advanced stuff having CWM recovery flashed on your Android smartphone, booting recovery mode for installing and dealing with third-party Android ROMs will still be the primary and, moreover, a necessary prerequisite.
Since stock Android recovery is a minimal system, there could be several reasons why you want to replace it with a custom recovery environment.
Method 1: Install CWM Recovery on Android Without PC
If you aren’t a “tech-person” or just don’t want to get into intricacies that come along flashing custom ROMs, you should go with this handy method for installing CWM recovery by using either of the apps mentioned below.
The only prerequisite for this method is that your device must be rooted, and also, don’t forget to take a backup of your data for the worst-case scenario if something goes wrong.
ROM Manager
It’s a must-have app for Android root users and an easy-to-use utility with a less cluttered user interface that helps users in flashing ROMs, organizing and making backups, and more.
Step 1. To begin, first, download ROM Manager from Google Play Store and install it.
Step 2. Launch the application, and initially, you will encounter a message notifying you something about the updates, so without a second thought, click on OK.
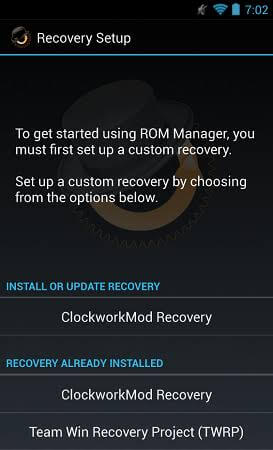
Step 3. Since this is your first time flashing an Android device with a custom recovery, select the first ClockworkMod Recovery option under “Install or Update Recovery.”
Step 4. And next, you will be asked to confirm your phone model, so do it and proceed further.
However, if you don’t find your device on the list, it must be unsupported, therefore to reassure, click on “Device Not Listed Above,” and most likely the system will tell you to manually install a ClockworkMod based recovery.
Now, give the below-mentioned app a try, and if in case that too doesn’t work for you, navigate to the manual method to get the job done anyway.
Flashify
True to its name, from flashing boot and recovery .img to building your flash queue, Flashify has got every functionality an advanced may ever look for. However, you can only use the app for free up to 3 flashes per day, and for an extension on the limit, you can use quick in-app purchases.
Step 1. To get started, download Flashify from Play Store and open it.
Step 2. Accept Disclaimer and next tap on Allow to grant Flashify to get root permission.
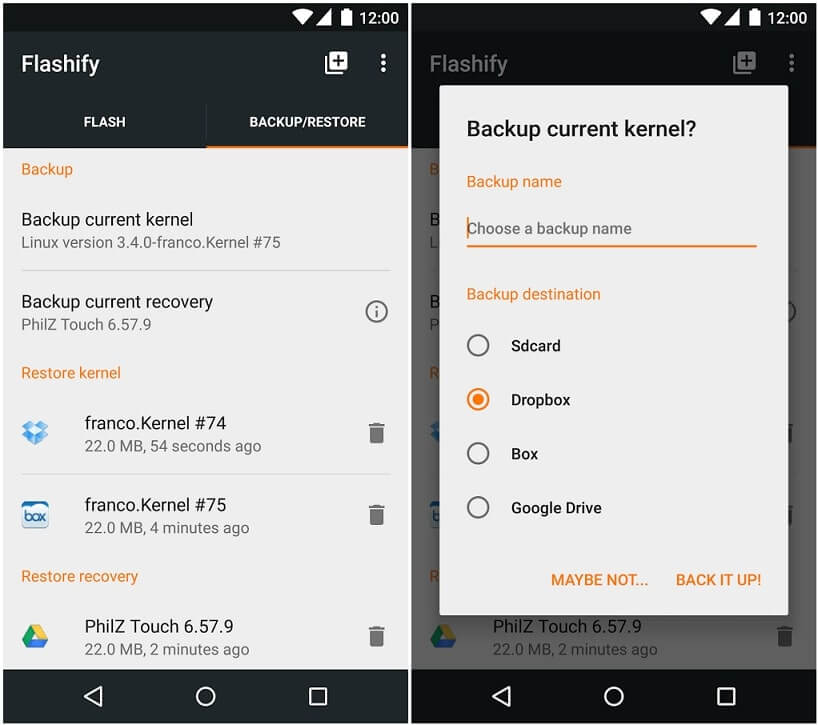
Step 3. Now before you get into flashing the recovery, it’s advisable to take a backup of your stock recovery beforehand. For doing that, click on BACKUP/RESTORE >> Backup current recovery and give your backup a name and choose a destination where you want to save it. And hit, “Back it up!”
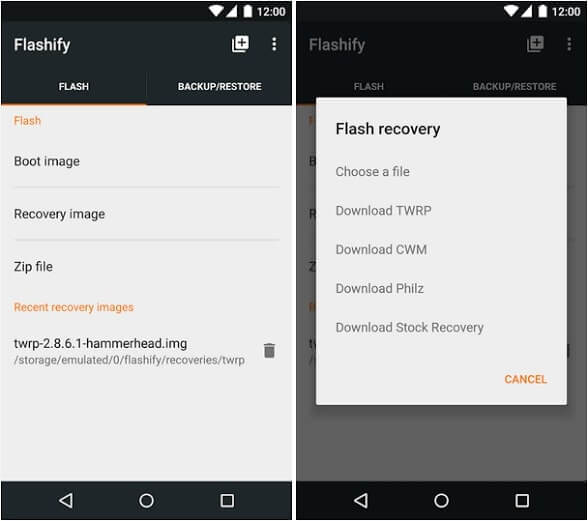
Step 4. Once you have the backup, switch to FLASH tab and select Recovery image, then choose Download CWM and you will be presented with a list of .img files, out of all you have to choose the latest CWM recovery image (should be the first one)
Step 5. Wait for the file to get downloaded, flash it and upon completion click on Reboot Now. That is it!
Method 2: Install CWM Recovery using PC
If none of the Android applications referred above helped you installing CWM recovery, this is the second yet last method you have. And for making the installation guide less complicated, we have broken it into 3 parts so that you can follow through with no hassle.
Install ADB and Fastboot Drivers
Step 1. To get started, the very first thing that you will be needed to do is to install ADB drivers and minimal ADB Tools on your PC.
Step 2. After downloading the .exe file, launch the adb.exe file to begin the installation process.
Step 3. Upon completion, comply with the Installation Wizard and Create a desktop icon.
Step 4. Once you have installed the tool, launch the tool from the desktop icon named as “Minimal ADB and Fastboot”. You should now see a command window open, with the command window open you can now issue ADB and Fastboot commands to your device.
Now, to connect your device with ADB, follow the below given steps.
Enable USB Debugging
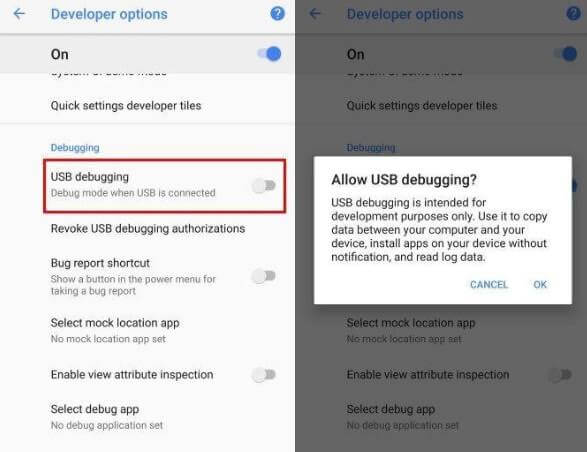
Step 1. Open your phone Settings and navigate to System and select About phone. Now scroll down to the bottom and tap Build number 7 times. You will get a short popup notifying that you are now a developer.
Step 2. Go back and click on Advanced, select Developers options, and search for USB debugging.
Step 3. Once located, simply toggle it ON, and you will get a prompt confirming the changes you are going to make, so click on OK, and you are done with this part.
Install ClockworkMod using ADB
Step 1. Firstly, download the latest CWM recovery .img file from here.
Step 2. And then, head over to your C Drive and look for the ADB folder (C:/ADB) and open it.
Step 3. Now, rename the downloaded CWM recovery file to recovery.img and paste it on the ABD folder.
Step 4. Within the empty space inside the folder, do Shift + Right-click and select Open command window here
Step 5. Connect your device to your PC using a USB cable and then, run the following command to make sure that it detects your device
adb devices
Step 6. If you see your device listed, enter the next command
adb reboot bootloader
Step 7. Now, wait until your phone reboot in bootloader mode. Then open your phone in Fastboot mode and type the following command and hit Enter
fastboot flash recovery recovery.img
Step 8. It will flash the recovery on your phone and lastly to reboot it run the below command
fastboot reboot
Yup, that’s pretty much all. You have successfully flashed your device with CWM recovery.
CWM Recovery vs. TWRP
As promised earlier, here is an unbiased comparison of popular custom recoveries. It’s true that ClockwordMod used to be a widely used recovery, but it’s not anymore in the league, now it’s TWRP all the way up with no contender around!
Since the software company which developed CWM has stopped building its versions anymore, there are no new releases of ClockworkMod Recovery images for any mainstream Android smartphones and tablets.
You may not find any proper info on the internet regarding this, but if you simply make a Google search for the latest CWM recovery image, you will find that there’s no update on ClockworkMod custom images from the last 5 years. Now making comments on its user interface, back/restore options comparing to TWRP does not make any sense.
With this, you know what’s the better choice for you to go for; it’s undoubtedly Team Win Recovery Project even if you consider other essential aspects too. Still, you may find peoples using CWM, but why to use when you already have the alternative worth choosing for?
So, that’s it, we hope you found this guide helpful for your needs. If you have any queries regarding this topic, put them down in the comment box below, and we’d love to answer you with possible resolutions.


![Fix: Android 13 Google Assistant Issues [6 Working Fixes]](https://devsjournal.com/wp-content/uploads/2023/06/android-13-google-assistant-768x384.jpg)
How to install cwm in karbonn a6 .and how to update karbonn a6 jelly bean to kitkat
my phone karbonn a26 is not installing the recovery image through the mtk
Hey ajinkya ! I can not download coclmodrecovery.img from ur link could u download for me my Mobile model no. Is kkarbonn titanium s5+
And
Yes MIUI rom also,
Plz bro
Mail me @ [email protected]
My Recovery mode is cracked it was not able to access from volume keys . And because of this the CWM is not installing . It Cracked when i am trying to flash CWM on my device
Thanx Man Done That !!!!!!
Its not working karbon titanium s5
Because Titanium is not a mediatek phone you can download the CWM(Recovery.img) recovery for Titanium S5 from here : CWM for S5, Install the recovery by this method : Installation Guide.. Keep visiting !
Bhai mujhe karbonn titanium mathone s310 ka recovery. IMG ka link de do na
I have karbonn titanium s5+…..i have followed all the procedures….bt after udating the recovery from mtk tool…it says to reboot into recovery mode…..bt after going to recovery it does nt shows the update version……..
Is there any other way to install cwm in karbonn titanium s5+……
You might have installed the recovery.img first before trying this procedure. Download Stock ROM of S5+ & flash the stock recovery through uncle tools. Now try this procedure, it has worked for all S5+ user & have got no complains. Hope this helps !
hey ajinkya mishra, i'm using Blu studio 5.0c hd rooted using king root app. tried this tutorial to install cwm recovery but i did't find my device's cwm.img(which i've downloaded from xda developers). i saved .img file in sd card only.. please help me out???
Hey Gautham,
Maybe you have saved the file inside a folder in SDcard. Save the recovery directly in SDcard. If you still can't find the Solution this is the best method to Install CWM in your Blu Studio 5.0C HD (MTK6582) Click here. I bet this is will work. Keep visiting !
yeah done with it!!! should i install cwm.img from recovery mode?? or can i flash roms directly from now
Maybe this would help you : How to Install Custom ROM. Have a good day ! Keep visiting.
I know to flash a rom, but device is not booting into recovery(when i press vol+ and home) mode.
Hey,
Can you make Clockworkmod recovery img for KARBONN A25 which one is given on the site is not working, Please make a clockworkmod recovery img for KARBONN A25.
bro mine is karbon a1+duple i need to install cwm for it where will i get .can i install cyoagen mod
Hai Ajinkya………….i have a doubt…….pls clarify me………only 6 months completed after purchasing my phone(Karbonn s5 plus)………if i rooted my mobile and installed cwm recovery….it avoids warranty………if i installed stock recovery again and unroot my phone and flash stock rom again using ygdp tool…can i get back my warranty again….pls reply soon…….
After unrooting & Installing the stock rom if you install a app name 'Traingle away' which deletes the Root Count there will be no signs of your device was rooted. But, there are even chances that some technicians figure out that root & Refuse to offer service. Hope this helps, Keep visiting !
in my karbonn a2+ after step 5 it got struck and nothing happens further…………suggest me what to do now??? 😕
This same happened with one of A2+ user, have you rooted your phone? If yes Restart your phone once it starts working follow this method : http://karbonnroms.blogspot.in/2014/08/clockworkmod-for-all-mediatek-device.html
yes i have rooted my phone…….
I downloaded the karbonn a25.img> opened MU MTK Tool> Update recovery> but nothing happen.
*gave root permission
*placed at the root of the sdcard
hllo Ajinkya sir..
First of all I'm so grateful to u for this awesome tutorial… its workingg. . (^_-)
bt how can i confirm that recovery is installed or not? I m using Karbonn A27plus.. i completed the mathod. and in recovery i just rebooted the ph. under cwm recovery options. and my ph started normally. how can i cinfirm that cwm us installed or not plz help me… ….
Switch off your phone then press Volup + Home + Lock button Select recovery if you have installed CWM correctly it might show you the CWM screen.
Bro the stock rom size is too large to download.
If you can upload or send that stock recovery image to me, it'd be great.
I messaged you on fb.
Bro I tried this method by the same procedure. But I didn't succeed and now there is also no stock recovery on my phone and it is not detecting any of the sim. My phone is titanium s2.
please help me bro I really need to fix this.
For Stock recovery
1. Download Stock ROM of Titanium S2 & Extract it using Winrar / 7zip / Poweriso. Find & Place the Recovery.img from the extracted folder in SDcard.
2. Download Uncle Tools from PlayStore & Launch it Select update Recovery and Select Recovery.img from the windows(under SDcard).
Thats all ! Hope this helps do leave your feedback. Thanks for visiting !