USB flash drives are the handy little data storage devices we all have been using for the convenience. Even in the era of cloud computing, the fashion of thumb drives is still not completely obsolete.
Portability and sizable data capacity on hand are being the primary cause; we are so accustomed to using USB sticks. Now, it is laughably easy to buy one and make use of; it is just as important to take care of your USB flash drive.
Being small in size, it is more than likely to get physically lost or stolen in any event. And you cannot be ignorant to it, especially, if you are dealing with some sensitive information or even the personal data you can’t afford getting any eyeballs.
Unfortunately, I cannot ship you a magic wand to your doorsteps to help you locate your USB drive every time you lose it. However, you can rather claim peace of mind by ensuring, even if you misplaced the stick, your private data remains protected as it cannot be accessed by any other person.
And how you can do that is by encrypting your USB Flash Drive that will allow you to restrict the unauthorized access to it. So, if you don’t want to compromise with the security of your data, below, I have detailed everything with regards to the concerning topic, read on to know more.
Hardware vs. Software USB Flash Drive Encryption

If you don’t know, there are 2 ways which by implementing either of them you can encrypt your USB storage device.
Hardware encrypted flash drives are readily available on the market. These are the drives that come with a dedicated chip installed within that is responsible for handling the encryption of the data stored on the drive’s memory.
And in software encryption, we either download a third-party software (paid or free) onto the host computer or make use of the in-built tool available on the computer’s operating system.
Both methods require authentication as an encryption key, password, or biometric to access the data stored on the drive. For hardware encryption, it has been noticed that these drives are prone to failure in some rare cases. For instance, if the chip gets removed or damaged, it’d be no longer encrypting your data.
Crosspondinly, for software encrypted drives, you can’t rely on outdated software for your data security; therefore, it’s advisable to regularly update the encryption software you are using.
Hardware encrypted flash drives come with advanced security features enabled and also have an upper hand performance wised, so if you carry sensitive information, these drives might be your necessity. Comparatively, software encryption is the cheaper of the two options; however, this factor shouldn’t be entertained unless you think your data isn’t important enough to spend a few bucks buying a flash drive with hardware encryption.
Furthermore, USB thumb drives with hardware encryption allow faster accessing of the data, prevents pre-boot attacks, and much more it has to do with securing your data. So, if you are going to buy these drives, make sure it incorporates AES-256 bit or adhere to the FIPS-compliant.
Also Read: 5 Important Windows 10 Privacy Settings
The trade-offs:
Upon encryption, you may get a feeling that your data is secure and most likely you won’t be having any privacy violation nightmare; but the reality is no encryption solution is perfect and 100% guaranteed. On the other side, encryption is a CPU intensive operation; thus, it makes the process of reading and writing data a bit slower.
The only notable downside of using software encrypted flash drives is, there is only one way out you can access the drive’s data by connecting it to the same operating system and encryption utility installed by which it has been encrypted in the first place.
I think by now you have chosen the way for the encryption of your USB drive; for hardware encryption, you can simply shop a flash drive having the appropriate functionalities. And how you can get the same results by employing software is given below.
How to Encrypt a USB Flash Drive using Software
Method 1: Using the Windows in-built tool
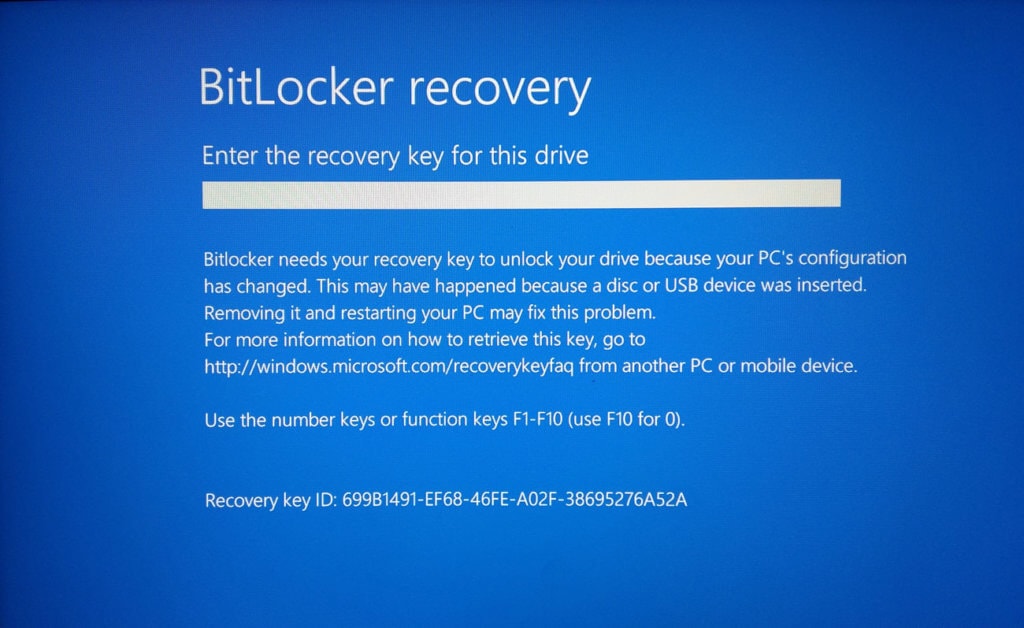
BitLocker, which is the most reliable and prominent built-in file encryption software, would help you make the job easier. It’s free to use Windows utility available for the Pro, Ultimate, or Enterprise edition of Windows Vista and higher, including Windows 10.
How to use:
- Connect your USB flash drive to your PC and navigate to This PC.
- Locate the drive, right-click on it, and choose “Turn on BitLocker.”
- Next, you have to choose how you want to unlock the drive by either selecting the password method or smart card. Tick the preferred option and proceed by clicking on Next.
- Select the way among the given, by how you want to backup your recovery key if in case you forget your password. This is quite important, so choose carefully.
- Next, choose how much of drive you want to encrypt. For new drives, you can select “encrypt used disk space only” so when you add in new data to the drive it’d automatically gets encrypt. Or you can choose “encrypt entire drive” if it already contains some data – and just to let you know this option is a bit slower and may take you more time.
- Now you will be asked to choose the encryption mode between the options New encryption mode and Compatible mode. You should choose the latter one if you think you are going to use the USB stick on the system’s running on older versions of Windows. Although, the new encryption mode is best for the fixed drives, hence, the compatible mode is recommended in this case.
- Lastly, click on Start encrypting and drive would get password protected. Time taken for the complete encryption is dependent on the size of the drive and the data contained.
Upon completion, you’ll see the drive icon has a lock on it. Now double-click on the icon, and if you get asked for providing a password for unlocking it, you can get ensured that your USB flash drive is successfully encrypted using BitLocker.
You might want to decrypt the drive somewhere later, so that too is simple. Right-click on the drive icon and choose Manage BitLocker and then tap on Turn off BitLocker among the given links. The same way, you can make more changes such as changing password, adding a smart card, and more.
I’d say, overall it’s the best easy-to-use tool for the encryption of your USB thumb drives if you are a Windows user.
Also Read: Top 10 best Password managers for Families & Business.
Method 2: Using Third-party Software
If for any reasons, you didn’t find the above solution to be the suitable one for your needs, here I’ve got another way. With the availability of the third-party data encryption software, the task has become easier than ever.
There are many tools available in the market; however, a very few are known that comes close to the reliability and flawless performance. Out of all – as per my knowledge and extensive research – at the time VeraCrypt is one of them which stands out to be the best software for data encryption.
VeraCrypt is a freeware utility which is a fork of the discontinued TrueCrypt project. Using this software is relatively easy which you can start by downloading its Windows installer.
- After installation, you can run the program that would initially result in a window with a bunch of drive letters and other key buttons.
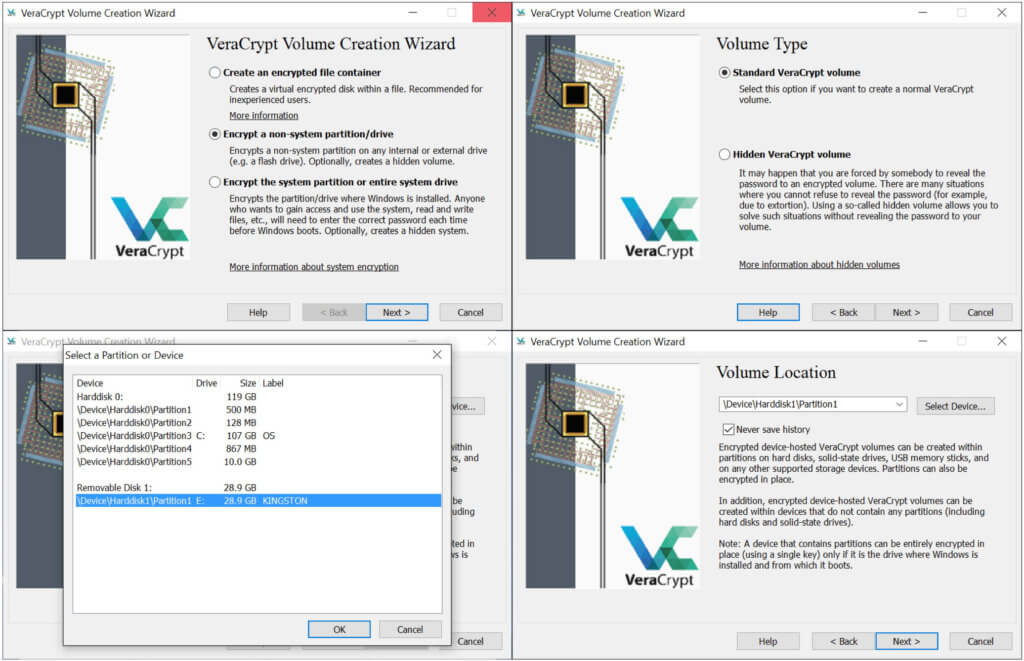
- Click on Create Volume, and it directs you to the volume creation wizard. And of all the options given, choose Encrypt a non-system partition/drive that would encrypt the entire USB flash drive, and click on Next.
- Now select the volume type you’d like to continue with. If you have the normal data which you want to password protect then choose Standard VetaCrypt volume. Or if you are working with classified or confidential data, in that case, go for Hidden VetaCrypt volume that would create a second encrypted volume inside the first encrypted volume.
- So, if you have chosen the second option, on the next screen, click on “Normal mode.”
- After that, select the removable device on the volume location window by clicking on the Select Drive option and tap OK.
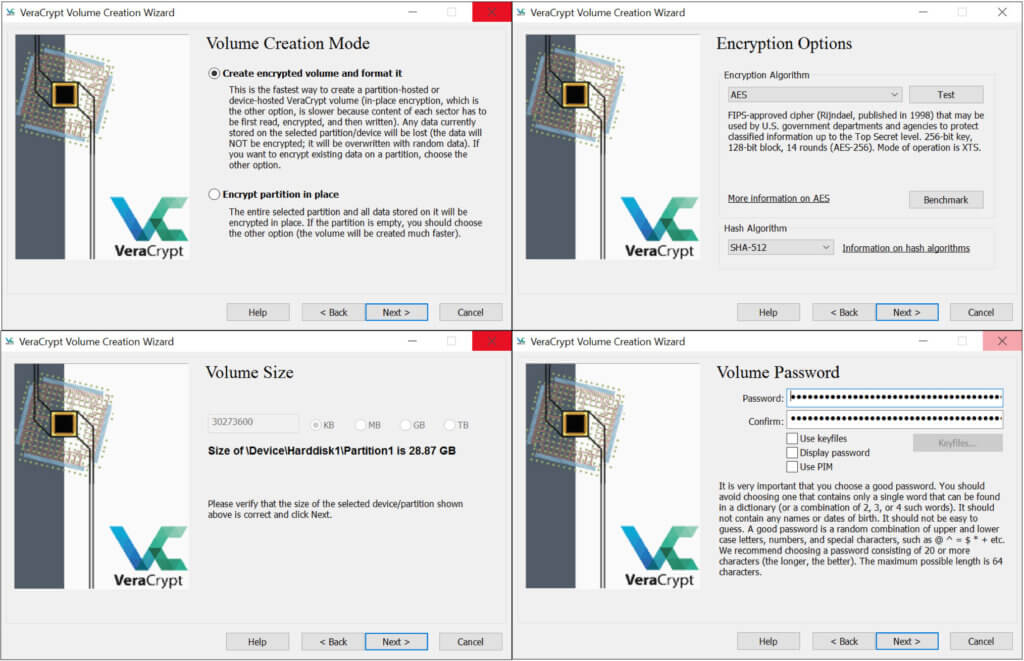
- Now you have to set the details for the outer volume encryption; you will be asked to choose the “Encryption algorithm” and “Hash algorithm.” If you aren’t aware of the mentioned terms, you should leave them as it is by default and click on Next.
- Type in the password you want to set for accessing the outer volume of encryption and hit the Next button.
- Select Yes or No, depending on whether or not you want to store files larger than 4GB on the drive. Although VeraCrypt recommends not to do so, if you are in strict need, just do the needful.
- On next screen, you’d be needed to choose the file format. Advisably, you should leave it as default and click on Format button. This may take you a while and once completed you’ll be needed to copy some data to it. It’s mandatory to fill the outer volume with fake data so that it won’t look suspicious.
- Now it’s time to set up the hidden volume. You can start that by choosing the type of encryption you want to proceed with. And next, you have to specify the size of the hidden volume you are going to create. The size you should go for would solely depend on how much data you are going to store on that hidden volume. Choose it and tap on Next.
- At last, provide a strong password and then click on Format option to complete setting up the encryption for the drive.
Also Read: Important steps to delete your data before selling your phone
Wait for a few seconds, and when you see the wizard displaying the way to access the hidden volume of the encrypted USB flash drive, that means you have finally finished the process. Or if you don’t understand it, you can refer to the steps mentioned below:
- Launch VeraCrpty and choose the drive letter from the list.
- Click on Select Device and choose the removable disk partition and tap on Mount button.
- Now, whatever’s volume (outer or hidden) password you enter that would be mounted to the new drive letter.
That’s all to this guide, and I hope you have got the way you can implement yourself for encrypting the data on your USB flash drive.
Frequently Asked Questions
Hardware-based encryption uses a dedicated processor that is physically located on the encrypted drive instead of the computer’s processor. This encryption processor also often contains a random number of generators to generate an encryption key, which the user’s password will unlock.
Software encryption relies on a password; when you give the right password, your files will be decrypted. Otherwise, they remain locked. With encryption enabled, it is passed through a special algorithm that scrambles your data as it is written to disk. The same software then unscrambles data as it is read from the disk for an authenticated user.
Hardware-encrypted flash drives come with a small chip that handles the encryption and are configured with two logical volumes: a small, hidden one and a larger one where your data goes. This is similar to hidden drive partitions on laptop drives for software recovery.
USB flash drives are rewritable and removable high reach capacity flash memory. A goal of flash technology has been to reduce the cost-per-bit and increase chip capacity, with the end goal of flash memory rivalling traditional hard disk drives.
BitLocker is a full volume encryption feature included with Microsoft Windows versions starting with Windows Vista. It is designed to protect data by providing encryption for entire volumes.
1. Create a virtual encrypted disk (volume) which you can mount and use just like a real disk
2. Encrypt an entire partition or storage device
3. Create a partition or storage drive containing an entire operating system
An encryption key is a random string of bits created for scrambling and unscrambling data. Encryption keys are designed with algorithms intended to ensure that every key is unpredictable and unique.
Decrypting a drive is simple. Right-click on the drive icon and choose Manage BitLocker and then tap on Turn off BitLocker among the given links.
There are many tools available in the market; however, a very few are known that comes close to the reliability and flawless performance. Out of all as per my knowledge and extensive research at the time VeraCrypt is one of them which stands out to be the best software for data encryption.