The number of simultaneous RDP connections that can be operated on Windows is restricted by the license, which won’t let you create a terminal RDP server based on the workstation usable by multiple individuals. For those in need of a terminal server, buying a Windows Server license, RDS CALs, and installing and configuring the Remote Desktop Session Host (RDSH) role is their best bet.
In this article, we have outlined the best practices for enabling multiple remote desktop connections. We have mentioned a few easy steps to enable the RDP multiple users option on Windows 11. Without further ado, let’s dig right in!
Note: The article is meant solely for educational purposes, and we take no liability for the risks involved or damages caused as a result of the below-mentioned steps.
Can You Activate Multiple Remote Desktop Connections in Windows 11?
In normal conditions, Windows 10 and Windows 11 will allow you to establish only 1 Remote Desktop Connection (RDP sessions) on a computer by default. As for multiple RDP sessions simultaneously, it can only be done on a Windows Server OS. Windows 10 and 11 have a few restrictions on the Remote Desktop Service usage, like:
- Remotely connect only to higher Windows editions such as Professional and Enterprise via RDP. Windows Home or Single Language editions are not equipped to receive incoming remote desktop connections.
- Only 1 simultaneous RDP connection is supported at a time, and if you try opening a second RDP session, you will be prompted to close the connection.
- If you work on the local computer console, the current session must be disconnected before creating a new remote RDP connection.
- The remote RDP session will be forcibly disconnected if you try to log in locally.
If a different Windows user attempts to connect when a Remote Desktop Connection is already established, the new user gets an error message which says:
Another user is signed in. If you continue, they’ll be disconnected. Do you want to sign in any way?
4 Ways to Enable RDP Multiple Sessions
Below we have laid out the 4 different ways to enable multiple remote desktop connections on Windows 11. Admittedly, the steps might look a little daunting at first, but you will get acclimatized to them before you know it. Here’s how to enable RDP multiple sessions:
1. Use RDP Wrapper Library
‘RDP Wrapper Library’ is an open-source GitHub project that serves as a layer between Remote Desktop Services and Service Control Manager (SCM), allowing users to establish multiple simultaneous RDP sessions on Windows 10 and 11. It also helps build an RDP server on Windows Home editions without modifying the ‘termsrv.dll’ file.
‘RDP Wrapper Library’ loads the termsrv library with only the modified parameters required for simultaneous connection. Even if the termsrv.dll file gets updated by Windows or during monthly cumulative update installations, it will work. Make sure you use the original unpatched termsrv.dll file before installing ‘RDP Wrapper Library.’
Here’s how to do it:
- Download RDP Wrapper Library.
- Extract the contents of the zip file.
- Right-click on “install.bat” and select ‘Run as administrator’ from the menu to install RDPWrap.
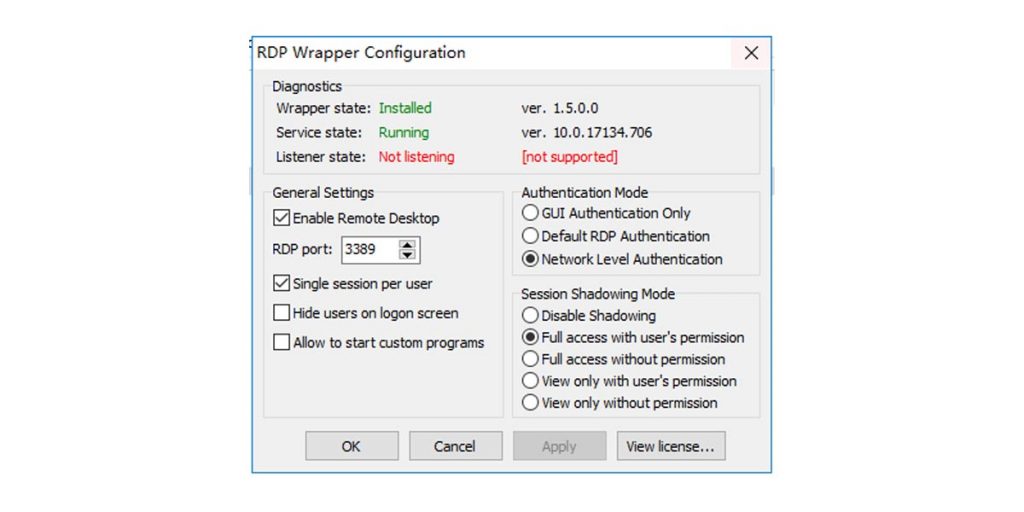
- Double-click on ‘RDPConfig.exe’ to open RDP Wrapper Configuration and verify the installation is done properly. Ensure all green flags are in the Diagnostics section.
After installing, you will most likely see that the RDP wrapper is running (Installed, Running, Listening) but not working. You might see the red warning stating “not supported” due to Windows 10 (ver. 10.0.19041.1320).
- Download the rdpwrap.ini file’s current version.
- Copy and paste this page’s contents to the C:\Program Files\RDP Wrapper\rdpwrap.ini file.
- Restart Windows.
- Double-click on ‘RDPConfig.exe’ to open ‘RDP Wrapper Configuration.’ Verify if all items are green in the Diagnostics section.
- Double-click on ‘RDPCheck.exe’ to prompt a secondary RDP session or connect multiple RDP sessions from your remote computers.
2. Modify termsrv.dll Using HEX Editor
Modifying termsrv.dll is yet another effective method of enabling multiple remote desktop connections on Windows 11. The steps are not half as complicated as they look. Follow through with each step, and you should be good to go.
Here’s how to go about it:
- Open Command Prompt to create a backup copy of the termsrv.dll file before editing or replacing it. Enter the following prompt: copy c:\Windows\System32\termsrv.dll termsrv.dll_backup
- To change the owner of a file from ‘TrustedInstaller’ to the local administrators group, execute the following: takeown /F c:\Windows\System32\termsrv.dll /A
- Upon successful completion, you will see this message: SUCCESS: The file (or folder): c:\Windows\System32\termsrv.dll now owned by the administrators group

- To grant the local administrators group with Full Control permissions for the termsrv.dll file using the icacls.exe, execute this: icacls c:\Windows\System32\termsrv.dll /grant Administrators:F
- Once the operation is completed successfully, you will see the following message: processed file: c:\Windows\System32\termsrv.dll Successfully processed 1 files; Failed processing 0 files.
- Stop Remote Desktop Services (TermService) with the services.msc console. Alternatively, execute the following command: Net stop TermService
- To find out the Windows version and build number, open PowerShell and execute the following command: Get-ComputerInfo | select WindowsProductName, WindowsVersion
- Download and install any of the following HEX editor software: HxD – Freeware Hex Editor and Disk Editor/ Tiny Hexer installer/ Tiny Hexer Small Portable Edition v1.8.1.6
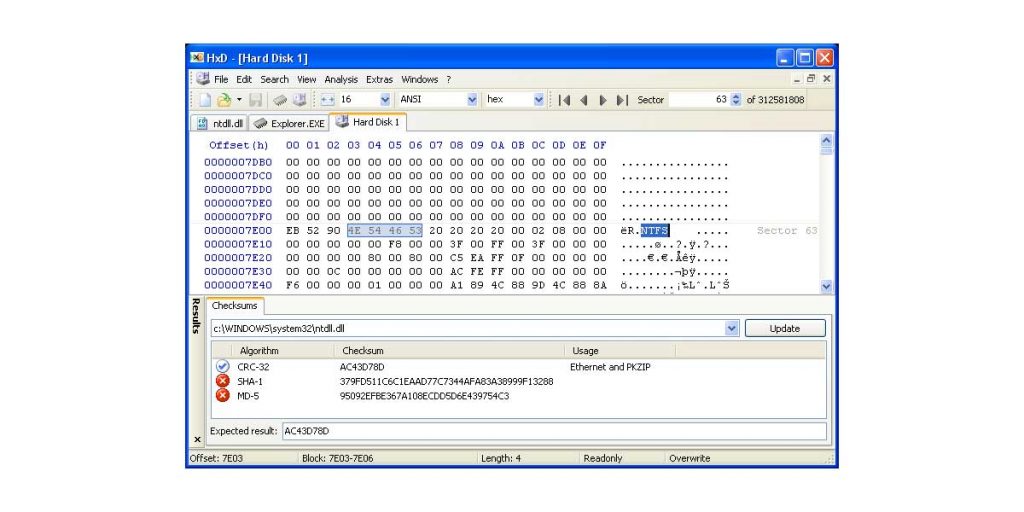
- Open the ‘termsrv.dll’ file with HEX editor. Tiny Hexer editor cannot directly edit ‘termsvr.dll’ files from the system32 folder, so you must copy it to your desktop and, following modification, replace the original file.
- Depending on your Windows version and build, locate this string to modify:
Windows 11 RTM (21H2 – 22000.258): 39 81 3C 06 00 00 0F 84 4F 68 01 00/ Windows 10 x64 21H2: 39 81 3C 06 00 00 0F 84 DB 61 01 00/ Windows 10 x64 21H1: 39 81 3C 06 00 00 0F 84 2B 5F 01 00/ Windows 10 x64 20H2: 39 81 3C 06 00 00 0F 84 21 68 01 00/ Windows 10 x64 2004: 39 81 3C 06 00 00 0F 84 D9 51 01 00/ Windows 10 x64 1909: 39 81 3C 06 00 00 0F 84 5D 61 01 00/ Windows 10 x64 1903: 39 81 3C 06 00 00 0F 84 5D 61 01 00/ Windows 10 x64 1809: 39 81 3C 06 00 00 0F 84 3B 2B 01 00/ Windows 10 x64 1803: 8B 99 3C 06 00 00 8B B9 38 06 00 00/ Windows 10 x64 1709: 39 81 3C 06 00 00 0F 84 B1 7D 02 00
- Replace it with the following string:
39 81 3C 06 00 00 0F 84 7F 2C 01 00
- Save the file, and execute TermService.
3. Patch termsrv.dll With PowerShell Script
This is a lengthy albeit helpful process. We have outlined the necessary steps. Make sure you follow them intently to avoid miscalculations. Here’s how to patch the termsrv.dll file with the help of PowerShell Script.
- Copy the following and paste it into a Notepad file:
# Stop RDP service, make a backup of the termsrv.dllfile and change the permissions
Stop-Service UmRdpService -Force
Stop-Service TermService -Force
$termsrv_dll_acl = Get-Acl c:\windows\system32\termsrv.dll
Copy-Item c:\windows\system32\termsrv.dll c:\windows\system32\termsrv.dll.copy
takeown /f c:\windows\system32\termsrv.dll
$new_termsrv_dll_owner = (Get-Acl c:\windows\system32\termsrv.dll).owner
cmd /c "icacls c:\windows\system32\termsrv.dll /Grant $($new_termsrv_dll_owner):F /C"
# search for a pattern in termsrv.dll file
$dll_as_bytes = Get-Content c:\windows\system32\termsrv.dll -Raw -Encoding byte
$dll_as_text = $dll_as_bytes.forEach('ToString', 'X2') -join '
$patternregex = ([regex]'39 81 3C 06 00 00(\s\S\S){6}')
$patch = 'B8 00 01 00 00 89 81 38 06 00 00 90'
$checkPattern=Select-String -Pattern $patternregex -InputObject $dll_as_text
If ($checkPattern -ne $null) {
$dll_as_text_replaced = $dll_as_text -replace $patternregex, $patch
}
Elseif (Select-String -Pattern $patch -InputObject $dll_as_text) {
Write-Output 'The termsrv.dll file is already patch, exitting'
Exit
}
else {
Write-Output “Pattern not found”
}
# patching termsrv.dll
[byte[]] $dll_as_bytes_replaced = -split $dll_as_text_replaced -replace '^', '0x'
Set-Content c:\windows\system32\termsrv.dll.patched -Encoding Byte -Value $dll_as_bytes_replaced
# comparing two files
fc.exe /b c:\windows\system32\termsrv.dll.patched c:\windows\system32\termsrv.dll
# replacing the original termsrv.dll file
Copy-Item c:\windows\system32\termsrv.dll.patched c:\windows\system32\termsrv.dll -Force
Set-Acl c:\windows\system32\termsrv.dll $termsrv_dll_acl
Start-Service UmRdpService
Start-Service TermService
- Save the file with the extension .ps1 like termsrv_rdp_patch.ps1
- To change the PowerShell execution policy settings for the present session, execute the following PowerShell command: Set-ExecutionPolicy Bypass -Scope Process -Force
- Double-click on ‘termsrv_rdp_patch.ps1’ to execute the script. You will need to edit the termsrv.dll file manually every time you upgrade to Windows or during monthly cumulative updates.
4. Modify the Local Group Policies
This is the last one on the list and a rather simple one at that. For this, make sure you follow each step carefully and without skipping any in between. This one is comparatively simpler than the rest, and it should be a breeze.
Here’s how to do it:
- Press the Windows key.
- Type gpedit.msc and press Enter to open the Local Group Policy Editor panel.
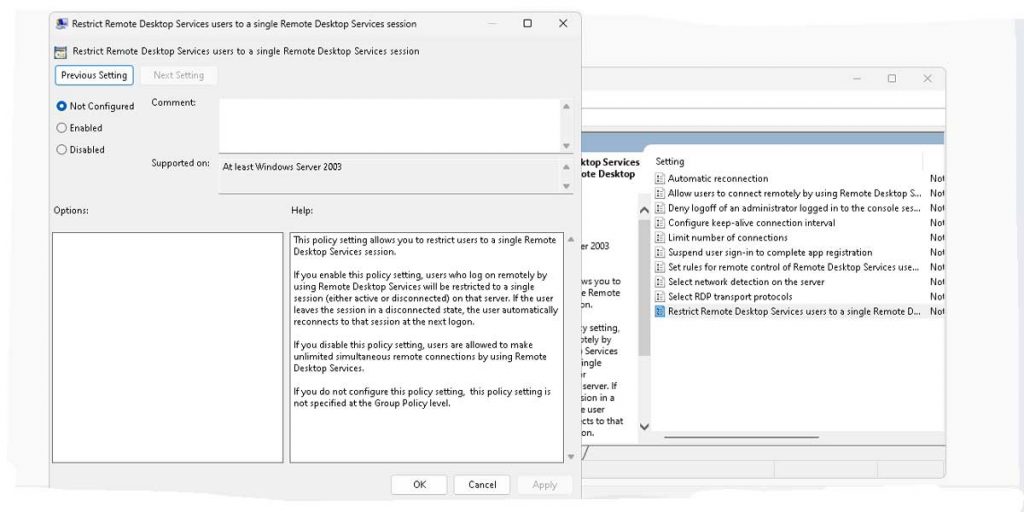
- Navigate to Computer Configuration > Administrative Templates > Windows Components > Remote Desktop Services > Remote Desktop Session Host > Connections.
- Double-click on the ‘Restrict Remote Desktop Services’ user and alter it to a single ‘Remote Desktop Services’ session policy and set it to Disabled.
- Double click on the ‘Limit number of connections’ policy. The default state should be ‘Not Configured.’ Select ‘Enabled radio’ to enable the counter menu of ‘RD Maximum Connections’ permitted in the ‘Options’ section.
- Set the ‘RD Maximum Connections’ permitted to 999999.
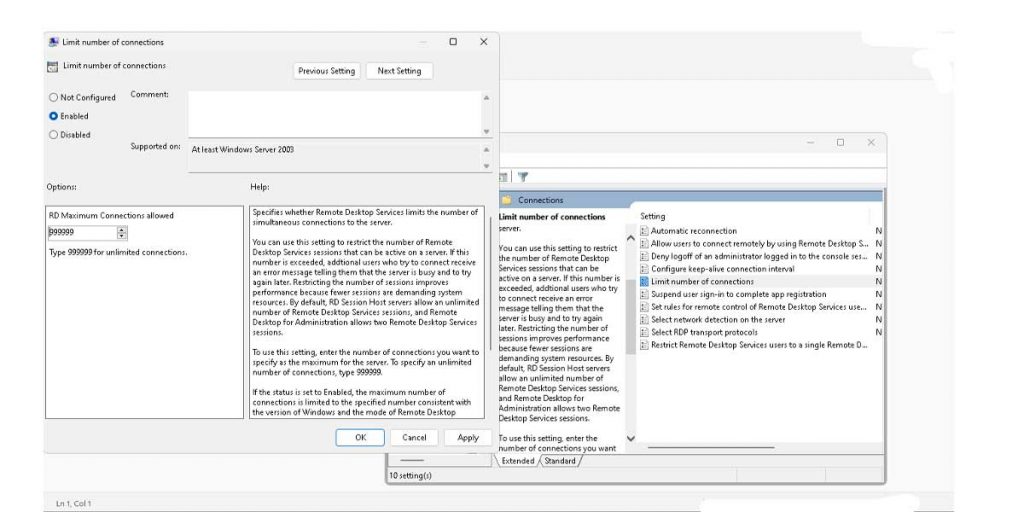
- Click on OK to apply the changes.
- Restart Windows.
Conclusion
That’s all there is to know about enabling multiple remote desktop connections on your Windows 11. These are the most commonly tried and tested set of methods to achieve RDP multiple sessions access, so make sure you go by trial and error to see which one pans out well in your case. Good luck!