Steam has been at the forefront of the gaming community’s evolution. Be it providing employment opportunities to avid gamers in the form of live streaming their games, for offering a platform for game purchases at the click of a button, Steam has broadened the horizon of the gaming world, and connected gamers across the world with its services.
So, when numerous such gamers complain of Steam not opening on Windows 11, it becomes a concern. In this article, we shall try to understand the underlying causes behind Steam not loading in Windows 11, followed by the best fixes for it. With that, let’s dig right in.
Why Won’t Steam Open on Windows 11?
While we cannot pinpoint the exact underlying issue that causes Steam to not open, we can always shortlist the most commonly observed ones. This will provide you with an idea of what could be going awry, in turn helping you get to the right fix. Here are some of the reasons why Steam games won’t launch Windows 11:
- If you leave the Steam app running in the background for long periods of time, while being engaged elsewhere, it could effectively cause Steam to crash or lag when you get back to it. So, if you are not using Steam, make sure you close it properly, before moving on to your next task at hand.
- If your system has been kept on for upwards of a day, or worse, a week, you could be facing difficulty launching many apps, including Steam. It is always recommended to turn off your system when not in use, so as to avoid accumulating too many background processes.
- If you have been using an older version of Steam which might contain bugs, you could be facing problems trying to launch Steam. Always update the app to stay on top of patches and bug fixes. Check for updates manually from time to time.
- Oftentimes if your time and date settings are not synced, it could cause issues with the launch of numerous apps, one of which is Steam. So, if Steam isn’t opening on Windows 11, try to check if your region, date, and time are properly synced.
- A third party application could be interrupting the smooth functioning of the Steam app. Uninstall third party apps that can overlap with Steam, and you should be taking care of the problem automatically.
- Steam is a rapidly evolving app, so it is only natural for it to have downtimes when all fixes and repairs are performed by the development team. Always check Steam’s server status to see if any repairing is going on currently. This can cause unexpected glitches and malfunctions.
- Blocked or worse, corrupt files often lead to the app not opening smoothly. Check the integrity of all the system files that are required to run Steam without a hitch. Run a scan and see if any file is corrupted.
- You could be running an outdated version of the Windows OS. This often leads to the lack of proper functioning of apps. Always make sure you check for updates manually, and stay on top of any patches available.
While it is hard to pinpoint the issue that is causing Steam to not open on your system, any one of the aforementioned ones could be the culprit. Now as for how to fix the issue of Steam not loading in Windows 11, read on for potential ways to resolve it.
8 Ways to Fix Steam Not Loading in Windows 11
Before you get to the more detailed fixes, it is essential that you check off the following boxes first: restart the Steam app by ending it from Task Manager, restart the system, run Steam as admin, unplug all peripherals one after the other to see if any one is causing the issue, turn off overclocking, turn on Windows Game Mode from Settings, uninstall or disable your antivirus temporarily, and check your internet connectivity.
If none of these work, here are 8 ways to fix Steam not opening on Windows 11:
1. Clear Steam Cache and Data
After prolonged use, your system accumulates cache and data from Steam to boost performance right from startup. While caches always serve a good purpose, an overloaded cache often causes issues such as Steam not starting in Windows 11. The good part is that you can simply delete all Steam, cache and consider it fixed.
Here’s how to do that:
- Press Windows + R to launch the Run window.
- Type “Steam://flushconfig” and hit Enter.
- Restart the Steam app, and re-enter your login credentials.
2. Update Windows 11 and Steam
An outdated Steam app or even an OS which hasn’t been kept up to date can cause issues such as Steam not launching on Windows 11. It is always best to check for updates manually, so as to never miss an update if the automatic notifications are not shown for whatsoever reason. Once again, it’s extremely easy to update both the app and your OS, and should take a few minutes only.
To update Steam, simply check for Steam client updates, and see if you have the latest version or whether any update is available. To update Windows 11, follow these steps:
- Go to Settings.
- Scroll down to Windows Update at the bottom of the left pane.
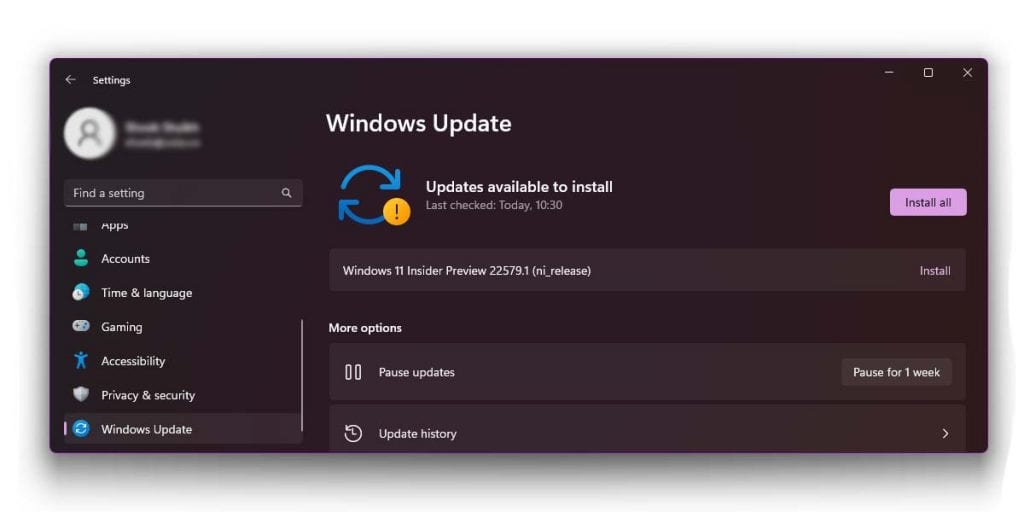
- Click on it to view if any updates are pending.
3. Reinstall Steam
If Steam isn’t opening on Windows 11, sometimes the best way out is to simply reinstall the Steam app from scratch. Your current downloaded version might be harboring malwares or bugs that a simple reinstall might be able to fix. Reinstalling a fresh copy of Steam takes but a few minutes only, and it is more often than not, quite effective.
Here’s how to reinstall Steam:
- Open the Control Panel and go to Programs.
- Go to Steam, click on Uninstall, and wait for it to be uninstalled.
- Once finished, navigate to the official Steam download page, and download the app.
- Finish the installation process.
If you are scared of losing valuable game files, simply delete everything in the previous Steam folder barring the Steam.exe file, Steamapps, and user data. Now, click on Steam.exe to install a new copy with the same user data to avert games being uninstalled. You can also install SteamOS with a bootable USB drive.
4. Update Date and Time Settings
As discussed before, incorrect date and time settings often lead to Steam not opening on Windows 11. Steam collects real-time information from your computer to run it smoothly as per your geographical location. So, any disturbance in the date and time can mess with the app’s functionality.
To fix the issue, follow these steps:
- Open Settings.
- Go to Time & Language.
- In the Date & Time section, turn the Set Time and the Set Time Zone to automatic.
- Restart the system.
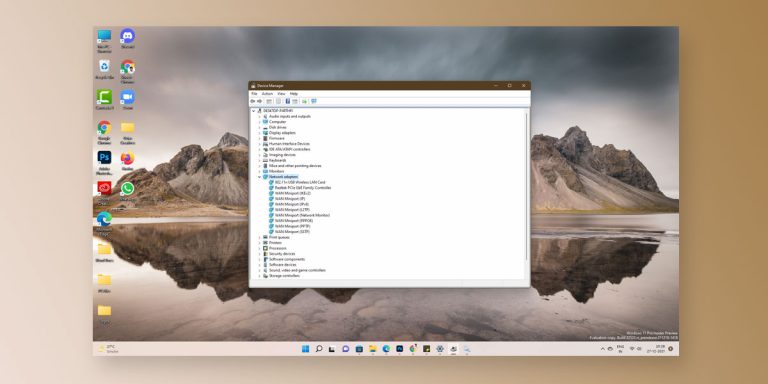
5. Update Drivers
Oftentimes you will find Steam not starting in Windows 11 solely because your graphics card drivers need the latest updates. Outdated drivers will always lead to problems, no matter which program we speak about. The way to update your drivers is quite easy, and takes but a few minutes.
Here are the steps to update your system’s drivers:
- Click on Windows + X, and select Device Manager.
- Open Display Adapters to view all the graphics drivers presently installed on your system.
- Launch the Device tab, and tab on Update Driver.
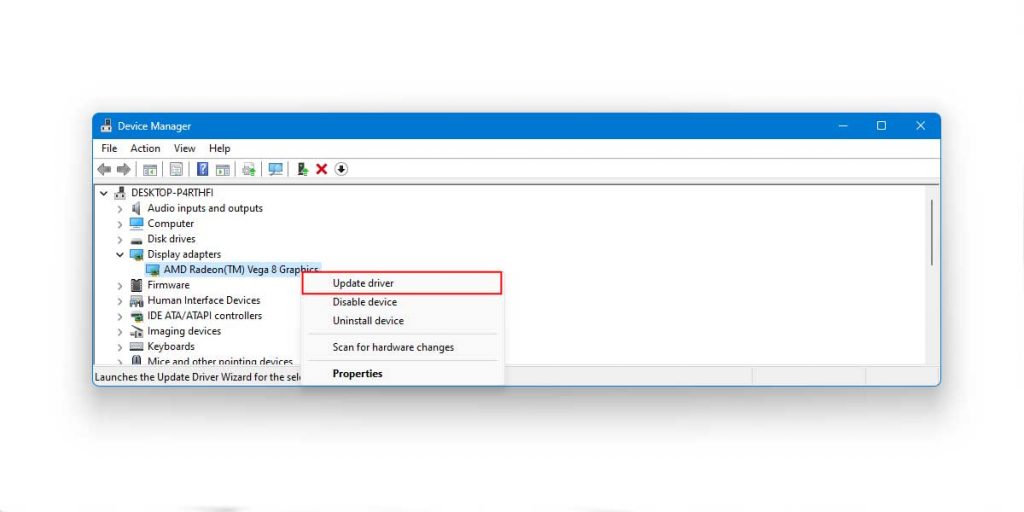
- Restart the system.
6. Alter Steam File Extension
If you are trying to run Steam without the proper extension, it will inevitably run into a myriad of errors. So, the reason Steam isn’t opening on Windows 11 could just be that. The good news is that you can change the extension in a jiffy, and with that you will potentially fix the issue altogether.
Here’s how to change the extension of the Steam file:
- Navigate to the location where Steam stores the files by right clicking the Steam icon and choosing ‘Open file location’.
- Find the “Clientregistry.blob” file, and promptly rename its extension to “ClientRegistry.old.blob”.
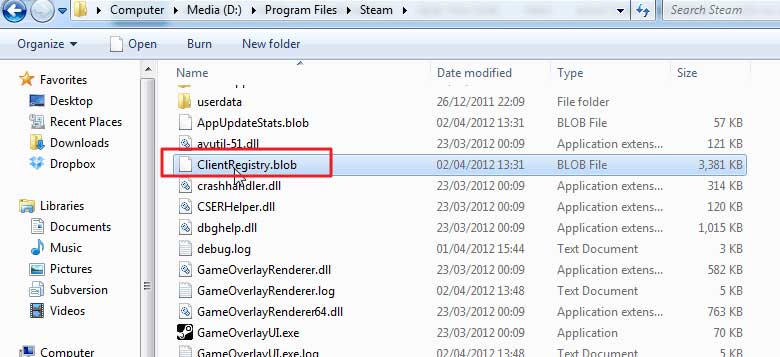
- Restart the system, and relaunch Steam.
7. Perform A Clean Boot
Upon startup, your system starts running numerous background processes together. These processes often interfere with the proper functioning of the Steam app. Be it due to a corruption error or even a glitch of some sort, performing a clean boot can solve the issue in a few minutes.
Here’s how to perform a clean boot:
- Press on Windows + R to open Run.
- Enter “msconfig” and select OK.
- Locate Services, and go to “Hide all Microsoft services”.
- Click on “Disable all”.
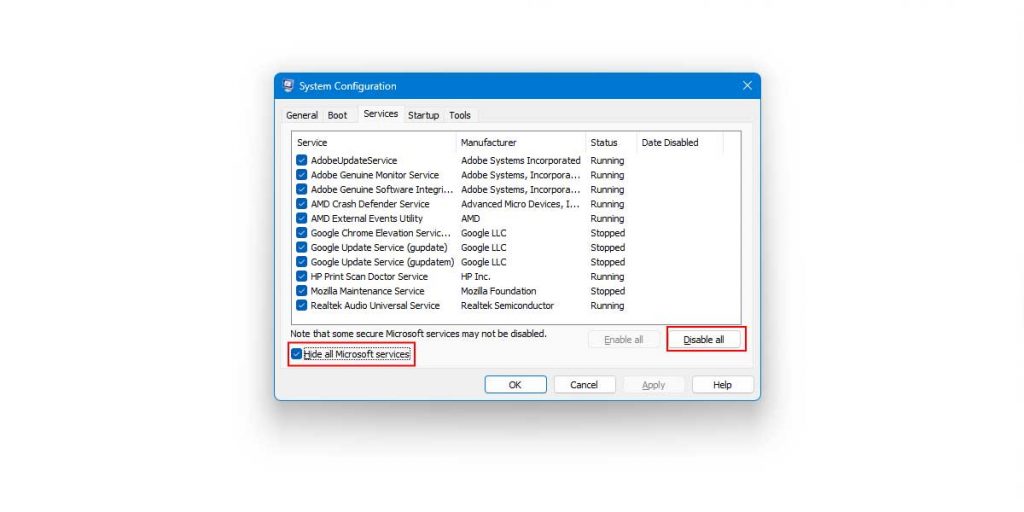
- Now, go to Startup, and open the Task Manager.
- Right-click on items, and select Disabled.
- Close the Task Manager, and click on OK.
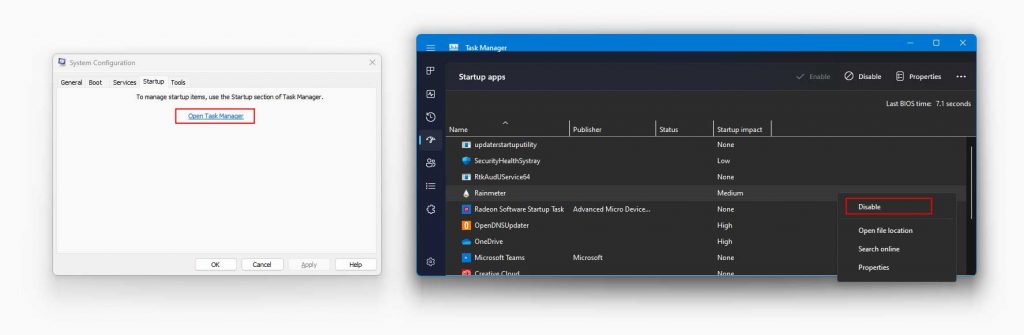
- Restart your system.
8. Run an SFC Scan
If nothing else seems to work, it’s best to let your system detect the issue and take care of it. This can be achieved with a SFC scan. An SFC scan will troubleshoot your system for possible errors, and show you a detailed report of any error present, along with the recommended fix. Simply choose to go for the said fix, and your system will resolve the issue for you.
Here’s how to do that:
- Click on the Search tab and enter “CMD”.
- Select ‘Run as administrator’ by right-clicking on Command Prompt.
- Click on ‘Yes’ in the following pop up.
- Type ‘powercfg -h off’, and then hit Enter.
- Now, enter ‘sfc /scannow’. “Beginning system scan. This process will take some time” will be shown.

- Let the scan finish, and wait for it to show “Windows Resource Protection did not find any integrity violations”. If not, there are errors found by the scan. In such cases. Let your system fix it promptly.
- Restart the system.
Conclusion
These are some of the most tried and tested ways to fix the recurring issue of Steam not opening on Windows 11. Make sure you go through them all, one after the other, and have patience while at it. Trial and error is the best course of action to weed out technical issues such as this one. Hopefully, any one of the aforementioned fixes will resolve the issue for you promptly.
Good luck!