Finally, after saving up for months, you now have enough money to get those AirPods you always wanted. As a result, you shed out a great deal of money and go buy those headphones. And just as you expected, those AirPods start sounding great right from the minute you bought them. Days go by and you continue to enjoy a smooth experience with your AirPods.
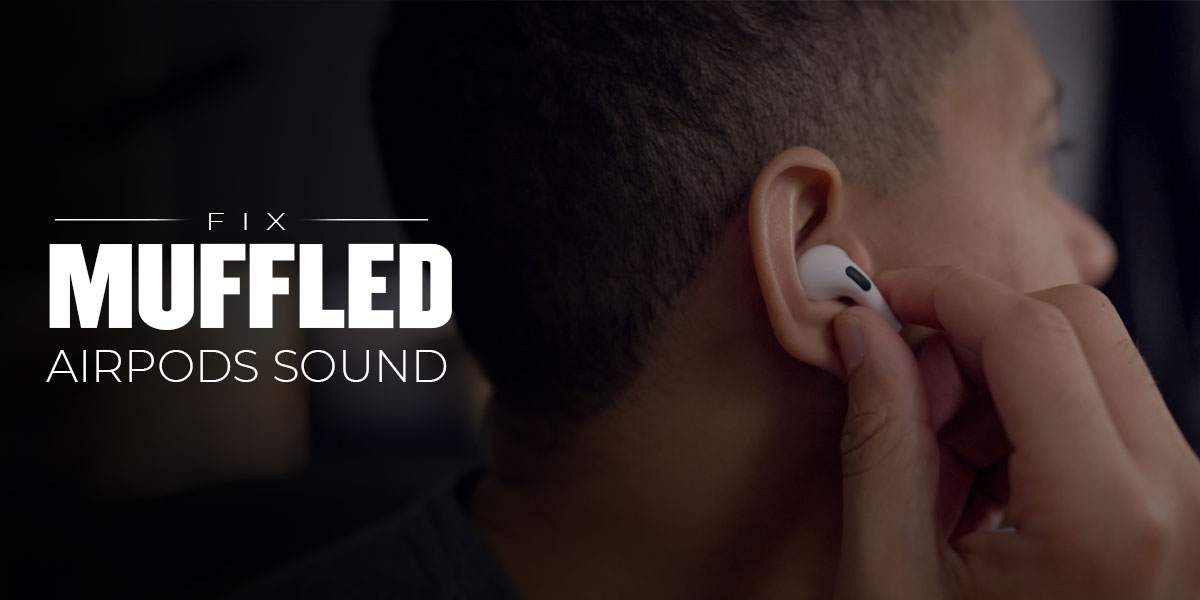
However, that experience is cut short when all of a sudden your Apple AirPods sound muffled. You realize that your highly expensive and extremely high-tech AirPods no longer produce the sound quality that is promised. AirPods have revolutionized the wireless industry. Following Apple, every major smartphone industry now has its own line of wireless Bluetooth headsets in the market. However, the majority of the users have complained that their Apple AirPods sound muffled.
Many users over the past few months have even reported that their AirPods Pro sound muffled. There could be various reasons why this may be happening. In this article, we will walk you through all the possible fixes to solve this issue. However, if your AirPods are connected & still do not produce any sound then follow our separate guide on AirPods Connected But No Sound.
Why do my AirPods Sound Muffled?
As we mentioned earlier, there could be several reasons why your AirPods sound muffled. However, the majority of the time the muffled sound could be the result of dust or lint getting accumulated in your AirPods and a simple cleaning would do it for you. For those who don’t know, Apple uses the 8-16 KHz SCO code throughout the Mac Ecosystem. At times, the AirPods’ AAC codec might be entangled with the SCO.
This could be one of the reasons why your AirPods are producing muffled sound. Bluetooth cannot support high-quality input and output streams simultaneously. So, if your AirPods are connected to your Mac, then that could also be why your AirPods sound muffled.
How to Fix Muffled AirPods Sound (iPhone)
There could be a lot of reasons why your AirPods sound muffled. Now that we have walked you through the probable causes of the same, it is time for you to know the solutions against it. Here, we have listed a few possible solutions that will tackle each cause individually.
Note: All the fixes mentioned below are arranged as per the severity of the problem. Hence, it is crucial that you tread serially. Also, if none of these fixes works out for you, kindly visit your nearest Apple store at once.
1. Ensure a Stable Bluetooth Connection
The majority of the time, we tend to forget that all wireless devices need a stable Bluetooth connection for efficient functioning. Great for short-distance transmission, Bluetooth is a great option for third-party applications and accessories such as your AirPods. While a stable Bluetooth connection will only provide you with the clearest of sounds, an unstable Bluetooth connection is why your AirPods sound muffled.
If you have an unstable Bluetooth connection, it may cause crackling or unclear sounds emerging out of your AirPods. In such cases, the problem lies with your Bluetooth altogether and NOT your AirPods.
2. Disable Nearby Bluetooth Devices
An unstable Bluetooth connection is likely the result of Bluetooth interference. Hence, we suggest that you all disable all your nearby devices. In the 21st century, right from our phones to our printers, everything runs on Bluetooth. However, if all the devices are connected via Bluetooth and are in close proximity, then we suggest you disable all nearby devices in order to prevent interferences of any sort.
3. Clean your AirPods
The majority of us tend to keep our AirPods inside our pockets when not in use. This can cause dust and lint to accumulate over your AirPods and your AirPods charging case. Here, you will need to thoroughly clean your AirPods to fix the issue.
Note: Always clean your AirPods case’s charging point using a CLEAN DRY cloth. Do NOT use metal or anything WET since it can break your charging point completely.
Here are some of the things that you need with you when cleaning your AirPods:
- Dry Microfiber Cloth (2 pieces)
- Q-Tip
- Spray Cleaner/ Rubber Alcohol
- Toothpicks
- Compressed Air Blower
Follow the given steps to clean your AirPods:
- Use a microfiber cloth to wipe down the complete exterior of your AirPods. This will make your AirPods free from loose particles if any.
- Dip a Q-tip on any screen cleaner and use it to clean the part of your AirPods from where the sound comes out.
- Next, use a toothpick to remove the softened buildup around the AirPods crevices.
- Again, use a microfiber cloth to take care of any residual particles.
- Finally, use compressed air to remove the dust particles that lie behind the grill.
- Set your AirPods aside on a clean table.
- Ensure that your AirPods are fully dry before you use them.
- Follow the same process to clean both the AirPods.
Also read: Fix: Apple AirPods & AirPods Pro Case not Charging
4. Reset your AirPods
At times, a quick reset can help tackle multiple issues simultaneously. Many users have reported that resetting their AirPods helped get rid of issues pertaining to sound quality, battery, and overall connectivity. To reset your AirPods, follow the given steps:
- Unpair your AirPods from your iPhone
- Press and hold the Setup button on your AirPods for roughly 15 seconds
- Notice the change in light
- The light will first turn white.
- Once it flashes amber for some time, it will turn to white once again
- This means that your AirPods have been successfully reset
Once you reset your AirPods, connect your AirPods to your respective device (iPhone, Mac, and so on). Play any sound to check whether your AirPods sound muffled.
5. Check your iOS device for Updates
If resetting your AirPods didn’t get the job done, then may you need to run an update. Having the latest updated version of any software or OS is important. Running an outdated version can keep you several app fixes and other features.
Every year, Apple tends to release a newer update to their existing OS. Your AirPods should always be kept updated as long as they are connected to an iOS device running the latest iOS.
So if you haven’t updated your iOS to the latest version, follow the given steps to do the same:
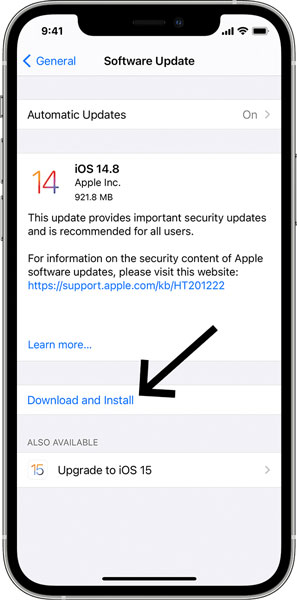
- Close all running applications
- Go to Settings > click on General
- Tap on Software Update
- You can click on any available update and click on Download and Install
- Enter your passcode and the click on Install Now
At times, it is highly likely that you haven’t received the latest iOS update. In such cases, it is advised that you contact your nearest Apple store for troubleshooting tips. If your AirPods sound muffled after you have updated your OS, we suggest you revert your update.
How to Fix Muffled AirPods Sound (MAC)
As we mentioned earlier in the article, one of the reasons why your AirPods sound muffled is when the codecs of your AirPods and your iPhone/MAC gets entangled. The AirPods tend to get stuck in the 16KHz codec due to the overall Mac sound ecosystem. In such cases, you will need to switch to the Mac’s default input system.
Switching the AirPods Microphone Input
This is a potential fix that can help fix your AirPods muffled sound. It is effortless to switch over to your MAC’s built-in Microphone input. You can implement any of the three methods mentioned below to do so:
1. Using Sound Settings on Mac
Sound Settings are available on every OS. To switch the AirPods microphone input using the Sound Settings, follow the given steps
- Open System Settings on your MAC
- Open the System Preferences app
- Go to Sound
- When in the Sound window, click on the Input tab at the top
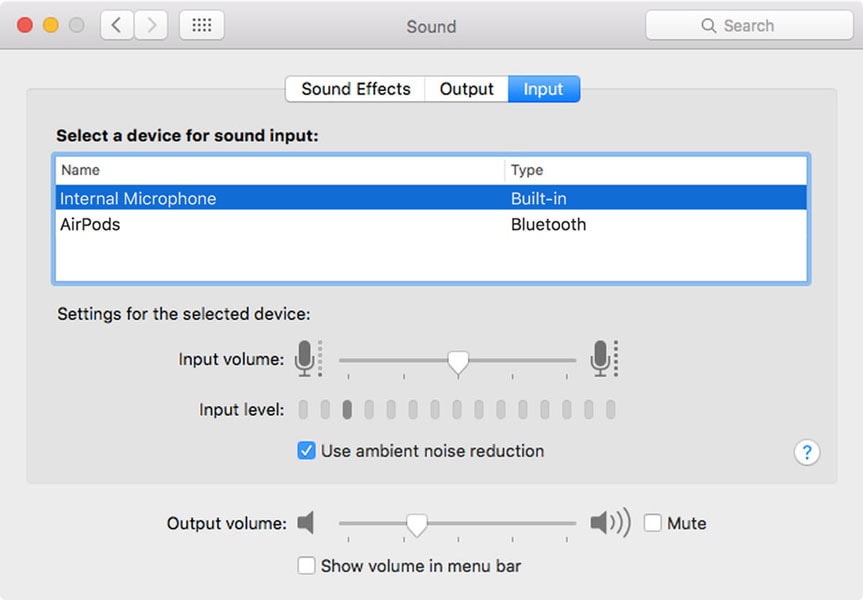
- Next, click on your Mac’s built-in microphone
- Wait for at least 10 seconds for your MAC to switch codecs
Once the codec has been changed, play any audio file using your AirPods to check if the AirPods sound muffled.
2. Using Bluetooth in the Menu Bar
For those who didn’t know, MAC has a Bluetooth located right at the menu bar that makes it easy to access the sound preferences app. To switch audio codecs using the Bluetooth in the menu bar, follow the given steps
- Click on the Bluetooth icon from the Menu bar
- From the drop down menu change the device from AirPods to Mac
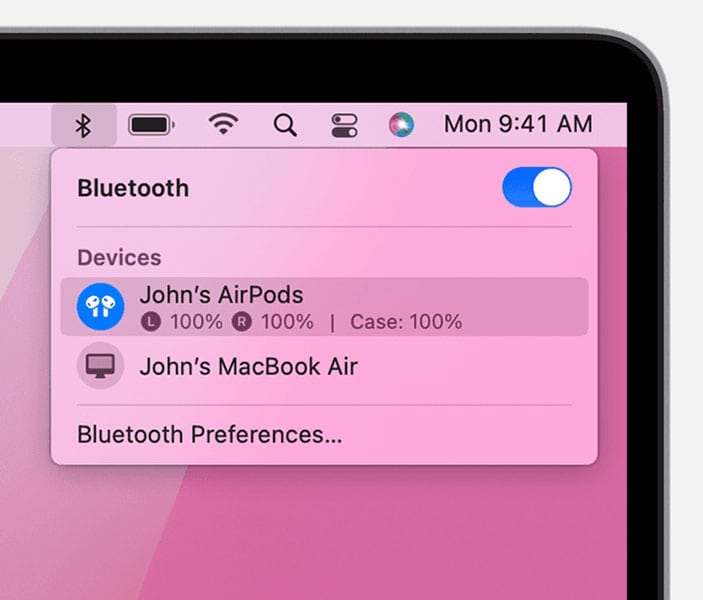
If it’s not visible to you then Go to System Settings > System Preferences app > Bluetooth
3. Using AirPods Sound Quality Fixer
As the name suggests, the Sound Quality Fixer is an in-built app that ultimately forces all the input settings to come into effect to correct any audio issues. To fix your AirPods muffled sound, follow the given steps
- Go to the Menu Bar
- Select Aipods Sound Quality Fixer
- Next, choose your MAC’s microphone as the forced input
- Wait for your MAC to shift codecs
Once this is done, the AirPods sound quality fixer will automatically force all these microphone input settings to come into effect the next time you encounter any audio issues
Conclusion
As we mentioned at the start of the article, there could be a lot of reasons why your AirPods sound muffled. However, the majority of the time it could be due to the dust and lint accumulated over your AirPods. Hence, a simple cleaning can make it work for you. But if none of the above-mentioned solutions has worked out for you, we suggest you visit your nearest Apple store at once and have your AirPods examined by an expert.