If you’re looking for a budget smartphone with a state of the art architecture, then Google Pixel 5 and 5a 5G smartphones are the ones to go for. Google’s brand new smartphone comes with a reasonable price tag and is a fully open-sourced software with an unlockable bootloader. What makes Pixel handsets stand out is the overall clean and stock OS experience. Also, the Pixel 5 and 5a 5G handsets have undergone several improvements in the camera department and major Android upgrades.
Google’s Pixel 5 series already comes equipped with some of the latest features. The kernel source code is already live. However, if you still want to make full use of your firmware and gain a greater degree of control of your device, you can always opt to root google pixel 5 & 5a 5G. Out of the numerous rooting software present out there, Magisk is the one to go for.
In this article, we will walk you through how to unlock bootloader, install TWRP & root google pixel 5 and 5a 5G using Magisk.
Rooting Google Pixel 5 and Pixel 5a 5G
For those who don’t know, there are a lot of benefits associated with rooting your device. You get access to the system partition that allows flashing a lot of mods. With Magisk, you are able to flash a custom kernel. But there are a lot of things you need to be mindful of when rooting. You will first need to unlock your bootloader in order to root Google Pixel 5 & 5a 5G. This will completely wipe out the data present on your phone.
In simple words, there are certain prerequisites you need to be mindful about. Here are the prerequisites you need to fulfil when you perform a Pixel 5 root and Pixel 5a 5G root.
Prerequisities
- A Pixel 5 or 5a 5G smartphone with 70% battery
- Magisk Installer
- Download and install Fastboot Files on your computer
- Download the TWRP Custom Recovery:
Note: Ensure that you back up all important data before you root your phone. Note that rooting will affect your Pixel smartphones. DevsJournal is NOT responsible for any damage to your phone while rooting.
1. Unlock Bootloader of Pixel 5 & 5a 5G
As we mentioned earlier, you will need to unlock the Pixel bootloader before you can perform the google pixel 5 root. But there are again a few things you need to take care of BEFORE you unlock the pixel bootloader. Unlocking your pixel bootloader will wipe out all data on your system. So, ensure that you have backed-up all your data on a portable hard drive
Now, you will first to enable the Pixel bootloader before you can unlock it. To do so,
- Open Settings
- Go to About
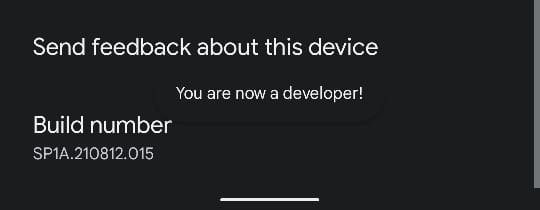
- Tap on the Build Number for 8 times rapidly
- This will now enable Developer Options on your Pixel smartphone . You will get this message – “You are a developer now”
- Return to Settings & Go to System
- Open Developer Options
- Now, find and enable the following on your Pixel smartphone OEM Unlocking & USB Debugging Mode.
You have now enabled your Pixel Bootloader. You can now proceed to unlock Pixel 5 bootloader.
Unlock your Pixel 5 Bootloader by following the given steps:
Note: Back up all your important data BEFORE you unlock Pixel 5 bootloader. If you want to flash custom ROMs, root, any more, you will need to unlock the bootloader.
- Switch off your Pixel 5 smartphone
- Press and hold Volume Down and Power buttons simultaneously
- You will now see the Fastboot/ Bootloader Mode on your screen
- Using the volume keys, navigate your way through and press the Power button to select
- Select the option which reads Restart Bootloader
- Connect your Pixel smartphone to your computer with the help of a USB cable
- Locate the folder where you have installed the Fastboot Files
- Type CMD in the address bar
- Type the following command
fastboot flashing unlock
- Press Enter to start the unlocking process
- Confirm the prompt on your screen using the Volume and power buttons
- Now, type the following command in CMD and execute
fastboot reboot
The bootloader of Pixel 5/ 5a 5G is now unlocked.
2. Install TWRP on Pixel 5 & 5a 5G
The TWRP is a community developed open sourced project that lets you install custom firmware on your Android when flashed. In addition to all that, it lets you take a full Nandroid backup and restore it later. Some other features that the TWRP lets you access are one-click root, one-click file flashing, bloatware removal, wipe clean cache, overlocking, underclocking, and many more.
- Download the TWRP for Pixel 5/ 5a 5G
- Ensure that your phone has atleast 70% battery
- Using the steps given above, boot into bootloader mode on your Pixel 5 smartphone
- When the bootloader mode is enabled, connect your mobile to your PC using a USB cable
- Move all the downloaded TWRP files into the Fastboot folder on your system
- Rename the Bootloader file as twrp.img (Mandatory)
- Now, Open CMD in the Fastboot folder
- Type in the following command
fastboot boot twrp.img
- Now, type in the following command and execute it
fastboot reboot
- Now, press and hold Volume Down + Power Button simultaneously
- Your device will now enter the custom recovery mode
- When in custom recovery mode, the TWRP will automatically patch the stock ROM
3. Root Pixel Pixel 5 & 5a 5G using Magisk
Before you proceed to root pixel 5a and root pixel 5a 5G, you will need to install the Magisk on your phone. You can download it from the prerequisite.
Once you have downloaded and installed Magisk manager on your Pixel 5/5a 5G, follow the steps given to proceed with the installation
- Install the Magisk Manager using the above link
- Transfer the Magisk Manager file to the internal memory of your smartphone
- Now, using the steps given above, boot your phone into Recovery mode
- Click on Install
- Locate and open Magisk File to confirm the installation
- This will commence the flashing process
- Once the installation is finished, reboot your Pixel smartphone.
Conclusion
You have now successfully performed the Google Pixel 5 root and have also flashed the TWRP. Now, you can customise your phone through your preference. Once you have downloaded Magisk on your phone, you can update it anytime using the Magisk manager application. Also, you can install another version of your firmware using Magisk. With Magisk installed on your phone, you can now enjoy all the benefits that come with it.
This doesn’t work at all! OEM Bootloader is completely locked out on Verizon phone.
That was possibly the best tut I’ve read in a long time. It’s precise, clear, concise without rambling on about a certain thing! Thank you for this tutorial!
Appreciate your efforts for the instructions of rooting Pixel 5.
There is a slight correction needed in Step 3.3. Step 3.3 currently reads, ‘Now, using the steps given above, boot your phone into bootloader mode’.
It should read, ‘Now, using the steps given above, boot your phone into RECOVERY MODE’. I capitalized what needs to be corrected. There is no ‘Install Menu’ in Bootloader Mode, however, there is a ‘Install’ button in the recovery mode.
I’ve made the changes. Thanks