For most smartphone users out there, the camera is a highly important factor to consider before getting a new phone. Unfortunately, there are very few smartphones out there that can be considered to have a great camera. One such offering from Google is the Google Pixel 3 and Pixel 3 XL smartphones. These smartphones are known to offer an excellent camera along with great software experience.
Since Google makes it, you get a complete stock Android experience. In fact, this phone also gets regular Android updates and will keep getting them for a long time. Although, the stock experience offered by a Google Pixel 3 series smartphone might be a bit bland for some users.
A lot of Google Pixel users wish for more customisation options that are missing. If you also want to have more customisations in your Google Pixel 3, then rooting it can be a great idea. Therefore, we are here to show you how to root Pixel 3 and unlock Pixel bootloader on your device. You can learn more about rooting Pixel 3 and Pixel 3 XL by going through this article until the end.
How to Root Google Pixel 3 & Pixel 3 XL using Magisk

When compared with most other Android smartphones out there, you can easily root the Pixel 3 XL. This is due to two major reasons; the first reason is that Google has not put any restrictions on this phone that might prevent you from rooting Pixel 3. Instead, the whole process required to root Google Pixel 3 is quite easy to follow.
Additionally, since the Google Pixel 3 lineup of smartphones is so popular, you can find all of the files and tools required to unlock the bootloader and TWRP for rooting it.
While there are methods to root your phone without a PC, it is advised to use a computer to successfully root Pixel 3 XL. Even if you are new to rooting Android smartphones, this guide will allow you to easily achieve Pixel 3 root access on your device since we have divided this guide into 3 parts.
Prerequisites
Before we begin the rooting process, there are a few other steps that need to be completed. These steps are essential to the rooting process and need to be done before you begin rooting your phone.
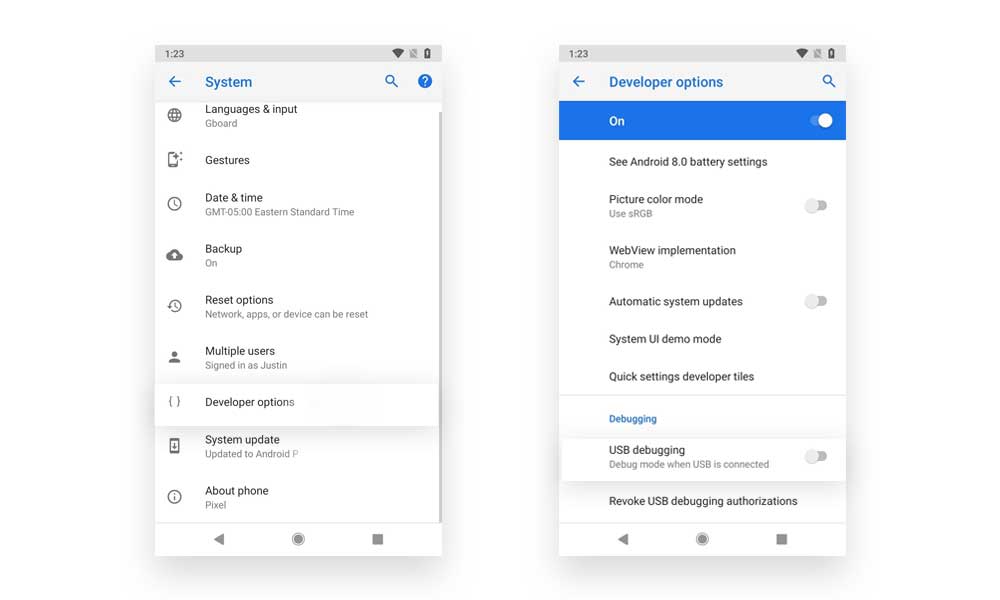
The first step required to root Google Pixel 3 XL is to unlock its bootloader. This will allow you to flash or install things like a custom recovery on your device. If you install a custom recovery like the TWRP pixel 3, you can use it to either install custom ROMs on your device or root your phone using Magisk. To unlock the bootloader, you have to enable bootloader unlocking as shown here:
Step 1. Open the Settings app your Pixel smartphone and head over to the About by scrolling down to the bottom.
Step 2. Then, tap on the Build Number for 8 times rapidly to enable Developer Options. Once done, you will see the “You are a developer now” message.
Step 3. Now, go back and open the Developer Options menu in the Settings app of your device.

Step 4. Here, find and enable USB Debugging Mode, OEM Unlocking, and the Advanced Reboot options on your phone.
Step 5. Once these are enabled, you can unlock your phone’s bootloader without any issues.
If you are familiar with rooting Android devices using a computer, then you must know that you need a lot of files and tools. This is also true for Pixel bootloader unlock since you have to download and install Fastboot files on your computer.
Other than the fastboot files, there are a couple of other files that will need to be downloaded as well. You will need to download the TWRP custom recovery. This recovery allows you to install custom files and MODs on your smartphone, including Magisk. In other words, you can use it to install Magisk for rooting Google Pixel 3 and 3 XL with ease. You can download the files on your computer using the links provided below. Once your phone has been rooted, you can transfer these files to your phone.
● TWRP for Google Pixel 3: Download
● TWRP for Google Pixel 3XL: Download
Once these files have been downloaded, you are ready to root the Pixel 3 using your computer. We recommend backing up all your data as you will lose all the data stored on your phone during the process.
1. Unlock Pixel Bootloader
The first step that you have to carry out for rooting Google Pixel 3 is to unlock Pixel Bootloader. Once you have an unlocked bootloader on your Pixel, you can easily flash and install different sorts of files on your device. This can be useful in replacing the Pixel 3 recovery mode using a custom recovery like TWRP. Follow the steps below to unlock the bootloader of your Google Pixel 3.
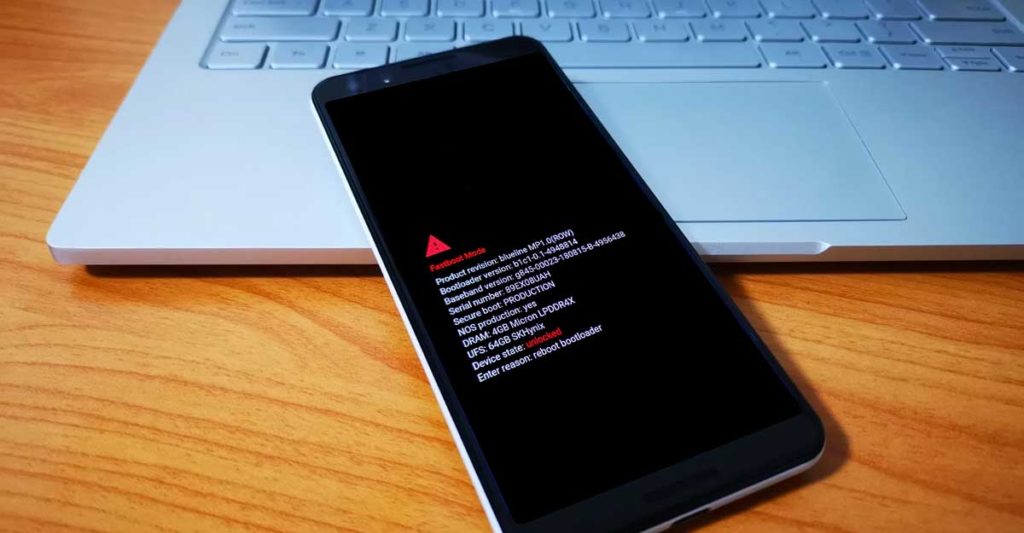
Step 1. First, switch off your Google Pixel 3 and then hold down the Volume Down and Power Key at the same time until you see the fastboot mode or bootloader mode on the screen.

Step 2. Then, use the volume keys to navigate and press the power button then select the Restart Bootloader option in here.
Step 3. After that, connect your Google Pixel 3 to your computer using a USB data cable.
Step 4. Now, go to the Fastboot folder created earlier with the installation of Fastboot files.
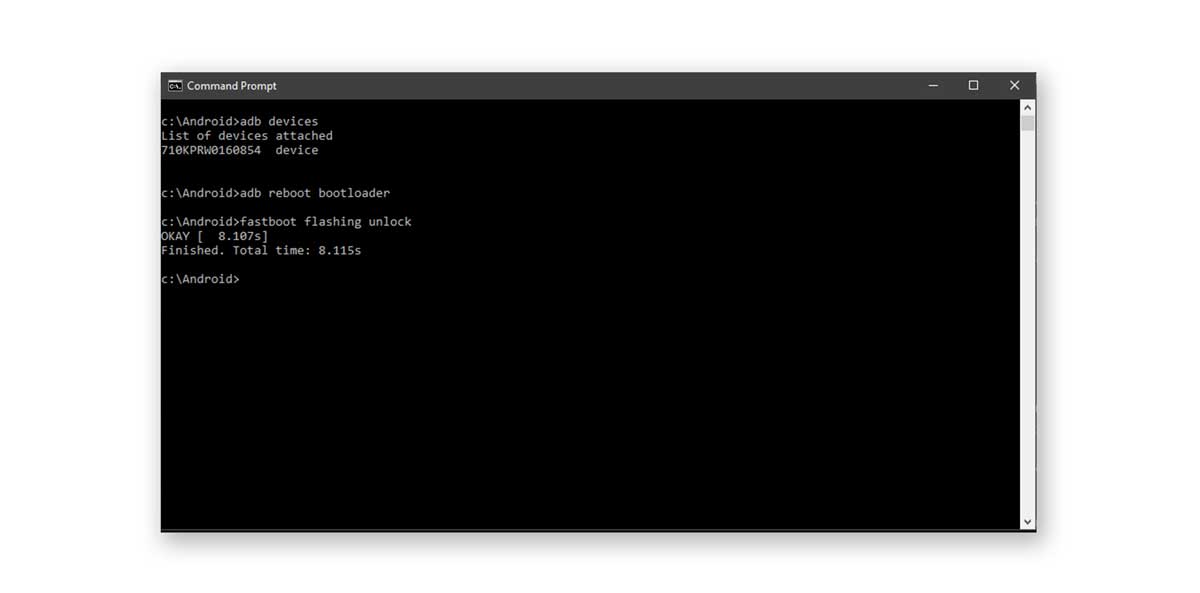
Step 5. In here, type CMD in the address bar and press enter to open Command Prompt.

Step 6. Once you are in the Command Prompt window, type fastboot flashing unlock to start the unlocking process.
Step 7. Then, confirm the prompt that you get on your device using volume keys and the power button.
Step 8. Come back to the Command Prompt window and type fastboot reboot that will successfully unlock the bootloader of your device.
2. Flash TWRP
Now that the bootloader of your Google Pixel 3 is unlocked, you can proceed ahead and install a custom recovery in it. A custom recovery will allow you to install Magisk in your phone to root Pixel 3 successfully.
While there are a lot of options, TWRP is considered to be one of the best. It is considered the best because of its features and the fact that you can permanently install it by flashing. You can directly boot into TWRP by following the steps below:
Step 1. As shown earlier in the bootloader unlock process, boot into the bootloader mode on your Google Pixel 3 using the volume keys and power button.
Step 2. Once you are in the bootloader mode, connect your device to your computer using a USB data cable.
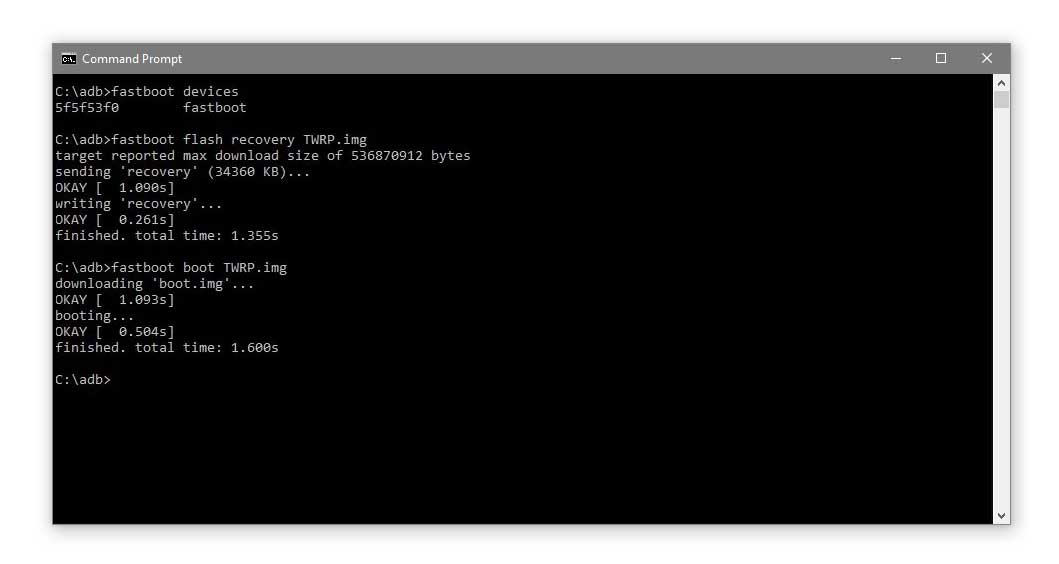
Step 3. Then, open the Command Prompt window in the fastboot folder, as shown previously.
Step 4. Inside the command prompt window, type fastboot boot twrp.img and press enter on your keyboard. Make sure that the TWRP file downloaded earlier is moved in the fastboot folder and has been renamed to twrp.img for this command to work successfully.

Step 5. After entering this command, your phone will go into TWRP mode where you can begin installing different files on your phone.
3. Download and Flash Magisk
There are a lot of methods for rooting an Android smartphone that mainly includes installing either SuperSU or installing Magisk on your device. But out of these two options, installing Magisk is the better option as it works better. Hence, if you also Pixel 3 XL root, simply install Magisk as shown in these instructions:
Step 1. Move the Magisk file from your computer to the internal storage of your phone.
Step 2. Now boot into TWRP via bootloader once again and head over to the Install menu.
Step 3. Here, find and open the Magisk file and confirm the installation.
Step 4. Once it is installed, simply reboot your Android device.
Conclusion
Even though the Google Pixel 3 is a great overall phone with excellent camera performance, some of you might be interested in getting more out of it. In such a case, rooting Pixel 3 can be a great option for many users out there. And thus, we have mentioned how to root Pixel 3 in this article, along with all of the required details.
All of these things should allow you to root your Google Pixel 3 successfully. That being said, if you still have any doubts regarding Pixel 3 rooting processing, make sure to leave your thoughts and questions in the comments section down below.