
LG took really long to officially allow the Bootloader Unlocking of their Flagship LG G6. But the unlock of Bootloader is available only for European G6 variants. Despite old processor, LG G6 is a good option with Bezelless and Large Aspect ratio 2:1 Display. Further, Rooting allows the modification of the kernel and Installation of Custom Roms.
Rooting provides not only more power but also a better battery. It allows you to remove Bloatware, install custom ROMs, flash different Mods, increase your device’s connection speed, & the list goes on and on once you start digging through the advantages. Follow our Guide to Unlock Bootloader, Flash TWRP and Root the LG G6.
Prerequisites
- European LG G6 H870(European variant) and LG USB drivers.
- Computer with ADB & Fastboot- Download here.
- Device IMEI, Go to the settings> About the phone or by dialling *#06#.
- LG developer account — sign up by clicking the “Start Unlocking the Bootloader” button at the bottom of the LG site CLICK HERE.
- TWRP Recovery (3.2.3-1) of LG G6
- DM-verify zip: Download
- Su zip (OR) magisk zip, for enabling root.
- Backup all the data on the Device or you will lose the data.
How to Root LG G6
Rooting LG G6 is pretty easy. The rooting procedure of LG G6 can be broken down into 3 steps, Unlocking the Bootloader, Installing TWRP Recovery & finally installing SuperSU to gain root access. Each new step relies on the previous step to have been completed.
How to Unlock Bootloader on LG G6
Step 1. To enable USB-Debugging, Go to Settings >> About phone >> Software info and tap Build number for 7-8 times. Now Return to the previous screen, select Developer Options and enable USB-Debugging.
Step 2. Allow OEM unlock on your device. Go to Settings >> Developer options >> Enable OEM Unlock.
Step 3. Navigate to the ADB installation folder, Right click the mouse while simultaneously pressing the shift key. Then select Open Command Prompt Here and enter the following ADB command to reboot into the bootloader
adb reboot bootloader
Alternatively, by powering off the phone then power the phone on while holding Volume UP (remove the USB cable otherwise it may boot into LG Download Mode)
Step 4. Next, use the following fastboot command to obtain Device ID:
fastboot oem device-id
Result: Fastboot command will return a string in two lines. This code is your Device ID which is needed to generate the unique unlock key for your Device.
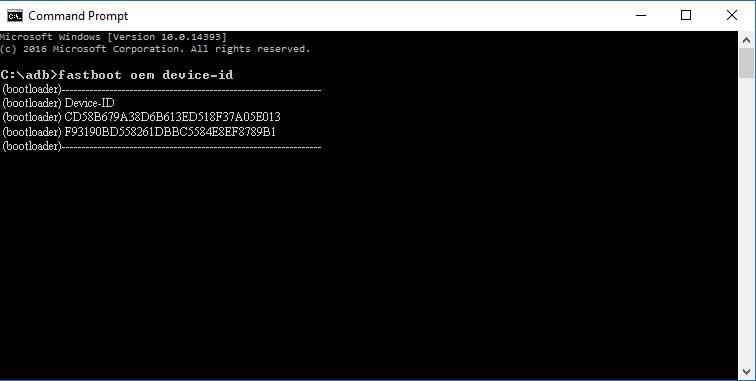
Example :
Code:
$ fastboot oem device-id
(bootloader)—————————————————————–
(bootloader) Device-ID
(bootloader) CD58B679A38D6B613ED518F37A05E013
(bootloader) F93190BD558261DBBC5584E8EF8789B1
(bootloader)—————————————————————–
Step 5. To generate your unlock key, you have to paste the two lines of output into one continuous string without “(bootloader)” and spaces.
For above example, the Device ID would be:
CD58B679A38D6B613ED518F37A05E013F93190BD558261DBBC 5584E8EF8789B1
Step 6. Copy Device ID and IMEI into the LG Developers Bootloader Unlock site. Then unlock.bin will be emailed to you. Download unlock.bin to the computer and place it in the Installation folder of ADB.

Step 7. Then, enter this command to unlock the bootloader
fastboot flash unlock unlock.bin
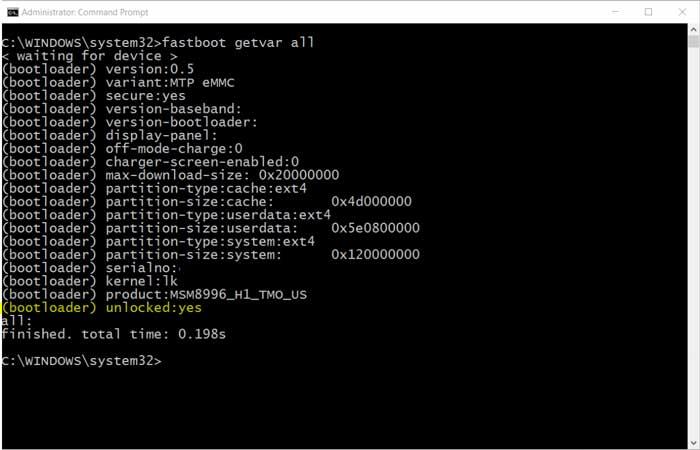
Step 8. To check if you have unlocked your device successfully, enter the below command:
fastboot getvar unlock
OR
fastboot getvar all
Step 9. You can now reboot the phone Entering the following command
fastboot reboot
How to install TWRP Recovery in LG G6
Step 1. You need to download the TWRP H870 image and Rename it to “twrp.img”
(Currently, there is no official TWRP for the H870 , we will update once official image is available)
Step 2. Enter to Bootloader menu using key combinations stated above also move the downloaded image to the installation folder of ADB.
Step 3. To Flash TWRP, enter the command
fastboot flash recovery twrp.img
Step 4. After flashing TWRP disconnect the USB cable. Then boot into recovery which should boot into TWRP. Enter the below command to boot into recovery.
fastboot reboot recovery
Step 5. Allow the modifications Now Go to>>wipe and Format all data by typing Ye
To keep TWRP recovery permanently in your device, you must 1st boot into TWRP and not boot back into Android until after doing one of the following
- If you are not likely to root the device, then flash the latest “no-verity-opt-encrypt.zip” from the TWRP.
- Flashing SuperSU/Magisk and obtaining root.
- For transfer of the zip files, use one of the methods below:
- MTP: Connect your phone to the computer and just copy the zips to the internal storage of the device.
- External SD: Copy the Zips to an external SD and insert the sd card into the phone.
Steps to Flash Dm-verity-Encrypt Zip, using TWRP
Step 1: Tap on Install on TWRP and Locate the Dm-verity zip file.
Step 2: Confirm the Flashing of the zip file and reboot into recovery.
How to root LG G6
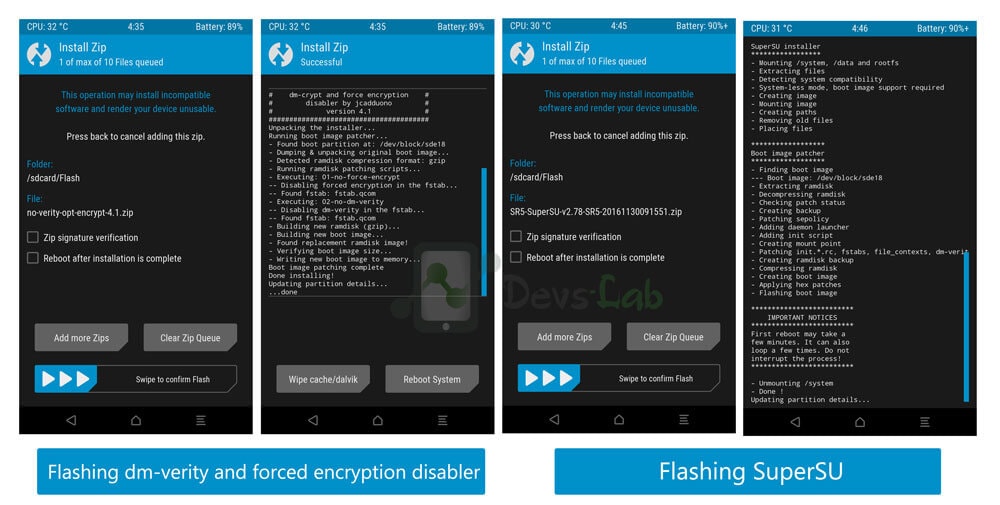
Step 1. Download SuperSU & latest dm-verity zip file from the Prerequisites section.
Step 2. Boot your device into TWRP Recovery mode.
Step 3. In TWRP, Tap the Install and locate the zip file in the device storage or sd card.
Step 4. Go to Install in recovery mode & Flash the dm-verity-opt-encrypt zip.
Step 5. Now flash the SuperSU zip file from Recovery. Wait for the installation to complete & reboot your device.
Conclusion
That’s it. If you followed every step correctly, your device should be rooted by now and will work flawlessly with an increase in battery life, performance, and power. You can check the root permissions by using any app requiring root/ Root checker apps. Follow us for Device specific guides. For any queries/issues, please comment below.
FAQs
1. I have an LG G6, not a European H870. Can I follow this method?
Yes, you can follow the above method to root your LG G6. The only thing you have to keep in mind while rooting is that, you have to download the TWRP version according to your phone.
2. Does Unlocking Bootloader of LG G6 erase data?
Unlocking Bootloader of LG G6 does erase data, therefore it is recommended to backup your data before unlocking the bootloader.
3. How to root LG G6 US997?
To root LG G6 US997, you have to follow each and every step correctly as mentioned in the above article and download the LG G6 US997 TWRP Recovery file from the Prerequisites section.
4. Is Bootloader a Firmware?
Bootloader is a part of firmware that runs when your device is switched on. It is the first process thats starts when ypur phone is switched on.
5. How to root LG G6 H872?
Rooting procedure will be the same as of LG G6 H870 as mentioned in the above article, do follow each and every step correctly while rooting. Download the TWRP Recovery latest version (3.2.3-1) of LG G6 H872 from the Prerequisites section.
6. Why to root LG G6?
Rooting provides not only more power but also a better battery. It allows you to remove Bloatware, install custom ROMs, flash different Mods, increase your device’s connection speed, & the list goes on and on once you start digging through the advantages.
7. How to root LG G6 H870?
To root LG G6 H870, you have to follow each and every step correctly as mentioned in the above article and download the LG G6 H870 TWRP Recovery file from the Prerequisites section.
Android version? It will be present only on devices running Android 6.0 or above. For versions below that, you can skip that step.
Wrong thread.
How to enable OEM unlock option on Asus ZenPad 8.0? The OEM unlock option is not being displayed in the developer’s option. https://uploads.disquscdn.com/images/07ec109d1766d1640f39fba9dd7a9f4b999e1d2c5d1ae8df26dc4fffa4d490b0.jpg