Sony’s new Flagship smartphone, the Xperia XZ with SD820 & 3GB of RAM is a sweet deal with Sony’s premium built quality. Now as usual, rooting your smartphone can give you additional functionality and control over your device. If you don’t know what Rooting is then, here is a link to more information. Once, you have decided to root, you need to check some prerequisites.
DISCLAIMER: Your warranty will be void. Please proceed at your own risk.
Prerequisites
- Minimal ADB: Setup ADB and Fastboot
- Sony Xperia XZ USB Drivers: Download
- Charge your device upto 50% to avoid any shutdown during the process. We won’t be responsible if your device gets bricked during to no charge.
- Backup all your data, Apps, contacts & everything your need. Although this process won’t erase any data (except unlocking bootloader), we need to create a restore point in order to restore if anything goes wrong.
[toc]
How to Root Sony Xperia XZ
- Unlock Bootloader: Opens the door to System files of your device. This allows you to flash images onto the main system partitions of the phone.
- Install a Custom Recovery: A custom recovery is flashed onto the recovery partition of the device and overwrites the stock recovery that exists by default. Custom recoveries bring lots of functionality and allows you to perform wipes, install flashable zips, create full backups of your NAND (Nandroid backup), and various other features. An unlocked bootloader is needed to install a custom recovery.
- Install SuperSU zip: You can gain root by flashing SuperSU through a custom recovery. A custom recovery allows flashing the SuperSU files into the system files. You can unroot your Android device in just one click.
Unlocking bootloader can cause some deterioration in low light camera performance and loss of DRM keys. It will also factory reset your device and format your data. BACKUP your device first!
How to unlock Bootloader on Xperia XZ
The first step to rooting your device or flashing ROM is to unlock the bootloader. To prepare your device to be unlocked follow the following steps:
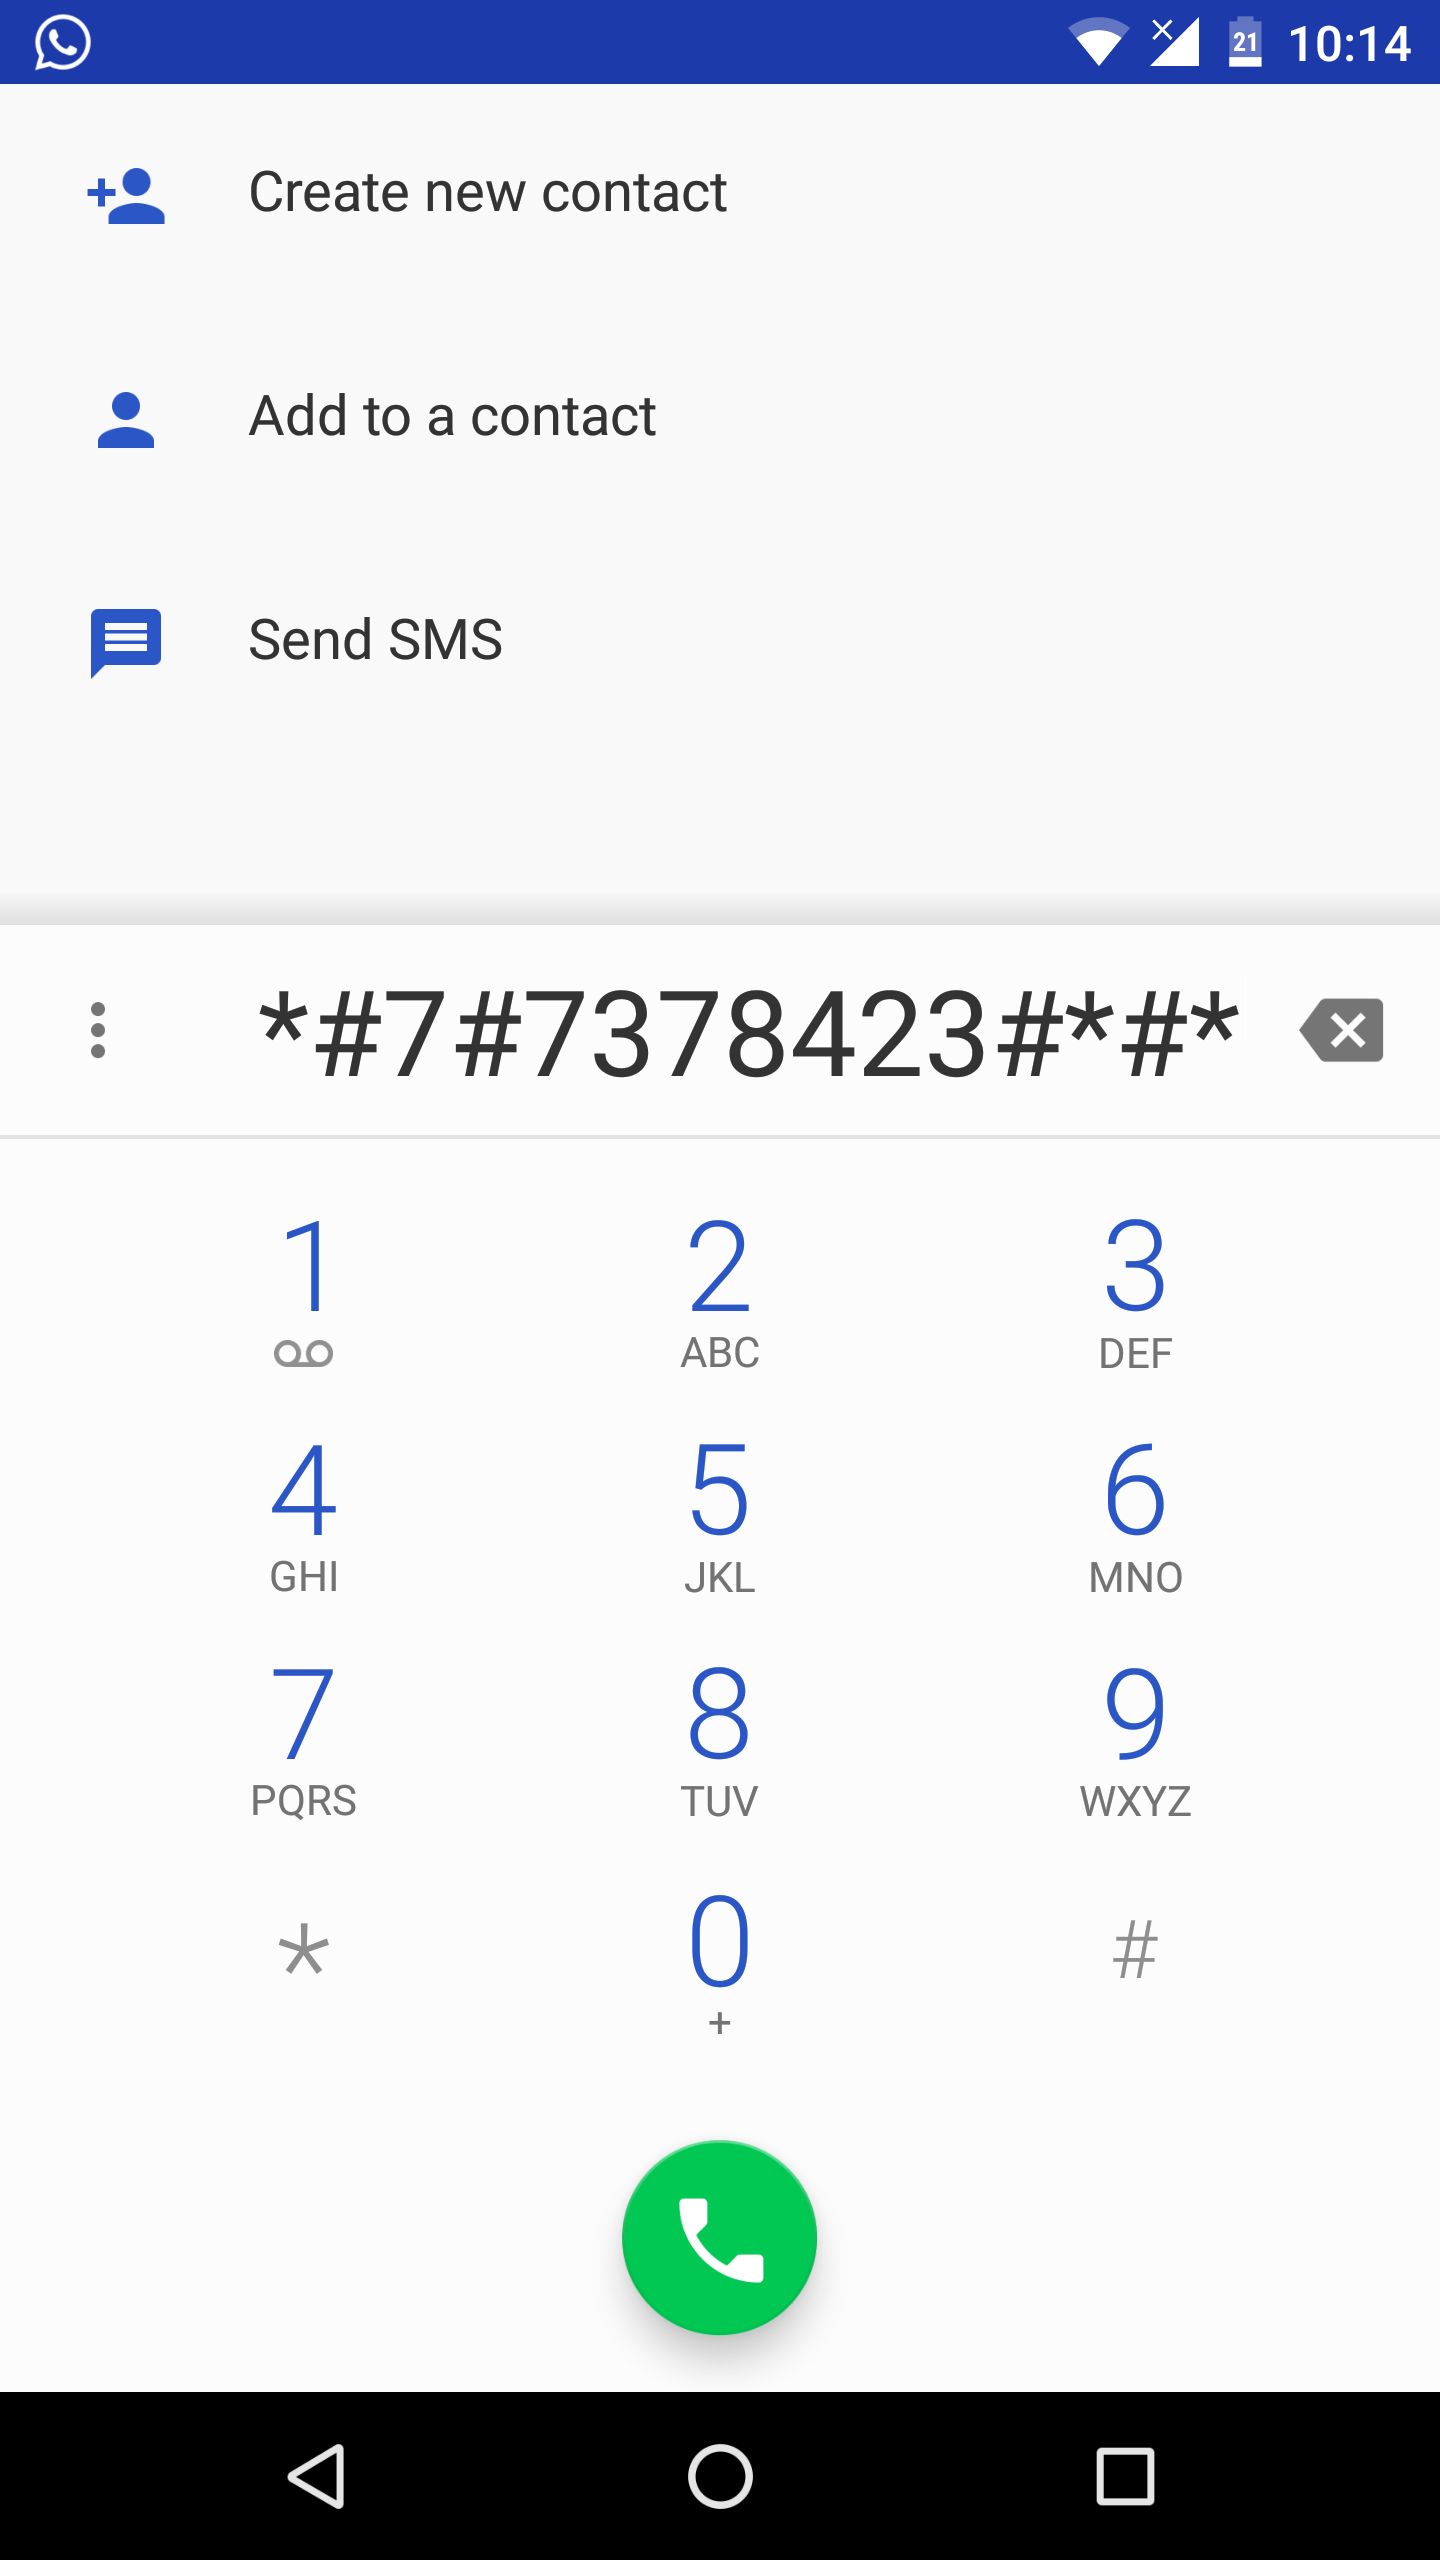
- Open your dialer.
- Dial *#*#7378423#*#*
- Click on Service info/Configuration.
- Check if “Bootloader Unlock” is yes under Rooting status. If not then your device can not be unlocked.
If you’re still here then let’s proceed. Before you unlock the bootloader BACKUP your media (photos, videos etc from internal storage) as this will wipe your data. You will also have to make a backup of your TRIM area partition. Follow the steps to do this :
- Check what android you are running on. Go to Settings -> About Phone -> Android Version. If you have 6.x.x then skip to step 6 but if you have 7.x.x then you have to downgrade to Marshmallow.
- Download FlashTool from its official website.
- Install the drivers for fastmode and for your device in the driver folder of the FlashTool.
- Click on XperiFirm and select Xperia XZ then F8831 or F8832. Click on “Check All” on the top right and choose 39.0.A.1.250 firmware. Just click on the fw name and download it. Close it after download, and close XperiFirm. FlashTool will now unpack the new firmware, wait for the end. Then click on Flash. Choose Flashmode options and select the downloaded firmware.
- Now put the phone into fastboot mode by turning it off and pressing VOLUME DOWN and plug the USB simultaneously. You will see a green LED. Wait untiil FlashTool says DONE. Reboot and now you are on Marshmallow.
- Download the “backup-TA.zip” : Link
- Enable USB Debugging by going into Settings -> About Phone -> tap build number until a pop up shows “You’re now a developer”. Locate Developer Options in your Settings and enable “USB Debugging.”
- Run backuipTA.sh if you are on Mac or BackupTA.cmd if you are on windows.
- Your partition will be saved as TA-ModelNumber-Serial-Timestamp.img. Keep it safe!
How to get Unlock Code for Sony Xperia XZ
Go to Sony Unlock and follow the steps below:
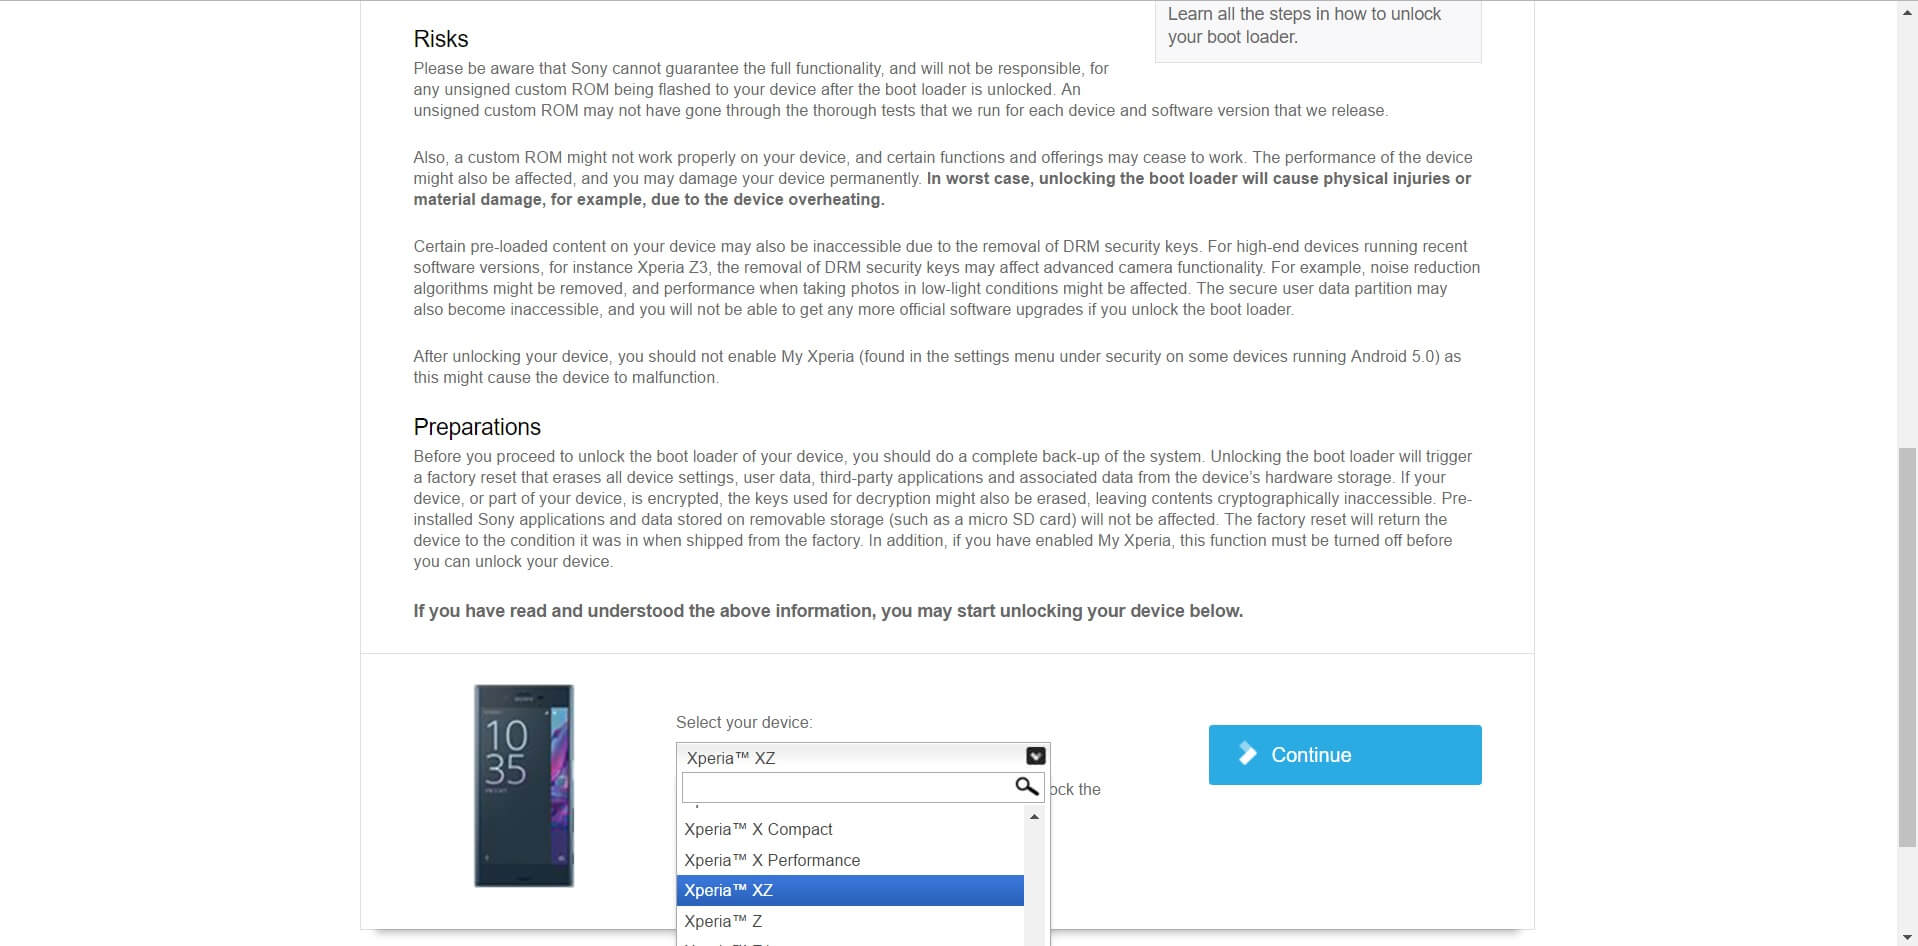
- Ensure that OEM Unlocking and USB Debugging is ON under Developer Options.
- Choose Xperia XZ at the bottom of the page.
- Enter your Email and you will receive a link in your mail. Follow the steps given by Sony.
- BE CAREFUL and, from now on, DON’T ENABLE the MyXperia. It could hard brick your phone.
Now your device is unlocked. We will noow go over some other fixes.
Flashing AndroPlus kernel to fix Battery issue
This kernel will help your device cope up with some battery issues and it also has some DRM Fixes. To install it, follow the steps :
- Download the kernel from here.
- Unzip the downloaded file and paste them into your fastboot directory.
- Now Boot into Bootloader mode by turning the device off and pressing VOLUME UP while plugging in the USB or use adb command – adb reboot bootloader
- Run the command prompt where your fastboot files are located. Do this by shift+right click and selecting Open command prompt here.
- Flash the kernel by the command – fastboot flash boot boot.img
- Reboot your device.
How to Flash TWRP in Sony Xperia XZ
This process will provide your device a custom recovery (TWRP) This can be used to flash root script, ROM and custom kernels at anytime without PC.
- Download TWRP image file.
- Paste it in your Fastboot directory and rename it as recovery.img.
- Flash the recovery by the command : fastboot flash recovery recovery.img
- Reboot your device into recovery. Press VOLUME DOWN and POWER.
How to Root Xperia XZ by SuperSU
Now to the final step. To root your device all you’ll need to do is flash the SuperSU via recovery or install the SuperSU from the play store.
- Download the flash image of SuperSU – Download
- Paste it in your device’s storage.
- Now Boot into recovery manually or via the command adb reboot recovery
- Now select install and navigate to the downloaded SuperSU image. Swipe to flash. Wait for it to complete.
- Reboot and check if you have SuperSU present in your apps.
Congratulations, now you are rooted!
Restore TA partition and Relock Bootloader
If you ever want to return to the stock or you want to return your device to service you will need to flash the stock and relock the bootloader.
- Backup all the data as your device will reset and formatted after this process.
- Rename your backed up TA partition and rename it TAbackup.img
- Boot into TWRP.
- Plug your device in your pc via USB and check the connection by the command adb devices in command prompt in your fastboot directory.
- Now run the command adb push TAbackup.img /data/local/tmp/TAbackup.img
- Then run adb shell dd if=/data/local/tmp/TAbackup.img of=/dev/block/bootdevice/by-name/TA
- Now flash Stock ROM via FlashTool and your device will have original DRM and stock ROM and Ta partition.
Congratulations! Now you have successfully rooted your device and learned how to return to stock and backup TA partition. Sony Xperia XZ is an amazing device and with root its capabilities increases even further. If you have any questions, post it in the comment section below.