Google Pixel and Pixel XL which comes with Android 7.1 Nougat, allows unlocking & rooting easily just like the Google Nexus devices. Although rooting Pixel smartphones isn’t much needed, but if you’re someone who loves to keep on experimenting & make the device as you wish; you can root your device. Root access for the Google Pixel and the Google Pixel XL is available by installing SuperSU which enables su access without touching anything in the system partition and allowing for dm-verity to be toggled.
Systemless Root for the Google Pixel and Pixel XL is very useful as it you can temporarily disable Root in your device if you face any app not working because of Root. Google has always supported Rooting & experimentation with Google devices hence keeping no fancy securities in bootloader unlocking process.
Prerequisites:
- A Windows PC
- Setup Minimal ADB and USB Drivers
- Pixel device charged upto 30% to avoid any shutdown during the flashing process.
- Make sure you backup your important stuffs like contacts & messages. You can perform a wireless backup by saving your data directly in your PC by using FlashFire tool.
How To Unlock Bootloader In Google Pixel And Pixel XL
Unlocking your bootloader allows you to install custom firmware, root your phone and install mods. Unlocking the bootloader of your phone does void the warranty of your phone, although some companies do allow it as long as the phone has not been permanently damaged.
Steps To Unlock Bootloader
Step 1. Enable USB debugging(Refer above) in your device and Connect your Pixel device to your computer.
Step 2. Download minimal ADB and launch ADB tool.
Step 3. To check if everything is working fine, type “adb devices” in the command window.
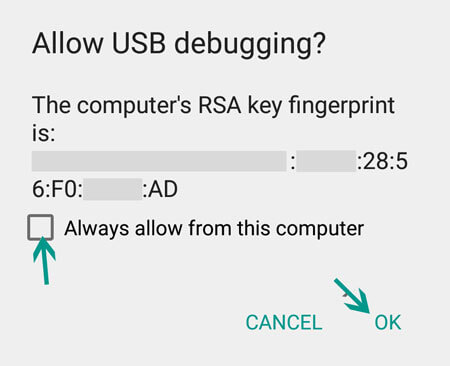
Step 4. You’ll see a popup in your device for confirmation. Click “OK”. You’ll see your device code in command window as shown above.
Step 5. To unlock your Pixel and Pixel XL bootloader, type “fastboot oem unlock”. You’ll see a warning message on your device, Press Yes.
Step 5. To unlock your Pixel and Pixel XL bootloader, type “fastboot oem unlock”. You’ll see a warning message on your device, Press Yes.
Step 6. You’re device will go through factory reset. You have finally unlocked Google Pixel.
Step 7. To reboot your device into System, type “fastboot reboot” or Press and hold power button until vibrate.
How To Install TWRP in Google Pixel & Pixel XL
TWRP gives you complete control over your device. You can use TWRP recovery to flash a custom ROMs, MOD apps and create and manage backups. You can install TWRP by two method, both these methods are mentioned below.
1. Install TWRP via TWRP Manager
TWRP Manager is a root application that will allow you to backup, restore and install your recovery. It is little bit easier than the ADB method.
Step 1. Download TWRP Manager app and install it in your device.
Step 2. Transfer the downloaded TWRP Recovery zip file in your Pixel device’s Internal memory.
Step 3. Launch the App and Tap on the button at the button, now click on “Install”.
Step 4. Click on “Select Zip” at the bottom & locate the TWRP zip file.
Step 5. After locating the file, click on Flash now! That’s it! you have successfully flashed TWRP recovery in Pixel device.
2. Install TWRP via ADB Fastboot
This method is bit more time consuming than the above. But if you’re not able to boot your device and your recovery is erased, you can use this method by booting your device into Fastboot mode. Install ADB USB Drivers & ADB Fastboot tool.
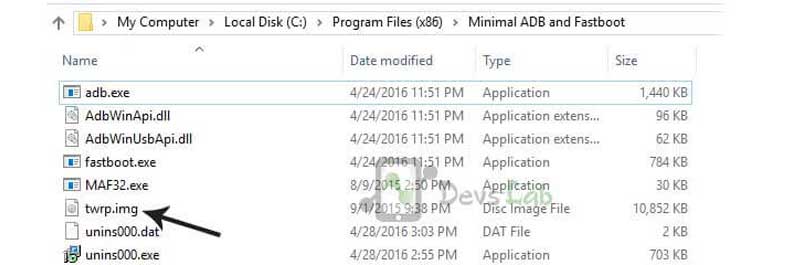
Step 1. Download TWRP.img file and place it in ADB folder.
Step 2. Launch command.bat file from ADB folder and boot your Pixel device into fastboot mode. To boot into fastboot mode, switch off your device:
- Press and hold the Power and Volume Down buttons at the same time
- When you feel the vibration, let go of these two buttons
Step 3. Now connect your Pixel device to PC using a USB cable. Type the command “fastboot devices” in the command window. (If everything is installed properly, it will return your device code)

Step 4. Now push the below command to install TWRP in your Pixel device “fastboot flash recovery twrp.img”.
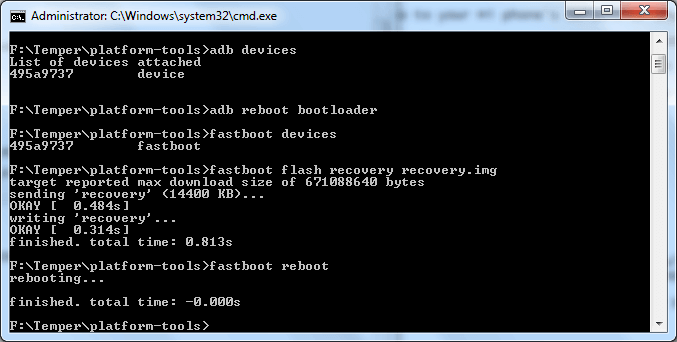
Step 5. You have successfully flashed TWRP Recovery in Google Pixel / Pixel XL. To reboot your device into system, type “fastboot reboot” in command window.
How to Root Google Pixel and Pixel XL
Step 1: Unlock Your Bootloader by following the steps mentioned above
Step 2. To boot your device into fastboot mode, type the following command – “adb reboot bootloader”.You will now need to download the boot-to-root images for the Pixel or Pixel XL (end of the post). Place the boot-to-root.img files in fastboot folder.
Step 3. After downloading the zip, you need to fastboot boot the boot-to-root image, DO NOT fastboot flash the image! In other words, the only command you’ll need for the two devices is the following:
fastboot boot boot-to-root.img
Wait a few minutes, and after a few reboots you’ll be booted up with full root access.
Download Boot to root for Google Pixel and Pixel XL
A big thanks to Chainfire for bringing root over to the devices! Systemless root allows you to unroot any time or disabled root temporarily without doing any procedures. It keeps your System files intact and allows using of apps that don’t like root access like Android Pay. Something not working out in your case? Comment below & we’ll try to get back to you as soon as possible.