Gone are the days when people use to burn ISO images in discs and use them as bootable media. As the time has changed, USB drives have replaced the discs as a faster and more convenient method for installing operating systems on a machine. Most of the Windows installations are performed using bootable USB drives.
There are many tools for creating a Windows 10/11 bootable USB drive, even Microsoft provides one of such tools. But before explaining about the feature provided by Microsoft, let me put some light on how you can create bootable USB Flash Drive using a software called Rufus.
How to Create Windows 10/Windows 11 Bootable USB/DVD
1. Create Windows 10/11 Bootable USB/DVD using Rufus
Before starting the process, you should head on to the Microsoft page, and download the 64 or 32-bit version of the media creation tool. You can download the download the Windows 10 or Windows 11 Technical Preview by joining the Windows Insider Program. One important thing that should be kept in mind is, you should be sure that you are using at least 4 GB USB drive for the 32-bit version and 8 GB drive for the 64-bit version.
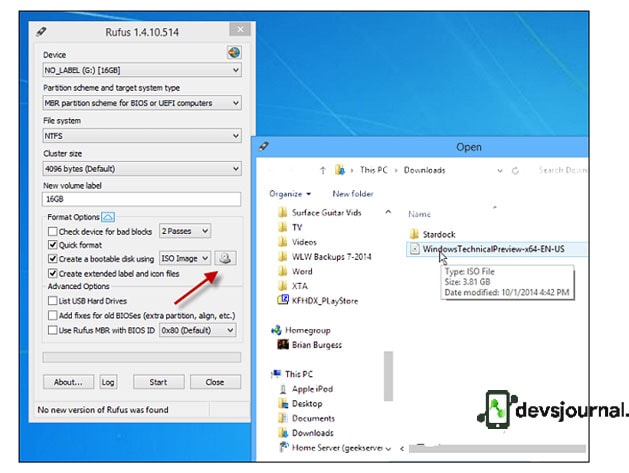
Step 1. To continue with the process, first download the software from here. Connect the USB flash drive and run the rufus.exe file.
Step 2. When you run the software, setting up is quite simple. First, you need to select the USB drive that you will be using. Also, select the partition scheme. It’s worth noting that Rufus also supports a bootable UEFI drive.
Step 3. In the next stage, you need to find the disc icon next to the ISO drop down. Click on the icon to navigate to the location of your official Windows 10/11 ISO.
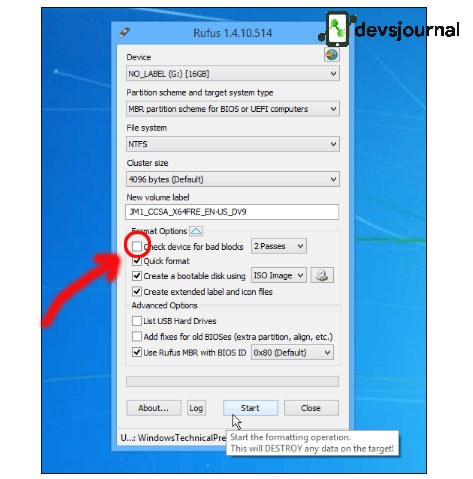
Step 4. Next, click on Start, and within minutes you should be good to go. In order to be extra careful, you might like to check on the “check device for bad blocks.” option. It is not mandatory though.
This will finally give a bootable USB drive. The entire process takes less than five minutes to create the drive using the older USB 2.0 port drive. If you use a USB3.0 setup, it might take less time. Anyways, after the bootable drive is created, you can move on to install the Windows 10/Windows 11 Technical Preview on your machine.
Some other Alternatives of Rufus
I have mentioned about using RUFUS to create bootable drive in this article. However, Rufus is not the only tool that can be used to create bootable drives of Windows 10. Below are some of the alternatives that are worth trying if in case you would like to.
- WinSetupFromUSB: One of the biggest advantage of WinSetupFromUSB is that you can put multiple ISO files in a single flash drive. This enables you to choose from different operating systems during the time of installation.
- UNetbootin: This software may not have too many features, but its advantage is that it is easy to use.The main reason for its existence is that it can be used to create Live USB drives. After connecting your USB drive, you just need to select your desired (supported) distribution. UNetbootin will automatically download the ISO from the internet and make Live USB for you.
- Universal USB Installer: Like UNetbootin, Universal USB Installer also can be used to make Live USB. It supports a few more extra ISOs, but does not allow the automatic download. Instead it provides the link to the download page of the distro.
- Windows 7 USB/DVD Download Tool: This tool has been made by Microsoft. Although it is known as Windows 7 USB/DVD Download Tool, it works for other versions also. However, Microsoft has stopped its development as with Windows 8, their new Media Creation Tool has been introduced.
Also Read: What is SuperFetch in Windows?
2. Create Windows 10/Windows 11 Bootable USB using CMD
Although it is quite easier to create a bootable USB using Rufus, there are also ways to do that, if in case you are not interested to use any softwares. The below section will explain exactly that. Before starting the process, it is required to format the USB drive using diskpart. Follow the following steps to perform the format of the drive.
Step 1. At first, insert your USB flash drive into your computer.
Step 2. Now, open Start Menu and type CMD to find Command Prompt. Right click on Command Prompt and click Run as Administrator. The command prompt can also be opened by pressing the Windows button and R simultaneously, and then typing CMD and press enter.
Step 3. Once the Command Prompt window appears, type diskpart and hit enter. Wait until the diskpart utility starts running.
Step 4. In the new diskpart window, type list disk and hit enter. It will show you all active disks on your computer.Most probably, you will see two disk types:
- Disk 0 is for the hard drive and,
- Disk 1 is for your USB Flash Drive with its total capacity.
Step 5. Since we are going to work on to create a bootable USB using CMD, we will work with Disk 1.
Step 6. Type select disk 1 in the same window and hit Enter. You will get a message ‘Disk 1 is now the selected disk’. That means any further operation that you do will affect your disk 1 directly.
Step 7. Type clean and hit Enter to remove all of the data in the USB drive. A clean command will format your bootable drive. You will get a message like ‘Diskpart succeeded in cleaning the disk’.
Step 8. Type create partition primary and hit Enter. You will get a message like Diskpart succeeded in creating the specified partition.
Step 9. Type select partition 1 and hit Enter. It will choose partition 1 for setting up it as an active partition. Type active and hit Enter. It will activate the current partition.
Step 10. Now, type format fs=ntfs quick and hit Enter. This command will format your current partition as NTFS file system quickly.
Step 11. Type exit and hit Enter. Exit command will close the Diskpart program but it doesn’t close the CMD window.
Step 12. Once this has been done, you will require to open the files inside the DVD or ISO , copy and paste them in the USB drive. There are two ways of copying the files in the USB drive. Let me explain each one of them.
3. Create Windows 11/Windows 10 Bootable USB from ISO Copying
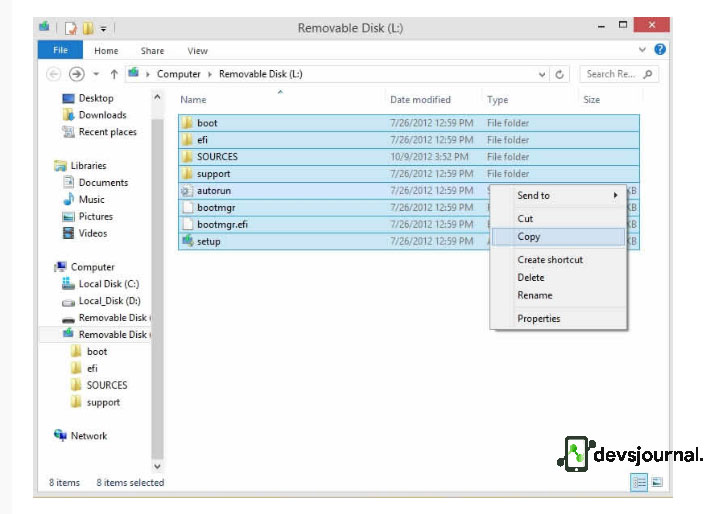
This is quite simple, you just need to open the folder that contains the ISO image. Select all the files within it and copy them. This will make your USB drive bootable in Windows 10 (or older versions) and you are good to go. Besides this, there is one more way to copy the files. It has been explained in the next section.
4. Copying files from a DVD to bootable USB using CMD
Before explaining this method, I would like to assume that the USB drive is the G: drive and the DVD drive has been assigned the letter E. By default, Command Prompt’s active directory for Administrator permission is on C:\Windows\System32>. We will navigate Command Prompt to set on DVD (E:) as its active directory. Also keep in mind that there should be a DVD inside DVD drive. Now follow the following steps:
- Type E: then hit Enter, and then the active directory is changed to E.
- Type cd boot and hit Enter. Now the active directory is changed to E:\boot>
- Type bootsect /nt60 g: and hit Enter. It will create the boot sector on G: drive (USB Flash drive).
- Type exit and hit Enter to close the Command Prompt.
The above steps will make your USB bootable, and it is ready to be used as a boot media. Next, you will need to copy the whole installation files contained on the DVD installer to the USB flash drive. To do this open the command prompt and type the command copy e:\*.* /s/e/f g: and press Enter. Do keep in mind to double check the letters of your drive. In the above example, we have assumed that the E is the drive letter of the DVD drive that holds the Windows DVD, G is the drive letter that you assigned to the external USB.
With that, you should now be able to use the USB drive as a bootable media to install Windows 10.
5. Create Windows 11/Windows 10 Bootable USB using Windows Media Creation Tool
We have mentioned about Windows media creation tool several times in this article. So you must be curious to know what it exactly is.
The Windows Media Creation Tool is a small program that you can can be downloaded from here and executed to download the Windows 11/Windows 10 ISO file that you can later use to create a Windows 10/11 installation DVD or USB, either to start a new Windows 10/11 installation or to repair an existing one.
After huge demand for bootable USB creator for Windows 7, Microsoft has started providing its Official bootable device maker which is handy & works pretty good to Create Bootable USB/DVD Windows 10 flash drive.
1. Click/tap on the Download button below to go to Microsoft. If your PC is a 32-bit operating system, on the Software download page, select Download Tool Now (32-bit version). If your PC is a 64-bit operating system, select Download Tool Now (64-bit version).
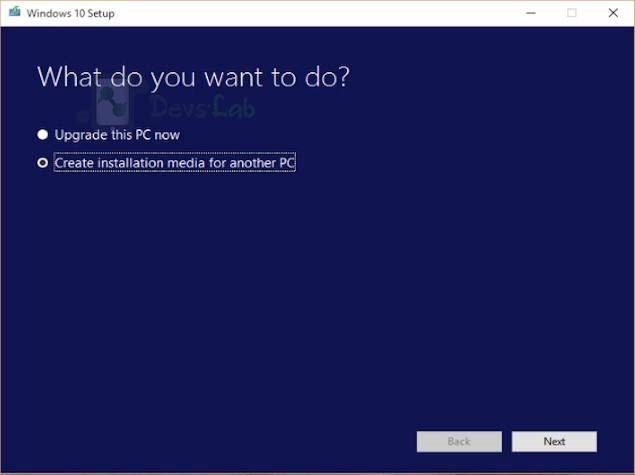
2. Open the Tool & Select Create installation media for another PC, and click/tap on Next.
3. Select the Language, Edition, and 32-bit (x86), 64-bit (x64), or both (32-bit and 64-bit on same USB) Architecture you want for the ISO file, and click/tap on Next.
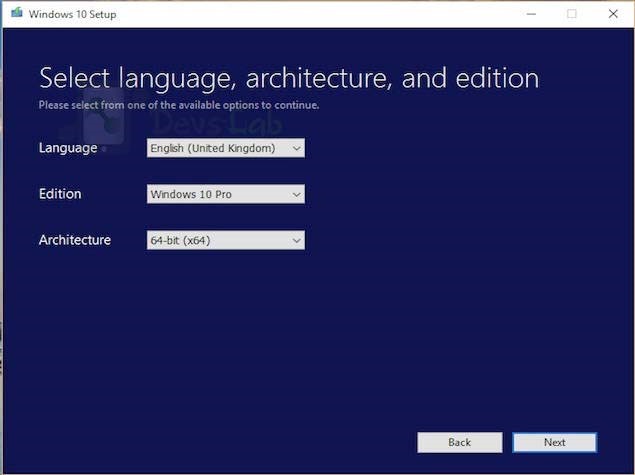
If you are currently running Windows 7 Starter, Windows 7 Home Basic, Windows 7 Home Premium, Windows 8, Windows 8.1, Windows 8.1 with Bing, or Windows 10 Home, choose Windows 10 Home as Edition.
If you are currently running Windows 7 Professional, Windows 7 Ultimate, Windows 8 Pro, Windows 8.1 Pro, Windows 8 Professional, Windows 8.1 Professional with Media Centre, or Windows 10 Pro, choose Windows 10 Pro as Edition.
4. Select USB flash drive, and click/tap on Next. If you want to create a bootable Windows 10 USB DVD, select ISO file. Make sure you have ISO file of the Windows 10 version you selected in step 3 handy.
5. Connect your USB flash drive, click/tap on the Refresh drive list link, select the USB flash drive, and click/tap on Next.
6. Now, the process of creating bootable drive will start.
How to install Windows 10/Windows 11 with the bootable drive
Now that you have your bootable drive in hand, the next step should be to install the Windows 10 OS in your machine using this drive. To do that you need to follow the following steps. But before that remember to keep a backup of your files.
Also Read: Difference between MBR vs GPT Partition Tables
Steps to install Windows 11/10 with bootable flash drive
Step 1. Attach the USB flash drive or insert the DVD on the PC where you want to install Windows 10.
Step 2. Restart your PC, and then press any key to boot from the USB flash drive or the DVD. If you restart your PC and your current version of Windows starts, you might have to open a boot menu or change the boot order in your PC’s BIOS or UEFI settings so that your PC boots from the media.
Step 3. To open a boot menu or change the boot order, you’ll typically need to press a combination of keys (such as F2, F12, Delete, or Esc) immediately after you turn on your PC. For instructions on changing the boot order for your PC, check the documentation that came with your PC or go to the manufacturer’s website. If changing the boot menu or order doesn’t work, try again by signing in to Windows, shutting down, and then starting your PC.
Step 4. On the Install Windows page, select your language, time, and keyboard preferences, and then select Next.
Step 5. Select Install Windows.
And with that you will get a fresh install Windows 10 operating system in your laptop or PC. Now it’s time to wrap up the article. I would like to hear your experiences with Windows 10 and feedback about this post in the comments section.