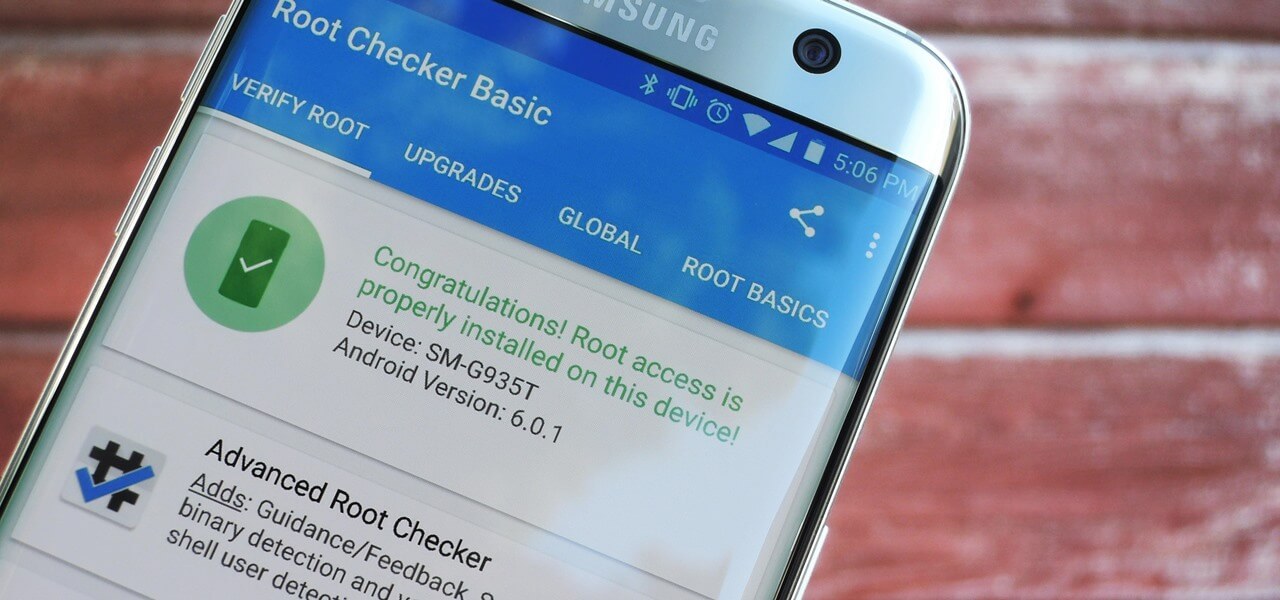
Samsung has made a handset that packs great battery smarts, excellent camera abilities and loads of raw power into an increasingly affordable package. But due to some battery issues, the Galaxy S7 sales took a great hit & completely lost the market & trust. Soon after that, Samsung released a new version of Galaxy S7 & S7 Edge. Things were improved upto an extent but not much. I believe rooting my Samsung Galaxy S7 edge was the best decision I have ever made. I have underclocked by CPU to avoid any heating & stay safe.
Android Rooting opens up too many doors for your device. You can choose between Performance, customization or both. Installing a Custom ROM, Xposed & Overclocking/underclocking as some of the advantages of Rooting. Although I won’t suggest overclocking Galaxy S7 series CPU as they are already prone to heat. So without thinking much, let’s just jump on to the Rooting procedure.
DISCLAIMER : We don’t take credit for releasing a root method — a huge giant thank-you goes out to Chainfire, Wanam, markhaines1985, PrinceComsy, Snoop05, x3demond3x, br3w3r, and everyone else who goes out of their way to make our phone experience better!
Prerequisites:
- Samsung galaxy S7 or Galaxy S7 Edge and a windows PC
- Optional – Backup your DATA to prevent any loss if something unfortunately goes wrong. If there is a point where it would be beneficial to start over or if you want to unroot, this will come in handy and save you a lot of trouble.
- Samsung USB driver : SAMSUNG_USB_DRIVERS (mirror)
- Minimal ADB Tool: Download
- Download and extract Odin3 v3.12 (try either version) | Odin3_v3.12.zip If the second one makes your device go into bootloop, try using the first one.
- Download engineer-rooted boot image for your device
- Samsung_G930x_QC_Rooted_BOOT.TAR (any Samsung Galaxy S7)
- Samsung_G935x_QC_Rooted_BOOT.TAR (any Samsung Galaxy S7 Edge) Do not extract these .TAR files.
- Download flash package: SuperSU-v2.76-S7QC.zip (mirror)
How to Root Samsung Galaxy S7 and S7 edge:
1. Enabling Developer Options
Step 1. Go to settings on your phone -> Lock screen and Security. Turn Off “Secure startup” to avoid any conflict between the system and the gaining Root access.
Step 2. Now go to setting -> About Phone and then tap “Build Number” 7 times until you see a popup message says that now you’re a developer or developer options have been enabled. Now to be check, navigate to Settings -> Developer’s Options and make sure it’s turned on.
2. Enable USB Debugging
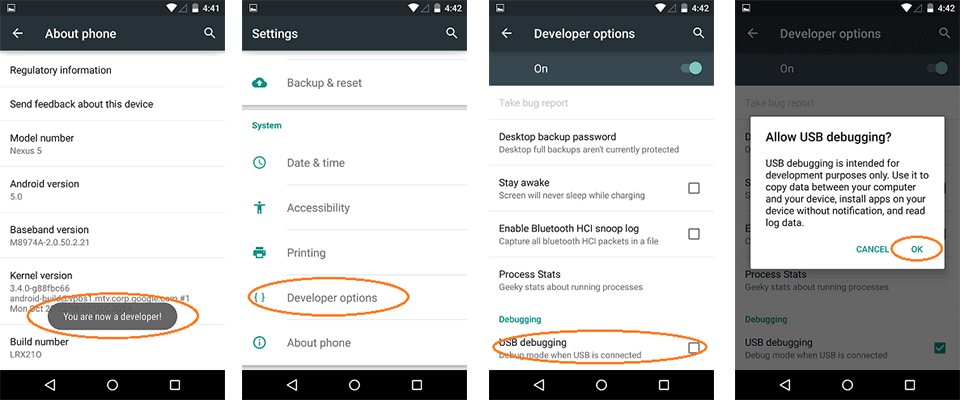
Step 1. Go to Settings -> Developer’s Options then turn on USB Debugging. Connect your USB from your PC then open command prompt (Win+R and type “cmd” and press enter.) In command prompt, type adb wait-for-device. You device might ask for permission, accept it (you can check always allow from this computer too)
Also Read: Top 10 best ROMs for Samsung Galaxy S7 and S7 Edge
3. Flashing Kernel Image file in Galaxy S7 & S7 edge using Odin
Step 1. Power Off the device. Then press the key combination – Home + volume down + power button. This will boot you into the download mode. Navigate to Confirm flash with volume up button.
Step 2. Open Odin. Click ‘AP’ and select the appropriate AP TAR file:
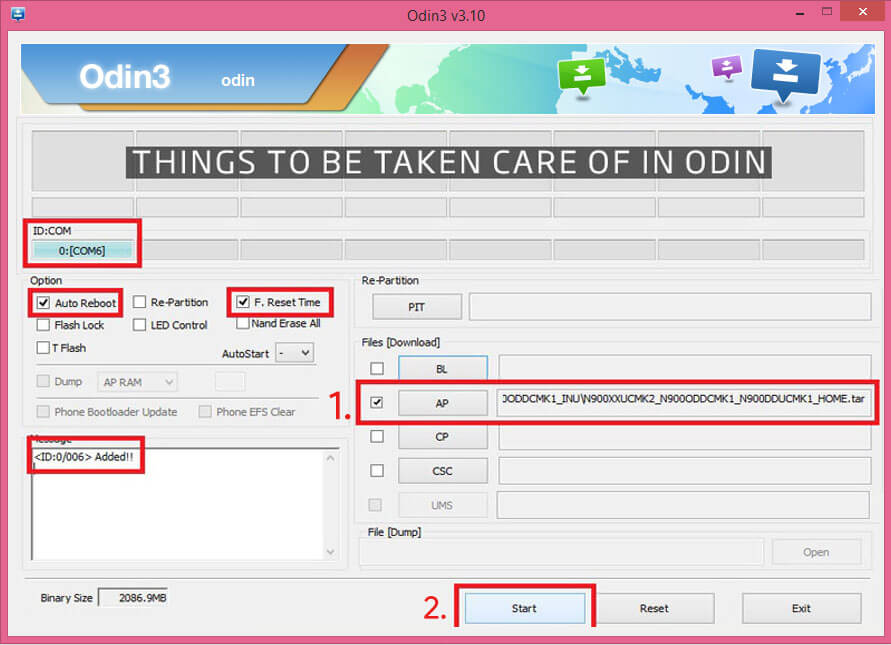
- Samsung_G930x_QC_Rooted_BOOT.TAR (any Samsung GalaxyS7)
- Samsung_G935x_QC_Rooted_BOOT.TAR (any Samsung GalaxyS7 Edge)
Step 3. Now click “Start” in Odin to flash the image and reboot the device. “DO NOT DISCONNECT THE USB”
Step 4. When your device reboots, go to settings and follow the procedure above to re-enable Developer’s Options and USB Debugging
4. How to flash SuperSU file in Galaxy S7 and S7 edge
Step 1. Now extract the “SuperSU flash package” you downloaded earlier. Connect your device using a USB cable to your PC/Laptop.
Step 2. Now run “root.bat” from “SuperSU-v2.76-S7QC”. Your device will reboot after completion. (If running “root.bat” briefly flashes another command window then your PC is most likely not given USB Debugging authorization or the cable is unplugged or ADB didn’t install properly or corrupted.)
Step 3. If the “root.bat” file has been run completely then your device will reboot itself. Once it reboots, you might be prompted my SuperSU that your binaries are outdated. Dismiss this and do not update. Chainfire has not given any support to this build yet. It might be given in future.
Step 4. On your device, locate SuperSU app and tap on settings. Find Security option and tap on “Enable su during boot”. This will run the superuser script everytime you boot up your device.
Even if you don’t have any problems, we recommend you to read and follow the next steps.
Debloat Galaxy S7 and S7 edge
Once you have rooted your Samsung Galaxy S7/S7 Edge, you might want to permanently freeze/disable few apps that won’t be using anywhere soon, but don’t necessarily want to delete. This Debloat Package will automatically do the job for you. Although this step is completely optional, I would suggest you to consider Debloating apps.
Prerequisites:
- Rooted Samsung Galaxy S7 or S7 Edge
- Install FlashFire on your device: Flashfire
- Download the fix or fix+de-bloat script for your device and transfer it to your device’s internal memory:
- S7_or_S7Edge_Fixes_V15.zip (any Samsung GalaxyS7 or S7 Edge)
- S7_or_S7Edge_Fixes_Debloater_V15.zip (any Samsung GalaxyS7 or S7 Edge)
How to flash Debloat Script in Galaxy S7 & S7 Edge:
Step 1. Launch FireFlash on your device and click (+) button in the lower right. Select “Flash ZIP or OTA”. Locate the flashable ZIP on your device’s memory and select it. Cllick to check “Mount/system read/write” and don’t check any other option.
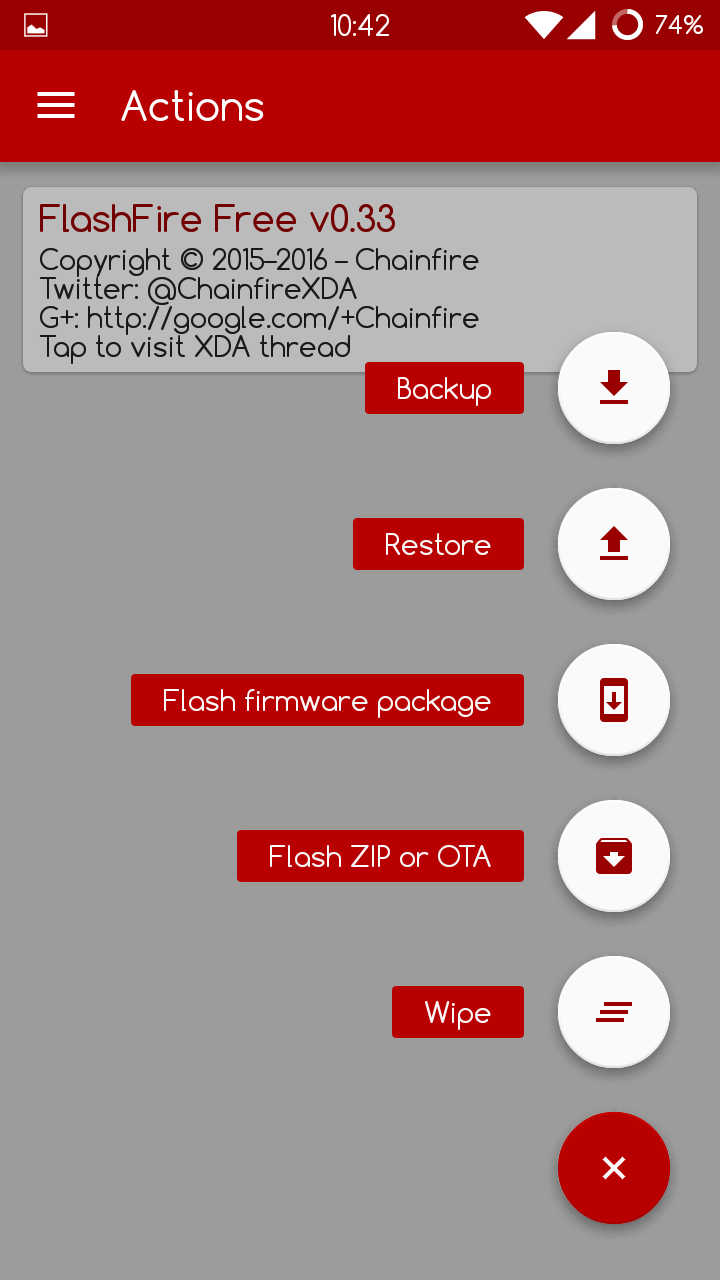
Step 2. Click “Flash” lightning button in the lower left corner and wait for the system to flash. Your phone could flash briefly before rebooting twice.
Step 3. That’s it! You have successfully flashed the debloater.
Tech Tip : Get an instant one click access to your all-time favorite android games remotely from anywhere on any device(PC/Mac/android/iOS) by loading Bluestacks applications on hosted citrix xendesktop from Cloud Desktop Online with affordable xendesktop pricing in the market powered by one of the leading QuickBooks Cloud Hosting providers – Apps4Rent
So you have now successfully rooted your Samsung Galaxy S7 and S7 edge without any issue. This is by far the simplest method as there are no complicated files that you need to deal with. Just a single file that works with all Galaxy S7 & S7 edge models. If you have any doubts or something isn’t working in your case, you can drop your comment in the comment section below, I will try to help you ASAP.


![[Official] Download Odin v3.14.4 for Samsung](https://devsjournal.com/wp-content/uploads/2016/10/Download-Samsung-Odin-downloader-tool-for-Windows-Mac-768x359.jpg)

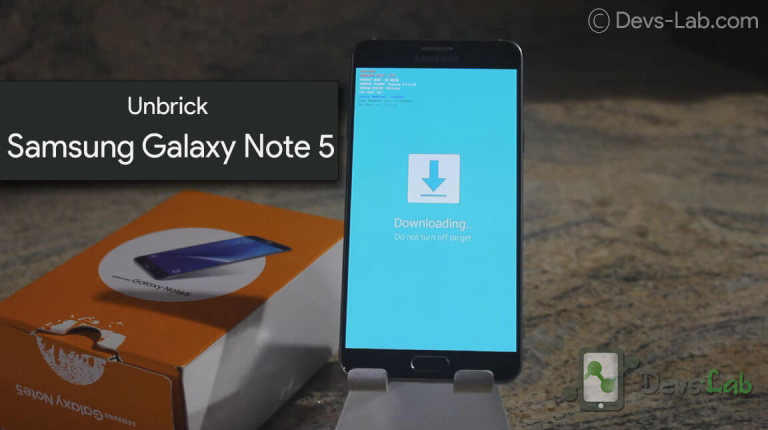

What’s the solution for S7 edge stuck “Downloading…” screen and nothing is happening for ages.
How do I reboot?
Ok, I managed to reboot and all is as before. Thanks God.
BTW: fuck the little geeks – maybe they are smart, but following instruction doesn’t work.
What’s the solution for S7 edge stuck “Downloading…” screen and nothing is happening for ages.
How do I reboot?
Ok, I managed to reboot and all is as before. Thanks God.
BTW: fuck the little geeks – maybe they are smart, but following instruction doesn’t work.
Stuck in boot loop on SM-G935T. DO NOT USE THIS!
Hey mate how do you fix the boot loop?